当前位置:网站首页>Keras深度学习实战(12)——面部特征点检测
Keras深度学习实战(12)——面部特征点检测
2022-06-27 16:18:00 【盼小辉丶】
Keras深度学习实战(12)——面部特征点检测
0. 前言
在计算机视觉中,面部关键点(也称为面部特征点)的定位通常是许多面部分析方法和算法中的关键步骤。在本节中,我们将训练卷积神经网络来检测面部的关键点,即左右眼,鼻子和嘴巴的四个坐标的边界。以下是两个绘制了面部关键点的示例图片:

如上图所示,检测到的关键点此图中被绘制为点。在人脸图像上共检测 68 个关键点,其中面部关键点包括:嘴,右眉,左眉,右眼,左眼,鼻子,下巴。在本文中,我们将基于预训练 VGG16 架构提取图像特征,然后微调模型检测图像中人物面部关键点。
1. 数据集和模型分析
1.1 数据集分析
对于关键点检测任务,我们所使用的数据集可以从 Github 中下载,数据集中标注了中图片的人物面部的关键点。在此任务中,输入数据是需要在其上检测关键点的图像,输出数据是图像中人物面部关键点的 x 和 y 坐标。
在构建模型前,首先将数据集下载至本地,查看数据集中标记的面部关键点信息,文件路径为 P1_Facial_Keypoints/data/training_frames_keypoints.csv:

检查此数据集中的面部关键点信息,可以看到,文件中共有 137 列,其中第一列是图像的名称,其余 136 列代表相应图像中 68 个面部关键点的 x 和 y 坐标值。
1.2 模型分析
接下来,继续分析此任务以及我们将使用的模型架构:
- 根据关键点检测任务,下载数据集
- 将图像调整为可以用于网络输入的形状
- 调整图像大小时,需要确保同时修改关键点,以便它们可以对应于已调整大小后的图像
- 使用预训练的
VGG16模型提取输入图像特征 - 创建面部关键点检测任务的输入和输出数组,其中输入数组是通过
VGG16模型处理后的图像特征,而输出数组是修改后的面部关键点位置坐标 - 最后,训练模型以减少面部预测关键点与实际关键点之间的绝对平均误差值
2. 面部特征点检测
本节中,我们将编程实现上一节中所分析的面部关键点检测模型。
导入相关库、数据集,并实例化预训练的 `VGG16模型:
import pandas as pd
import cv2
import numpy as np
from copy import deepcopy
from keras.applications.vgg16 import preprocess_input
from keras.applications import vgg16
from matplotlib import pyplot as plt

data = pd.read_csv('P1_Facial_Keypoints/data/training_frames_keypoints.csv')
vgg16_model = vgg16.VGG16(include_top=False, weights='imagenet',input_shape=(224,224,3))
预处理数据集,包括:提取图像、调整图像尺寸、获得 VGG16 提取到的图像特征,并将根据缩放图像修改的面部关键点位置作为输出。
初始化用于创建输出和输出的列表:
x = []
x_img = []
y = []
循环构建图像文件名,并读取图像:
for i in range(data.shape[0]):
    img_path = 'P1_Facial_Keypoints/data/training/' + data.iloc[i,0]
    img = cv2.imread(img_path)
捕获面部关键点值并进行存储,然后调整图像大小,以满足模型输入形状,并预处理图像,以便可以将其传递给 VGG16 模型并提取特征::
    kp = deepcopy(data.iloc[i,1:].tolist())
    kp_x = (np.array(kp[0::2])/img.shape[1]).tolist()
    kp_y = (np.array(kp[1::2])/img.shape[0]).tolist()
    kp2 = kp_x +kp_y
    img = cv2.resize(img, (224, 224))
    preprocess_img = preprocess_input(img.reshape(1,224,224,3))
    vgg16_img = vgg16_model.predict(preprocess_img)
将输入和输出值追加到相应的列表中:
    x_img.append(img)
    x.append(vgg16_img)
    y.append(kp2)
创建输入和输出数组:
x = np.array(x)
x = x.reshape(x.shape[0], x.shape[2], x.shape[3], x.shape[4])
y = np.array(y)
建立并编译模型
from keras.models import Sequential
from keras.layers import Conv2D, MaxPooling2D, Flatten, Dense, Dropout
model_fine_tuning = Sequential()
model_fine_tuning.add(Conv2D(512, kernel_size=(3, 3), activation='relu',input_shape=(x.shape[1],x.shape[2],x.shape[3])))
model_fine_tuning.add(MaxPooling2D(pool_size=(2, 2)))
model_fine_tuning.add(Flatten())
model_fine_tuning.add(Dense(512, activation='relu'))
model_fine_tuning.add(Dropout(0.5))
model_fine_tuning.add(Dense(y.shape[1], activation='sigmoid'))
model_fine_tuning.summary()
输出用于检测面部关键点的微调模型简要信息如下:
Model: "sequential"
_________________________________________________________________
Layer (type)                 Output Shape              Param #
=================================================================
conv2d (Conv2D)              (None, 5, 5, 512)         2359808
_________________________________________________________________
max_pooling2d (MaxPooling2D) (None, 2, 2, 512)         0
_________________________________________________________________
flatten (Flatten)            (None, 2048)              0
_________________________________________________________________
dense (Dense)                (None, 512)               1049088
_________________________________________________________________
dropout (Dropout)            (None, 512)               0
_________________________________________________________________
dense_1 (Dense)              (None, 136)               69768
=================================================================
Total params: 3,478,664
Trainable params: 3,478,664
Non-trainable params: 0
_________________________________________________________________
最后,编译并拟合模型:
model_fine_tuning.compile(loss='mean_absolute_error',optimizer='adam')
history = model_fine_tuning.fit(x/np.max(x), y,
                            epochs=10,
                            batch_size=32,
                            verbose=1,
                            validation_split = 0.1)
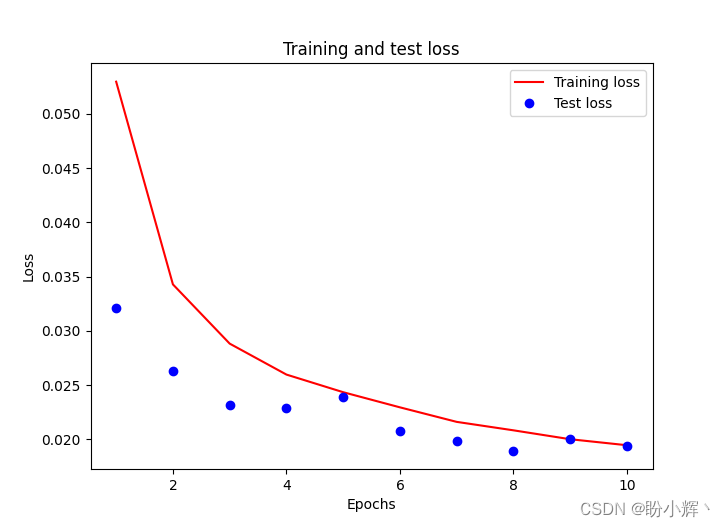
需要注意的是,我们将输入数组除以输入数组的最大值,以缩放输入数据集,而 validation_split 可选参数用于在没有提供验证集的时候,按一定比例(此处为 10% )从训练集中取出一部分训练数据作为测试集。训练和测试损失随 epoch 增加的变化情况如下:
3. 模型测试
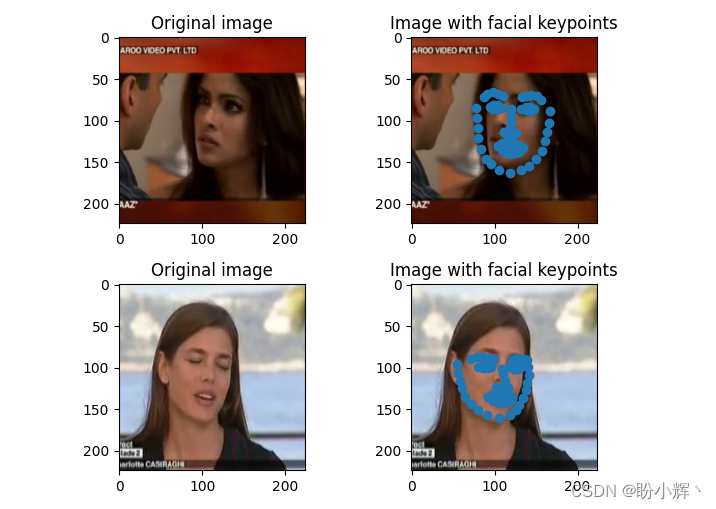
预测测试图像。在下面的代码中,我们预测输入数组中倒数第 6 和第 7 个图像,由于 validation_split 为 0.1,训练时模型并未见到这 2 张图像,可以用于衡量训练后的模型性能。我们确保将图像通过 preprocess_input 方法进行预处理,然后通过 vgg16_model 提取图像特征,最后将 vgg16_model 的输出传递给构建的 model_fine_tuning :
test_img_input = preprocess_input(x_img[-7].reshape(1,224,224,3))
pred = model_fine_tuning.predict(vgg16_model.predict(test_img_input/np.max(test_img_input)))

plt.subplot(221)
plt.title('Original image')
plt.imshow(cv2.cvtColor(x_img[-7], cv2.COLOR_BGR2RGB))
plt.subplot(222)
plt.title('Image with facial keypoints')
plt.imshow(cv2.cvtColor(x_img[-7], cv2.COLOR_BGR2RGB))
kp = pred.flatten()
plt.scatter(kp[0:68]*224, kp[68:]*224)

test_img_input = preprocess_input(x_img[-6].reshape(1,224,224,3))
pred = model_fine_tuning.predict(vgg16_model.predict(test_img_input/np.max(test_img_input)))

plt.subplot(223)
plt.title('Original image')
plt.imshow(cv2.cvtColor(x_img[-6], cv2.COLOR_BGR2RGB))
plt.subplot(224)
plt.title('Image with facial keypoints')
plt.imshow(cv2.cvtColor(x_img[-6], cv2.COLOR_BGR2RGB))
kp = pred.flatten()
plt.scatter(kp[0:68]*224, kp[68:]*224)
plt.show()
先前对测试图像的预测可以如下所示,我们可以看到,在测试图像上可以非常准确地检测到图片中人物的面部关键点。
小结
面部关键点的定位通常是许多面部分析方法和算法中的关键步骤。在本节中,我们介绍了如何通过训练卷积神经网络来检测面部的关键点,首先通过预训练模型提取特征,然后利用微调模型预测图像中人物的面部关键点。
系列链接
Keras深度学习实战(1)——神经网络基础与模型训练过程详解
Keras深度学习实战(2)——使用Keras构建神经网络
Keras深度学习实战(3)——神经网络性能优化技术
Keras深度学习实战(4)——深度学习中常用激活函数和损失函数详解
Keras深度学习实战(5)——批归一化详解
Keras深度学习实战(6)——深度学习过拟合问题及解决方法
Keras深度学习实战(7)——卷积神经网络详解与实现
Keras深度学习实战(8)——使用数据增强提高神经网络性能
Keras深度学习实战(9)——卷积神经网络的局限性
Keras深度学习实战(10)——迁移学习
Keras深度学习实战(11)——可视化神经网络中间层输出
边栏推荐
- MFS分布式文件系统
- The first in China! EMQ joined Amazon cloud technology's "startup acceleration - global partner network program"
- 开源之夏 2022 | openGauss 项目中选公布
- JS event binding and common events
- Lvgl8.x migrating to stm32f4
- Advanced learning of MySQL -- Application -- Optimization of other SQL statements
- MySQL数据库登录和退出的两种方式
- Written in eclipse, problems after querying the database connection
- 银河麒麟V10系统激活
- Technology sharing | introduction to kubernetes pod
猜你喜欢

Application of scaleflux CSD 2000 in Ctrip

Oracle TRUNC function processing date format

Advanced learning of MySQL -- Application -- Optimization of other SQL statements
Galaxy Kirin V10 system activation

Common optimization techniques for Web Performance
![[Tang Laoshi] C -- encapsulation: member method](/img/47/9a4ffd787624f6208b6aee66c38b48.jpg)
[Tang Laoshi] C -- encapsulation: member method

建立自己的网站(10)

New products, new personnel and new services, Infiniti will continue to plough into China's future!

Asemi rectifier bridge kbp310 function pin diagram

Redis installation
随机推荐
Galaxy Kirin V10 system activation
How to turn off the server terminal name of vscode
Use lamda expression and stream flow to traverse map and list
The computer voice is blurry, the video is also out of the card, and the sound cannot be played. It is normal to insert the headset
How to arrange digital collections on online platforms such as reading and Chinese online? Will "read/write-to-earn" products be launched in the future?
Vscode suggests that you enable gopls. What exactly is it?
Contest3182 - the 39th individual training match for 2021 freshmen_ E: ringring
推荐几个开源的物联网平台
Mise à jour SQL mise à jour par lots
国内首家!EMQ加入亚马逊云科技“初创加速-全球合作伙伴网络计划”
Space calculation of information and innovation industry in 2022
国产数据库认证考试指南汇总(2022年6月16日更新)
Wanzhou gold industry: a common technical term in gold t+d transaction?
Daily leetcode force deduction (31~35)
Hikvision Tools Manager海康威视工具大全(含SADP、录像容量计算等工具)百万安防从业者的实用工具
如何使用物联网低代码平台进行画面管理?
Seata中 SelectForUpdateExecutor 可以先获取全局锁,再执行 sql吗?
Shardingsphere sharding proxy actual combat scenario
PostgreSQL数据库WAL——资源管理器RMGR
中国工业软件市场研究报告出炉,力控SCADA、MES丰富国产工业软件生态