当前位置:网站首页>HCIA实验(07)综合实验
HCIA实验(07)综合实验
2022-07-25 09:47:00 【雨天_】

【1】第一阶段 :基础配置
1.进行拓扑设计和地址规划
192.168.1.0/24 (划分成三个子网,一个骨干,R1和R2需要两个子网)
192.168.1.0/26 (骨干)
192.168.1.0/30
192.168.1.4/30 192.168.1.8/30 ...... 192.168.1.60/30
192.168.1.64/26 R1 192.168.1.64/27 192.168.1.96/27
192.168.1.128/26 R2 192.168.1.128/27 192.168.1.160/27
192.168.1.192/26

2.配置路由器接口的IP地址和子接口
[r1]int g0/0/0
[r1-GigabitEthernet0/0/0]ip add 192.168.1.1 30
[r1]int g0/0/1.1
[r1-GigabitEthernet0/0/1.1]dot1q termination vid 2
[r1-GigabitEthernet0/0/1.1]arp broadcast enable
[r1-GigabitEthernet0/0/1.1]ip add 192.168.1.65 27
[r1]int g0/0/1.2
[r1-GigabitEthernet0/0/1.2]dot1q termination vid 3
[r1-GigabitEthernet0/0/1.2]arp broadcast enable
[r1-GigabitEthernet0/0/1.2]ip add 192.168.1.97 27
[r2]int g0/0/0
[r2-GigabitEthernet0/0/0]ip add 192.168.1.2 30
[r2]int g0/0/1
[r2-GigabitEthernet0/0/1]ip add 12.1.1.1 24
[r2]int g0/0/2.1
[r2-GigabitEthernet0/0/2.1]dot1q termination vid 2
[r2-GigabitEthernet0/0/2.1]arp broadcast enable
[r2-GigabitEthernet0/0/2.1]ip add 192.168.1.129 27
[r2]int g0/0/2.2
[r2-GigabitEthernet0/0/2.2]dot1q termination vid 3
[r2-GigabitEthernet0/0/2.2]arp broadcast enable
[r2-GigabitEthernet0/0/2.2]ip add 192.168.1.161 27
[r3]int g0/0/0
[r3-GigabitEthernet0/0/0]ip add 12.1.1.2 24
[r3]int g0/0/1
[r3-GigabitEthernet0/0/1]ip add 1.1.1.1 24
3.配置DHCP服务,创建池塘
[r1]ip pool v2
[r1-ip-pool-v2]network 192.168.1.64 mask 255.255.255.224
[r1-ip-pool-v2]gateway-list 192.168.1.65
[r1-ip-pool-v2]dns-list 114.114.114.114 8.8.8.8
[r1]ip pool v3
[r1-ip-pool-v3]network 192.168.1.96 mask 255.255.255.224
[r1-ip-pool-v3]gateway-list 192.168.1.97
[r1-ip-pool-v3]dns-list 114.114.114.114 8.8.8.8
[r1]int g0/0/1.1
[r1-GigabitEthernet0/0/1.1]dhcp select global
[r1]int g0/0/1.2
[r1-GigabitEthernet0/0/1.2]dhcp select global
[r2]ip pool v2
[r2-ip-pool-v2]network 192.168.1.128 mask 255.255.255.224
[r2-ip-pool-v2]gateway-list 192.168.1.129
[r2-ip-pool-v2]dns-list 114.114.114.114 8.8.8.8
[r2]ip pool v3
[r2-ip-pool-v3]network 192.168.1.160 mask 255.255.255.224
[r2-ip-pool-v3]gateway-list 192.168.1.161
[r2-ip-pool-v3]dns-list 114.114.114.114
[r2]int g0/0/2.1
[r2-GigabitEthernet0/0/2.1]dhcp select global
[r2]int g0/0/2.2
[r2-GigabitEthernet0/0/2.2]dhcp select global
4.将交换机上的各个接口划分到对应的VLAN中
[sw1]vlan batch 2 to 3
[sw1]port-group group-member e0/0/2 to e0/0/3
[sw1-port-group]port link-type access
[sw1-port-group]port default vlan 2
[sw1]int e0/0/4
[sw1-Ethernet0/0/4]port link-type access
[sw1-Ethernet0/0/4]port default vlan 3
[sw2]vlan batch 2 to 3
[sw2]int e0/0/2
[sw2-Ethernet0/0/2]port link-type access
[sw2-Ethernet0/0/2]port default vlan 2
[sw2]int e0/0/3
[sw2-Ethernet0/0/3]port link-type access
[sw2-Ethernet0/0/3]port default vlan 3
5.配置trunk干道
[sw1]int e0/0/1
[sw1-Ethernet0/0/1]port link-type trunk
[sw1-Ethernet0/0/1]port trunk allow-pass vlan all
[sw2]int e0/0/1
[sw2-Ethernet0/0/1]port link-type trunk
[sw2-Ethernet0/0/1]port trunk allow-pass vlan all
6.为服务器手写IP地址

7.测试


【2】第二阶段:划分区域
1.宣告
[r1]ospf 1 router-id 1.1.1.1
[r1-ospf-1]area 0
[r1-ospf-1-area-0.0.0.0]network 192.168.1.1 0.0.0.0
[r1-ospf-1]area 1
[r1-ospf-1-area-0.0.0.1]network 192.168.1.65 0.0.0.0
[r1-ospf-1-area-0.0.0.1]network 192.168.1.97 0.0.0.0
[r2]ospf 1 router-id 2.2.2.2
[r2-ospf-1]area 0
[r2-ospf-1-area-0.0.0.0]network 192.168.1.2 0.0.0.0
[r2-ospf-1]area 2
[r2-ospf-1-area-0.0.0.2]network 192.168.1.129 0.0.0.0
[r2-ospf-1-area-0.0.0.2]network 192.168.1.161 0.0.0.0
2.查看


(R1和R2之间建立了邻接关系)
3.优化
[r1]ospf 1
[r1-ospf-1]area 1
[r1-ospf-1-area-0.0.0.1]abr-summary 192.168.1.64 255.255.255.192
[r2]ospf 1
[r2-ospf-1]area 2
[r2-ospf-1-area-0.0.0.2]abr-summary 192.168.1.128 255.255.255.192


(区域间汇总,将两个环回汇总成一个环回)
4.进一步优化(阻挡其发Hello包)
设置沉默接口
[r1]ospf 1
[r1-ospf-1]silent-interface g0/0/1.1
[r1-ospf-1]silent-interface g0/0/1.2
[r2]ospf 1
[r2-ospf-1]silent-interface g0/0/2.1
[r2-ospf-1]silent-interface g0/0/2.2
5.进行加密认证
[r1]int g0/0/0
[r1-GigabitEthernet0/0/0]ospf authentication-mode md5 1 cipher 123456
[r2]int g0/0/0
[r2-GigabitEthernet0/0/0]ospf authentication-mode md5 1 cipher 123456
6.开启 telnet 功能
[r1]aaa
[r1-aaa]local-user wang password cipher 123456
[r1-aaa]local-user wang service-type telnet
[r1-aaa]local-user wang privilege level 15
[r1-aaa]q
[r1]user-interface vty 0 4
[r1-ui-vty0-4]authentication-mode aaa
通过DHCP获取IP,自动有个缺省路由

验证:

7.拒绝PC1对三个IP的 telnet 行为
![]()
[r1] acl 3000
[r1-acl-adv-3000]
[r1-acl-adv-3000]rule deny tcp source 192.168.1.92 0 destination 192.168.1.1 0 destination-port eq 23
[r1-acl-adv-3000]rule deny tcp source 192.168.1.92 0 destination 192.168.1.65 0 destination-port eq 23
[r1-acl-adv-3000]rule deny tcp source 192.168.1.92 0 destination 192.168.1.97 0 destination-port eq 23
[r1]int g0/0/1.1
[r1-GigabitEthernet0/0/1.1]traffic-filter inbound acl 3000
验证:

【3】第三阶段:局域网访问广域网
![]()
1.构建缺省路由
[r2]ospf 1
[r2-ospf-1]default-route-advertise always 
(为R1发缺省路由)
[r2]ip route-static 0.0.0.0 0 12.1.1.2(为边界路由器R2手写缺省路由)
2.构建EASY NAT
[r2]acl 2000
[r2-acl-basic-2000]rule permit source 192.168.1.0 0.0.0.255
[r2-acl-basic-2000]q
[r2]int g0/0/1
[r2-GigabitEthernet0/0/1]nat outbound 2000
验证:

【4】第四阶段:通过域名访问HTTP
![]()
1.搭建服务器和client


2.端口映射
[r2]interface g0/0/1
[r2-GigabitEthernet0/0/1]nat server protocol tcp global current-interface 80 inside 192.168.1.100 80
Warning:The port 80 is well-known port. If you continue it may cause function failure.
Are you sure to continue?[Y/N]:y
3.验证

4.建立端口映射
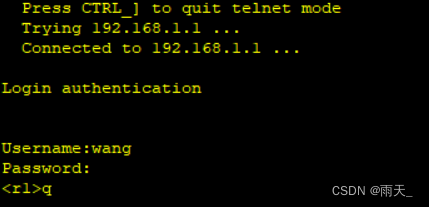
![]()
[r2]int g0/0/1
[r2-GigabitEthernet0/0/1]nat server protocol tcp global current-interface 23 inside 192.168.1.1 23
Warning:The port 23 is well-known port. If you continue it may cause function failure.
Are you sure to continue?[Y/N]:y
成功登录:
5.防环
[r1]ip route-static 192.168.1.0 26 NULL 0
[r2]ip route-static 192.168.1.128 26 null 0
边栏推荐
- disabled和readonly 以及焦点问题
- 5.NFS共享服务和ssh远程控制服务
- 2. Introduce the deployment of lamp platform +discuz Forum
- When installing mysql, string the service installation failure > mysql80 startup failure
- Test plan and test plan
- [strategic mode] like Zhugeliang's brocade bag
- ONNX(Open Neural Network Exchange)介绍
- 10.expect免交互
- Analysis of event channel principle in Kraken
- String longest common prefix
猜你喜欢

4. FTP service configuration and principle

Use three.js to realize the cool cyberpunk style 3D digital earth large screen

Redis usage scenario

美国机场围棋风格可视化专题图:ArcGIS Pro版本

DHCP configuration (take Huawei ENSP as an example)

Fastdfs离线部署(图文)

微信小程序WxPrase中包含文件无法点击解决

Open virtual private line network load balancing

MySQL offline deployment
![[Blue Bridge Cup training 100 questions] scratch Taiji diagram Blue Bridge Cup scratch competition special prediction programming question centralized training simulation exercise question No. 22](/img/d5/56173050f62d5b6fa336ff8d257fca.png)
[Blue Bridge Cup training 100 questions] scratch Taiji diagram Blue Bridge Cup scratch competition special prediction programming question centralized training simulation exercise question No. 22
随机推荐
For cycle: daffodil case
Software test notes, test case design
Install MySQL database version 5.7.29 under ubuntu20.04 system
disabled和readonly 以及焦点问题
Vs Code connects to the remote jupyter server
UE4 external open EXE file
js 集合
I wrote code for openharmony, and the second phase of "code" pioneer officially opened!
配置FTP虚拟用户及访问控制
微信小程序WxPrase中包含文件无法点击解决
9. Shell text processing three swordsmen awk
3、 Five operation modes of unittest test cases
2.shell脚本之条件语句
2021 京东笔试总结
8.shell文件处理三剑客之sed
Add CONDA virtual environment env to the Jupiter kernel
存储、计算、分布式虚拟化篇(收集整理适合小白)
[Blue Bridge Cup training 100 questions] scratch Taiji diagram Blue Bridge Cup scratch competition special prediction programming question centralized training simulation exercise question No. 22
Configure FTP virtual user and access control
Use three.js to realize the cool cyberpunk style 3D digital earth large screen