当前位置:网站首页>yolov5官方代码解读——前向传播
yolov5官方代码解读——前向传播
2022-08-02 14:09:00 【虹夭】
yolov5前向传播代码解读
前言
本笔记以yolov5 4.0版本为例
在yolov5/models/yolo.py中,我们可以运行main代码块查看yolov5s的结构。
                 from  n    params  module                                  arguments
  0                -1  1      3520  models.common.Focus                     [3, 32, 3]
  1                -1  1     18560  models.common.Conv                      [32, 64, 3, 2]
  2                -1  1     18816  models.common.C3                        [64, 64, 1]
  3                -1  1     73984  models.common.Conv                      [64, 128, 3, 2]
  4                -1  1    156928  models.common.C3                        [128, 128, 3]
  5                -1  1    295424  models.common.Conv                      [128, 256, 3, 2]
  6                -1  1    625152  models.common.C3                        [256, 256, 3]
  7                -1  1   1180672  models.common.Conv                      [256, 512, 3, 2]
  8                -1  1    656896  models.common.SPP                       [512, 512, [5, 9, 13]]
  9                -1  1   1182720  models.common.C3                        [512, 512, 1, False]
 10                -1  1    131584  models.common.Conv                      [512, 256, 1, 1]
 11                -1  1         0  torch.nn.modules.upsampling.Upsample    [None, 2, 'nearest']
 12           [-1, 6]  1         0  models.common.Concat                    [1]
 13                -1  1    361984  models.common.C3                        [512, 256, 1, False]
 14                -1  1     33024  models.common.Conv                      [256, 128, 1, 1]
 15                -1  1         0  torch.nn.modules.upsampling.Upsample    [None, 2, 'nearest']
 16           [-1, 4]  1         0  models.common.Concat                    [1]
 17                -1  1     90880  models.common.C3                        [256, 128, 1, False]
 18                -1  1    147712  models.common.Conv                      [128, 128, 3, 2]
 19          [-1, 14]  1         0  models.common.Concat                    [1]
 20                -1  1    296448  models.common.C3                        [256, 256, 1, False]
 21                -1  1    590336  models.common.Conv                      [256, 256, 3, 2]
 22          [-1, 10]  1         0  models.common.Concat                    [1]
 23                -1  1   1182720  models.common.C3                        [512, 512, 1, False]
 24      [17, 20, 23]  1    229245  Detect                                  [80, [[10, 13, 16, 30, 33, 23], [30, 61, 62, 45, 59, 119], [116, 90, 156, 198, 373, 326]], [128, 256, 512]]
Model Summary: 283 layers, 7276605 parameters, 7276605 gradients, 17.1 GFLOPS
在main代码块下面添加打印语句,手动打印yolov5的模型结构
print(model)
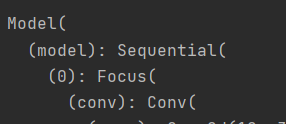
这时,我们就会惊讶的发现,yolov5的模型居然是只有一个nn.Sequential的顺序结构,不是说好的是下面这种复杂的网络结构吗??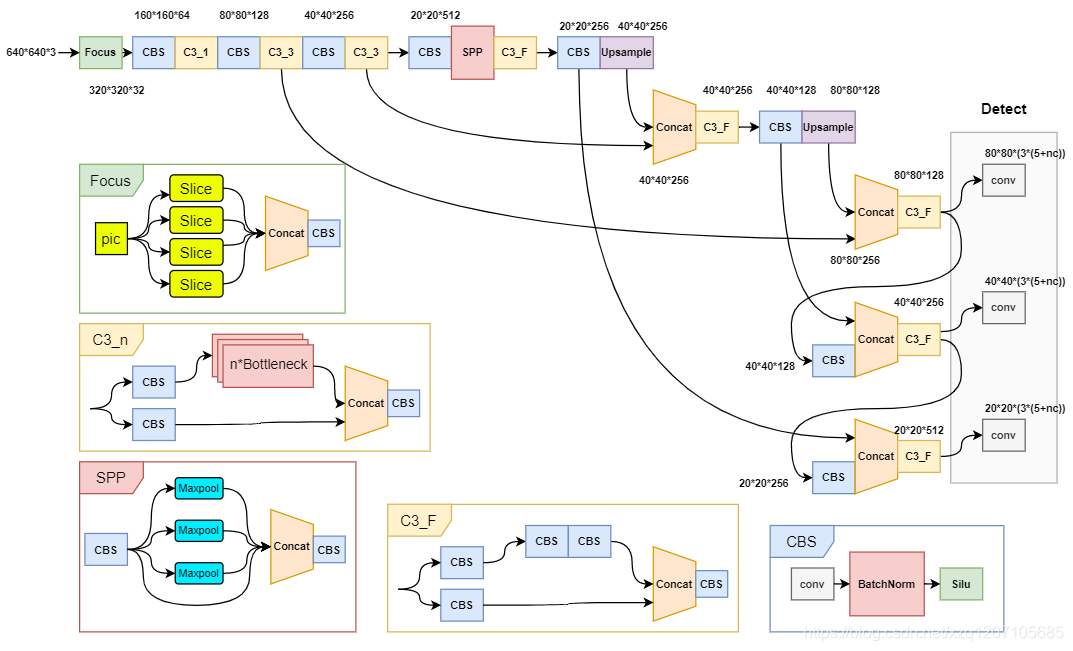
这就是yolov5官方编写前向传播过程代码的巧妙之处了
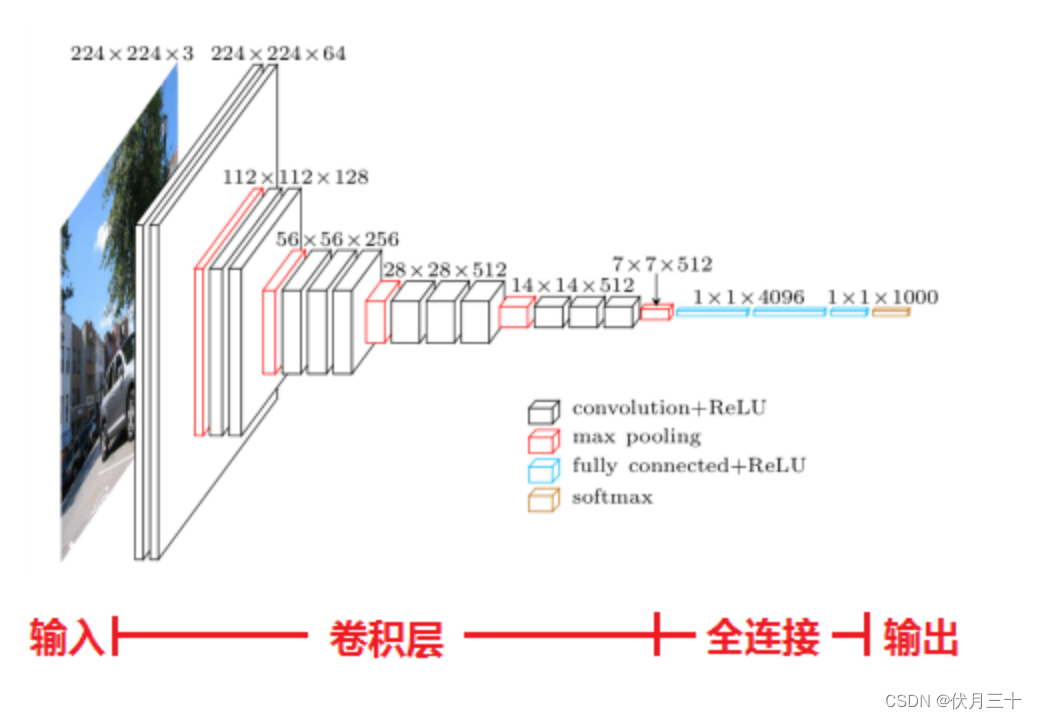
yolov5的网络结构
yolov5/models/yolov5s.yaml
# parameters
nc: 80  # number of classes
depth_multiple: 0.33  # model depth multiple
width_multiple: 0.50  # layer channel multiple

# anchors
anchors:
  - [10,13, 16,30, 33,23]  # P3/8
  - [30,61, 62,45, 59,119]  # P4/16
  - [116,90, 156,198, 373,326]  # P5/32

# YOLOv5 backbone
backbone:
  # [from, number, module, args]
  [[-1, 1, Focus, [64, 3]],  # 0-P1/2
   [-1, 1, Conv, [128, 3, 2]],  # 1-P2/4
   [-1, 3, C3, [128]],
   [-1, 1, Conv, [256, 3, 2]],  # 3-P3/8
   [-1, 9, C3, [256]],
   [-1, 1, Conv, [512, 3, 2]],  # 5-P4/16
   [-1, 9, C3, [512]],
   [-1, 1, Conv, [1024, 3, 2]],  # 7-P5/32
   [-1, 1, SPP, [1024, [5, 9, 13]]],
   [-1, 3, C3, [1024, False]],  # 9
  ]

# YOLOv5 head
head:
  [[-1, 1, Conv, [512, 1, 1]],
   [-1, 1, nn.Upsample, [None, 2, 'nearest']],
   [[-1, 6], 1, Concat, [1]],  # cat backbone P4
   [-1, 3, C3, [512, False]],  # 13

   [-1, 1, Conv, [256, 1, 1]],
   [-1, 1, nn.Upsample, [None, 2, 'nearest']],
   [[-1, 4], 1, Concat, [1]],  # cat backbone P3
   [-1, 3, C3, [256, False]],  # 17 (P3/8-small)

   [-1, 1, Conv, [256, 3, 2]],
   [[-1, 14], 1, Concat, [1]],  # cat head P4
   [-1, 3, C3, [512, False]],  # 20 (P4/16-medium)

   [-1, 1, Conv, [512, 3, 2]],
   [[-1, 10], 1, Concat, [1]],  # cat head P5
   [-1, 3, C3, [1024, False]],  # 23 (P5/32-large)

   [[17, 20, 23], 1, Detect, [nc, anchors]],  # Detect(P3, P4, P5)
  ]
yolov5官方在yolov5s.yaml 定义了yolov5s的网络结构,其中backbone和head定义了每层网络的
[数据来源,网络深度,网络类型,参数]
以[[-1, 6], 1, Concat, [1]], # cat backbone P4这一行为例:
- 数据来源:表示该层的输入来自哪个层,-1代表上一层,“数字”代表顺序(从0开始)。该例中第一个
[-1, 6]代表了该层的数据来自上一层和第6层。 - 网络深度
- 网络类型:该例中Concat代表该层为Concat层
- 参数:创建网络对象的参数,该例中第4个
[1]代表创建Concat对象时,第一个参数dimension为1,下面时Concat层的定义。
class Concat(nn.Module):
    # Concatenate a list of tensors along dimension
    def __init__(self, dimension=1):
        super(Concat, self).__init__()
        self.d = dimension

    def forward(self, x):
        return torch.cat(x, self.d)
yolov5的前向传播代码
生成网络结构
官方在yolov5/models/yolo.py的main方法中定义了生成网络结构的代码。
该代码实际上就是读取yaml文件中的数据,创建对应的网络对象添加到layers列表中,然后创建一个nn.Sequential对象。
def parse_model(d, ch):  # model_dict, input_channels(3)
    logger.info('\n%3s%18s%3s%10s %-40s%-30s' % ('', 'from', 'n', 'params', 'module', 'arguments'))
    anchors, nc, gd, gw = d['anchors'], d['nc'], d['depth_multiple'], d['width_multiple']
    na = (len(anchors[0]) // 2) if isinstance(anchors, list) else anchors  # number of anchors
    no = na * (nc + 5)  # number of outputs = anchors * (classes + 5)

    layers, save, c2 = [], [], ch[-1]  # layers, savelist, ch out
    for i, (f, n, m, args) in enumerate(d['backbone'] + d['head']):  # from, number, module, args
        m = eval(m) if isinstance(m, str) else m  # eval strings
        for j, a in enumerate(args):
            try:
                args[j] = eval(a) if isinstance(a, str) else a  # eval strings
            except:
                pass

        n = max(round(n * gd), 1) if n > 1 else n  # depth gain
        if m in [Conv, Bottleneck, SPP, DWConv, MixConv2d, Focus, CrossConv, BottleneckCSP, C3]:
            c1, c2 = ch[f], args[0]
            args = [c1, c2, *args[1:]]
            if m in [BottleneckCSP, C3]:
                args.insert(2, n)
                n = 1
        elif m is nn.BatchNorm2d:
            args = [ch[f]]
        elif m is Concat:
            c2 = sum([ch[x if x < 0 else x + 1] for x in f])
        elif m is Detect:
            args.append([ch[x + 1] for x in f])
            if isinstance(args[1], int):  # number of anchors
                args[1] = [list(range(args[1] * 2))] * len(f)
        elif m is Contract:
            c2 = ch[f if f < 0 else f + 1] * args[0] ** 2
        elif m is Expand:
            c2 = ch[f if f < 0 else f + 1] // args[0] ** 2
        else:
            c2 = ch[f if f < 0 else f + 1]

        m_ = nn.Sequential(*[m(*args) for _ in range(n)]) if n > 1 else m(*args)  # module
        t = str(m)[8:-2].replace('__main__.', '')  # module type
        np = sum([x.numel() for x in m_.parameters()])  # number params
        m_.i, m_.f, m_.type, m_.np = i, f, t, np  # attach index, 'from' index, type, number params
        logger.info('%3s%18s%3s%10.0f %-40s%-30s' % (i, f, n, np, t, args))  # print
        save.extend(x % i for x in ([f] if isinstance(f, int) else f) if x != -1)  # append to savelist
        layers.append(m_)
        ch.append(c2)
    return nn.Sequential(*layers), sorted(save)
其中最关键的就是下面这一句,将我们在yaml文件中定义的每一层的数据来源保存到该层的对象中。
m_.i, m_.f, m_.type, m_.np = i, f, t, np # attach index, 'from' index, type, number params
前向传播
前向传播的关键代码在yolov5/models/yolo.py中,Model(nn.Module)类的forward_once方法
Model(nn.Module).forward_once(self, x, profile=False)
    def forward_once(self, x, profile=False):
        y, dt = [], []  # outputs
        for m in self.model:
            if m.f != -1:  # if not from previous layer
                x = y[m.f] if isinstance(m.f, int) else [x if j == -1 else y[j] for j in m.f]  # from earlier layers

            if profile:
                o = thop.profile(m, inputs=(x,), verbose=False)[0] / 1E9 * 2 if thop else 0  # FLOPS
                t = time_synchronized()
                for _ in range(10):
                    _ = m(x)
                dt.append((time_synchronized() - t) * 100)
                print('%10.1f%10.0f%10.1fms %-40s' % (o, m.np, dt[-1], m.type))

            x = m(x)  # run
            y.append(x if m.i in self.save else None)  # save output

        if profile:
            print('%.1fms total' % sum(dt))
        return x
x是输入的数据,y是保存每层输出结果的列表
每次前向传播,程序就遍历self.model中保存的每一层网络,在下面这句代码中
x = y[m.f] if isinstance(m.f, int) else [x if j == -1 else y[j] for j in m.f] # from earlier layers
如果该层的数据来源m.f是-1,就保留x为上一层的输出,否则,就从y中取出对应层的输出结果。
之后,进行完该层的前向传播后,就将输出结果添加到y中
x = m(x)  # run
y.append(x if m.i in self.save else None)  # save output
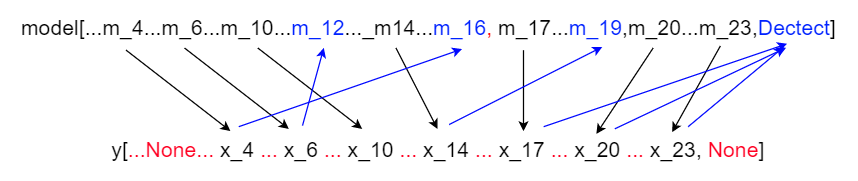
注意上面是只有该层索引m.i在self.save中时,才会保存结果,否则保存None。
综上,yolov5官方代码的前向传播过程示意图如下:(注意,每层的输入还包括上一层的输出)
边栏推荐
猜你喜欢

Binder ServiceManager解析
How to set the win10 taskbar does not merge icons
PyTorch⑨---卷积神经网络_线性层
How to update Win11 sound card driver?Win11 sound card driver update method
深度学习之 卷积网络(textCNN)

基于无监督医学图像配准论文(1)

PyTorch②---transforms结构及用法
PyTorch①---加载数据、tensorboard的使用
PHY6222蓝牙5.2支持MESH组网M0内核超低功耗

Win10 Settings screen out from lack of sleep?Win10 set the method that never sleep
随机推荐
vscode镜像
基于51单片机和物联网的智能家居系统(ESP8266物联网模块)
win10无法直接用照片查看器打开图片怎么办
Tensorflow常用函数
为android系统添加产品的过程
蓝牙温度检测系统(基于BT08-B蓝牙模块)
boost库智能指针
用U盘怎么重装Win7系统?如何使用u盘重装系统win7?
基于深度学习的配准框架
【使用Pytorch实现ResNet网络模型:ResNet50、ResNet101和ResNet152】
define #使用
Win11声卡驱动如何更新?Win11声卡驱动更新方法
LORA芯片ASR6505无线远距离传输8位MCU
DP1332E内置c8051的mcu内核NFC刷卡芯片国产兼容NXP
将SSE指令转换为ARM NEON指令
PyTorch⑤---卷积神经网络_卷积层
FP7195转模拟调光技术解决智能家居调光频闪和电感噪音的原理
镜像法求解接地导体空腔电势分布问题
DP4344兼容CS4344-DA转换器
【我的电赛日记(三)】STM32学习笔记与要点总结