当前位置:网站首页>Fastdfs-5.0.5 installation
Fastdfs-5.0.5 installation
2022-06-22 03:20:00 【qq_ thirty-seven million seven hundred and five thousand five h】
fastdfs-5.0.5 install
1 preparation
Download a software :http://sourceforge.net/projects/fastdfs/files/
install gcc. command :yum install make cmake gcc gcc-c++
2 install libfastcommon
1 Upload libfastcommon-master.zip To /usr/local/software Next
2 unpack libfastcommon-master.zip:
command :unzip libfastcommon-master.zip -d /usr/local/fast/
3 Entry directory :cd /usr/local/fast/libfastcommon-master/

4 Compile and install :
command :./make.sh
command :./make.sh install
Pay attention to the installation path : in other words , our libfastcommon The default installation is /usr/lib64/ This
Location .
5
Create software .FastDFS The directory set by the main program is /usr/local/lib/, So we need to create /
usr/lib64/ Soft connection files of some core execution programs under .
command :mk dir /usr/local/lib/
command :ln -s /usr/lib64/libfastcommon.so /usr/local/lib/libfastcommon.so
command :ln -s /usr/lib64/libfastcommon.so /usr/lib/libfastcommon.so
command :ln -s /usr/lib64/libfdfsclient.so /usr/local/lib/libfdfsclient.so
command :ln -s /usr/lib64/libfdfsclient.so /usr/lib/libfdfsclient.so
3 install FastDFS
1 Enter into cd /usr/local/software Next , decompression FastDFS_v5.05.tar.gz file
command :cd /usr/local/software
command :tar -zxvf FastDFS_v5.05.tar.gz -C /usr/local/fast/
2 Installation and compilation
command :cd /usr/local/fast/FastDFS/
Compile command :./make.sh
Installation command :./make.sh install
3 Using the default installation method script file description :
1、 The service script is in :
/etc/init.d/fdfs_storaged
/etc/init.d/fdfs_trackerd
2、 Configuration file in :
/etc/fdfs/client.conf.sample
/etc/fdfs/storage.conf.sample
/etc/fdfs/tracker.conf.sample
3、 The command line tool is in /usr/bin/ Under the table of contents
Fdfs_* Some columns of the execute script 
4 because FastDFS Service script settings bin The catalogue is /usr/local/bin/ Next , But actually we installed it in /u
sr/bin/ below . So we need to change it FastDFS Path in configuration file , That is, it needs to be modified
Configuration files :
command :vim /etc/init.d/fdfs_storaged
Perform the global replace command :%s+/usr/local/bin+/usr/bin
command :vim /etc/init.d/fdfs_trackerd
Perform the global replace command :%s+/usr/local/bin+/usr/bin
4 Configure tracker (192.168.1.172 node )
1 Get into cd
/etc/fdfs/ Directory configuration tracker file ( Note that 192.168.1.172 node ), hold tracker.conf.samp
le Document carried out cope One copy : To modify tracker.conf file 
2 modify tracker.conf file
command :vim /etc/fdfs/tracker.conf
As shown in the figure below : We temporarily modify the... In the configuration file base_path that will do .
Change to your own path address :base_path=/fastdfs/tracker
Be careful : about tracker.conf For the explanation of configuration file parameters, please refer to the official documents , The address is :
http://bbs.chinaunix.net/thread-1941456-1-1.html
3 Finally, we must create the previously defined directory ( That is to say /fastdfs/tracker):
command :mkdir -p /fastdfs/tracker
4 Turn off firewall :( We don't need to consider the problem of firewall in our study )
Vim /etc/sysconfig/iptables
add to :-A INPUT -m state --state NEW -m tcp -p tcp --dport 22122 -j ACCEPT
restart :service iptables restart
5 Start the tracker
As shown in the figure :
Directory command :cd /fastdfs/tracker/ && ll
start-up tracker command :/etc/init.d/fdfs_trackerd start
View process commands :ps -el | grep fdfs
stop it tracker command :/etc/init.d/fdfs_trackerd stop
6 You can set the boot tracker :( The general production environment needs to start some services , Such as keepaliv
ed、linux、tomcat wait )
command :vim /etc/rc.d/rc.local
Add configuration :/etc/init.d/fdfs_trackerd start
5 To configure FastDFS Storage
1 Enter file directory :cd /etc/fdfs/, Conduct copy storage A document
command :cd /etc/fdfs/
command :cp storage.conf.sample storage.conf
2 modify storage.conf file
command :vim /etc/fdfs/storage.conf
Modify the content :
base_path=/fastdfs/storage
store_path0=/fastdfs/storage
tracker_server=192.168.1.172:22122
http.server_port=8888
3 Create storage directory :mkdir -p /fastdfs/storage
4 Turn on the firewall :
command :vim /etc/sysconfig/iptables
add to :-A INPUT -m state --state NEW -m tcp -p tcp --dport 23000 -j ACCEPT
restart :service iptables restart
5 Start storage (storage)
command :/etc/init.d/fdfs_storaged start ( close :/etc/init.d/fdfs_storaged stop)
( After successful initial startup, it will be in /fastdbf/storage/ Create under directory data、logs Two directories )
6 see FastDFS storage Startup successful
command :ps -ef | grep fdfs
And we go into /fastdfs/storage/data/ You will see some directory files under the folder (256*256)
, as follows :
command :cd /fastdfs/storage/data/ && ls
7 Empathy , You can also set the boot memory :( The general production environment needs to start some services ,
Such as keepalived、linux、tomcat wait )
command :vim /etc/rc.d/rc.local
Add configuration :/etc/init.d/fdfs_storaged start
So far our FastDFS The environment has been set up !
6 test
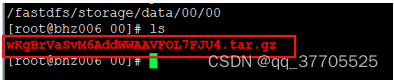
1 Let's use the command to upload a file . Be careful : Is in tracker( tracker ) The upload .
First we're on the tracker (192.168.1.172) in copy One copy client.conf file .
command :cd /etc/fdfs/
command :cp client.conf.sample client.conf
2 edit client.conf file
command :vim /etc/fdfs/client.conf
Modify the content :
base_path=/fastdfs/tracker
tracker_server=192.168.1.172:22122
3 We found the script location of the command , And use the command , Upload files :
command :cd /usr/bin/
command :ls | grep fdfs
4 Use command fdfs_upload_file Upload :
First , Let's look at the memory first (192.168.1.173), Enter into data Next , When entering 00 Folder
Next , Find out 00 There are a lot of folders under the folder , And then continue into 00 Under the folder , In the end we
The folder entered is :
/fastdfs/storage/data/00/00 There are no documents in it .
then , We upload , For example, put the previous /usr/local/software/ Somewhere under the folder
File upload to FastDFS Go to... In the system , On the tracker (192.168.1.172) Upload file in , Orders such as
Next :
command :/usr/bin/fdfs_upload_file /etc/fdfs/client.conf
/usr/local/software/FastDFS_v5.05.tar.gz
In the end, we found out , After the command is executed , Return to one group1/M00/00/00/… Of ID, In fact
Is to return the currently uploaded file in the memory (192.168.1.173) Which group in 、 Which item
Recording position , So we look at... In memory /fastdfs/storage/data/00/00 Folder location , Find out
The file just uploaded already exists , Only this and nothing more , Our test upload file has OK 了 . as follows
:
7 FastDFS And Nginx Integrate
1 First of all, the two machines must be installed first nginx
2 Then we are on the storage node (192.168.1.173) install fastdfs-nginxmodule_v1.16.tar.gz Package for integration .
Directory command :cd /usr/local/software/
Unpack the command :tar -zxvf /usr/local/software/fastdfs-nginx-module_v1.16.tar.gz -C
/usr/local/fast/
3 Entry directory :cd fastdfs-nginx-module/src/
4 Edit profile config
command : vim /usr/local/fast/fastdfs-nginx-module/src/config
Modify the content : Remove the... In the figure below local Document hierarchy 
After modification, it is :
5 FastDFS And nginx To integrate
First put the previous nginx To delete
Directory command :cd /usr/local/
The delete command :rm -rf nginx
Enter into nginx Directory command :cd nginx-1.6.2/
Add module command :./configure --add-module=/usr/local/fast/fastdfs-nginx-module/src/
Recompile command :make && make install
6 Copy fastdfs-ngin-module Configuration file in , To /etc/fdfs Directory , As shown in the figure :

copy command :cp /usr/local/fast/fastdfs-nginx-module/src/mod_fastdfs.conf /etc/fdfs/
7 Make changes /etc/fdfs/ Under the table of contents , We just copy Over here mod_fastdfs.conf file .
command :vim /etc/fdfs/mod_fastdfs.conf
Modify the content : For example, connection timeout 、 Tracker path configuration 、url Of group To configure 、
connect_timeout=10
tracker_server=192.168.1.172:22122
url_have_group_name = true
store_path0=/fastdfs/storage
8 Copy FastDFS Inside 2 File , To /etc/fdfs Directory , As shown in the figure :
Directory command :cd /usr/local/fast/FastDFS/conf/
Copy command :cp http.conf mime.types /etc/fdfs/
9 Create a soft connection , stay /fastdfs/storage Create a soft connection in the file storage directory , Link it to the actual stored data
The catalog of .
command :ln -s /fastdfs/storage/data/ /fastdfs/storage/data/M00
10 modify Nginx The configuration file , As shown in the figure :
command :vim nginx.conf
Modify the configuration as shown in the following figure :
Modified as :
listen 8888;
server_name localhost;
location ~/group([0-9])/M00 {
#alias /fastdfs/storage/data;
ngx_fastdfs_module;
}
Be careful :nginx The port in should be configured according to step 5 FastDFS In storage storage.conf Consistent file configuration ,
That is to say (http.server_port=8888)
11 Finally, check the firewall , And then we start nginx service 
Start command :/usr/local/nginx/sbin/nginx, We just uploaded a file , Upload successful ,
Pictured :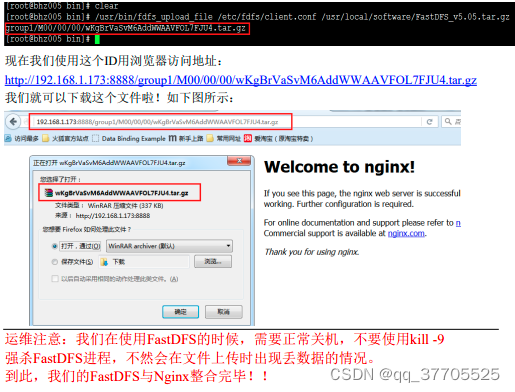
8 Start stop service
Start command :
start-up tracker command :/etc/init.d/fdfs_trackerd start
View process commands :ps -el | grep fdfs
start-up storage command :/etc/init.d/fdfs_storaged start
View process commands :ps -el | grep fdfs
start-up nginx command :/usr/local/nginx/sbin/nginx
Stop the order :
stop it tracker command :/etc/init.d/fdfs_trackerd stop
close storage command :/etc/init.d/fdfs_storaged stop
close nginx command :/usr/local/nginx/sbin/nginx -s stop
边栏推荐
- HarmonyOS鸿蒙使用ORM Bee访问数据库实例
- 克隆的vmware虚拟主机网卡无法启动解决办法
- FastDFS-6.0.6
- Tag dynamic programming - preliminary knowledge for question brushing -1 Dynamic programming five part problem solving method + lt.509 Fibonacci number / Sword finger offer 10 I + lt.70. Climbing stai
- torch.max()使用讲解
- 图数据库ONgDB Release v-1.0.2
- Force buckle 239 Sliding window Max
- 六、MySQL之数据定义语言(一)
- 【NVMe2.0b 11】NVMe Reset
- opencv安装(x86/tx2 cuda/共享库)
猜你喜欢
![[nvme2.0b 9] controller initialization process](/img/70/536b2c850c611d5d0c013586d4c2d5.png)
[nvme2.0b 9] controller initialization process
【NVMe2.0b 8】NVMe 队列仲裁机制
记一则服务器内存泄漏解决过程

Day12QFile2021-09-27

UnionPay payment return merchant nignx post request 405
Force buckle 160 Intersecting linked list

Opencv installation (x86/tx2 cuda/ shared library)
Operating instructions for tcp202 current probe of Tektronix oscilloscope

圖數據庫ONgDB Release v-1.0.2

Redis6.0新特性(下)
随机推荐
Common string operations in day15qt 2021-10-20
JS操作节点经典案例(三级联动)
Harmonyos Hongmeng uses ORM bee to access database instances
TX2 mirror source settings
【 thesis 】 zero reference depth curve estimation for low light image enhancement
Classic case of JS operation node (three-level linkage)
fastdfs5.0.11安装
6、 MySQL data definition language (1)
【Kubernetes 系列】Kubernetes 是什么?
你是一名技术管理者还是项目管理者?
图数据库ONgDB Release v-1.0.2
Day12QFile2021-09-27
为什么程序员写的第一个程序是“Hello World!”
ACL 2022 | multilingual knowledge map reasoning based on self supervised graph alignment
Day17QtQLcdNumber2021-10-22
【爬虫笔记1】环境搭建和必要工具Selenium
C3-qt realize Gobang games (I) November 7, 2021
关于Map做状态映射的问题
BOM 属性、方法、事件应用案例
Configuration and optimization of redis cache database