当前位置:网站首页>pytorch学习笔记10——卷积神经网络详解及mnist数据集多分类任务应用
pytorch学习笔记10——卷积神经网络详解及mnist数据集多分类任务应用
2022-07-31 05:16:00 【qq_50749521】
卷积神经网络详解
在上一集中我们说到,黑白图像是单通道的,彩色图像是三通道的,这三通道分别是:Red、Green、Blue,也就是我们所说的RGB。对于这样一个彩色图像对应的图像张量,我们一般用C(通道数)* H(图像高度)*W(图像宽度)来刻画。
之前我们用全连接模型接softmax来做多分类,但在全联接模型里,直接把图像拼成一连串,会导致丧失了原有的空间信息。
而卷积可以保留图像的空间结构。
- 先从一个单通道图像入手

输入一个单通道,宽为5,高为5的图像(1 * 5 * 5)
我们用一个3 * 3的卷积核和做卷积。
这里的卷积是做数乘,不是矩阵乘法。每算完一个向右平移,最终得到:
- 3 input channels
对于一个三通道的图像张量:
我们只要把每个通道的张量和一个卷积核做卷积即可,最终得到3个3 * 3的张量,把这三个3 * 3的张量相加就能卷积结果。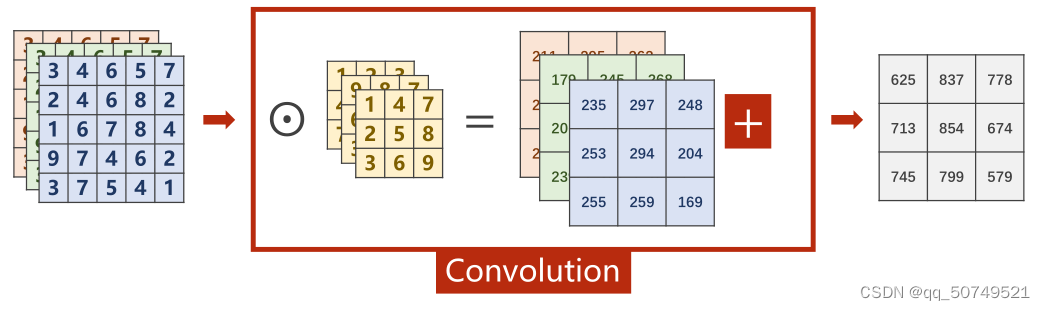
对于这样一个(3,5,5)的图像张量,与(3,3,3)的卷积核卷积,得到(1,3,3)的张量。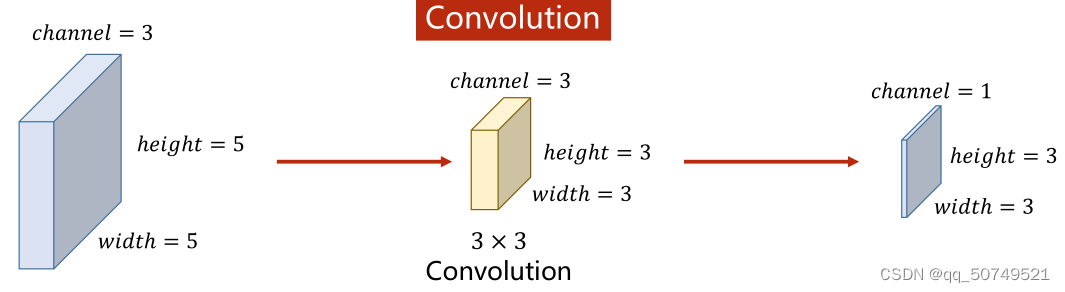
进一步总结:
对于(n, w, h)的图像张量,如果拿一个k * k的卷积核做卷积,那么这个卷积核也一定是n通道的,即(n, k, k),最终的卷积结果就是(1, w-k+1, w-k+1)
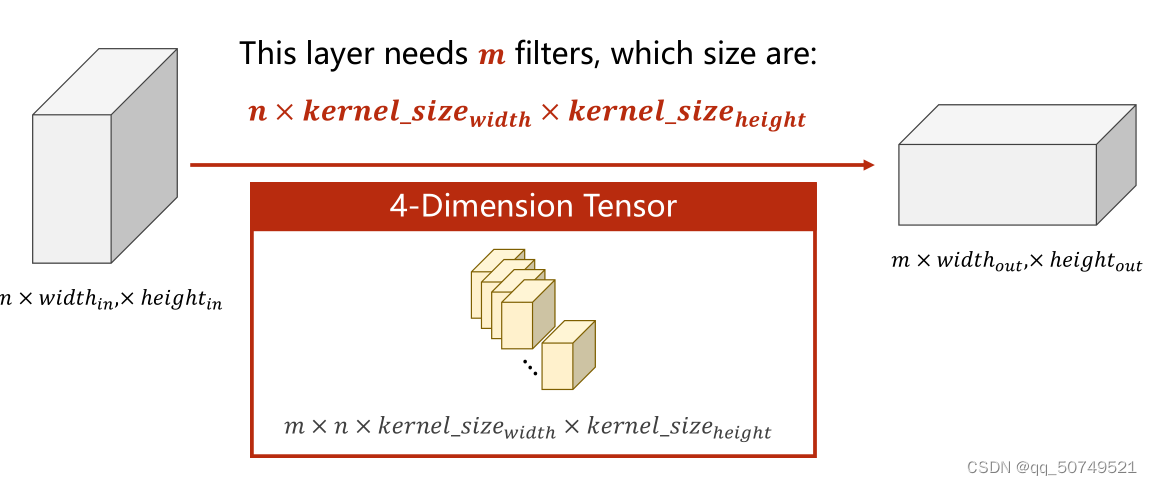
- 如果我们要得到一个多通道的输出结果呢?
用不同的卷积核把上面的过程重复m遍,得到m个(1, w-k+1, w-k+1),把他们拼接起来就可以得到(m, w-k+1, w-k+1)了。
这样,为了更普遍化的表示卷积核,我们进一步定义卷积核为
(m, n, w, h)
其中,
m表示我们要的输出通道数
n表示输入的通道数
w表示卷积核宽
h表示卷积核长
写一个(5, 100, 100)的输入,卷积核(10, 5, 3, 3)。这就表示输入是5通道,长高均为100的图像张量,经过10次通道为5,大小为3 * 3的卷积核卷积,应该会得到一个(10, 98, 98)的输出。
import torch
in_channels, out_channels = 5, 10
width, height = 100, 100
kernel_size = 3
batch_size = 1
input = torch.randn(batch_size, in_channels, height, width)
conv_layer = torch.nn.Conv2d(in_channels, out_channels,
                            kernel_size = kernel_size)
output = conv_layer(input)
print(input.shape)
print(output.shape)
print(conv_layer.weight.shape)
torch.Size([1, 5, 100, 100])
torch.Size([1, 10, 98, 98])
torch.Size([10, 5, 3, 3])
这里面的batch_size也就是我们每次批量输入的图像数量,1就表示一次输入一张。
- 如果我们的图像是高5长5的,经过3 * 3卷积后是3 * 3的,但我们想要结果也是5 * 5的呢?
padding——给输入围圈0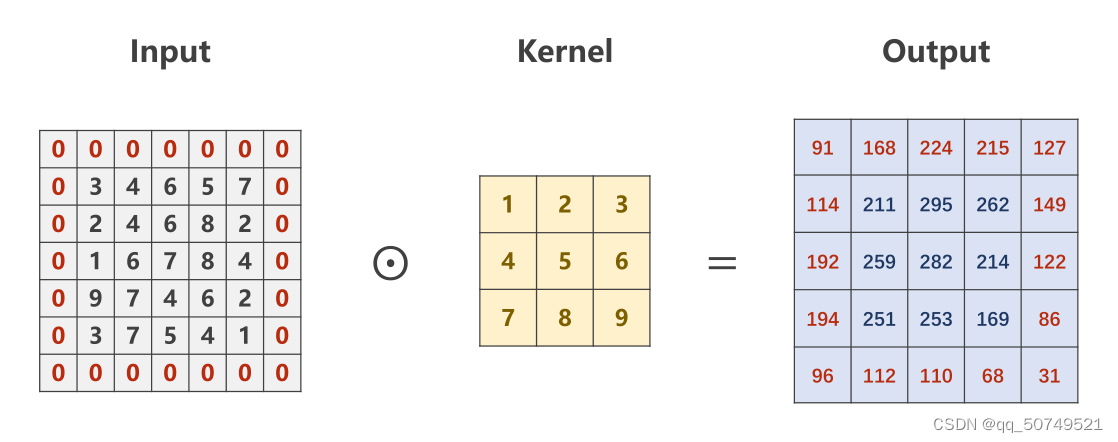
input = [3,4,6,5,7,
         2,4,6,8,2,
         1,6,7,8,4,
         9,7,4,6,2,
         3,7,5,4,1]
input = torch.Tensor(input).view(1, 1, 5, 5)#B C W H
conv_layer = torch.nn.Conv2d(1, 1, kernel_size=3, padding=1, bias= False)#input_channel, output_channel, 3*3卷积核, 一维padding, 不加偏置
kernel = torch.Tensor([1,2,3,4,5,6,7,8,9]).view(1, 1, 3, 3)#input_channel, output_channel ,3*3
conv_layer.weight.data = kernel.data#赋给卷积权重
output = conv_layer(input)
print(output)
print(output.shape)
tensor([[[[ 91., 168., 224., 215., 127.],
          [114., 211., 295., 262., 149.],
          [192., 259., 282., 214., 122.],
          [194., 251., 253., 169.,  86.],
          [ 96., 112., 110.,  68.,  31.]]]], grad_fn=<ConvolutionBackward0>)
torch.Size([1, 1, 5, 5])
- 如果我们想要输出长宽变小,更快实现压缩。我们可以加大卷积核扫描平移的步长。
默认情况下stride = 1. 这里我们设置stride = 2.
一个5 * 5的张量就会变成 2 * 2的了。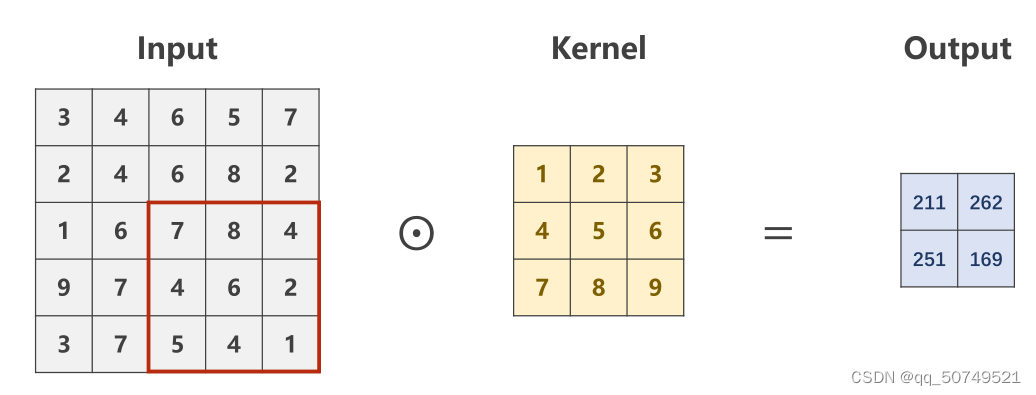
input = [3,4,6,5,7,
         2,4,6,8,2,
         1,6,7,8,4,
         9,7,4,6,2,
         3,7,5,4,1]
input = torch.Tensor(input).view(1, 1, 5, 5)#B C W H
conv_layer = torch.nn.Conv2d(1, 1, kernel_size=3, stride = 2, bias= False)#input_channel, output_channel, 3*3卷积核, 一维padding, 不加偏置
kernel = torch.Tensor([1,2,3,4,5,6,7,8,9]).view(1, 1, 3, 3)#input_channel, output_channel ,3*3
conv_layer.weight.data = kernel.data#赋给卷积权重
output = conv_layer(input)
print(output)
print(output.shape)
tensor([[[[211., 262.],
          [251., 169.]]]], grad_fn=<ConvolutionBackward0>)
torch.Size([1, 1, 2, 2])
- MaxPooling layer——在每个块内找最大值即可,进行快速压缩

input = [3,4,6,5,
        2,4,6,8,
        1,6,7,8,
        9,7,4,6
        ]
input = torch.Tensor(input).view(1,1,4,4)
maxpooling_layer = torch.nn.MaxPool2d(kernel_size = 2)
output = maxpooling_layer(input)
print(output)
print(output.shape)
tensor([[[[4., 8.],
          [9., 8.]]]])
torch.Size([1, 1, 2, 2])
用卷积神经网络对mnist数据集进行多分类

输入(batch_size, 1, 28, 28)
->经过卷积层(1, 10, 5, 5), 输出(batch_size, 10, 24, 24)
单通道变10通道,长高为28-5+1 = 24
->经过maxpooling下采样, 输出(bacth_size, 10, 12, 12)
->经过卷积层(10, 20, 5, 5), 输出(batch_size, 20, 8, 8)
10通道变20通道,长高为12-5+1 = 8
->经过maxpooling下采样, 输出(bacth_size, 20, 4, 4)
->展成(batch_size, 320)
->经过(320, 10)全连接层,输出(bacth_size, 10), 从而进行十分类
输出C * W * H,通道会变,高度和宽度也会变。
代码:
import torch
from torchvision import transforms
from torchvision import datasets
from torch.utils.data import DataLoader
import torch.nn.functional as F
import torch.optim as optim
batch_size = 64
transform = transforms.Compose([
    transforms.ToTensor(),
    transforms.Normalize((0.1307, ), (0.3081, ))
])
train_dataset = datasets.MNIST(root='../dataset/mnist/',
                               train=True,
                               download=False,
                               transform=transform)
train_loader = DataLoader(train_dataset,
                          shuffle=True,
                          batch_size=batch_size)
test_dataset = datasets.MNIST(root='../dataset/mnist',
                              train=False,
                              download=False,
                              transform=transform)
test_loader = DataLoader(test_dataset,
                         shuffle=False,
                         batch_size=batch_size)
class Net(torch.nn.Module):
    def __init__(self):
        super(Net, self).__init__()
        self.conv1 = torch.nn.Conv2d(1, 10, kernel_size = 5)
        self.conv2 = torch.nn.Conv2d(10, 20, kernel_size = 5)
        self.pooling = torch.nn.MaxPool2d(2)
        self.fc = torch.nn.Linear(320, 10)
        self.relu = torch.nn.ReLU()

    def forward(self, x):
        x = self.relu(self.pooling(self.conv1(x)))
        x = self.relu(self.pooling(self.conv2(x)))
        x = x.view(x.size(0), -1)
        x = self.fc(x)
        return x
model = Net()
criterion = torch.nn.CrossEntropyLoss()
optimizer = optim.SGD(model.parameters(), lr = 0.01)
epoch_list = []
loss_list = []
loss_sum = 0
for epoch in range(10):
    for index, data in enumerate(train_loader, 0):
        inputs, labels = data
        optimizer.zero_grad()
        y_pred = model(inputs)
        loss = criterion(y_pred, labels)
        loss.backward()
        optimizer.step()

        loss_sum += loss.item()
        batch = index
    print('epoch = ', epoch, 'loss = ', loss_sum/batch)
    epoch_list.append(epoch)
    loss_list.append(loss_sum/batch)
    loss_sum = 0
epoch = 0 loss = 0.5009269244937085
epoch = 1 loss = 0.14979709709896094
epoch = 2 loss = 0.10758499573546451
epoch = 3 loss = 0.08902853002658426
epoch = 4 loss = 0.07835054308028938
epoch = 5 loss = 0.06980127688564892
epoch = 6 loss = 0.06388871054082568
epoch = 7 loss = 0.059718344841408866
epoch = 8 loss = 0.055480038152317834
epoch = 9 loss = 0.05270801689137835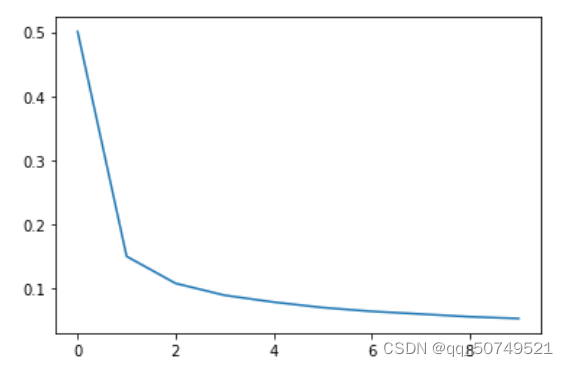
total = 0
correct = 0
with torch.no_grad():
    for data in test_loader:
        images, labels = data
        outputs = model(images)
        _,predicted = torch.max(outputs.data, dim = 1)
        total +=labels.size(0)
        correct += (predicted == labels).sum().item()
print( 'Accuracy on test set: %d %%' % (100 * correct / total))
Accuracy on test set: 98 %
比较
在上一篇文章当中,我们是用了全连接层来进行多分类处理的。
俩种模型对比:
全连接层的输出正确率是97%,卷积层输出正确率是98%。这也印证了前面所说的,在全联接模型里,直接把图像拼成一连串,会导致丧失了原有的空间信息。而卷积可以保留图像的空间结构,效果更好。
每天一个企业级理解~
1%正确率的提高
= 3%的错误率 -> 2%的错误率
= 提升了33%的性能
Great~
边栏推荐
- sqlite 查看表结构 android.database.sqlite.SQLiteException: table splitTable has no column named
- Several forms of Attribute Changer
- break and continue exit in js
- Pure shell implementation of text replacement
- cocos create EditBox 输入文字被刘海屏遮挡修改
- js中的this指向与原型对象
- cocos2d-x-3.2 Physics
- np.fliplr与np.flipud
- 变分自编码器VAE实现MNIST数据集生成by Pytorch
- Principle analysis of famous website msdn.itellyou.cn
猜你喜欢


随机推荐
cocoscreator 显示刘海内容
活体检测FaceBagNet阅读笔记
通信原理——纠错编码 | 汉明码(海明码)手算详解
UiBot has an open Microsoft Edge browser and cannot perform the installation
MySQL面试题大全(陆续更新)
cocoscreator3.5.2打包微信小游戏发布到QQ小游戏修改
quick-3.5 无法正常显示有混合纹理的csb文件
cocos2d-x-3.2 image graying effect
MYSQL transaction and lock problem handling
MySQL高级SQL语句(二)
浅谈对分布式模式下CAP的理解
Attribute Changer的几种形态
Talking about the understanding of CAP in distributed mode
为什么bash中的read要配合while才能读取/dev/stdin的内容
VS通过ODBC连接MYSQL(一)
softmax函数详解
Eternal blue bug reappears
深度学习知识点杂谈
cocos2d-x-3.2 create project method
腾讯云GPU桌面服务器驱动安装