当前位置:网站首页>The latest MySql installation teaching, very detailed
The latest MySql installation teaching, very detailed
2022-07-31 05:52:00 【m0_67392811】
目录
3.选完以后,点击右下方的“Advanced Options”
4.Make sure the two paths are OK Next
5.A path warning pops up,直接Yes
7.?设置密码(Use strong password authentication、Use legacy authentication)
8.?Next 后,直接点击“Execute”,开始安装,点击安装之后需要等待片刻
9.?接着Next,点击“Finish”,此时MySQL安装完成
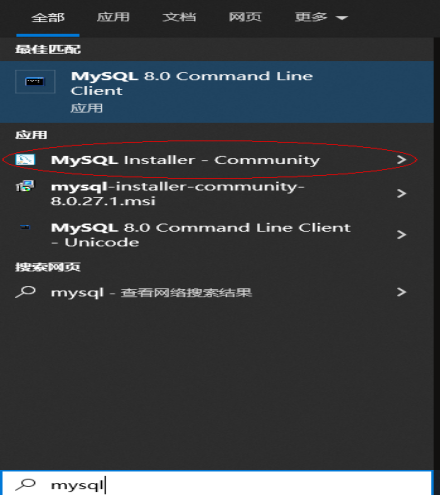
1.在WindowStart typing in the search boxmysql,并选择第一个
2.右键打开“此电脑”属性,先点击“高级系统设置”,再点击“环境变量”
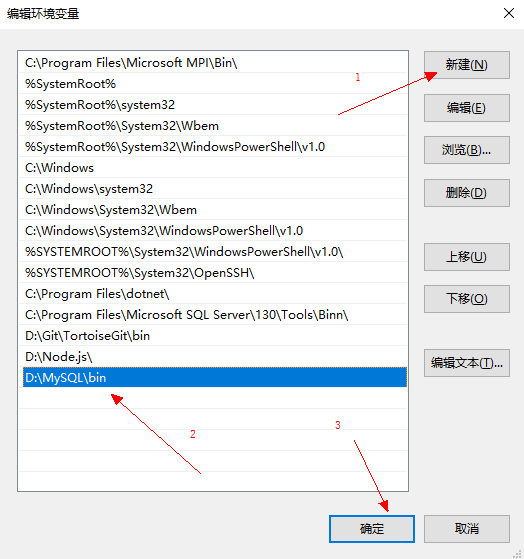
4.点击“新建”,将MySQL的安装路径添加上去,之后点击“确定”
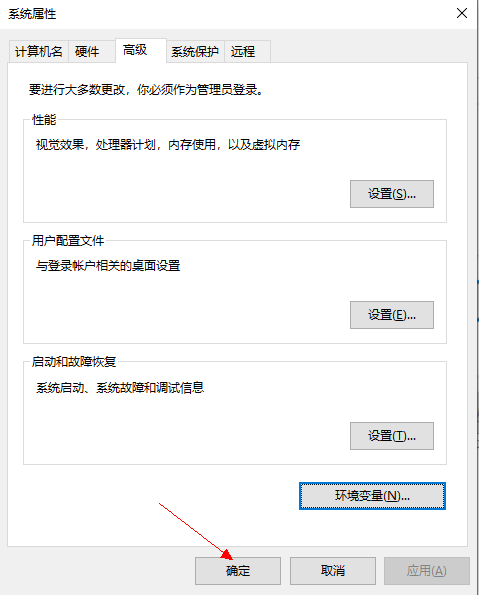
5.Make sure to save the settings all the way
1.在Window开始处搜索mysql,打开“MySQL Installer - Community"
3.选择“MySQL Workbench 8.0.28 -X64”
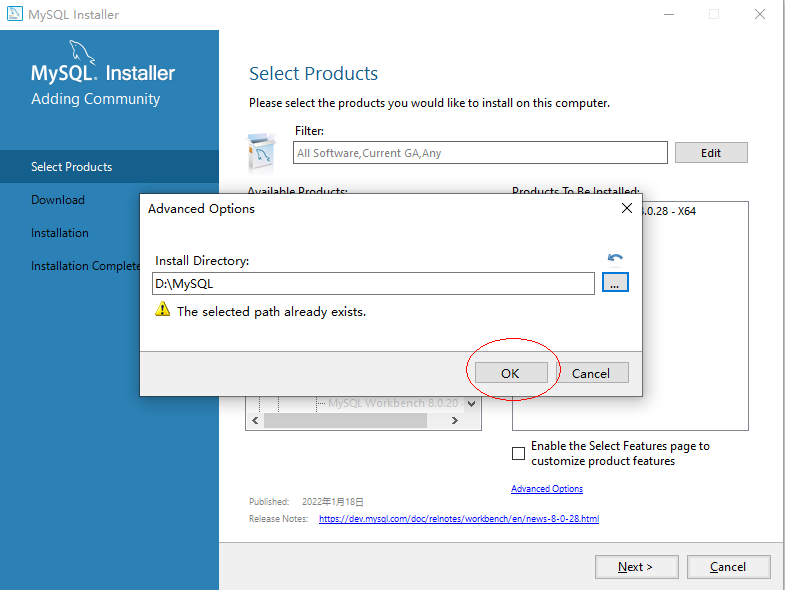
4.点击右下角”Advanced Options“,配置好安装路径
一、下载MySQL
Mysql官网下载地址https://downloads.mysql.com/archives/installer/
1. 选择想要安装的版本,点击Download下载
本篇文章选择的是8.0.27.1版本

Download and open the program directly

****二、安装MySq
1. 选择设置类型
“Developer Default”是开发者默认;
“Server only”仅作为服务器安装;
“Clientonly”仅作为客户端安装;
“Full”是完整安装;
“Custom”是自定义安装;

注:If your computer configuration allows it,也可以选择安装“FULL”完整版,里面包含Workbenchwait as it should,一步到位
2. 选择安装的产品和功能
****依次点开“MySQL Servers”、“MySQL Server”、“MySQL Server8.0”、“MySQL Server8.0.27 -X64”,Then click the green arrow.****注意:Select the product according to the computer system,这里选择64位系统.
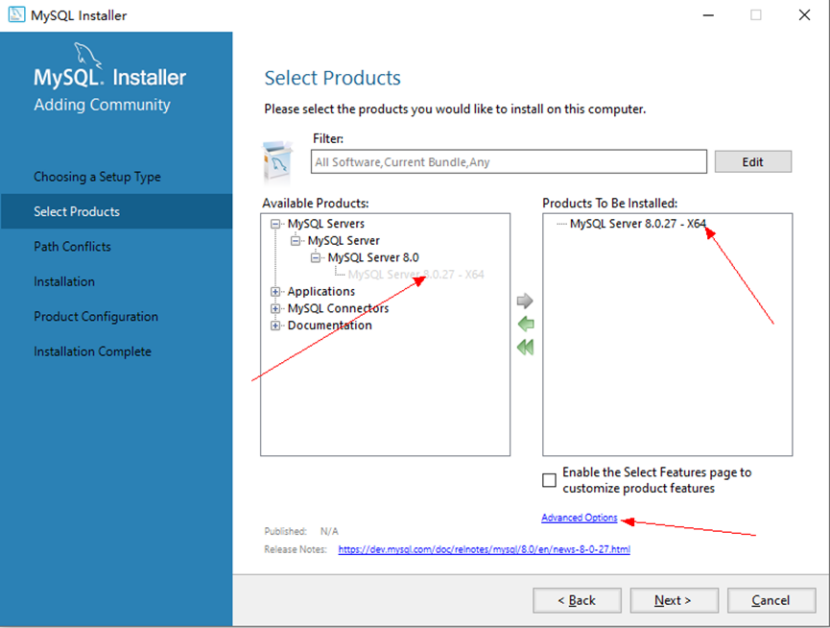
3.选完以后,点击右下方的**“Advanced Options”******
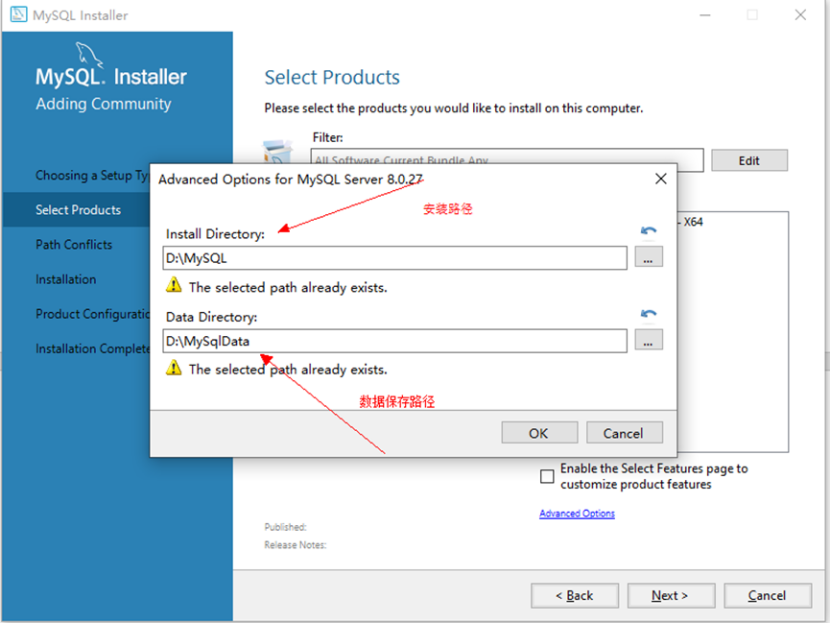
4.Make sure the two paths are OK Next

5.A path warning pops up,直接Yes

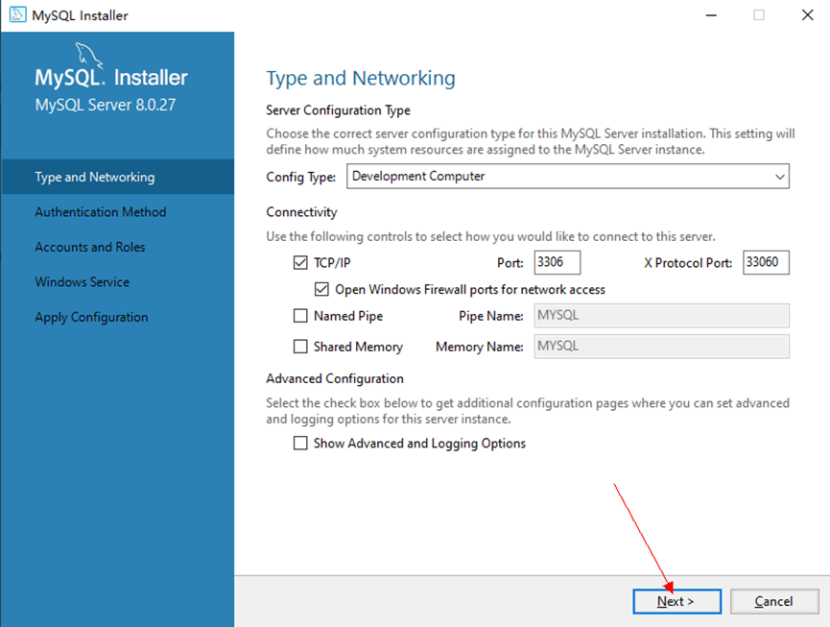
****6.一路畅通无阻,Next
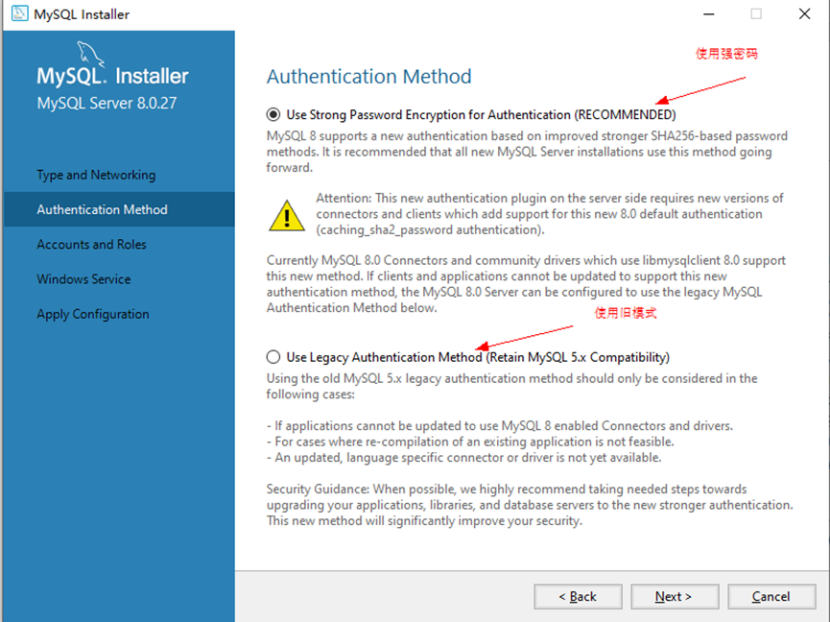
****7.设置密码(Use strong password authentication、Use legacy authentication)

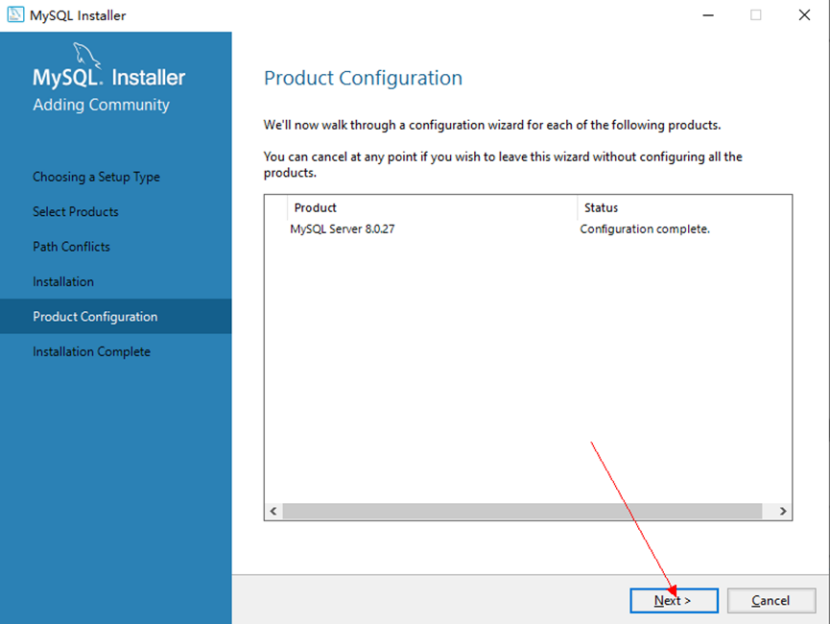
****8.******Next 后,********直接点击“Execute”,开始安装,**点击安装之后需要等待片刻


****9.******接着Next,**点击“Finish”,此时MySQL安装完成

****三、验证MySQL安装是否成功
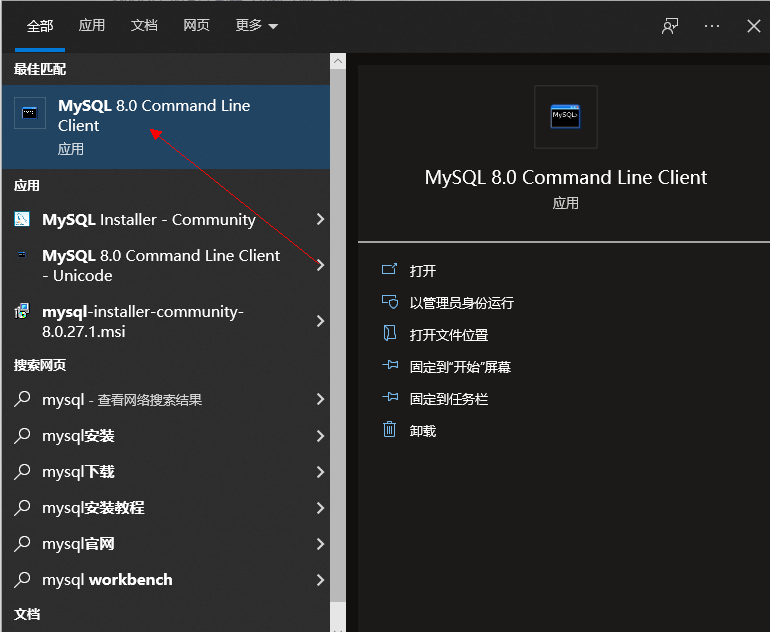
1.在WindowStart typing in the search boxmysql,并选择第一个
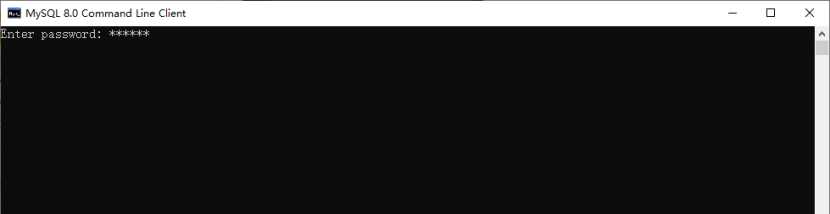
2.输入安装时设置的密码
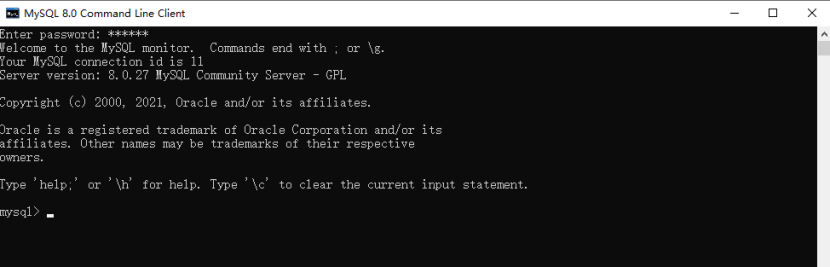
3.说明安装成功
****四、配置环境变量
1.找到MySQL安装路径(注意是bin文件下)

2.右键打开“此电脑”属性,先点击“高级系统设置”,再点击“环境变量”
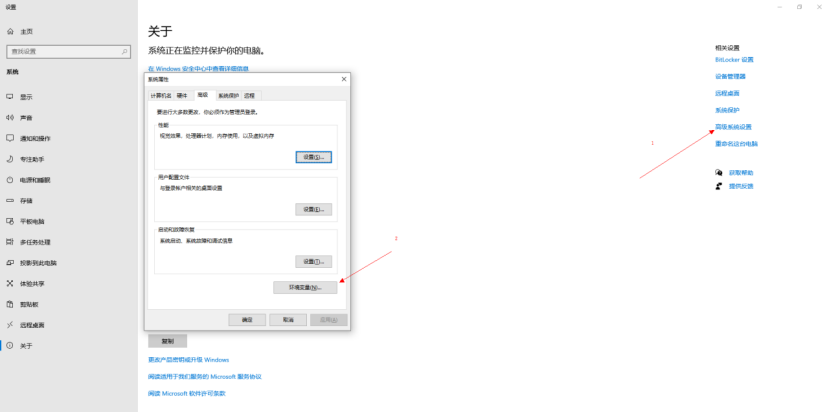
3.在“系统变量”中选择“Path”,点击“编辑”

4.点击“新建”,将MySQL的安装路径添加上去,之后点击“确定”
5.Make sure to save the settings all the way
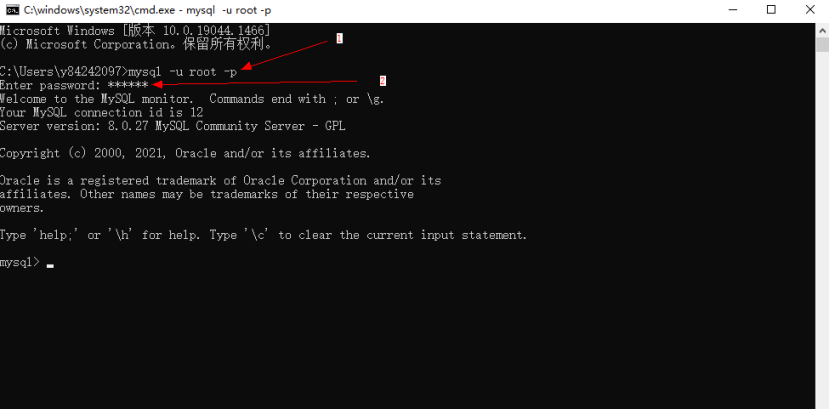
验证环境变量是否配置好,按下“window+R”键弹出运行框,输入“cmd”进入window命令行,输入“mysql -u root -p”按下回车,再输入密码,按下回车,出现下面界面则是已经配置成功
五、安装MySQL Workbench
1.在Window开始处搜索mysql,打开“MySQL Installer - Community"
2.Add安装

3.选择“MySQL Workbench 8.0.28 -X64”

4.点击右下角”Advanced Options“,配置好安装路径
(For convenience I have both installed in the same folder)
5.确认安装路径


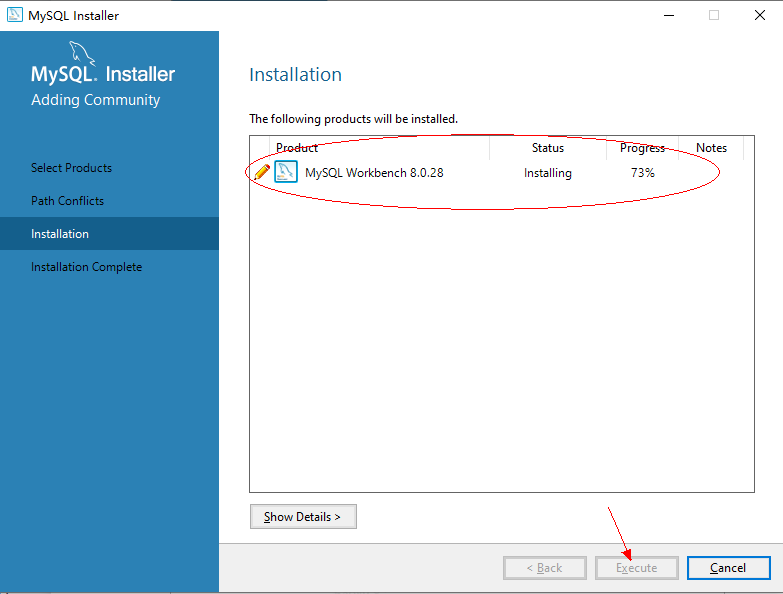
6.开始下载

7.下载完后,继续安装
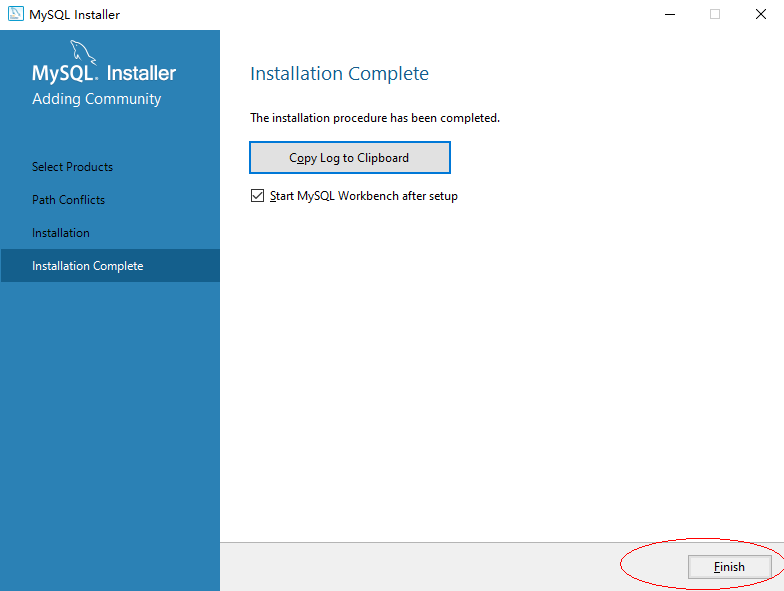
8.安装完后,Next,最终完成
Others can be installed later according to personal development needsMySql部分,与上面WorkbenchDownload and install the same,此处不多做演示
本章到此结束
先自我介绍一下,小编13年上师交大毕业,曾经在小公司待过,去过华为OPPO等大厂,18年进入阿里,直到现在.深知大多数初中级java工程师,想要升技能,往往是需要自己摸索成长或是报班学习,但对于培训机构动则近万元的学费,着实压力不小.自己不成体系的自学效率很低又漫长,而且容易碰到天花板技术停止不前.因此我收集了一份《java开发全套学习资料》送给大家,初衷也很简单,就是希望帮助到想自学又不知道该从何学起的朋友,同时减轻大家的负担.添加下方名片,即可获取全套学习资料哦
边栏推荐
- 继承、Super,重写、抽象类、抽象方法 1(第七天)
- [JVM Loading]---Class Loading Mechanism
- vulhub靶场学习日记xxe-lab
- Build DVWA with phpstudy
- If the account number or password is entered incorrectly for many times, the account will be banned.
- Fragmented NFT (Fractional NFT)
- NFT:数字所有权的核心
- 阿里云中mysql数据库被攻击了,最终数据找回来了
- Getting to know regular expressions
- gin框架学习-Gin框架和Gorm框架搭建一个简单的API微服务
猜你喜欢

What is GameFi?
![[windows]--- SQL Server 2008 super detailed installation tutorial](/img/b7/dc802c63b07edc4298b6e6b90d865c.png)
[windows]--- SQL Server 2008 super detailed installation tutorial
【windows】--- SQL Server 2008 超详细安装教程

uni-app进阶之创建组件/原生渲染【day9】
Error: Cannot find module ‘D:\Application\nodejs\node_modules\npm\bin\npm-cli.js‘

MySQL高级SQL语句(二)
对于输出点是时间戳的渗透测试方法(以Oracle数据库为例)
Why is the redis single-threaded also so fast?
Access数据库的查询
【C语言3个基本结构详解——顺序、选择、循环】
随机推荐
最新MySql安装教学,非常详细
【JVM加载】---类加载机制
leetcode-每日一题565. 数组嵌套(标记图和并查集)
Redis:简单实用
08 【生命周期 组件】
年终总结——岁月静好~
gin框架学习-GORM框架进阶之CRUD接口(数据库增删改查操作)
Redis管道技术/分区
Using IIS10 to build an asp website in win11
[JVM Loading]---Class Loading Mechanism
mac10.14中安装mysqldb
[uiautomation] Get WeChat friend list (stored in txt)
[Elastic-Job source code analysis] - job listener
Linux modify MySQL database password
闭包(二)
阿里云中mysql数据库被攻击了,最终数据找回来了
Install mysqldb in mac10.14
gin框架学习-Casbin入门指南(ACL、RBAC、域内RBAC模型)
NFT与数字藏品到底有何区别?
【swagger关闭】生产环境关闭swagger方法