当前位置:网站首页>Lamp architecture 5 - MySQL Cluster and master-slave structure
Lamp architecture 5 - MySQL Cluster and master-slave structure
2022-06-21 13:38:00 【Zhaohui_ Zhang】
Catalog
Setting of experimental environment
Two 、mysql Composition cluster of —— Configuration of the main server
3、 ... and 、mysql Composition cluster of —— Configuration from server
Four 、 Basic principle of master-slave database
2、 From the server server2 Data file information in
5、 ... and 、 Build linearity “ Lord - from 1- from 2”
1、 build “ One master and two slaves ” structure —— Create a new slave server node server3
2、 build “ Linear one master one slave ” structure —— From the server node server2 Configuration of
3、mysql Data backup and recovery -------> Synchronization process
6、 ... and 、 build “ One master, many followers ” structure
1、 introduce GTID The concept of
One 、 Master slave database
Setting of experimental environment
Open another virtual machine server2, And configure it mysql( Here you can use server1 Has been compiled in mysql)
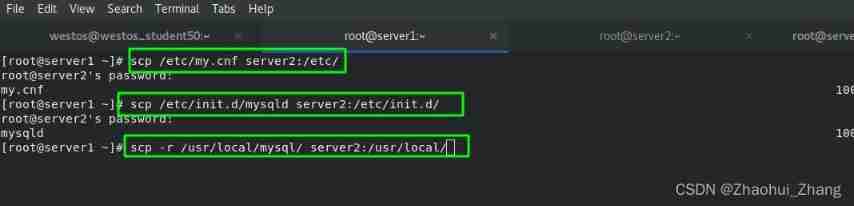
The first server1 in mysql Configuration file for 、 Execute command script 、 The compiled file is copied intact to server2 Under the same directory in .
stay server2 Create user , establish mysql The resource directory of , And specify everyone and all groups .

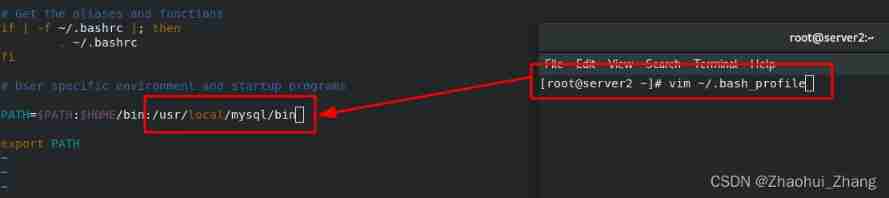
stay server2 Add mysql Environment variables of , and <source> Make it effective .
Yes server2 Medium mysqld Perform initialization operation
mysqld --initialize --user=mysqlAfter getting the initialization password , start-up mysql, And change the initialization password .

Two 、mysql Composition cluster of —— Configuration of the main server
1、 Official website information

2、 Set up mysql The server ID
stay </etc/my.cfg> Add two new lines to the file , The first line indicates the server name , The second line represents the server ID Number .

3、 restart mysql service
/etc/init.d/mysqld restartCheck the database status , It can be used normally. .

4、mysql All log files for
mysql All the log files are in </data/mysql> In the catalog <mysql-bin.000001> In file . It's an encrypted mysql Proprietary binaries , Special... Can be used <mysqlbinlog> Command view .

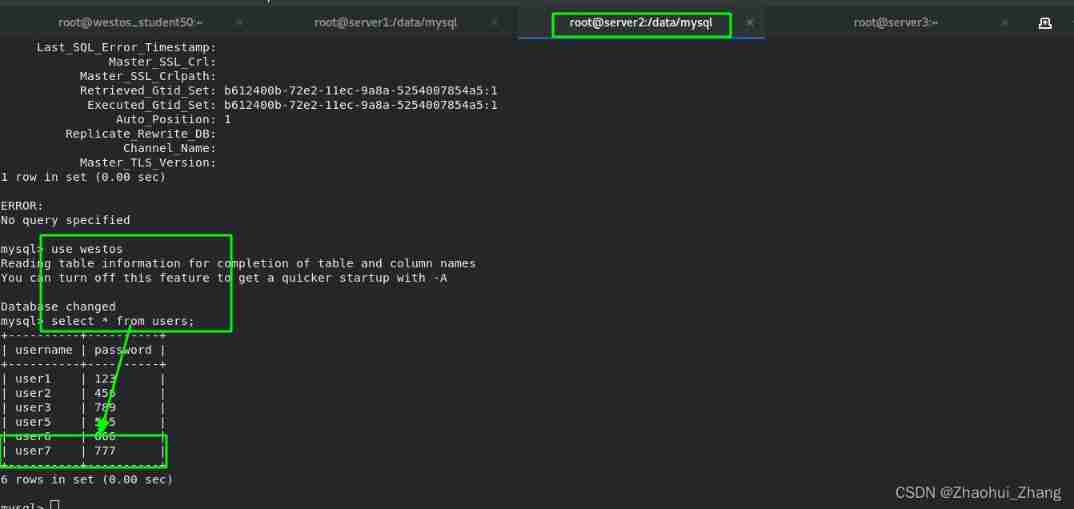
5、 Database internal operation —— to grant authorization
The first box indicates setting the password “westos”,“repl” Followed by the domain ,"%" Represents all domains .
The second box indicates authorization , “repl” Followed by the domain ,"%" Represents all domains , Therefore, it means that any host has access to .
The serial number of the third box indicates the log number of each change , The latest... Will be displayed .
CREATE USER 'repl'@'%' IDENTIFIED BY 'westos';
GRANT REPLICATION SLAVE ON *.* TO 'repl'@'%';
3、 ... and 、mysql Composition cluster of —— Configuration from server
1、 Changing configuration files , Set from server ID by 2( In fact, just with 1 If it's different )

2、 Restart the database

3、 Set the master( To follow ) host
CHANGE MASTER TO
MASTER_HOST='172.25.254.1',                 # Host to follow IP
MASTER_USER='repl',                         # The domain of the database in the host to follow
MASTER_PASSWORD='westos',                   # The password of the database to follow
MASTER_LOG_FILE='mysql-bin.000001',         # Log file of the database to follow
MASTER_LOG_POS=595;                         # Oppress the following database logs ID( From this ID Start )
start slave; # Start the following server 
4、 Check the database status
show slave status\G ;See these two lines “yes” It means from the server mysql Set up successfully . Listed parameters .

(4) test
stay server1 Create a new data table in the master server .
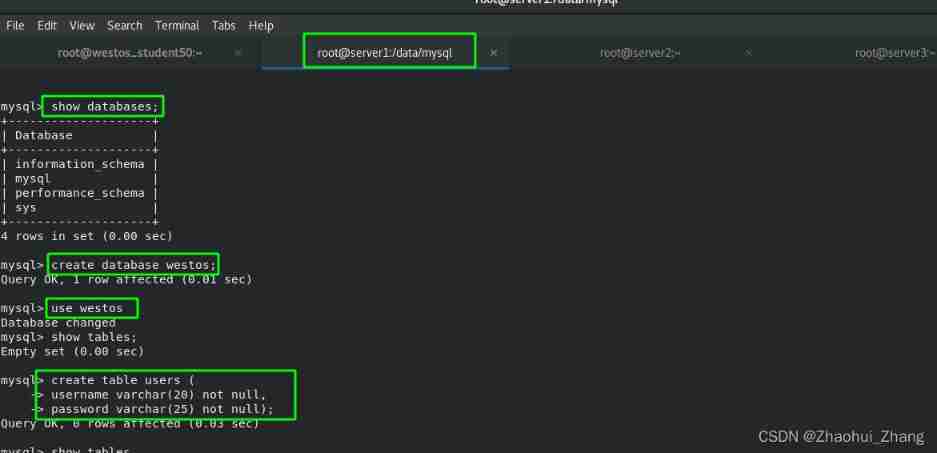
Change the contents of the data table :

stay server2 in , Nothing moved , stay server1 The newly changed data in the master server will be automatically synchronized to server2 From the server .

Be careful : This operation step is one-way , That is, on the primary server server1 Changes in are automatically synchronized to the slave server server2 in , Never be in server2 Change data in , Otherwise, the master and slave will not be synchronized . Therefore, it is generally from the server “ read-only ” Pattern .
Four 、 Basic principle of master-slave database
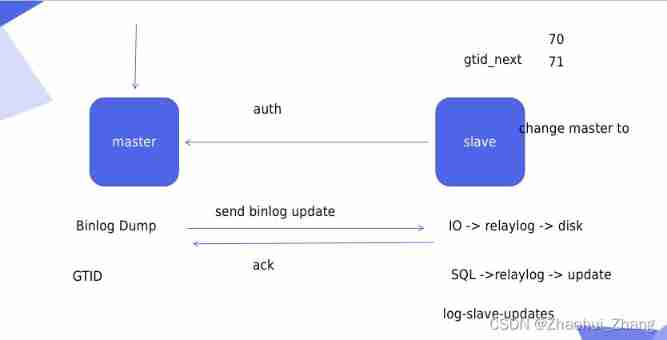
1、 Schematic diagram
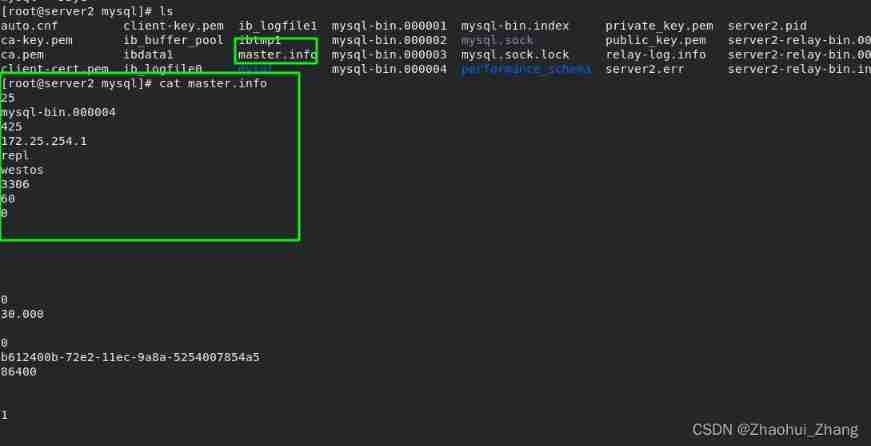
2、 From the server server2 Data file information in
From the server server2 in , Data directory </data/mysql/> in , among <server2-relay-bin.index> Represents the log file <server2-relay-bin.000002> The index of .

<master.info> There is master Connection information of the host .

3、 Master-slave structure
There are two general master-slave structures , It is divided into “ One master, many followers ” and “ Linear one master one slave ”

“ Linear one master one slave ” Are the benefits of ,A After the update, you only need to synchronize the data to B, Don't look like “ One master, many followers ” Structure to synchronize data to B and C, master server A The pressure will be less .
“ One master, many followers ” The structure is suitable for “ Read more and write less ” The circumstances of .
5、 ... and 、 Build linearity “ Lord - from 1- from 2”
1、 build “ One master and two slaves ” structure —— Create a new slave server node server3
The data can be obtained from the previous server1 and server2 Directly copy the past


stay server3 In the following configuration :


start-up mysql And change the password

2、 build “ Linear one master one slave ” structure —— From the server node server2 Configuration of
stay server2 Configuration file for </etc/my.cnf> Add the following two lines .
The first line is to start the binary log , To facilitate nodes server3 from server2 Synchronization information in ;
The second line is to start node log playback , That is to say server2 from server1 The data fetched in is played back to the binary log of the local machine .

When the changes are complete , restart server2 Of mysql service , You can see that

see server2 Log in <mysqlbinlog mysql-bin.000001 -v>, You can see in the server1 The changes just made in have been synchronized to server2 It's in .

The system only recognizes each synchronization <mysql-bin.000001> Log files , and <server2-relay-bin.index> What is recorded in the document is from server1 Synchronized record index in , The logs of all these records should be synchronized to <mysql-bin.000001> in .


3、mysql Data backup and recovery -------> Synchronization process
server1 The data backup :
mysqldump -pwestos westos > dump.sqlIn the actual production environment , Be sure to lock the watch . Because there is too much data , Backup takes time , If the table is not locked, new data will be written during the backup process, which will cause confusion in the backup data .

server3 Data recovery :
Be careful : Be careful of this pit . This sentence in the backup file means : If... Exists in the current database “users” Words of watch , You have to delete it first .
intend , To keep the two databases consistent , Delete the original library first .
however , If the actual requirement is to merge two databases , The backed up data will directly overwrite the previous data . Cause loss to actual production .

Recovery process :
Enter the first server3 In the database of , What also have no , either <westos> surface , So I created a <westos> surface .

Restore order :
mysql -pwestos westos < dump.sql
server3 Synchronization settings for :
First in server2 Add authorization to , You can see that the log sequence number is 1007,server3 To follow , Just set the serial number
CREATE USER 'repl'@'%' IDENTIFIED BY 'westos';
GRANT REPLICATION SLAVE ON *.* TO 'repl'@'%';
flush privileges; # Refresh database 
And then in server3 Set in slave Following master server information , What we have to do here is “ Linear one master one slave ” structure , therefore server3 To follow is server2. After setting up , Still need to start slave!!! Then check it out server3 Medium slave Information , Display succeeded .
CHANGE MASTER TO
MASTER_HOST='172.25.254.2',                 # Host to follow IP
MASTER_USER='repl',                         # The domain of the database in the host to follow
MASTER_PASSWORD='westos',                   # The password of the database to follow
MASTER_LOG_FILE='mysql-bin.000001',         # Log file of the database to follow
MASTER_LOG_POS=1007;                         # Oppress the following database logs ID( From this ID Start )
4、 test
stay server1 Change database in , stay server3 View in . You can see , The changes are synchronized to as soon as they are complete server3 in .

6、 ... and 、 build “ One master, many followers ” structure
1、 introduce GTID The concept of
Supplementary information : One master and one slave , The master server will automatically find the slave server , therefore GTID No special configuration is required . One master and many slaves , When the primary server fails, it will look for the most “ near ” From the server , therefore GTID Manual configuration required .
GTID(Global Transaction Identifiers)—— Global transport identification

mysql The log of the server will be automatically added GTID Who should I look for next .

2、 build “ One master, many followers ” structure —— From the server node server2/3 Configuration of (GTID The way )
see master The state of :

see slave state :

Manual configuration GTID:
Manual configuration GTID when , need All master-slave nodes (server1/2/3) Add the following two lines to ; Indicates that the declaration is to use GTID Pattern , And force enable .

stay From the node server2 and server3 Set in mysql

change master to
master_host='172.25.254.1',
master_user='repl',
master_password='westos',
master_auto_position=1;                # Automatically update data
server2:

server3:

test :
At the main node server1 Add data to

At the slave node server2 View status and data in , It's synced (server3 Same thing ).

slave Follow from node master The master node information will be automatically saved in <master.info> in
边栏推荐
- Is the live interactive function of the applet running in the app?
- MySQL - index
- Is it safe to open a securities account by downloading the app of qiniu business school? Is there a risk?
- Kotlin - sequence sequence
- Detailed explanation and examples of common parameters of curl
- 用时间戳优化 TCP 实践
- 处理接口幂等性的两种常见方案
- Atguigu---- conditional rendering
- TOOD: Task-aligned One-stage Object Detection
- 3D slicer import label and view label
猜你喜欢

Memcached (high performance memory object cache)

Kube Prometheus grafana installation plug-in and grafana image renderer

Distributed transactions, simple in principle, are all pits in writing

Chapter IX Cisco ASA application nat
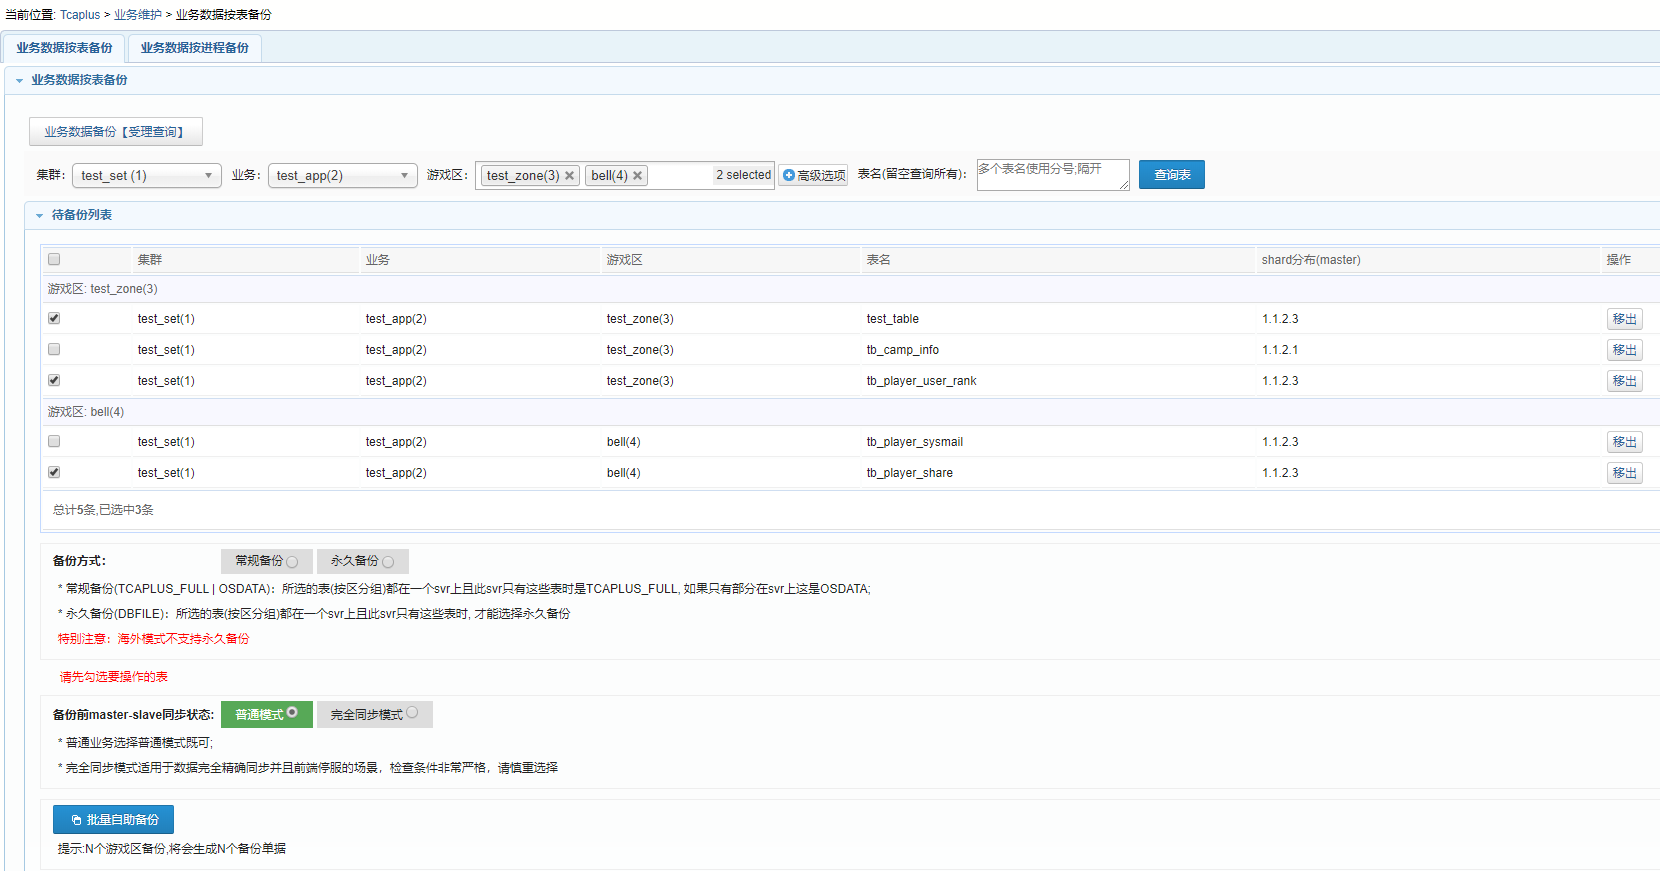
【深入理解TcaplusDB技术】TcaplusDB业务数据备份
![[in depth understanding of tcapulusdb technology] tcapulusdb construction data](/img/83/200cd9705138583eee6b3db55135ff.png)
[in depth understanding of tcapulusdb technology] tcapulusdb construction data

Is the live interactive function of the applet running in the app?

SCCM creates a client collection based on the installed app and periodically pushes application updates

Must the database primary key be self incremented? What scenarios do not suggest self augmentation?
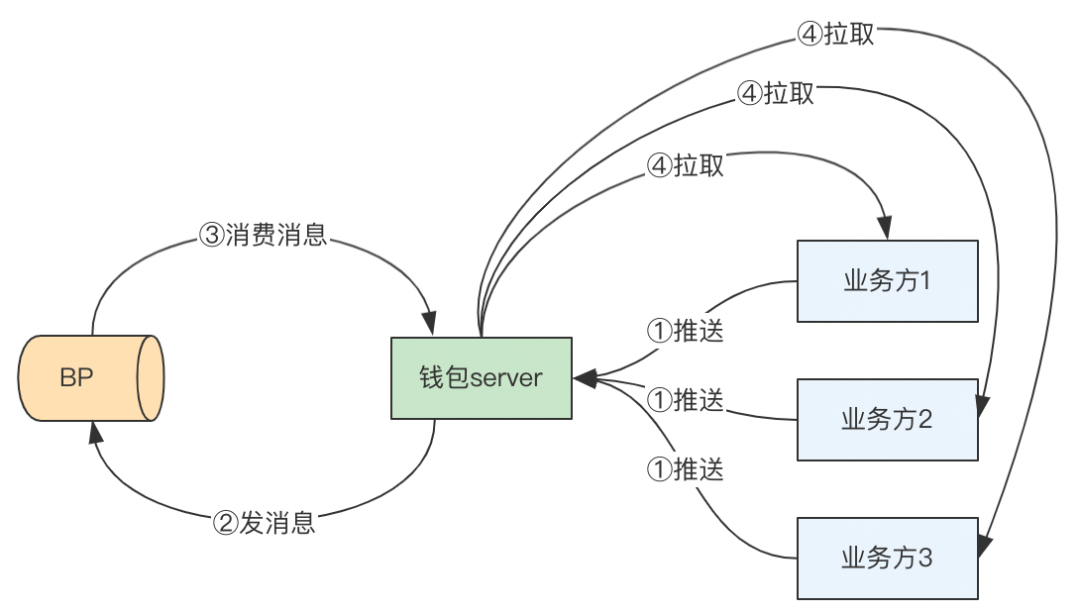
Analysis on the wallet system architecture of Baidu trading platform
随机推荐
Nouveau partage de l'expérience de travail à domicile
Atguigu---- conditional rendering
MySQL - view properties
Chapter IX Cisco ASA application nat
【深入理解TcaplusDB技术】Tmonitor系统升级
如何使用搜索引擎?
Explanation of common mesh generation methods in workbench
Turn to the countdown for coupon issuance! First look at the rules of interstellar pocket donation
IMU selection, calibration error analysis, AHRS integrated navigation
MySQL - built in functions
Farewell to the endless summer
Navigation bar switching, message board, text box losing focus
居家辦公初體驗之新得分享| 社區征文
The xdd-plus login prompt on the Qinglong panel is "the current login environment is abnormal. To ensure the security of your account, you cannot log in temporarily. It is recommended to connect the t
[in depth understanding of tcapulusdb technology] tcapulusdb construction data
Machine learning explores the metastable phase diagram of covalent carbon, which can be used to discover or design metastable materials in the future
Babbitt yuancosmos daily must read: wechat may ban a official account for the first time on the grounds of "involving secondary transactions in digital collections", and the new regulations of the pla
Use map set or list set to store list set
Eureka's timedsupersortask class (periodic task with automatic interval adjustment)
Nanjing University static program analyses -- Introduction learning notes