当前位置:网站首页>Centos7 deployment sentry redis (with architecture diagram, clear and easy to understand)
Centos7 deployment sentry redis (with architecture diagram, clear and easy to understand)
2022-07-03 14:51:00 【Natural player】
1 origin
From the last article How to use it correctly Vertx operation Redis(3.9.4 With source code analysis ) Speaking of ,
This article shares Vert.x Connect and operate Redis, It introduces monomer Redis And clusters rRedis The connection and operation of ,
Because of monomer Redis And clusters Redis The previous experiments have been completed (Ubuntu20.04), It can be used directly , however , Sentinel's Redis No building , therefore , Only connection and operation codes can be given , No test is given ,
therefore , Over the weekend ( It's raining , The typhoon “ Siemba ”[xiān bā] Attack ) In the way of setting up sentinels on experimental machines Redis colony ,
Test sentinel mode Vert.x Connect and operate Redis, Improve the previous article ,
Because the experimental machine is CentOS7 The system of ,
Deploy Sentinel Redis It took some time , There is still reference value ,
Share as follows .
2 Get ready
The overall structure is shown in the figure below , It can be seen from the picture that , sentry 3 individual , Form a sentinel cluster ; node 3 individual , One master node and two slave nodes . The sentinel monitors the running status of the node cluster , And instantly switch Services , Guarantee Redis Normal operation .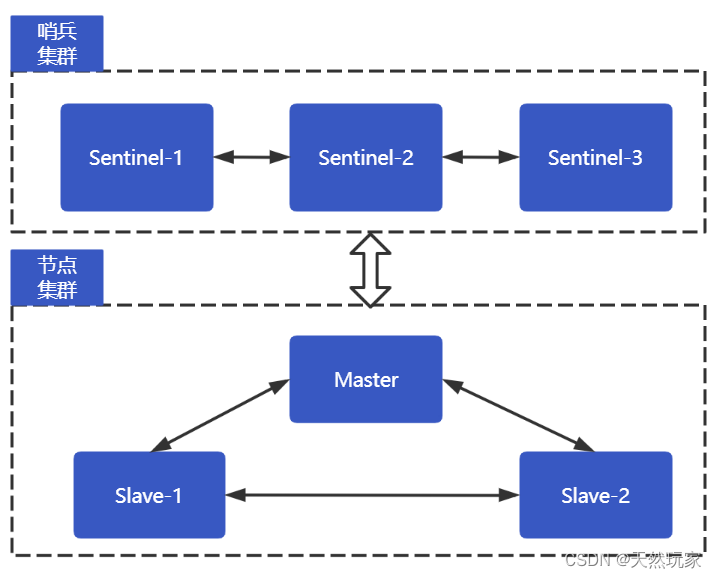
2.1 Compile environment
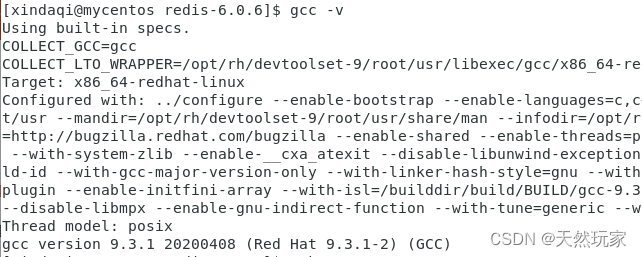
CentOS7 default gcc Version is 4.8.5, see gcc command :gcc -v, The results are shown in the following figure :
The version gcc Can't compile Redis6.0.6, So it needs to be upgraded gcc, Use the following command :
#  Software set (Software collections)
yum -y install centos-release-scl
# gcc And tool set
sudo yum -y install devtoolset-9-gcc devtoolset-9-gcc-c++ devtoolset-9-binutils
#  Enable gcc
scl enable devtoolset-9 bash
After installation gcc edition , As shown in the figure below :
2.2 Redis Get ready
This article USES the Redis6.0.6, The version Redis Sentinel and cluster deployment can be realized .
Download address :http://download.redis.io/releases/redis-6.0.6.tar.gz
2.3 compile Redis
decompression Redis To directory , Such as :/home/xindaqi/install/redis
tar -zxvf redis-6.0.6.tar.gz -C /home/xindaqi/install/redis
Get into redis-6.0.6 Folder , compile Redis, command :make,
As shown in the figure below :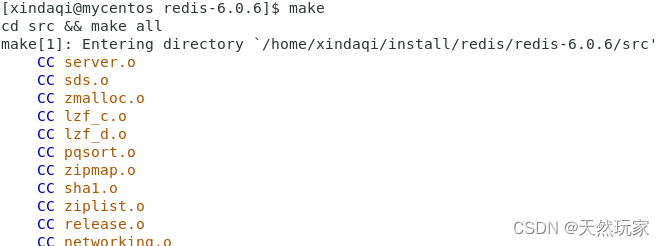
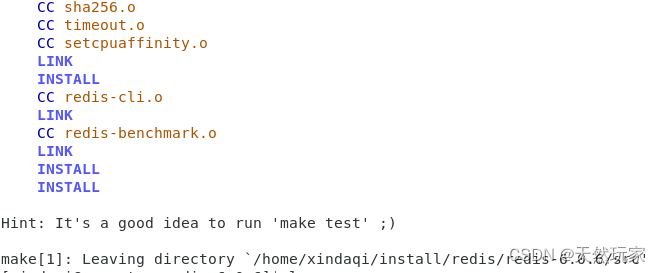
thus , complete Redis compile ,
The environment is ready .
3 To configure
In sentinel mode , Configure three Redis node ( Virtual node ), therefore , It consists of one master node and two slave nodes ,
Compile the above Redis Copy three copies , Store to path :/home/xindaqi/install/redis/sentinel,
Name it 9001,9002,9003, Long like this :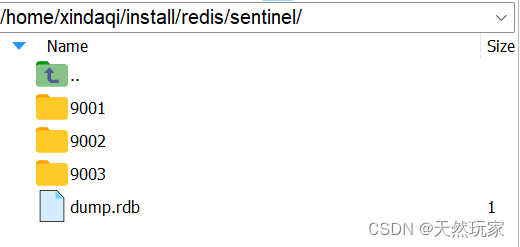
among ,9001 Master node ,9002 and 9003 As a slave node .
Node information is as follows :
| Serial number | node IP | port | describe |
|---|---|---|---|
| 1 | 192.168.1.12 | 9001 | Master node |
| 2 | 192.168.1.12 | 9002 | From the node |
| 3 | 192.168.1.12 | 9003 | From the node |
The sentry information is as follows :
| Serial number | node IP | port | describe |
|---|---|---|---|
| 1 | 192.168.1.12 | 26379 | sentry 1 |
| 2 | 192.168.1.12 | 26380 | sentry 2 |
| 3 | 192.168.1.12 | 26381 | sentry 3 |
3.1 Node configuration
3.1.1 Master node
Modify in the master node Redis To configure :redis.conf,
The changes are as follows :
#  notes IP binding ,Redis Service for all IP to open up
# bind 127.0.0.1 ::1
#  Turn off protection mode , all IP Accessible Redis Server side
protected-mode no
# Redis Service port
port 9001
#  The daemons run Redis Server side
daemonize yes
# pid file :9001
pidfile /var/run/redis_9006.pid
#  Log files :9001
logfile /home/xindaqi/project/logs/redis-9001.log
3.1.2 From the node
The slave node configuration information is as follows :redis.conf,
Different from the master node , The slave node needs to configure the master node partition information (replicaof), For synchronizing data and delivering messages .
- From the node 1
Port usage 9002.
#  notes IP binding ,Redis Service for all IP to open up
# bind 127.0.0.1 ::1
#  Turn off protection mode , all IP Accessible Redis Server side
protected-mode no
# Redis Service port
port 9002
#  The daemons run Redis Server side
daemonize yes
# pid file :9001
pidfile /var/run/redis_9006.pid
#  Log files :9001
logfile /home/xindaqi/project/logs/redis-9002.log
#  Master node replica : Synchronize the data of the master node to the slave node
replicaof 192.168.1.12 9001
- From the node 2
Port usage 9003.
#  notes IP binding ,Redis Service for all IP to open up
# bind 127.0.0.1 ::1
#  Turn off protection mode , all IP Accessible Redis Server side
protected-mode no
# Redis Service port
port 9003
#  The daemons run Redis Server side
daemonize yes
# pid file :9001
pidfile /var/run/redis_9006.pid
#  Log files :9001
logfile /home/xindaqi/project/logs/redis-9003.log
#  Master node replica : Synchronize the data of the master node to the slave node
replicaof 192.168.1.12 9001
3.1.3 Start the master-slave service
After configuration , Next, you can start the master-slave service , Check out the information .
Use Shell The script starts the service , The contents are as follows :
echo "Starting Redis master and slave"
cd /home/xindaqi/install/redis/sentinel
9001/src/redis-server 9001/redis.conf
9002/src/redis-server 9002/redis.conf
9003/src/redis-server 9003/redis.conf
echo "Redis master and slave is started!!!"
3.1.4 Node information
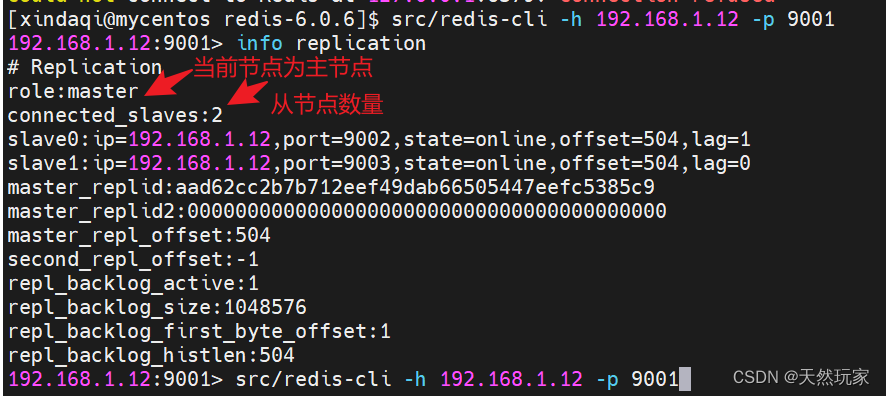
- Get into Redis Master node :
src/redis-cli -h 192.168.1.12 -p 9001
- View node information
Node information includes the number of slave nodes 、 From the node IP and Port etc. .
info replication
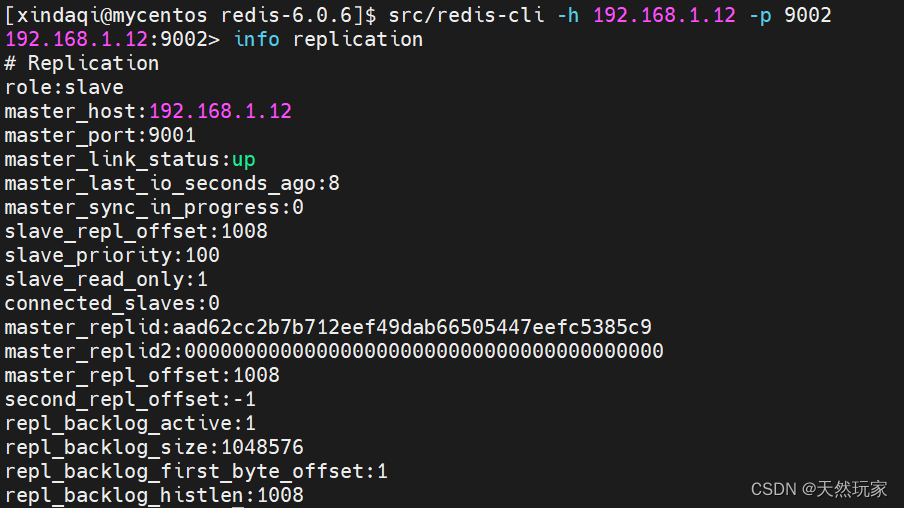
- Enter from node
src/redis-cli -h 192.168.1.12 -p 9002
- View slave node information
View the master node information from the node , Such as IP and Port And the working state of the main node :UP perhaps DOWN.
info replication
3.2 Sentinel configuration
After completing node configuration , Next, you need to configure sentinels ,
this paper , Sentinels also use clusters ( fictitious ) The way ,
Configure three sentinel nodes , It can be seen from the above ,Redis6.0.6 Support sentry and cluster configuration , therefore ,
You can directly modify the sentry's configuration file :sentinel.conf.
3.2.1 sentinel
Sentinel configuration , The core is to configure the port of the sentry and the master node for monitoring ,
adopt sentinel monitor mymaster 192.168.1.12 9001 2 Monitor master , And name the main node ,
Yes , The name of the master node is actually configured in the sentinel ,
because , The client connection is through the sentinel .
- sentry -1
#  The port where the sentry runs
port 26379
#  The daemons run
daemonize yes
#  Process documents
pidfile "/var/run/redis-sentinel-26379.pid"
#  Log location
logfile "/home/xindaqi/project/logs/sentinel-26379.log"
#  Main node information monitored by sentry
# mymaster: Master node name
# 192.168.1.12: Master node IP
# 9001: Master node Port
# 2: Identify the number of sentinels at the primary node , If the number of sentinels reaches this number, it is determined that the primary node is lost , Then it is determined that the primary node is objectively disconnected
sentinel monitor mymaster 192.168.1.12 9001 2
- sentry -2
#  The port where the sentry runs
port 26380
#  The daemons run
daemonize yes
#  Process documents
pidfile "/var/run/redis-sentinel-26380.pid"
#  Log location
logfile "/home/xindaqi/project/logs/sentinel-26380.log"
#  Main node information monitored by sentry
# mymaster: Master node name
# 192.168.1.12: Master node IP
# 9001: Master node Port
# 2: Identify the number of sentinels at the primary node , If the number of sentinels reaches this number, it is determined that the primary node is lost , Then it is determined that the primary node is objectively disconnected
sentinel monitor mymaster 192.168.1.12 9001 2
- sentry -3
#  The port where the sentry runs
port 26381
#  The daemons run
daemonize yes
#  Process documents
pidfile "/var/run/redis-sentinel-26381.pid"
#  Log location
logfile "/home/xindaqi/project/logs/sentinel-26381.log"
#  Main node information monitored by sentry
# mymaster: Master node name
# 192.168.1.12: Master node IP
# 9001: Master node Port
# 2: Identify the number of sentinels at the primary node , If the number of sentinels reaches this number, it is determined that the primary node is lost , Then it is determined that the primary node is objectively disconnected
sentinel monitor mymaster 192.168.1.12 9001 2
3.2.2 Activate the sentry
After completing the sentry configuration , Next, start the sentry , Also use Shell perform ,
Shell The script is as follows :
echo "Starting Redis sentinel"
cd /home/xindaqi/install/redis/sentinel
9001/src/redis-sentinel 9001/sentinel.conf
9002/src/redis-sentinel 9002/sentinel.conf
9003/src/redis-sentinel 9003/sentinel.conf
echo "Redis sentinel is started!!!"
3.2.3 Check the sentry information
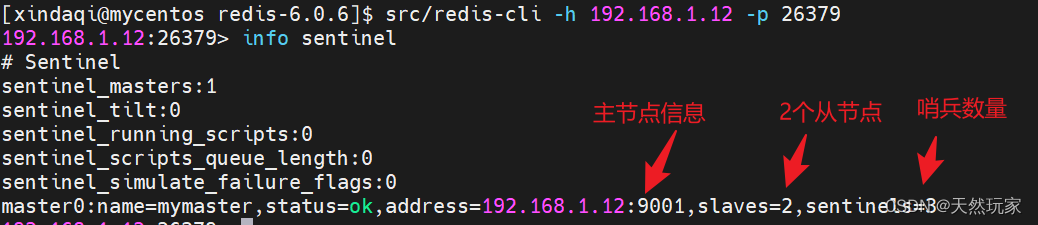
- Enter the sentry
src/redis-cli -h 192.168.1.12 -p 26379
- Check the information
View the master node information in the current cluster through the sentry 、 Number of slave nodes and sentinels , As shown in the figure below .
info sentinel
3.3 port configuration
because CentOS7 The default firewall is on , By default, all ports are closed ,
therefore , Deployed services need to expose ports , You need to open ports one by one ,
The ports that need to be opened here are :26379、26380、26381、9001、9002 and 9003.
With 26379 Port as an example :
#  Open port
sudo firewall-cmd --zone=public --add-port=26379/tcp --permanent
#  Port validation
sudo firewall-cmd --reload
4 Summary
The core :
(1) Environmental preparation :gcc upgrade ,Redis compile ;
(2) Configuration node : Master and slave nodes ;
(3) Deploy sentinels : Listen to the master node , Configure master node name ;
(4) Open ports :CentOS7 Default off Port , therefore , You need to open all ports of sentinels and nodes .
Q&A
error: ‘struct redisServer’ has no member named ‘aof_rewrite_perc’
CentOS7 Default
gcc -v
Improve gcc edition , Install the following plug-ins :
#  Software set (Software collections)
yum -y install centos-release-scl
# gcc And tool set
sudo yum -y install devtoolset-9-gcc devtoolset-9-gcc-c++ devtoolset-9-binutils
#  Enable gcc
scl enable devtoolset-9 bash
边栏推荐
- Awvs batch operation script
- mmdetection 学习率与batch_size关系
- How to color ordinary landscape photos, PS tutorial
- Several sentences extracted from the book "leather bag"
- tonybot 人形机器人 查看端口并对应端口 0701
- Zzuli:1055 rabbit reproduction
- 7-10 stack of hats (25 points) (C language solution)
- QT program font becomes larger on computers with different resolutions, overflowing controls
- 【微信小程序】WXSS 模板样式
- Address book sorting
猜你喜欢
Bucket sorting in C language

Tonybot humanoid robot checks the port and corresponds to port 0701

Talking about part of data storage in C language

4-20-4-23 concurrent server, TCP state transition;
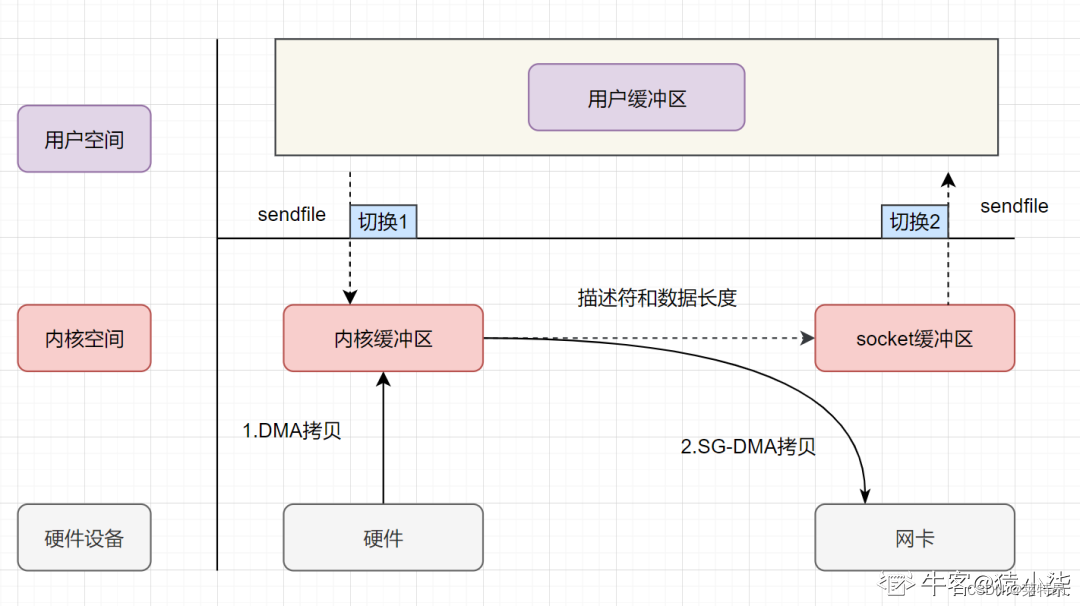
零拷贝底层剖析
![[engine development] rendering architecture and advanced graphics programming](/img/a4/3526a4e0f68e49c1aa5ce23b578781.jpg)
[engine development] rendering architecture and advanced graphics programming
Code writing and playing method of tonybot humanoid robot at fixed distance

tonybot 人形機器人 紅外遙控玩法 0630

adc128s022 ADC verilog设计实现

Niuke: crossing the river
随机推荐
Zzuli:1044 failure rate
远程服务器后台挂起 nohup
ASTC texture compression (adaptive scalable texture compression)
Luogu p5194 [usaco05dec]scales s solution
C language to implement a password manager (under update)
China PETG market forecast and Strategic Research Report (2022 Edition)
4-24--4-28
FPGA blocking assignment and non blocking assignment
Zzuli:1046 product of odd numbers
Find books ()
[graphics] adaptive shadow map
Get permissions dynamically
Vs+qt multithreading implementation -- run and movetothread
NOI OPENJUDGE 1.6(09)
Happy capital new dual currency fund nearly 4billion yuan completed its first account closing
Zzuli:1052 sum of sequence 4
Solve the problem that PR cannot be installed on win10 system. Pr2021 version -premiere Pro 2021 official Chinese version installation tutorial
Awvs batch operation script
Creation of data table of Doris' learning notes
tonybot 人形机器人 查看端口并对应端口 0701