当前位置:网站首页>Store and guarantee rancher data based on Minio objects
Store and guarantee rancher data based on Minio objects
2022-07-28 20:07:00 【RancherLabs】
Author's brief introduction
Xie Zeqin ,SUSE Rancher Technical support engineer , Be responsible for customer maintenance and after-sales technical support services , Provide relevant technical solutions . Have CKA、CKS The official certification , Years of experience in Cloud Computing , Experienced from OpenStack To Kubernetes Technological change of , For the underlying operating system 、KVM Virtualization and Docker Container and other related cloud native technologies have rich practical experience .
Preface
Rancher It's an enterprise Kubernetes Container management platform , It simplifies use Kubernetes The process of , Provides a complete software stack , For teams using containers .Rancher Solves the problem of managing multiple servers across any infrastructure Kubernetes The operational and security challenges of clusters , Also for DevOps The team provides integration tools to run containerized workloads .
The picture below is Rancher Official architecture :

Architecture
It can be seen from the picture that Rancher The data is stored in etcd in .
etcd It's also Kubernetes Key components of ,Kubernetes Cluster adoption etcd The whole state of the cluster is stored : Including clusters 、 node 、 Running workloads 、 And all Kubernetes Metadata and status information of resource objects .
stay Rancher and Kubernetes On the cluster , A lot of data is read and written all the time , How to protect etcd The data in has become a problem we need to solve .
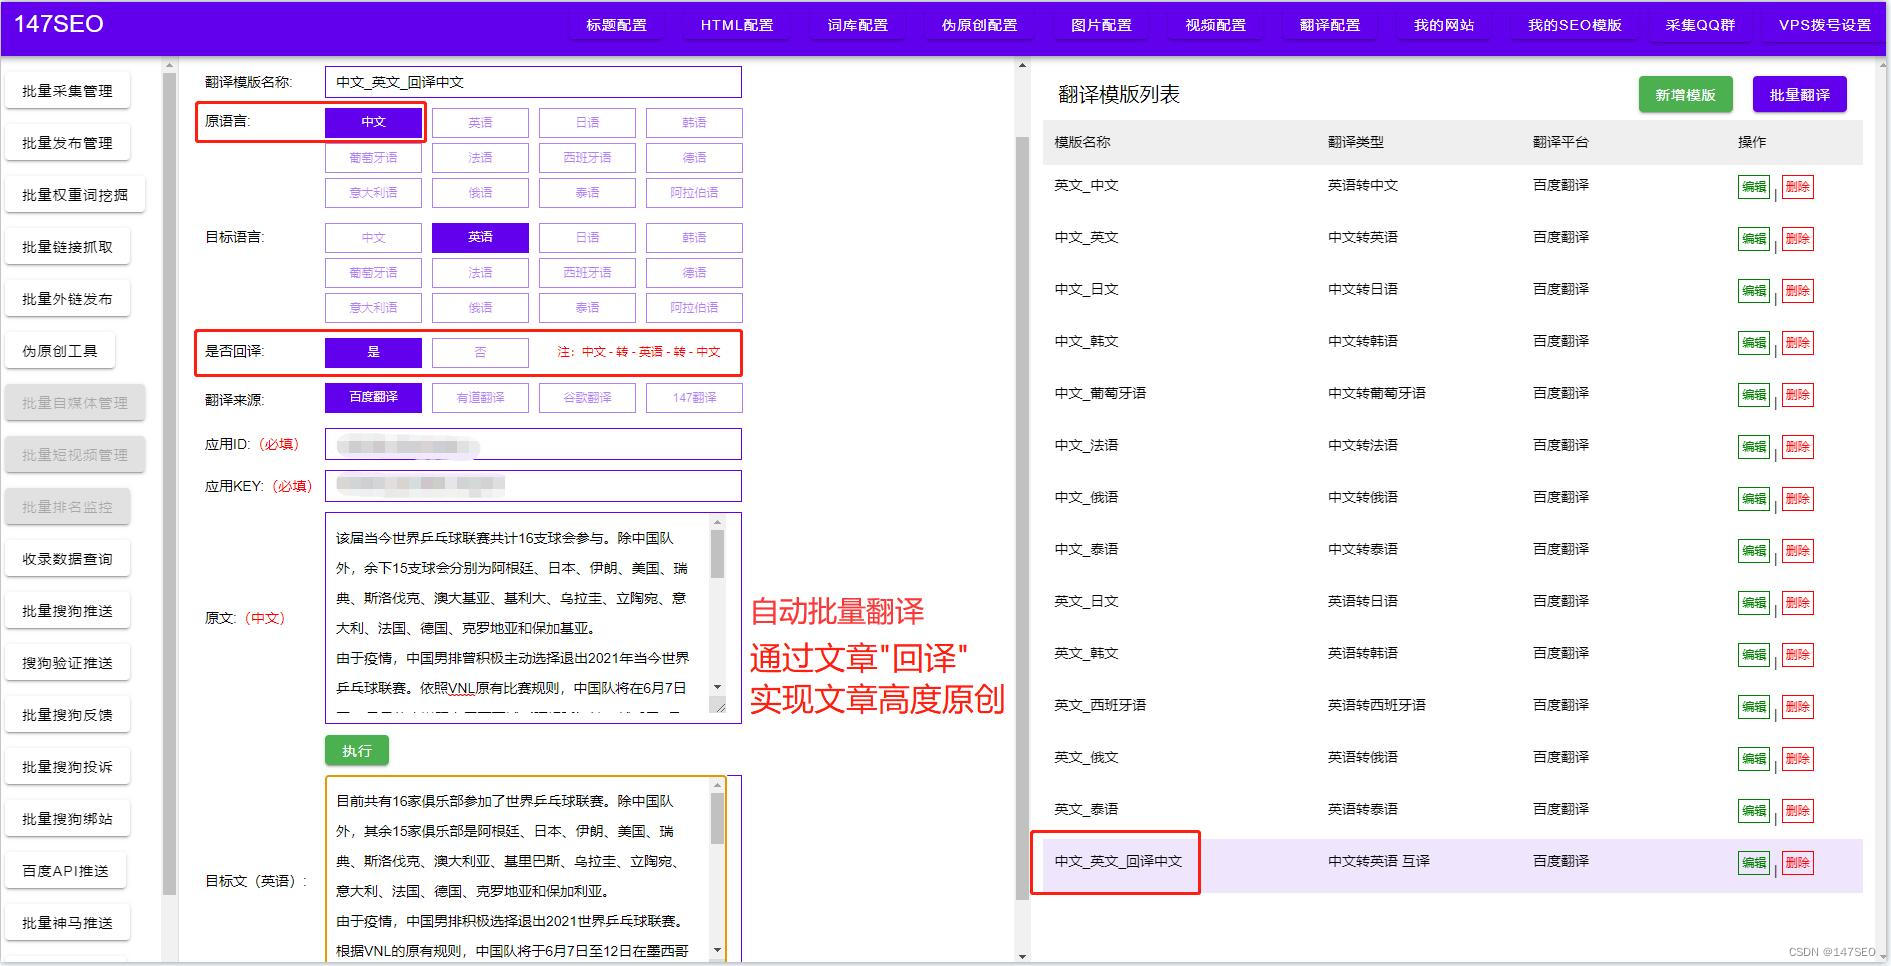
This article will show you how to pass MinIO The ability to store objects , To protect Rancher and The downstream Kubernetes The data of .
precondition
- Rancher:2.6.6
- k8s:v1.23.7
MinIO Rapid deployment
MinIO Introduce
MinIO It is an open source high-performance object storage system , be based on Golang Realization , Provide with Amazon S3 Compatible API Interface .
MinIO advantage
- Cloud native : Conform to the architecture and construction process of all cloud native clouds , It also includes the latest cloud computing technologies and concepts . It includes support for Kubernetes 、 Micro server and multi tenant container technology , Let the object store for Kubernetes More friendly .
- High performance : On standard hardware , read / The writing speed is as high as 183 GB / second and 171 GB / second , Have higher throughput and lower latency .
- Scalable : Expansion starts with a single cluster , The cluster can work with other MinIO Cluster Federation to create a global namespace , And can span multiple different data centers when needed .
- Easy to operate : Simple deployment , Simplifies the process of using object storage , Support multiple platforms to run .
MinIO Deploy
- One click generation ssl Self signed certificate script , Save the following script to
create-cert.shIn file .
#!/bin/bash -ehelp (){ echo ' ================================================================ ' echo ' --ssl-domain: Generate ssl The primary domain name required for the certificate , If not specified, it defaults to www.rancher.local, If it is ip Access the service , You can ignore ;' echo ' --ssl-trusted-ip: commonly ssl The certificate only trusts domain access requests , Sometimes you need to use ip To visit server, Then I need to give ssl Certificate add extension IP, Multiple IP Separated by commas ;' echo ' --ssl-trusted-domain: If you want to access multiple domains , Then add the extended domain name (SSL_TRUSTED_DOMAIN), Multiple extended domain names are separated by commas ;' echo ' --ssl-size: ssl Number of encrypted bits , Default 2048;' echo ' --ssl-cn: Country code (2 It's a letter code ), Default CN;' echo ' Examples of use :' echo ' ./create_self-signed-cert.sh --ssl-domain=www.test.com --ssl-trusted-domain=www.test2.com \ ' echo ' --ssl-trusted-ip=1.1.1.1,2.2.2.2,3.3.3.3 --ssl-size=2048 --ssl-date=3650' echo ' ================================================================'}case "$1" in -h|--help) help; exit;;esacif [[ $1 == '' ]];then help; exit;fiCMDOPTS="$*"for OPTS in $CMDOPTS;do key=$(echo ${OPTS} | awk -F"=" '{print $1}' ) value=$(echo ${OPTS} | awk -F"=" '{print $2}' ) case "$key" in --ssl-domain) SSL_DOMAIN=$value ;; --ssl-trusted-ip) SSL_TRUSTED_IP=$value ;; --ssl-trusted-domain) SSL_TRUSTED_DOMAIN=$value ;; --ssl-size) SSL_SIZE=$value ;; --ssl-date) SSL_DATE=$value ;; --ca-date) CA_DATE=$value ;; --ssl-cn) CN=$value ;; esacdone# CA Related configuration CA_DATE=${CA_DATE:-3650}CA_KEY=${CA_KEY:-cakey.pem}CA_CERT=${CA_CERT:-cacerts.pem}CA_DOMAIN=cattle-ca# ssl Related configuration SSL_CONFIG=${SSL_CONFIG:-$PWD/openssl.cnf}SSL_DOMAIN=${SSL_DOMAIN:-'www.rancher.local'}SSL_DATE=${SSL_DATE:-3650}SSL_SIZE=${SSL_SIZE:-2048}## Country code (2 It's a letter code ), Default CN;CN=${CN:-CN}SSL_KEY=$SSL_DOMAIN.keySSL_CSR=$SSL_DOMAIN.csrSSL_CERT=$SSL_DOMAIN.crtecho -e "\033[32m ---------------------------- \033[0m"echo -e "\033[32m | Generate SSL Cert | \033[0m"echo -e "\033[32m ---------------------------- \033[0m"if [[ -e ./${CA_KEY} ]]; then echo -e "\033[32m ====> 1. It is found that CA Private key , Backup "${CA_KEY}" by "${CA_KEY}"-bak, Then recreate \033[0m" mv ${CA_KEY} "${CA_KEY}"-bak openssl genrsa -out ${CA_KEY} ${SSL_SIZE}else echo -e "\033[32m ====> 1. Generate a new CA Private key ${CA_KEY} \033[0m" openssl genrsa -out ${CA_KEY} ${SSL_SIZE}fiif [[ -e ./${CA_CERT} ]]; then echo -e "\033[32m ====> 2. It is found that CA certificate , Backup first "${CA_CERT}" by "${CA_CERT}"-bak, Then recreate \033[0m" mv ${CA_CERT} "${CA_CERT}"-bak openssl req -x509 -sha256 -new -nodes -key ${CA_KEY} -days ${CA_DATE} -out ${CA_CERT} -subj "/C=${CN}/CN=${CA_DOMAIN}"else echo -e "\033[32m ====> 2. Generate a new CA certificate ${CA_CERT} \033[0m" openssl req -x509 -sha256 -new -nodes -key ${CA_KEY} -days ${CA_DATE} -out ${CA_CERT} -subj "/C=${CN}/CN=${CA_DOMAIN}"fiecho -e "\033[32m ====> 3. Generate Openssl The configuration file ${SSL_CONFIG} \033[0m"cat > ${SSL_CONFIG} <<EOM[req]req_extensions = v3_reqdistinguished_name = req_distinguished_name[req_distinguished_name][ v3_req ]basicConstraints = CA:FALSEkeyUsage = nonRepudiation, digitalSignature, keyEnciphermentextendedKeyUsage = clientAuth, serverAuthEOMif [[ -n ${SSL_TRUSTED_IP} || -n ${SSL_TRUSTED_DOMAIN} || -n ${SSL_DOMAIN} ]]; then cat >> ${SSL_CONFIG} <<EOMsubjectAltName = @alt_names[alt_names]EOM IFS="," dns=(${SSL_TRUSTED_DOMAIN}) dns+=(${SSL_DOMAIN}) for i in "${!dns[@]}"; do echo DNS.$((i+1)) = ${dns[$i]} >> ${SSL_CONFIG} done if [[ -n ${SSL_TRUSTED_IP} ]]; then ip=(${SSL_TRUSTED_IP}) for i in "${!ip[@]}"; do echo IP.$((i+1)) = ${ip[$i]} >> ${SSL_CONFIG} done fifiecho -e "\033[32m ====> 4. Build service SSL KEY ${SSL_KEY} \033[0m"openssl genrsa -out ${SSL_KEY} ${SSL_SIZE}echo -e "\033[32m ====> 5. Build service SSL CSR ${SSL_CSR} \033[0m"openssl req -sha256 -new -key ${SSL_KEY} -out ${SSL_CSR} -subj "/C=${CN}/CN=${SSL_DOMAIN}" -config ${SSL_CONFIG}echo -e "\033[32m ====> 6. Build service SSL CERT ${SSL_CERT} \033[0m"openssl x509 -sha256 -req -in ${SSL_CSR} -CA ${CA_CERT} \ -CAkey ${CA_KEY} -CAcreateserial -out ${SSL_CERT} \ -days ${SSL_DATE} -extensions v3_req \ -extfile ${SSL_CONFIG}echo -e "\033[32m ====> 7. Certificate production completed \033[0m"echoecho -e "\033[32m ====> 8. With YAML Format output result \033[0m"echo "----------------------------------------------------------"echo "ca_key: |"cat $CA_KEY | sed 's/^/ /'echoecho "ca_cert: |"cat $CA_CERT | sed 's/^/ /'echoecho "ssl_key: |"cat $SSL_KEY | sed 's/^/ /'echoecho "ssl_csr: |"cat $SSL_CSR | sed 's/^/ /'echoecho "ssl_cert: |"cat $SSL_CERT | sed 's/^/ /'echoecho -e "\033[32m ====> 9. additional CA Certificate to Cert file \033[0m"cat ${CA_CERT} >> ${SSL_CERT}echo "ssl_cert: |"cat $SSL_CERT | sed 's/^/ /'echoecho -e "\033[32m ====> 10. Rename Service Certificate \033[0m"echo "cp ${SSL_DOMAIN}.key tls.key"cp ${SSL_DOMAIN}.key tls.keyecho "cp ${SSL_DOMAIN}.crt tls.crt"cp ${SSL_DOMAIN}.crt tls.crtExecute the following command to generate the certificate , Please refer to Rancher Generate a self signed certificate document .
chmod +x create-cert.sh./create-tls.sh --ssl-domain=minio.zerchin.xyz --ssl-size=2048 --ssl-date=3650 among --ssl-domain Change to visit minio Domain name of .
2、 establish minio Folder .
mkdir -p /minio/datamkdir -p /minio/certs/CAs3、 Copy the created certificate to the directory of the certificate .
cp tls.crt /minio/certs/public.crtcp tls.key /minio/certs/private.keycp cacerts.pem /minio/certs/CAs/cacerts.pem4、
docker run Command to start MinIO.
minio Support stand-alone deployment and cluster deployment , Single machine deployment is used here .
docker run -itd --net host --name minio --restart unless-stopped -v /minio/data:/data -v /minio/certs:/certs -e MINIO_ROOT_USER=admin -e MINIO_ROOT_PASSWORD=Rancher123 minio/minio server /data --console-address minio.zerchin.xyz:443 --address minio.zerchin.xyz:9000 --certs-dir /certsParameter description :
MINIO_ROOT_USER: Set up administrator users .MINIO_ROOT_PASSWORD: Administrator user password .--console-address:MinIO Management platform address , When a certificate is detected , Automatically configured to https.--address: Address of actual data transmission .--certs-dir: Set the certificate directory , The default is${HOME}/.minio/certsThis directory , Here is the directory we mount . Note that the name of the certificate and secret key must bepublic.crtandprivate.key. If there is self signature CA certificate , You need to put it under this pathCAsCatalog .
MinIO Use
1、 visit MinIO.
Browser access https://minio.zerchin.xyz.
The user name and password are from the previous step MINIO_ROOT_USER and MINIO_ROOT_PASSWORD Account and password in .

minio-login
2、 establish Bucket, Name it backup.

minio-create-bucket-1

minio-create-bucket-2

minio-create-bucket-3
3、 Create access users .

minio-create-user-1

minio-create-user-2

minio-create-user-3
adopt MinIO Backup and recovery Rancher Downstream of management K8s colony
Rancher Downstream of management K8s There are two ways to save snapshots in a cluster , One is to directly cluster the downstream etcd The snapshot backup file is stored locally , The other is to cluster downstream etcd The snapshot backup file is saved locally , At the same time, copy to the remote S3 On storage , Here we choose the second way to Rancher Downstream of management K8s The snapshot of is saved in MinIO Object storage .
etcd The snapshot backup
1、 Edit downstream cluster , stay Etcd Backup storage Next , choice s3.

rancher-k8s-etcd-1
Parameter description :
S3 Bucket Name:S3 Bucket name for .S3 Folder: The folder under the bucket . If it is not filled in, the data will be stored directly in the root directory of the bucket .S3 Region Endpoint: Appoint S3 Endpoint URL Address , This corresponds to the front--addressExposed addressAccess Key:S3 Of accessKeySecret Key:S3 Of secretKeyCustomize CA certificate: Custom certificate authentication , Used to connect to S3 Endpoint .
Click save , Wait for the cluster to update .
2、 Create downstream cluster snapshots .
After the cluster is updated , We enter the cluster , stay Snapshots Next , Click on Create a snapshot now Button , Will automatically help us create etcd snapshot , And save to remote MinIO On storage .

rancher-k8s-etcd-2
3、 Verify that the snapshot is stored in MinIO in .

rancher-k8s-etcd-minio-1
You can see , The corresponding snapshot file has been stored in backup bucket - k8s-etcd Catalog The following the ,etcd Snapshot backup succeeded .
etcd Snapshot recovery
1、 Snapshot based recovery k8s colony .

rancher-k8s-etcd-restore-1

rancher-k8s-etcd-restore-2
Select corresponding etcd Snapshot file , Click on Restore Resume , Three recovery methods are supported , Namely :
- Restore only etcd data .
- At the same time recover k8s Version and etcd data .
- At the same time, restore the cluster configuration 、k8s Version and etcd data .

rancher-k8s-etcd-restore-3
In the upper left corner Restore snapshot It indicates that the cluster is recovering , Wait until the downstream cluster returns to normal .
adopt MinIO Backup and recovery Rancher
from Rancher v2.5 Start ,rancher-backup operator For backup and recovery Rancher.rancher-backup Helm chart ad locum .
Backup restore operator Need to be installed in local In the cluster , And only for Rancher Application for backup . Backup and restore operations are only available in local Kubernetes In the cluster .
Rancher Version must be v2.5.0 And above , To use this backup and recovery Rancher Methods .
Restore the backup to a new Rancher When setting , The version of the new setting should be the same as that of the backup .
Rancher Backup Deploy
1、 install Rancher Backup.
First go to local In the cluster ( namely rancher The cluster ), stay application & Application market - Charts Under the navigation bar , Click on Rancher Backups App start installation .

install-rancher-backup-1
2、 Click on install , What's installed here is 2.1.2 edition .

install-rancher-backup-2
3、 Choose to install to System project , And then click next step

install-rancher-backup-3
4、 Select the default storage location , First choose No default storage location , Click on install After button , Start installation .

install-rancher-backup-4
5、 Wait a few minutes , etc. rancher backup Of pod start-up .( Depending on the speed of pulling the image )

install-rancher-backup-5
Create the first one Backup
1、 Create a secret, choice Opaque type .

backup-secret-1
2、 Name it minio-cerd, Add two pieces of data , Respectively accessKey and secretKey , And save .
backup-secret-2

backup-secret-3
3、 stay Rancher Backup - Backups Under the navigation bar , Click on the right establish Button , Create the first one Backup.

backup-1
4、 Storage location selection Use Amazon S3 Compatible object storage services .

backup-2
Parameter description :
Credential ciphertext: Choose the minio Ciphertext .Bucket name:S3 Bucket name for .Folder: The folder under the bucket . If it is not filled in, the data will be stored directly in the root directory of the bucket .Endpoint: Appoint S3 Endpoint URL Address , This corresponds to the front--addressExposed addressEndpoint CA: Self signed certificate needs to be added CA certificate , Use it here first base64 Fill in after coding .
5、 After the save , Will automatically initiate rancher Backup request , At the same time, save the backup data file to S3 On storage , When displayed Completed It indicates that the backup has been successful .( Record the backup file name , Recovery will use )

backup-3
6、 Sign in MinIO, Check that the backup file has been saved .

backup-minio-1
be based on Backup recovery Rancher
What we should pay attention to here is , There is no need to install on the new cluster during data recovery Rancher. If you will Rancher Restore to installed Rancher On the new cluster , May cause problems .
1、 install RKE colony .
Need to install with current Rancher The same version of the cluster , The installation method can be referred to Rancher Official documents , One is ready here RKE colony , I won't go into that .
2、 add to Rancher-Backup Corresponding Helm repo.
helm repo add rancher-charts https://charts.rancher.iohelm repo update3、 install rancher-backup Helm chart, Specify the same rancher-backup edition , Choose here 2.1.2 edition .
helm install rancher-backup-crd rancher-charts/rancher-backup-crd -n cattle-resources-system --create-namespace --version 2.1.2helm install rancher-backup rancher-charts/rancher-backup -n cattle-resources-system --version 2.1.24、 see rancher-backup pod Is the status ready .
# kubectl -n cattle-resources-system get podsNAME READY STATUS RESTARTS AGErancher-backup-74779d9dfd-vjdth 1/1 Running 0 27s5、 To write minio-cerd-secret.yaml file , To configure MinIO Access key .
apiVersion: v1kind: Secretmetadata: name: minio-cred namespace: cattle-resources-systemtype: Opaquedata: accessKey: <s3 access key base64 code > secretKey: <s3 secret key base64 code >perform kubectl Command to add this secret.
kubectl create -f minio-cerd-secret.yaml6、 To write Restore yaml file , Name it restore.yaml.
apiVersion: resources.cattle.io/v1kind: Restoremetadata: name: restore-miniospec: backupFilename: minio-backup-da0178a9-bf73-4b4d-a615-863bf7e46689-2022-07-18T17-46-43Z.tar.gz prune: false storageLocation: s3: credentialSecretName: minio-cred credentialSecretNamespace: cattle-resources-system bucketName: backup folder: rancher-backup endpoint: minio.zerchin.xyz:9000 endpointCA: |- LS0tLS1CRUdJTiBDRVJUSUZJQ0FURS0tLS0tCk1JSURGVENDQWYyZ0F3SUJBZ0lKQUp1Z1pWNVFN ... ... ... L2xlRFdzNThVd3FvYWtVc0diQT09Ci0tLS0tRU5EIENFUlRJRklDQVRFLS0tLS0K The parameters are all followed by Backup The same parameters as , among backupFilename The parameter needs to specify the specific backup file name , Can be in Backup View... Under the page , It can also be in MinIO View... Under the page .
Run the configuration .
kubectl create -f restore.yaml7、 see Restore state .
kubectl get restorekubectl logs -n cattle-resources-system --tail 100 -f rancher-backup-xxx-xxxWhen restore crd The state becomes Completed when , It indicates that the recovery is complete , as follows :
# kubectl get restores.resources.cattle.io NAME BACKUP-SOURCE BACKUP-FILE AGE STATUSrestore-minio S3 minio-backup-da0178a9-bf73-4b4d-a615-863bf7e46689-2022-07-18T17-46-43Z.tar.gz 74s Completed8、 Next use Helm install Rancher.
Use the same version of Helm To install Rancher.
helm install rancher rancher-stable/rancher -n cattle-system --set xxx --set xxx9、 Switch Rancher Front end load balancing /DNS Resolve to new Rancher Node .
10、 Sign in Rancher UI Interface , Visit normal , The recovery is successful .

restore-1
边栏推荐
- C language implementation of strncpy
- [C language] step jumping problem [recursion]
- [C language] Fibonacci sequence [recursion and iteration]
- Rand function generates pseudo-random numbers
- How many types of rain do you know?
- Cell review: single cell methods in human microbiome research
- Basic knowledge of communication network 01
- 云原生编程挑战赛火热开赛,51 万奖金等你来挑战!
- Implementation of memmove in C language
- Find the memory occupied by the structure
猜你喜欢
![[C language] Gobang game [array and function]](/img/73/1e708b0640c2dbc86393206840b059.png)
[C language] Gobang game [array and function]
![[C language] simulation implementation of strlen (recursive and non recursive)](/img/73/e92fe714515491f1ea366d6924c9ec.png)
[C language] simulation implementation of strlen (recursive and non recursive)

The results of the second quarter online moving people selection of "China Internet · moving 2022" were announced

JS preventdefault() keyboard input limit onmousewheel stoppropagation stop event propagation

How navicate modifies the database name

Can China make a breakthrough in the future development of the meta universe and occupy the highland?

C+ + core programming
English translation Italian - batch English translation Italian tools free of charge

CDGA|工业互联网行业怎么做好数据治理?

Cloud computing notes part.1 - system management
随机推荐
[C language] scanf format input and modifier summary
The cloud native programming challenge is hot, with 510000 bonus waiting for you to challenge!
Cloud computing notes part.2 - Application Management
Return and job management of saltstack
党员故事|李青艾用漫画带动农民增收致富
JVM(二十四) -- 性能监控与调优(五) -- 分析GC日志
河北邯郸:拓展基层就业空间 助力高校毕业生就业
河北:稳粮扩豆助力粮油生产提质增效
9. Pointer of C language (1) what is pointer and how to define pointer variables
English translation Portuguese - batch English conversion Portuguese - free translation and conversion of various languages
[NPP installation plug-in]
Implementation of markdown editor in editor.md
Labelme (I)
Leetcode day2 连续出现的数字
C language array and bubble sort
[C language] step jumping problem [recursion]
1. C language variable type, global variable, local variable
Labelme(一)
2. Floating point number, the difference between float and double in C language and how to choose them
认识中小型局域网WLAN