当前位置:网站首页>LabVIEW performs a serial loopback test
LabVIEW performs a serial loopback test
2022-06-10 23:47:00 【LabVIEW development】
LabVIEW Perform the serial loopback test
Loopback test can verify the operation of serial communication by sending and receiving data from the same serial port . It can display the serial port , A problem with the cable or the software that generates the message , Without connecting to third-party hardware . Loopback testing can be used for RS-232,RS-422 and RS-485 serial communication .
Connect hardware
Refer to the following sections to properly connect the hardware . Determine which serial communication protocol is used (RS-232 And RS-422 / 485) And the type of serial connector used .
RS-232
stay RS-232 On port , Will send (TXD) The signal is connected to the receiver (RXD) The signal . Depending on the connector type , Please refer to the following pins . Connections are shown in gray .

edit
Add picture comments , No more than 140 word ( Optional )
* Because the distance between the pins is very small , Therefore, it is not recommended to use alone RJ-50 Loop back test the connector .
RS-422 / 485(4 Line )
stay RS-422 / 485 On port , take TXD + Signal connected to RXD + The signal , take TXD- Signal connected to RXD- The signal . Depending on the connector type , Please refer to the following pins . The positive connection is indicated in red , The negative connection is shown in blue .

edit
Add picture comments , No more than 140 word ( Optional )
* Because the distance between the pins is very small , Therefore, it is not recommended to use alone RJ-50 Loop back test the connector .
RS-422 / 485(2 Line automatic )
about 2 Line configuration , Two... Will be required RS-485 Port to achieve settings similar to traditional loopback testing .
At every RS-485 On port , stay TXD + and RXD + Between signals and TXD- and RXD- Place jumpers between signals .
From port 1 To port 2, Connect the short-circuit positive signals together , And connect the short-circuit negative signal together . take GND The signals are connected together . Depending on the connector type , Please refer to the following pins .
Positive connections are shown in red , Negative connections are shown in blue ,GND Connections are shown in green .

Edit switch to center
Add picture comments , No more than 140 word ( Optional )
Because the spacing between pins is very small , Therefore, it is not recommended to use alone RJ-50 Loop back test the connector .
Configuration software
from “ Start ” Open in menu Measurement and Automation Explorer(MAX).
stay “ Equipment and interfaces ” Select the communication port of interest under . If you can't see the port , see also MAX or LabVIEW Serial in COM Port lost .
Select... At the bottom of the window “ Port settings ” tab . Make sure the correct settings are selected , And then choose “ verification ”.

edit
Add picture comments , No more than 140 word ( Optional )
If you are using RS-485, Please select “ senior ” tab , And make sure that... Is set correctly Transceiver mode .
Select Save to save the settings .
Test communication
Be careful : Can be in MAX VISA Test panel or LabVIEW In the example, the communication is tested . Make sure not to open at the same time VISA Test panels and LabVIEW, otherwise VISA Will throw the error of accessing resources ( Error code -1073807246 hex:0xbfff0072).
Measurement and Automation Explorer
stay MAX in , Select the desired communication port , And then choose “ open VISA Test panel ” .
open “ Test panel ” After window , choice “ Input / Output ” .
stay “ basic I / O” Tab , choice “ Inquire about ” To send the default * IDN?\ n command .
then , The display window will outline the write and read operations . The test panel shall successfully read the sent * IDN?\ n command .

edit
Add picture comments , No more than 140 word ( Optional )
LabVIEW
about RS-232 and RS-485(4 Line ), Please use the factory sample Simple Serial.vi Test communication .
To find examples , Please open the LabVIEW And navigate to the help tab >> Find examples >> Hardware input and output >> Serial >> Simple Serial.vi .
Make sure you choose the right VISA Resource name , And the serial setting is correct .
function VI.
The response indicator shall show * IDN?\ n command .
If you are using RS-485(2 Line system ), Please use the factory sample RS-485 Transceiver Control.vi Test communication .
To find examples , Please open the LabVIEW And navigate to the help tab >> Find examples >> Hardware input and output >> Serial >> RS-485 Transceiver Control.vi .
Make sure you choose the right VISA Resource name , And the serial setting is correct .
According to the Pattern Appoint Transceiver mode .
function VI.
The response indicator shall show * IDN?\ n command .
More details , Participate in the introduction of the following annex .
LabVIEW、LabVIEW Development 、LabVIEW Programming 、LabVIEW Program
Examples and information mentioned above , Both in word In the attachment in , Click to download . Learn more , Can you contact us .
LabVIEW Perform the serial loopback test - Beijing Hanwen Wangxing Technology Co., Ltd (bjcyck.com)
边栏推荐
- C# Tryparse的用法
- 掌握高性能计算前,我们先了解一下它的历史
- 300 questions on behalf of the first lecture on determinant
- Leetcode 501: mode dans l'arbre de recherche binaire
- Data and information resource sharing platform (IV)
- [Video] kmeans mean clustering and hierarchical clustering: R language analysis life happiness index visualization | data sharing
- 给线程池里面线程添加名称的4种方式
- LabVIEW用高速数据流盘
- How to generate automatic references (simple drawings)
- ILRuntime热更框架 安装以及断点调试
猜你喜欢
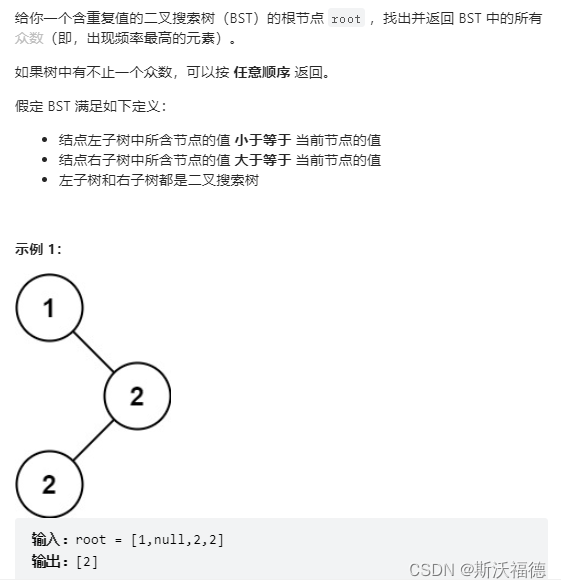
Leetcode 501: mode dans l'arbre de recherche binaire

一 组工人合作完成某一部件的装配工序所需的时间(单位:分钟)分别如下:

基于CenterOS7安装Redis及常见问题解决(带图讲解)

LabVIEW错误“内存已满 - 应用程序停止在节点”

LabVIEW和VDM提取色彩和生成灰度图像

Yuntu says that every successful business system cannot be separated from apig

easyrecovery15操作简单方便的数据恢复工具

Ilruntime hotfix framework installation and breakpoint debugging
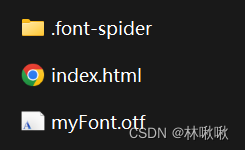
字蛛(font-spider)教学——ttf/otf字体文件压缩

Data and information resource sharing platform (IV)
随机推荐
How to handle the database query error with Emoji expression in Typecho- Xingze V Club
R language to draw two-dimensional normal distribution density surface;
上海证券开户是安全的吗?
easyrecovery15操作简单方便的数据恢复工具
Analysis of Genesis public chain
SystemVerilog(十)-用户自定义类型
Introduction to software testing: the concept and process of software testing (brilliant content)
掌握高性能计算前,我们先了解一下它的历史
iframe框架自适应大小/全屏显示网页框架的方法
MySQL learning child query
Redis list list common commands
Why many new websites are not included by search engines
Project training 10 - backup of specific databases
Data and information resource sharing platform (V)
LeetCode 501 :二叉搜索樹中的眾數
黑马头条丨腾讯薪酬制度改革引争议;英特尔全国扩招女工程师;黑马100%就业真的吗......
Is it safe for CICC Fortune Securities to open an account? Is it reliable?
考研英语词汇 unit1
Postgraduate entrance examination English vocabulary unit1
LabVIEW prohibits other multi-core processing applications from executing on all cores