当前位置:网站首页>PXE efficient mass network capacity
PXE efficient mass network capacity
2022-07-30 07:50:00 【G Curry Fried Rice】
目录
1、Turn off the firewall and core protection first
11、Create a new virtual machine experiment
一、PXE概述
PXE 严格来说并不是一种安装方式,而是一种引导的方式.
进行 PXE 安装的必要条件是要安装的计算机中包含一个 PXE 支持的网卡(NIC),即网卡中必须要有 PXE Client.PXE (Pre-boot Execution Environment)协议使计算机可以通过网络启动.
协议分为 client 和 server 端
PXE client 在网卡的 ROM 中,当计算机引导时,BIOS 把 PXE client 调入内存执行,由 PXE client 将放置在远端的文件通过网络下载到本地运行.
运行 PXE 协议需要设置 DHCP 服务器 和 TFTP 服务器
DHCP 服务器用来给 PXE client(将要安装系统的主机)分配一个 IP 地址,由于是给 PXE client 分配 IP 地址,所以在配置 DHCP 服务器时需要增加相应的 PXE 设置.
此外,在 PXE client 的 ROM 中,已经存在了 TFTP Client.PXE Client 通过 TFTP 协议到 TFTP Server 上下载所需的文件.
二、PXE服务的构建过程
1、PXE客户机发出DHCP请求,向DHCP服务器申请IP地址.
2、DHCP服务器响应PXE客户机的请求,自动从IP地址池中分配一个IP地址给PXE客户机,并且告知PXE客户机:TFTP服务器的IP地址和PXE引导程序文件pxelinux.0,默认在TFTP共享目录/var/lib/tftoboot下
3、PXE客户机向TFTP服务器发起获取pxelinux.0引导程序文件的请求
4、TFTP服务器响应PXE客户机的请求,将其共享的pxelinux.0文件传输给PXE客户机.
5、PXE客户机通过网络来启动到系统安装主界面
6、PXE客户机向文件共享服务器(ftp、http、nfs)发起获取centos系统或windows系统安装文件的请求.
7、vsftp文件共享服务响应PXE请求,将共享额系统安装文件传输给PXE客户机.
8、PXE客户机进入到安装提示向导界面,用户需要手动完成系统安装的操作
三、配置PXE
1、Turn off the firewall and core protection first
systemctl stop firewalld

systemctl disable firewalld

setenforce 0
2、环境准备
The virtual machine prepares two network cards,One for resource download,one for configurationdhcp


Configure the newly added network card
[[email protected] dhcp]# cd /etc/sysconfig/network-scripts
[[email protected] network-scripts]# cp ifcfg-ens33 ifcfg-ens37 复制网卡
[[email protected] network-scripts]# vim ifcfg-ens37 进行编辑
After the configuration is complete, restart the network card
[[email protected] network-scripts]# systemctl restart network
3、配置DHCP服务
yum -y install dhcp  安装dhcp服务
cat /etc/dhcp/dhcpd.conf  可以查看配置文件内容,Found out that there is a template
cp -p  /usr/share/doc/dhcp*/dhcpd.conf.example  /etc/dhcp/dhcpd.conf  将模板复制过来

vim /etc/dhcp/dhcpd.conf 复制过来之后,Enter to start editing 
编辑完毕,保存退出后
systemctl start dhcpd     开启dhcp服务

systemctl enable dhcpd    开机自启动
4、安装配置tftp服务
yum -y install tftp-server

yum -y install xinetd

tftp被xinetd所托管,xinetd默认没有安装,配置文件

rpm -q tftp-server  xinetd   查看一下是否安装成功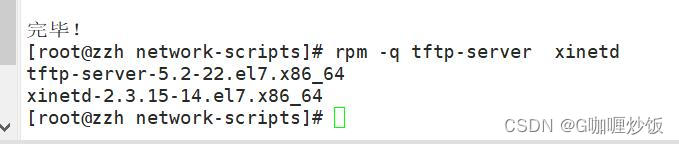
vim /etc/xinetd.d/tftp 安装完成开始配置tftp

配置文件内容*********************
service tftp
{
        socket_type             = dgram
        protocol                = udp
        wait                    = yes                      //wait no表示客户机可以多台一起连接,yes表示客户机只能一台一台连接,表示是否开启多线程一起工作,否则需要等待
        user                    = root
        server                  = /usr/sbin/in.tftpd
        server_args             = -s /var/lib/tftpboot     //指定TFTP根目录(引导文件的存储路径) -c允许上传
        disable                 = no                       //修改 disable no表示开启TFTP服务
        per_source              = 11                       //通过限制一个主机的最大连接数,从而防止某个主机独占某个服务,这里每个IP地址的连接数是11个
        cps                     = 100 2                    //表示服务器最多启动100个连接,如果达到这个数目将停止启动新服务2秒.在此期间不接受任何请求
        flags                   = IPv4
}

******************************
5、准备ftp需要共享的文件
mount /dev/cdrom /mnt 挂载镜像文件
cd /mnt/images/pxeboot        进入内核文件

cp initrd.img vmlinuz /var/lib/tftpboot  复制内核初始化文件
配置完毕后,开启服务
systemctl start xinetd

systemctl enable xinetd

systemctl start tftp

systemctl enable tftp
以上就是为了将镜像中的内核文件+系统的初始化文件 丢到tftp的默认共享的目录中,以便后续pxe-client来下载
7、准备PXE引导镜像文件pxelinux.0
pxelinux.0是个二进制文件,主要作用相当于一个系统安装步骤的指引,引导客户端如何安装系统
yum provides */pxelinux.0   查找这个文件是由哪个软件包安装的,当不是一个路径和一个软件包时用*/
yum -y install syslinux
rpm -ql syslinux | grep pxelinux 查找pxe引导程序的位置
Select the queried second file to copy
cp /usr/share/syslinux/pxelinux.0 /var/lib/tftpboot 拷贝tftp的根目录下,系统引导文件
注,只有安装了 system-config-kickstart 软件包,才会有/usr/share/syslinux/目录及目录中的文件
此时,We have three files ready.
8、手工配置default菜单文件
启动菜单用来指导客户机的引导过程,包括如何调用内核,如何加载驱动.默认的启动菜单文件为 default,应放置在 tftp 根目录的 pxelinux.cfg 子目录下,典型的启动菜单配置可参考以下操作自动或手动建立. 至于为什么要是/var/lib/tftpboot/pxelinux.cfg/default文件,因为是由pxelinux.0这个文件决定好的
mkdir /var/lib/tftpboot/pxelinux.cfg/

默认pxelinux.cfg是没有的需要手动创建,注意它是一个目录而非文件虽然是以.cfg结尾

vim /var/lib/tftpboot/pxelinux.cfg/default  配置菜单文件
9、安装ftp服务,准备centos7安装源
yum -y install vsftpd   安装ftp服务

mkdir /var/ftp/centos7

cp -rf /mnt/* /var/ftp/centos7   将镜像复制到其中
systemctl start vsftpd     开启ftp服务

systemctl enable vsftpd 开机自启 
10、配置kickstart无人值守安装
yum -y install system-config-kickstart 安装system-config-kickstart工具

打开无人值守配置程序开始配置


查看保存的文件

cd /root  #进入家目录

vim anaconda-ks.cfg  进行编辑
将里面的anaconda-ks.cfgthe content inside,复制到var/ftp/ks.cfg中

vim /var/ftp/ks.cfg 
vim /var/lib/tftpboot/pxelinux.cfg/default

进入菜单文件进行优化,将ks引导参数至引导菜单文件 
到这就配置完成了
11、Create a new virtual machine experiment


边栏推荐
- Local Implicit Grid Representations for 3D Scenes详解
- A New Paradigm for Distributed Deep Learning Programming: Global Tensor
- Test and Development Engineer Growth Diary 009 - Environment Pai Pai Station: Development Environment, Test Environment, Production Environment, UAT Environment, Simulation Environment
- libgrape-lite: 提供 GraphScope 的图分析能力
- Rapidly develop GraphScope graph analysis applications
- Camera coordinate system, world coordinate system, pixel coordinate system conversion, and Fov conversion of OPENGLDEFocal Length and Opengl
- 舒尔补(schur completement)
- The calculation proof of the intersection of the space line and the plane and its source code
- 相机坐标系,世界坐标系,像素坐标系三者转换,以及OPENGLDEFocal Length和Opengl 的 Fov转换
- B站崩了,如果是你是那晚负责的开发人员你会怎么做?
猜你喜欢

Linx common directory & file management commands & VI editor usage introduction

Devops基本概念和原理
Install MySQL under Linux (centos7)

MongoDB-CUD without R

STL源码剖析:bound friend template friend代码测试和理解

空间顶点到平面的距离计算的证明及其源码

Test Development Engineer Growth Diary 001 - Some Introduction to Agile Testing, CI/CD/CT, DecOps

prometheus-basic_auth加密配置

你被MySQL 中的反斜杠 \\坑过吗?

进程和计划任务管理
随机推荐
如何理解普吕克坐标(几何理解)
Network Protocol 03 - Routing and NAT
Selenium02
Local Implicit Grid Representations for 3D Scenes详解
Mastering JESD204B (1) – Debugging of AD6676
The Force Plan Microservices | Centralized Configuration Center Config Asymmetric Encryption and Security Management
SE_01
GNNLab:基于空间共享思想设计的新型 GNN 系统
你被MySQL 中的反斜杠 \\坑过吗?
Deploy GraphScope with Helm
Test Development Engineer Growth Diary 007 - Bug Priority Definition and Filling Specifications
MySQL common commands and mysqldump backup
MongoDB - Introduction, Data Types, Basic Statements
libgrape-lite: 提供 GraphScope 的图分析能力
多线程基础(概念,创建,中断)
Graph analysis like NetworkX with GraphScope
LVM和磁盘配额
Advanced multi-threading (CountDownLatch, deadlock, thread-safe collection class)
测开基础知识01
用 GraphScope 像 NetworkX 一样做图分析