当前位置:网站首页>Raspberry pie 4B Getting Started Guide
Raspberry pie 4B Getting Started Guide
2022-06-30 07:24:00 【Three stinky ginger】
Raspberry pie 4B Hands on Guide
The software package and image can be obtained from Baidu online disk :
link :https://pan.baidu.com/s/1ReffurBHQWKU9cPnZFdOpw
Extraction code :2021
– From Baidu network disk super member V4 The share of
First make sure we have the following :
1. Raspberry pie board , My is 4B edition
2. One SD card
3. A card reader
4. Raspberry pie power cord
5. A wire line
List of articles
One . Burn image
First install the following burning tools 【2. development environment \ Image burning tool \ Image burning tool balena-etcher】:

Installation process skipped .
After installation, open the software as follows :

Click on select image, Choose our image 【2. development environment \ System image 】.

Note that img Suffix .
Then click on “select target”, Choose our hard drive , Here is the one who chose us SD card , Be careful not to make the wrong choice .

next , Start burning .


This process takes a long time , You can make a cappuccino first .
Verification is required after burning :

End of validation :

After that, pull out the card reader , Re insert , You can see that :

Two . To configure WIFI
Here I use the mobile phone to turn on the hotspot , In fact, you can also connect your own router .
I first opened a hot spot with my mobile phone , Hot spot name :aiden password :123456789
It should be noted that the name and password should not be in Chinese .
Then open it with Notepad or other software 【11. Boot profile 】 Under the

Modified as :
country=CN
ctrl_interface=DIR=/var/run/wpa_supplicant GROUP=netdev
update_config=1

network={

	ssid="aiden"
	psk="123456789"
	priority=5
}
Remember to save... After modification .
Then copy the above two configuration files to boot pan :

After the copy is completed, you can boot Disk eject . And then take it out SD card , Put it on the raspberry pie . Then plug the power cord into the raspberry pie , Turn it on , The raspberry pie will automatically connect to our hot spot after you turn it on . Then the computer is connected to our hotspot . So we can see on the mobile phone :

The one above is raspberry pie , Here is my computer .
3、 ... and .SSH Sign in
open ssh Tools 【9. Supporting auxiliary software 】:

Configure the following :
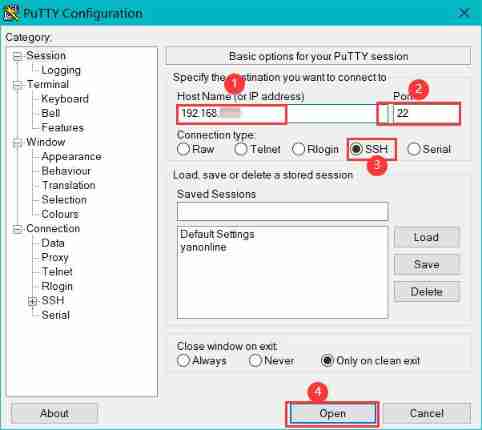
IP The address is what we saw on the mobile phone , The port number is selected by default 22,ssh.
choice open after , The following screen will appear :

Choose... Directly here “ yes ” that will do .
Then enter the user name :pi password :raspberry
Note that we can't see it when entering the password , This is a Linux A protection mechanism under , We can input the content one by one . After entering the user name and password, the following interface appears :

It indicates that the connection is successful at this time .
Four . Turn on VNC service
Based on the previous window , We type... In the terminal :

There will be :

Use the up and down keys of the keyboard to move the cursor to select “5 Interfacing Options”, And return ;
And then choose P3.

choice “ yes ”
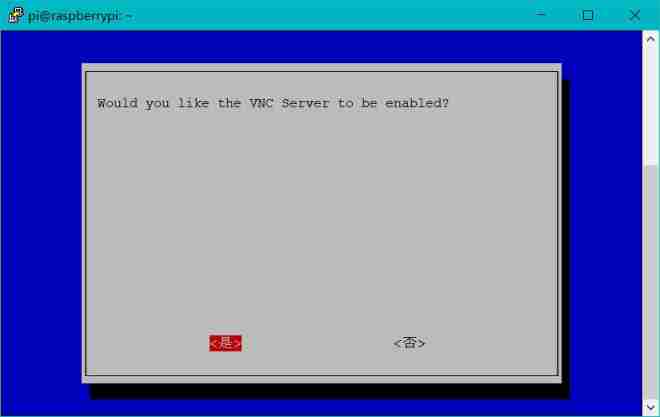
Finally, don't forget :

So it turns on VNC service .
And then install it on your computer VNC Software :

Installation process skipped .
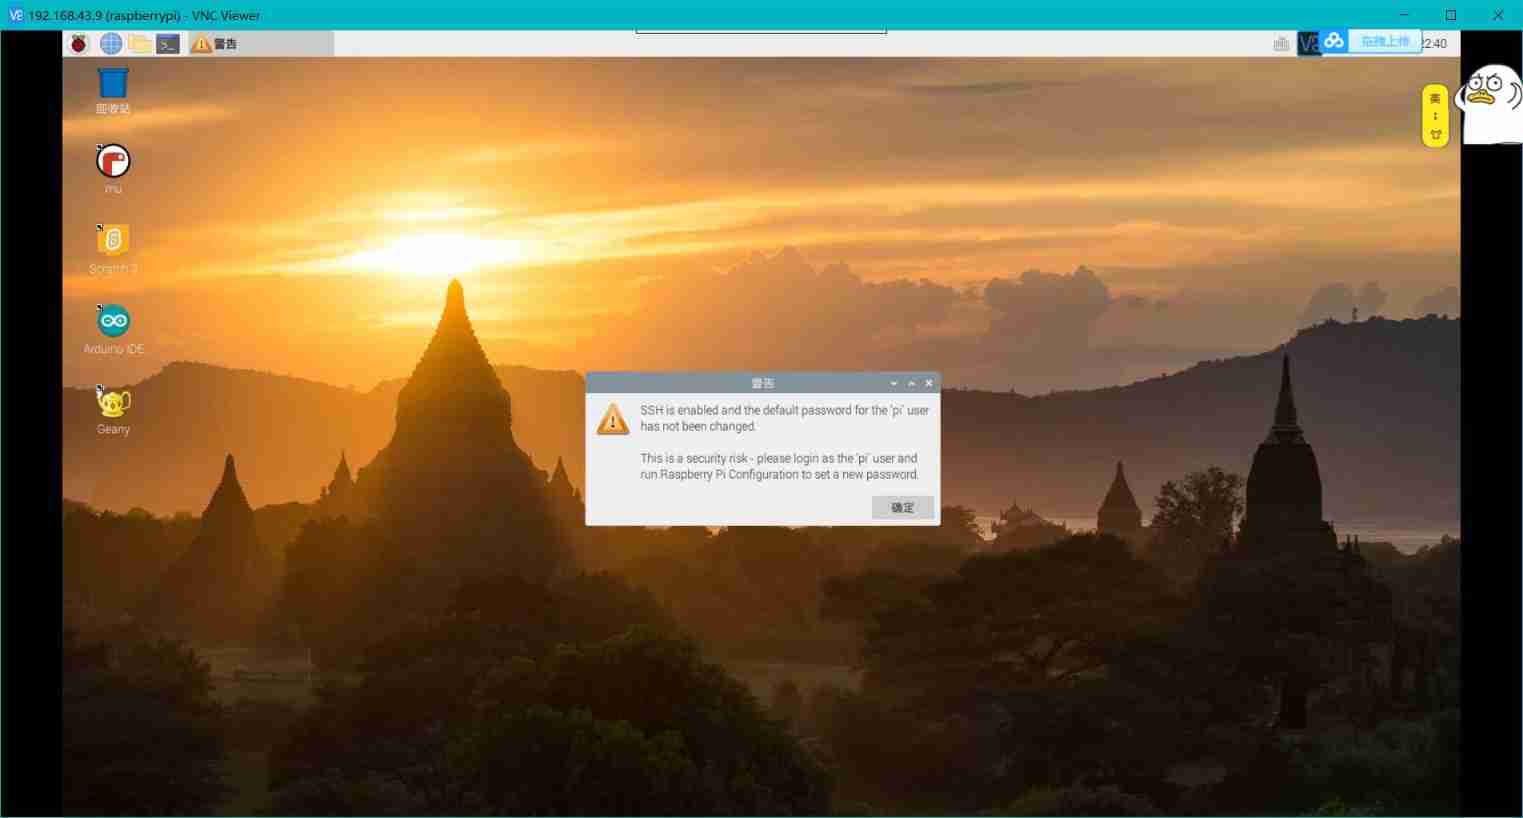
After installation, open the software and enter ip Address :
choice

Enter your username and password . user name :pi password :raspberry

And then choose ok You can enter the table of our raspberry pie .
5、 ... and . Connect the raspberry pie to the computer using a cable
First of all, we need to , Access terminal , lookup ip Address .( Just now, it was a hot spot where raspberry pie and computer were connected to mobile phones at the same time )
Input in the terminal :

Then you'll see :

choice eth0 Corresponding inet Address . Let's record this address .
next , We quit VNC, Enter the address we just mentioned :

Just follow the previous steps .( But you must have connected the computer to the raspberry pie with an Internet cable , The computer can be connected to other computers first wifi)
After following the above steps , We can connect other hot spots in raspberry pie .

6、 ... and . install opencv-python
Because our system is actually pre installed , So there are already python Environmental Science , We can open the terminal of raspberry pie to check the version :

What we use later is python3.
Here you can change the image source first . Refer to this article :https://zhuanlan.zhihu.com/p/98079246
Then execute the following instructions in the terminal in turn :( Be sure to change the source before these operations , Otherwise it will be very slow )
sudo apt-get update
pip3 install numpy  ( If you already have it, you can upgrade it  pip3 install -U numpy)
pip3 install opencv-python
Test whether it can be used after installation :

If no error is reported, the import is successful .
7、 ... and . install TensorFlow2
Here I mainly refer to this article :https://zhuanlan.zhihu.com/p/158745478
1. Check whether the environment is installed successfully
python3 --version
pip3 --version
virtualenv --version
If a command is not found when it runs , Is not installed , Need to be in the 2 Step, select the corresponding command to install .
2. Installing modules that are not installed
According to the first 1 Step , Select from the following commands as needed , among update And installation libatlas-base-dev The command must be selected .
sudo apt update  #  This command is required
sudo apt install python3-dev python3-pip  #  If already installed Python3 and pip3 Then skip this command
sudo apt install libatlas-base-dev  #  This command is required , Be careful !!!
sudo pip3 install -U virtualenv  #  If the virtual environment is already installed , Skip this command
3. Creating a virtual environment .
virtualenv --system-site-packages -p python3 ./venv

4. Activate the virtual environment
source ./venv/bin/activate

After executing the above statements, you enter the virtual environment .
5. to update pip
pip3 install --upgrade pip

6. Install dependency packages
pip3 install keras_applications==1.0.8 --no-deps
pip3 install keras_preprocessing==1.1.0 --no-deps
pip3 install h5py==2.9.0
pip3 install -U six wheel mock


7. download tensorflow package
Here I offer a TensorFlow2.3.0 My bag . In the link shared by Baidu online disk at the beginning .
Use vnc The file transfer tool of will transfer the package .
Then enter the path where the package is placed to install .
pip3 install tensorflow-2.3.0-cp37-none-linux_armv7l.whl
Some other dependent packages will be automatically downloaded during the download process , At this point, wait for the installation to complete .
Enter... After installation python Whether the environment test can be imported successfully :

Reference resources :
1.https://blog.csdn.net/u014397533/article/details/50910531
2.https://zhuanlan.zhihu.com/p/158745478
边栏推荐
- Install go language development tools
- Introduction to go project directory structure
- 模拟接口没声明异常抛出异常
- Record the problem that the system file cannot be modified as an administrator during the development process
- Use of ecostruxure (3) creating composite function blocks
- Pit stepping record: Supervisor log return information: redis extension is not installed
- LabVIEW program code update is slow
- MySQL encounters the problem of expression 1 of select list is not in group by claim and contains nonaggre
- 大学刚毕业不知道做什么工作怎么办?
- [introduction to Expo application] v Expert recommendation letter template
猜你喜欢

Thread pool - C language

Egret P2 pit encountered by physical engine (1)

Starting MySQL ERROR! Couldn‘t find MySQL server (/usr/local/mysql/bin/mysqld_safe)

Calculation and parameter quantity of neural network
社招两年半10个公司28轮面试面经

Can introduction

Pit stepping record: Supervisor log return information: redis extension is not installed

What if I don't know what to do after graduating from university?

MySQL encounters the problem of expression 1 of select list is not in group by claim and contains nonaggre

Record the problem that the system file cannot be modified as an administrator during the development process
随机推荐
Keil serial port redirection
手机开户股票开户安全吗?开户需要准备什么?
Stm32g0 and FreeRTOS learning summary
模拟接口没声明异常抛出异常
Use of ecostruxure (3) creating composite function blocks
Win10 step pit - power on 0xc0000225
将本地电脑文件复制到虚拟机系统中详细方法
June 29, 2022 -- take the first step with C # -- add decision logic to the code using the "if", "else" and "else if" statements in C #
Detailed methods for copying local computer files to virtual machine system
Linu foundation - zoning planning and use
Pool de Threads - langage C
Pit stepping record: Supervisor log return information: redis extension is not installed
Cubemx completes STM32F103 dual serial port 485 transceiver transmission
Deploying web projects using idea
Realization of dissolve effect in unity and its principle analysis
Dynamic memory management
网络安全-单臂路由、DHCP中继和ICMP协议
Video player (I): process
Detailed analysis of message signals occupying multiple bytes and bits
How to determine the size of the platform byte order?