当前位置:网站首页>Chainsafe cross chain bridge deployment tutorial
Chainsafe cross chain bridge deployment tutorial
2022-06-29 20:22:00 【Brain in new VAT】
In this tutorial , We will be in WAGMI and Fuji Build a bridge between . This bridge will help us to wrap in wWGM The original in WGM Tong zhengcong WAGMI The chain moves back and forth to Fuji chain . Use this guide , You can do this at any time based on EVM Between the chains of any ERC20 Pass to deploy a bridge .
Learn in a familiar language The etheric fang Web3 DApp Development : Java | Php | Python | .Net / C# | Golang | Node.JS | Flutter / Dart
The packaged version of the original pass is linked to it ERC20 Express . use ERC20 Standard packaging can make some processes such as entrusted transaction easier . You can easily get the packaged by sending the native token to the packaged token contract address ERC20 Pass card .
WAGMI It's based on EVM Independent test chain , Deployed in Avalanche Custom subnet of the network .
We will use Chainsafe Bridge repository for , Easily build a strong and secure EVM Cross chain bridge .
1、 Workflow of cross chain bridge
WAGMI and Fuji Chains are not interconnected by default , But we can make them communicate . The repeater monitors events on a chain ( By polling the block ), And use these events on the other chain to perform the necessary actions . such , We can also link the token from one chain bridge to another by using smart contracts .
The following is the workflow description of cross chain bridging -
- The user is in Bridge Deposit a voucher on the contract
- Bridging contract requirements Handler Contract execution deposit action
- The process contract locks the stored pass in the safe
- The bridge contract is issued Deposit event
- RelayerDeposit Receive events from the source chain
- The repeater creates a voting proposal on the target chain to cast a new token
- After the relay voting reaches the threshold , The proposal was implemented
- The pass is cast to the addressee's address
Bridging the token from the source chain to the target chain involves locking and coinage methods . Connecting the token from the target chain to the source chain involves destruction and release methods . We cannot cast and burn tokens that we cannot control . therefore , They need to be locked in the pass safe on the source chain . And generate the corresponding token on the target chain ( We will deploy and therefore control it ).

2、 Pre requirements for deploying cross chain bridges
The requirements for following up this tutorial are listed below -
- stay MetaMask Add... To the network WAGMI and Fuji chain
- stay WAGMI The Internet (MetaMask) Import on wWGM Tokens, ( assets ). This is the address ——0x3Ee7094DADda15810F191DD6AcF7E4FFa37571e4
- from WAGMI Faucet request 1 individual WGM.
- from Fuji Faucet request 10 individual AVAX.
- Send some... To the passport address WGM Pass card , To receive the same number of wWGM. Always keep some WGM Pass card , To cover transaction costs .
3、 Set the deployment environment
Let's create a new directory deploy-bridge, We will save the bridge code in it . We will use the following repositories -
- ChainSafe/chainbridge-deploy - This will help us build bridge contracts . Code
- ChainSafe/chainbridge - This will help us build off chain repeaters . Code
3.1 install Chainbridge Command line tools
Use the following command , We can clone and install Chainbridge Command line tools for . This will help us establish bridging contracts and demonstrate cross chain transfer . After deploying the bridge contract , You can use it ABI And contract address to set your UI.
git clone -b v1.0.0 --depth 1 https://github.com/ChainSafe/chainbridge-deploy \
&& cd chainbridge-deploy/cb-sol-cli \
&& npm install \
&& make install
This will build the contract and install cb-sol-cli command .
3.2 Set the environment variable
Let's set the environment variables , So we don't have to write their values every time we issue a command . Move back deploy-bridge Catalog ( Main project directory ) And create a new file configVars. Put the following into it -
SRC_GATEWAY=https://subnets.avax.network/wagmi/wagmi-chain-testnet/rpc
DST_GATEWAY=https://api.avax-test.network/ext/bc/C/rpc

SRC_ADDR="<Your address on WAGMI>"
SRC_PK="<your private key on WAGMI>"
DST_ADDR="<Your address on Fuji>"
DST_PK="<your private key on Fuji>"

SRC_TOKEN="0x3Ee7094DADda15810F191DD6AcF7E4FFa37571e4"
RESOURCE_ID="0x00"
- SRC_ADDR and DST_ADDR Is the address where the bridge contract will be deployed and will act as a repeater .
- SRC_TOKEN It is the passport we want to bridge . This is a WGM Packaging ERC20 Version is also known as wWGM The address of .
- RESOURCE_ID It could be anything . It's on both sides (WAGMI and Fuji) Identify our bridged ERC20 Pass card .
- Every time we change these configuration variables , Must update our bash Environmental Science . Run the following command based on the relative location of the file . These variables are temporary , Only exists in the current terminal session , Once the session ends, it will be refreshed . Make sure to load these environment variables into the bash Commands that use them Any location ( for example S R C G A T E W A Y or SRC_GATEWAY or SRCGATEWAY or SRC_ADDR)
source ./configVars
4、 Configure the source chain
We need to set the source chain as follows -
- Deploy Bridge and Handler contract , take $SRC_ADDR Set as the default and unique repeater
- take wWGM The token is registered as a resource on the bridge
4.1 Deployment contract
Command line tools cb-sol-cli Will help us deploy the contract . Run the following command in the terminal session where the configuration variables are loaded . It will add SRC_ADDR Is the default relay , Used to change events from Wagmi chain ( Source ) Relay to Fuji chain ( The goal is ).
One of the most important parameters to note when deploying a bridge contract is expiry value . This is the number of blocks that a proposal is considered cancelled . By default , It's set to 100. stay Avalanche Main Internet , Use this value , The proposal may be in 3-4 Expired in minutes . You should select a very large expiration value based on the chain to deploy the bridge . otherwise , If a limited number of proposals are not received on time , Your proposal will be cancelled .
You should also remember this , Sometimes during high network activity , The transaction may be stuck for a long time . Proposal transaction card in this case , It may lead to the cancellation of previous proposals . therefore , The expiration value should be large enough , The relay should be the most competitive gas Price release transactions .
cb-sol-cli --url $SRC_GATEWAY --privateKey $SRC_PK --gasPrice 25000000000 deploy \
    --bridge --erc20Handler \
    --relayers $SRC_ADDR \
    --relayerThreshold 1 \
    --expiry 500 \
    --chainId 0
The output will return the deployed contract ( Bridging and handlers ) Address . to update configVars file , Add the following 2 Variables and load them into the environment :
SRC_BRIDGE="<resulting bridge contract address>"
SRC_HANDLER="<resulting erc20 handler contract address>"
Make sure to use source Command to load these environment variables .
4.2 Configure resources on the bridge
Running the following command will wWGM The token is registered as a resource on the source bridge .
cb-sol-cli --url $SRC_GATEWAY --privateKey $SRC_PK --gasPrice 25000000000 bridge register-resource \
    --bridge $SRC_BRIDGE \
    --handler $SRC_HANDLER \
    --resourceId $RESOURCE_ID \
    --targetContract $SRC_TOKEN
5、 Configure the target chain
We need to set the target chain as follows -
- Deploy Bridge and Handler contract , Set up $DST_ADDR It is the default and only repeater
- Deployment representative bridging wWGM The token can be cast or burned ERC20 contract
- take wWGM The token is registered as a resource on the bridge
- take wWGM The pass is registered on the bridge as mintable/burnable
- grant Handler Contract to cast new wWGM Pass authority
5.1 Deployment contract
Run the following command , stay Fuji Deployment on the chain Bridge、ERC20 Handler and wWGM contract . It will be set again DST_ADDR To change events from Fuji chain ( The goal is ) Relay to Wagmi chain ( Source ) Default repeater for . For this example , both SRC_ADDR and DST_ADDR Represents the same thing .
cb-sol-cli --url $DST_GATEWAY --privateKey $DST_PK --gasPrice 25000000000 deploy\
    --bridge --erc20 --erc20Handler \
    --relayers $DST_ADDR \
    --relayerThreshold 1 \
    --chainId 1
Update the environment variables with the details you will get by running the above command . Don't forget to load these variables .
DST_BRIDGE="<resulting bridge contract address>"
DST_HANDLER="<resulting erc20 handler contract address>"
DST_TOKEN="<resulting erc20 token address>"
5.2 Configure resources on the bridge
Running the following command will wWGM Register as a resource on the bridge .
cb-sol-cli --url $DST_GATEWAY --privateKey $DST_PK --gasPrice 25000000000 bridge register-resource \
    --bridge $DST_BRIDGE \
    --handler $DST_HANDLER \
    --resourceId $RESOURCE_ID \
    --targetContract $DST_TOKEN
5.3 Set the token to be castable and burnable
When you receive a pass deposit , There are two options for bridges -
- Lock the received pass in a chain , And cast the corresponding token on another chain
- Burn the received token on a chain , Release the corresponding token on the other chain
We cannot cast or burn any token beyond our control . Although we can lock and release these passes by placing them in the pass safe . The bridge must know which pass it can burn . Use the following command , We can set the resource to be burnable . The bridge will select the operation according to whether the token can be burned .
cb-sol-cli --url $DST_GATEWAY --privateKey $DST_PK --gasPrice 25000000000 bridge set-burn \
    --bridge $DST_BRIDGE \
    --handler $DST_HANDLER \
    --tokenContract $DST_TOKEN
5.4 The authorization handler casts a new pass
Now let's allow the handler to cast deployed on the target chain ERC20 (wWGM) Pass card . Run the following command .
cb-sol-cli --url $DST_GATEWAY --privateKey $DST_PK --gasPrice 25000000000 erc20 add-minter \
    --minter $DST_HANDLER \
    --erc20Address $DST_TOKEN
The deployer of the contract ( here SRC_ADDR or DST_ADDR) Have administrator privileges . Administrators can add or remove new relays 、 moneyer 、 Administrator, etc . It can also Mint new coins on the target chain ERC20 Pass card . You can use these files cb-sol-cli Issue these commands with the options mentioned in . Unless some intervention is needed , Otherwise, if the successor fails to forge tokens on the target chain on time , The coinage command should not be used manually .
6、 Deploy repeaters
Deploy the bridge 、 The handler 、 All settings on the chain such as pass have been completed . But the two chains are not connected to each other . We need some off chain repeaters to pass messages between chains . The relay will vote on deposit events in a chain , And submit a voting proposal to cast or release the corresponding token on another chain .
Because we set the relay threshold to 1, So when deploying bridges and handlers , We just need to come from 1 A voting proposal for a repeater . But in production , We should use a large number of repeaters with high thresholds , To avoid centralization of power .
So , We will use Chainsafe The repeater of . Follow the steps described below to deploy the repeater .
6.1 Clone and build repeater code
Open a new terminal session , While keeping the environment variables loaded by the previous session . We must also load environment variables in this session .source You can also use the command to load these variables in this session .
Now? , Move to this deploy-bridge Directory and run the following command to clone the repeater repo( stay Go To realize ), And build its binary file .
git clone -b v1.1.1 --depth 1 https://github.com/ChainSafe/chainbridge \
&& cd chainbridge \
&& make build
This will be chainbridge/build Create a binary file in the directory chainbridge.
6.2 Configure repeater
The repeater requires some configuration , Such as source chain 、 Target chain 、 bridge 、 Handler address, etc . Run the following command . It will make a config.json A file containing the required details . You can update these details as needed .
echo "{
  \"chains\": [
    {
      \"name\": \"WAGMI\",
      \"type\": \"ethereum\",
      \"id\": \"0\",
      \"endpoint\": \"$SRC_GATEWAY\",
      \"from\": \"$SRC_ADDR\",
      \"opts\": {
        \"bridge\": \"$SRC_BRIDGE\",
        \"erc20Handler\": \"$SRC_HANDLER\",
        \"genericHandler\": \"$SRC_HANDLER\",
        \"gasLimit\": \"1000000\",
        \"maxGasPrice\": \"50000000000\",
        \"http\": \"true\",
        \"blockConfirmations\":\"0\"
      }
    },
    {
      \"name\": \"Fuji\",
      \"type\": \"ethereum\",
      \"id\": \"1\",
      \"endpoint\": \"$DST_GATEWAY\",
      \"from\": \"$DST_ADDR\",
      \"opts\": {
        \"bridge\": \"$DST_BRIDGE\",
        \"erc20Handler\": \"$DST_HANDLER\",
        \"genericHandler\": \"$DST_HANDLER\",
        \"gasLimit\": \"1000000\",
        \"maxGasPrice\": \"50000000000\",
        \"http\": \"true\",
        \"blockConfirmations\":\"0\"
      }
    }
  ]
}" >> config.json
Check and confirm config.json Details in the file .
In the above order , You can see blockConfirmations Set to 0. This is for the image Avalanche Such a network is very effective , Because once submitted , The block will be confirmed .
Unlike other chains , Like Ethereum , need 20-30 Block confirmation . therefore , Please use this configuration carefully , It depends on the type of chain you use .If the corresponding token is cast or released based on the unconfirmed block , Can cause serious problems .
6.3 Set key
Let the repeater access your key . Use these keys , The relay will propose a deposit event and execute the proposal . It will require a password to be set to encrypt these keys . Every time the repeater is started , It will ask for this password .
./build/chainbridge accounts import --privateKey $SRC_PK

./build/chainbridge accounts import --privateKey $DST_PK
7、 Cross chain bridge test
Setup is now complete - Up and down the chain . Now we just need to start the repeater and test the bridge . For testing purposes , We are going to use cb-sol-cli Deposit transactions on the bridge . But you can make the front end and use ABI Integrate it with the bridge .
7.1 Start the repeater
Run the following command to start the repeater . It will print a log of all events related to our bridge , These events occur in two chains . So keep the repeater running and execute the next command in another terminal session .
./build/chainbridge --config config.json --verbosity trace --latest
7.2 The authorization handler governs my pass
Now? , Let us in WAGMI Deposit the pass on the bridge . But before that , We need to approve the process on our behalf ( here ) Use ( Lock or destroy ) Pass card SRC_PK. Amount here in Wei In units of (1 The etheric (WGM) = 10^18 Wei). We will approve 0.1 wWGM.
cb-sol-cli --url $SRC_GATEWAY --privateKey $SRC_PK --gasPrice 25000000000 erc20 approve \
    --amount 100000000000000000 \
    --erc20Address $SRC_TOKEN \
    --recipient $SRC_HANDLER
7.3 Deposit the pass into the cross chain bridge
Once approved , We can send deposit transactions . Now let's deposit on the bridge 0.1 wWGM. The handler will be from our address ( here SRC_PK) lock ( Transferred to the
Pass safe )0.1 wWGM, And cast the new token on the target chain to the receiver ( here DST_ADDR).
cb-sol-cli --url $SRC_GATEWAY --privateKey $SRC_PK --gasPrice 25000000000 erc20 deposit \
    --amount 100000000000000000 \
    --dest 1 \
    --bridge $SRC_BRIDGE \
    --recipient $DST_ADDR \
    --resourceId $RESOURCE_ID
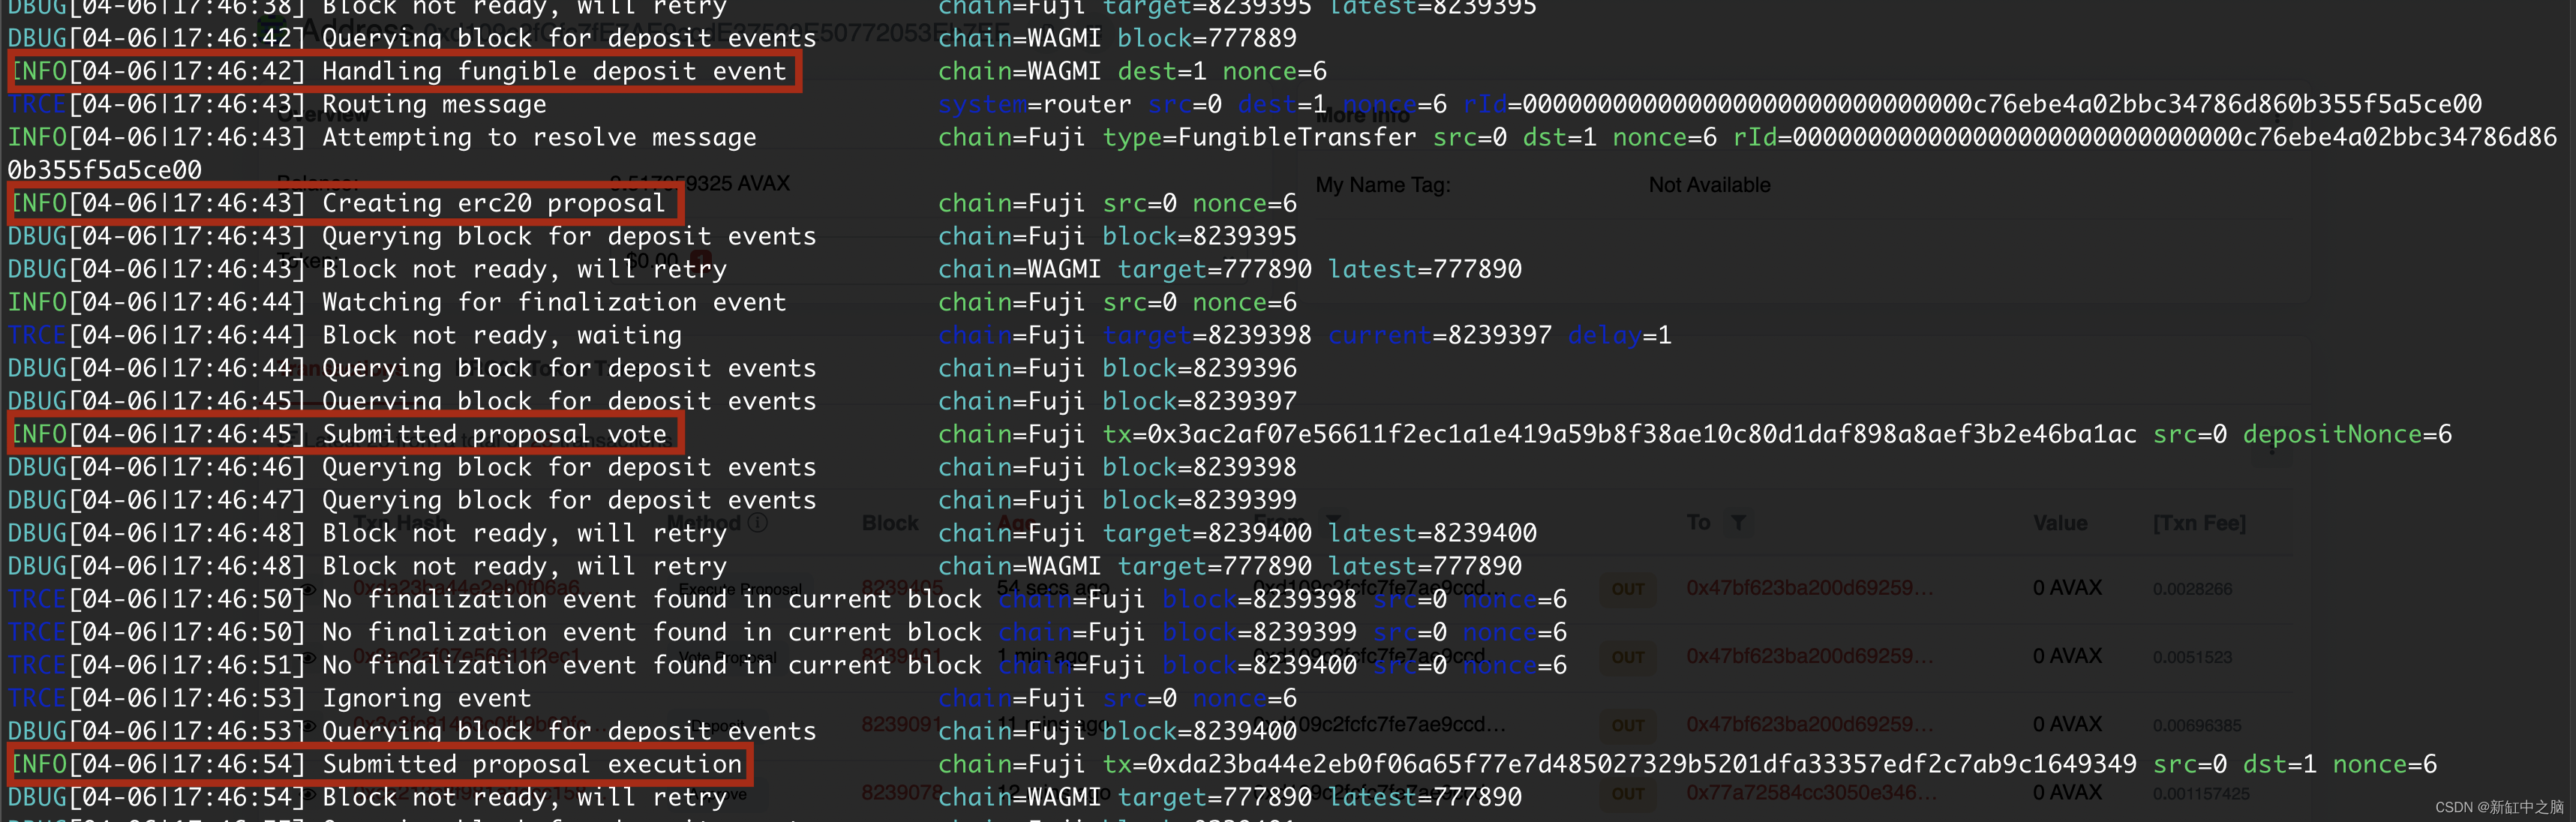
The fair will 0.1 wWGM Transfer to the pass safe and issue a Deposit event , This event will be captured by the relay . After this event , It will send the voting proposal to the target chain . Because the threshold is 1, The bridge will implement the proposal , And new wWGM Cast to the recipient's address . This is a screenshot of the repeater output .
Again , We can transfer the token back to WAGMI chain .
8、 Conclusion
Similar to the above process , You can 2 Based on EVM A bridge is deployed between the chains of . We use command line tools for approval and deposit . This can be further extended to build
Front end integrated with the bridge . at present , It relies on a single repeater , It's not safe . We need a lot of repeaters and high thresholds to avoid any form of centralization .
By reading ChainSafe Of Chainbridge file To learn more about these contracts and implementations .
Link to the original text :Deploying Cross-Chain EVM <-> EVM Bridge
Huizhi.com translation and sorting , Reprint please indicate the source
边栏推荐
- Flume configuration 2 - ganglia for monitoring
- 数据链路层
- Tag based augmented reality using OpenCV
- Website stress testing tool - webbench
- 4-1 port scanning technology
- Coreldraw2022 new version v24.1.0.360 update
- [buuctf.reverse] 142_ [SUCTF2019]babyunic
- . NETCORE unified authentication authorization learning - run (1)
- Win7 easy connect 提示:选路连接失败,可能当前连接网络异常,请稍后重试
- 18. `bs对象.节点名.next_sibling` previous_sibling 获取兄弟节点
猜你喜欢

mapbox-gl开发教程(十二):加载面图层数据

【Try to Hack】vulnhub narak

Koa 源码剖析

C#_ Convert camera images to bitmap format and draw Crosshairs
Mapbox GL development tutorial (12): loading surface layer data

mysql中explain语句查询sql是否走索引,extra中的几种类型整理汇总

CorelDRAW2022全新版V24.1.0.360更新

Sentinel的快速入门,三分钟带你体验流量控制

Uncover the secret! Pay attention to those machines under the membership system!

「运维有小邓」日志分析工具使用越来越频繁的原因
随机推荐
Go: how to write a correct UDP server
Jmeter之BeanShell详解和夸线程调用
Tag based augmented reality using OpenCV
4-1 port scanning technology
注解
CorelDRAW最新24.1.0.360版本更新介绍讲解
mysql中explain语句查询sql是否走索引,extra中的几种类型整理汇总
Foxit software was invited to appear at the 2022 advanced manufacturing digital intelligence development forum
Community interview -- jumpserver open source fortress in the eyes of an it newcomer
annotation
Flume-ng配置
[notes] take notes again -- learn by doing Verilog HDL – 014
How to use filters in jfinal to monitor Druid for SQL execution?
Koa 源码剖析
Following the crowd hurts you
网站压力测试工具——Webbench
XSS vulnerability
Wangedit rich text editor usage (detailed)
Linux安装MySQL8
Linux安装MySQL5