当前位置:网站首页>list:list的介绍和模拟实现
list:list的介绍和模拟实现
2022-08-02 03:32:00 【RNGWGzZs】

-----------"别问可不可以,只说愿不愿意"
(1)list是什么?
1.list可以在常数范围内,对任意位置进行插入、删除数据。
2.list底层是双向循环链表。
3.list相对于(vector\string)插入数据,简单高效
4.但list不支持随机访问。

(2)list功能及其使用:
①构造函数
构造函数 | 说明 |
list() | 构造空的list |
list (size_type n, const value_type& val = value_type()) | 构造的list中包含n个值为val的元素 |
list (const list& x) | 拷贝构造函数 |
list (InputIterator fifirst, InputIterator last) | 用[fifirst, last)区间中的元素构造list |

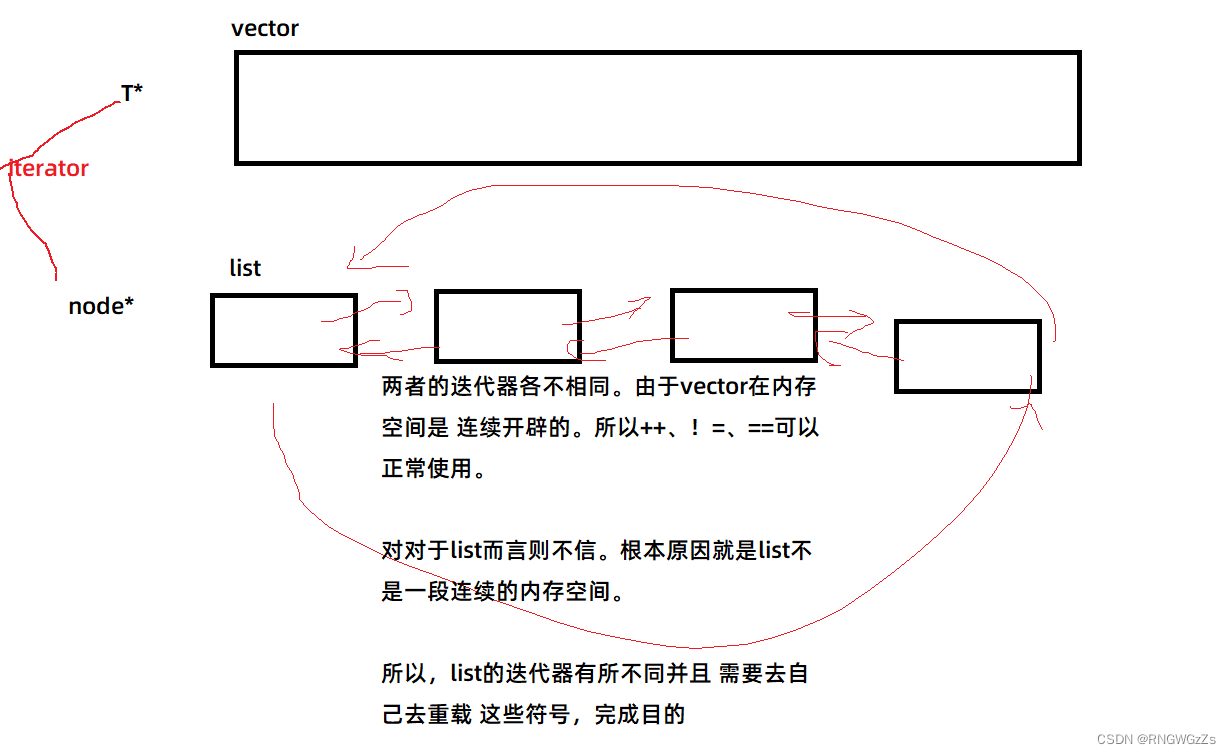
② 迭代器
迭代器 | 说明 |
begin+end | 返回第一个元素的迭代器+返回最后一个元素下一个位置的迭代器 |
rbegin + rend | 返回第一个元素的reverse_iterator,即end位置,返回最后一个元素下一个位置的reverse_iterator,即begin位置 |

③修改:
函数声明 | 说明 |
push_front | 在list首元素前插入值为val的元素 |
pop_front | 删除list中第一个元素 |
push_back | 在list尾部插入值为val的元素 |
pop_back | 删除list中最后一个元素 |
insert | 在list position 位置中插入值为val的元素 |
erase | 删除list position位置的元素 |
swap | 交换两个list中的元素 |
clear | 清空list中的有效元素 |


大部分功能已经介绍了,也就在此打住吧。
(3)list模拟实现:
list基本框架:

①<重>list迭代器:
//迭代器
	template<class T>
	struct _list_iterator
	{
		//再让节点在这个 结构体内重命名
		typedef _list_node<T> node;
		//牵涉一些运算
		typedef _list_iterator<T> self;
		node* _pnode;   //list迭代器 本质就是个 节点指针


		_list_iterator(const node* pnode)
			:_pnode(pnode)
		{}

		//*
		T& operator* ()
		{
			return _pnode->_val;
		}

		//重载!=
		bool operator!=(const self& s)
		{
			//两个地址不一样
			return _pnode != s._pnode;
		}

	   //前置++
		self& operator++()
		{
			_pnode = _pnode->_next;
			return *this;
		}

		//后置++
		self operator++(int)
		{
			node* tmp = _pnode;
			_pnode = _pnode->_next;
			return tmp;
		}

		//前置--
		self& operator--()
		{
			_pnode = _pnode->_prev;
			return *this;
		}

		//后置
		self operator--()
		{
			node* tmp = _pnode;
			_pnode = _pnode->_prev;
			return tmp;
		}

	};
对list迭代器的铺设框架完善好了,简单地进行插入下。

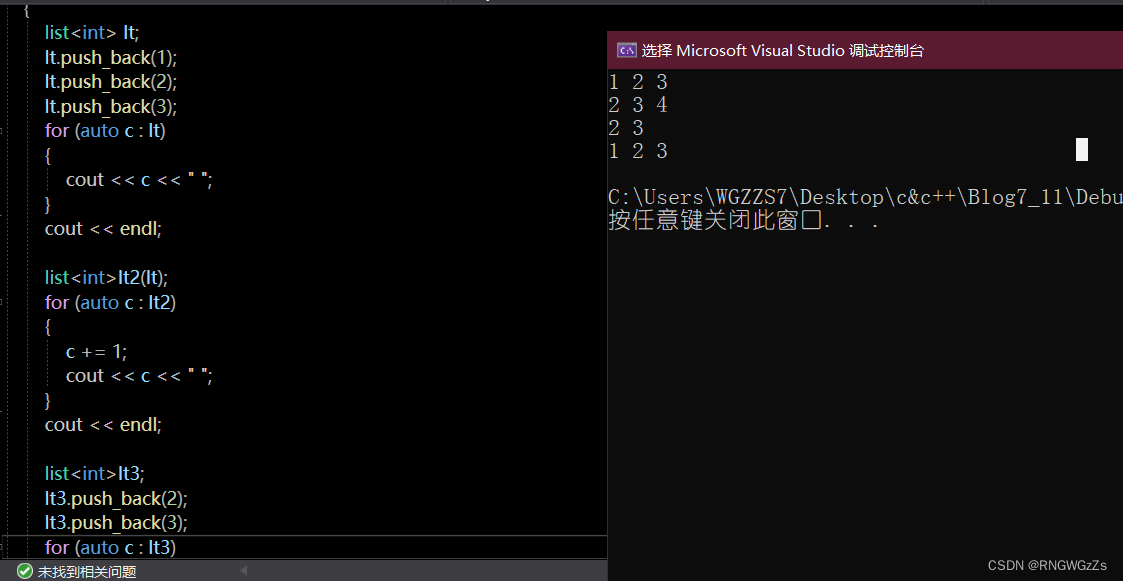
我们先尾插几个数字;
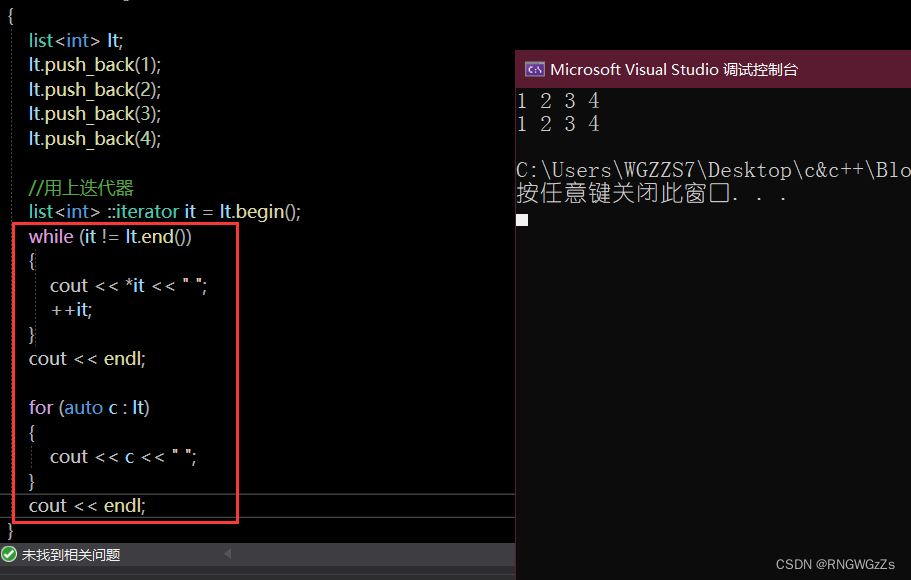
迭代器也可以正常使用。
迭代器模板!!!:
void PrintList(const list<int>& lt)
	{
		list<int> ::iterator it = lt.begin();
		while (it != lt.end())
		{
			*it += 1;
			cout << *it << " ";
			++it;
		}
		cout << endl;
	}
此时我们封装一个打印list内容的函数,
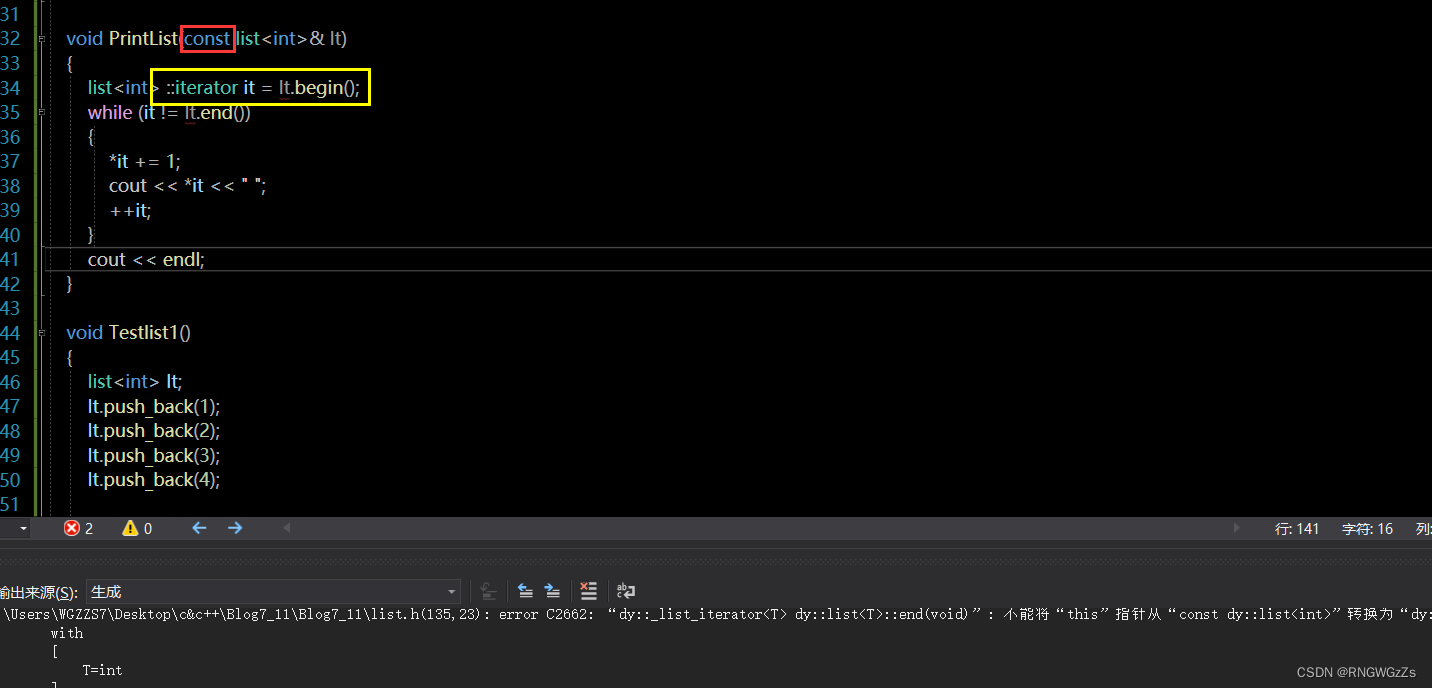
此时出现报错,其现在原因可能出在用了非const迭代器。
所以我们在list内 更新迭代器。
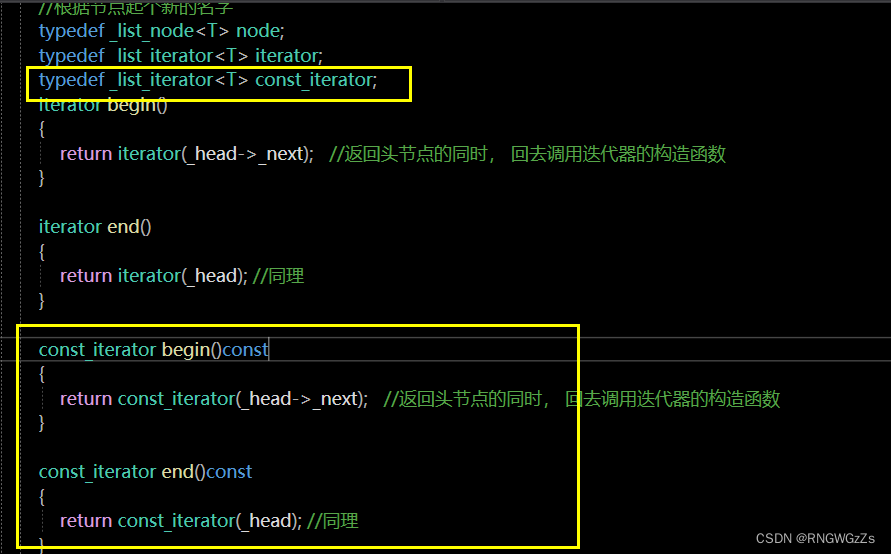
 此时代码变过,但问题是,居然能修改const修饰的对象?! 这肯定超出了我们想要的效果。
问题出在:
所以,只有去再重新 单独创建一个const_iterator 才能实现。
 然而,这样未免太过于繁琐,const迭代器与非const迭代器仅仅只有在一处地方 不同。

最后:
	template<class T,class Ref,class Ptr>
	struct _list_iterator
	{
		//再让节点在这个 结构体内重命名
		typedef _list_node<T> node;
		//牵涉一些运算
		typedef _list_iterator<T, Ref,	Ptr>  self;
		node* _pnode;   //list迭代器 本质就是个 节点指针


		_list_iterator(node* pnode)
			:_pnode(pnode)
		{}

		//*
		T& operator*()
		{
			return _pnode->_val;
		}

		//重载!=
		bool operator!=(const self& s)
		{
			//两个地址不一样
			return _pnode != s._pnode;
		}

	   //前置++
		self& operator++()
		{
			_pnode = _pnode->_next;
			return *this;
		}

		//后置++
		self operator++(int)
		{
			node* tmp = _pnode;
			_pnode = _pnode->_next;
			return tmp;
		}

		//前置--
		self& operator--()
		{
			_pnode = _pnode->_prev;
			return *this;
		}

		//后置
		self operator--(int)
		{
			node* tmp = _pnode;
			_pnode = _pnode->_prev;
			return tmp;
		}
	};
各自会去找各自对应的部分。

list比较难的部分就是在于迭代器,搞定 这部分,之后的操作也就易如反掌
②属性:
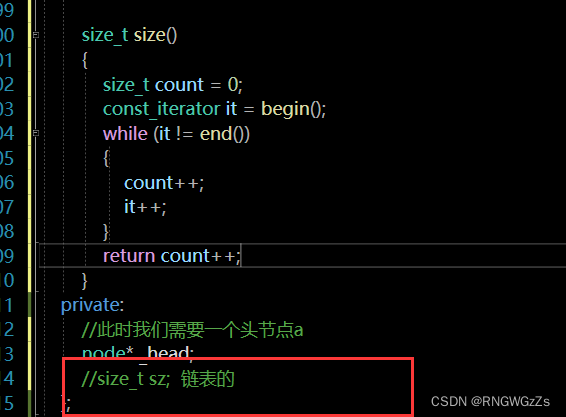
size:
链表的size有两种方法:
1.计数++
size_t size()
		{
			size_t count = 0;
			const_iterator it = begin();
			while (it != end())
			{
				count++;
				it++;
			}
			return count++;
		}
2.定义类成员变量,动态增加。
empty:
	bool empty()
		{
		    //最初 头节点 的指针都是指向自己
			return begin() == end();
		}
③修改:
push_back:
void push_back(const T& x)
		{
			node* newnode = new node(x);  //创建节点
			//尾插链接
			node* tail = _head->_prev;

			tail->_next = newnode;
			newnode->_prev = tail;

			newnode->_next = _head;
			_head->_prev = newnode;
		}
push_front\pop_front\pop_back会采取复用的方式(insert\erase),
Insert:
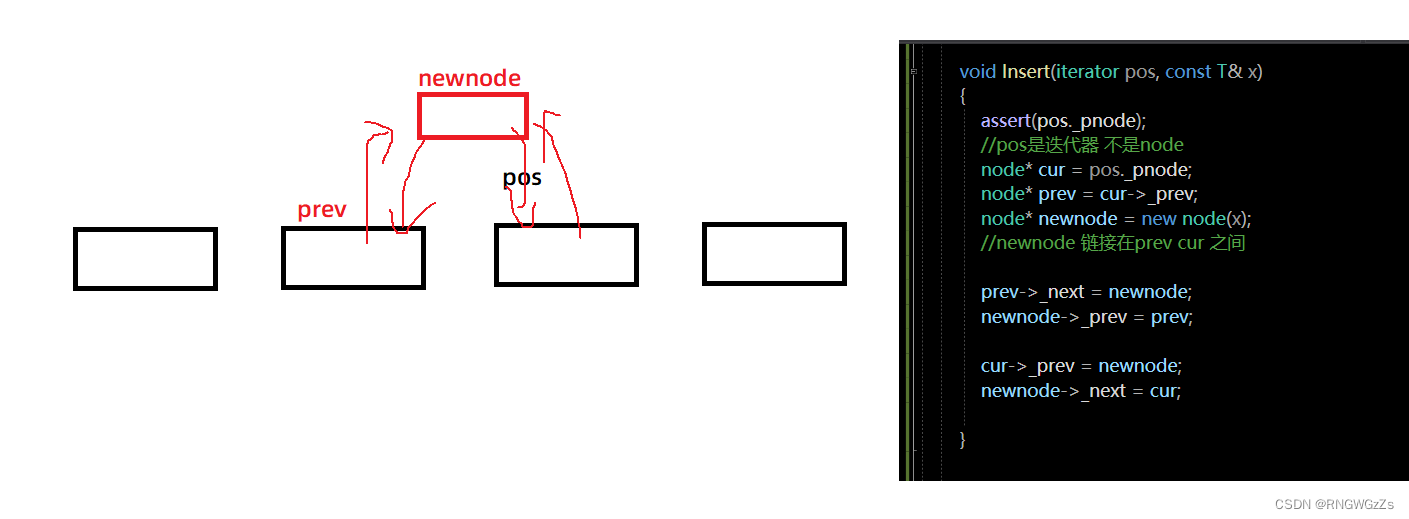
		void Insert(iterator pos, const T& x)
		{
			assert(pos._pnode);
			//pos是迭代器 不是node
			node* cur = pos._pnode;
			node* prev = cur->_prev;
			node* newnode = new node(x);
			//newnode 链接在prev cur 之间

			prev->_next = newnode;
			newnode->_prev = prev;

			cur->_prev = newnode;
			newnode->_next = cur;

		}
erase:

iterator erase(iterator pos)
		{
			assert(pos._pnode);
			node* cur = pos._pnode;
			node* prev = cur->_prev;
			node* next = cur->_next;

			delete cur;
			prev->_next = next;
			next->_prev = prev;
	       //返回下一个节点的迭代器
			return iterator(next);  //用next 去构造

		}
pop\push:
	void push_back(const T& x)
		{
			//node* newnode = new node(x);  //创建节点
			尾插链接
			//node* tail = _head->_prev;

			//tail->_next = newnode;
			//newnode->_prev = tail;

			//newnode->_next = _head;
			//_head->_prev = newnode;
			Insert(end(),x);
		}

		void push_front(const T& x)
		{
			Insert(begin(), x);
		}

		void pop_back()
		{
			erase(--end());
		}

		void pop_front()
		{
			erase(begin());
		}

④构造与删除:
析构清除:
	void clear()
		{
			iterator it = begin();
			while (it != end())
			{
				//erase(it++);
				it=erase(it);
			}
		}
		~list()
		{
			clear();
			delete _head;
			_head = nullptr;
		}
拷贝构造与赋值重载:
	//拷贝构造
		//l2(l1);
		list(const list<T>& lt)
		{
			//构造头节点
			_head = new node();
			_head->_next = _head;
			_head->_prev = _head;

			//依次尾插
			for (const auto& c : lt)
			{
				//不引用就是拷贝构造
				push_back(c);
			}
		}


		list<T>& operator=(list<T> v)
		{
			swap(_head,v._head);
			return *this;
		}

		//s1=s2;
		//传统写法
		list<T>& operator=(list<T>& v)
		{
			if (this != &v)
			{
			//先清理自己
			clear();
			//再以次插入值
			for (const auto& c : v)
				{
					push_back(c);
				}
		}
		return *this;
		}
构造:
       //数值构造
		list(size_t n, const T& val)
		{
		 	_head = new node();  //首先创建头节点
			_head->_prev = _head;
	 		_head->_next = _head;   //指针指向自己

			while (n--)
			{
				push_back(val);
			}
	  	  }


 //迭代区间
		list(iterator first, iterator last)
		{
			_head = new node();  //首先创建头节点
			_head->_prev = _head;
			_head->_next = _head;   //指针指向自己

			while (first != last)
			{
				push_back(*first);
				first++;
			}
		}
这篇list的短文也就结束了,希望对你有帮助
祝你好运~

边栏推荐
猜你喜欢
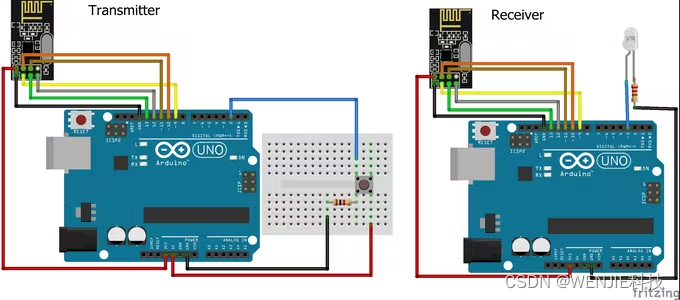
【nRF24L01 connects with Arduino to realize wireless communication】

联阳IT66121FN提供SDI转HDMI方案分享

联阳(ITE)IT66021FN:HDMI转RGB芯片 3D 资料
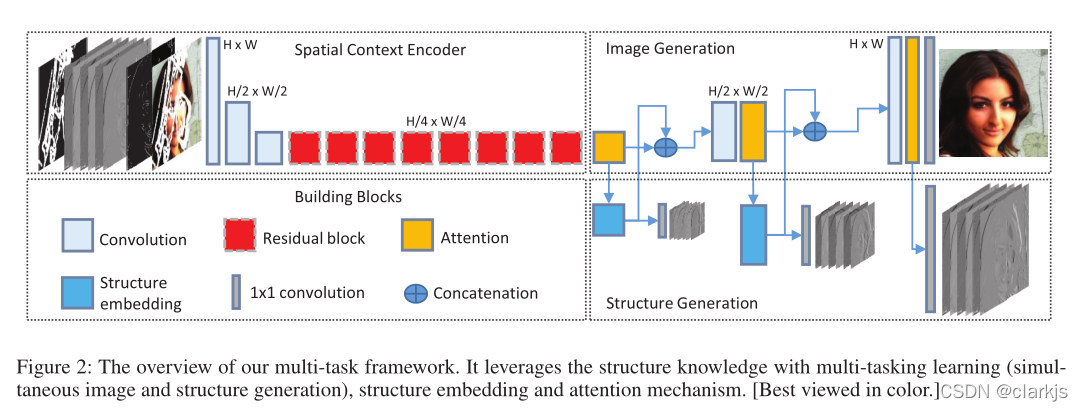
2020 - AAAI - Image Inpainting论文导读《Learning to Incorporate Structure Knowledge for Image Inpainting》

ICN6211:MIPI DSI转RGB视频转换芯片方案介绍 看完涨知识了呢
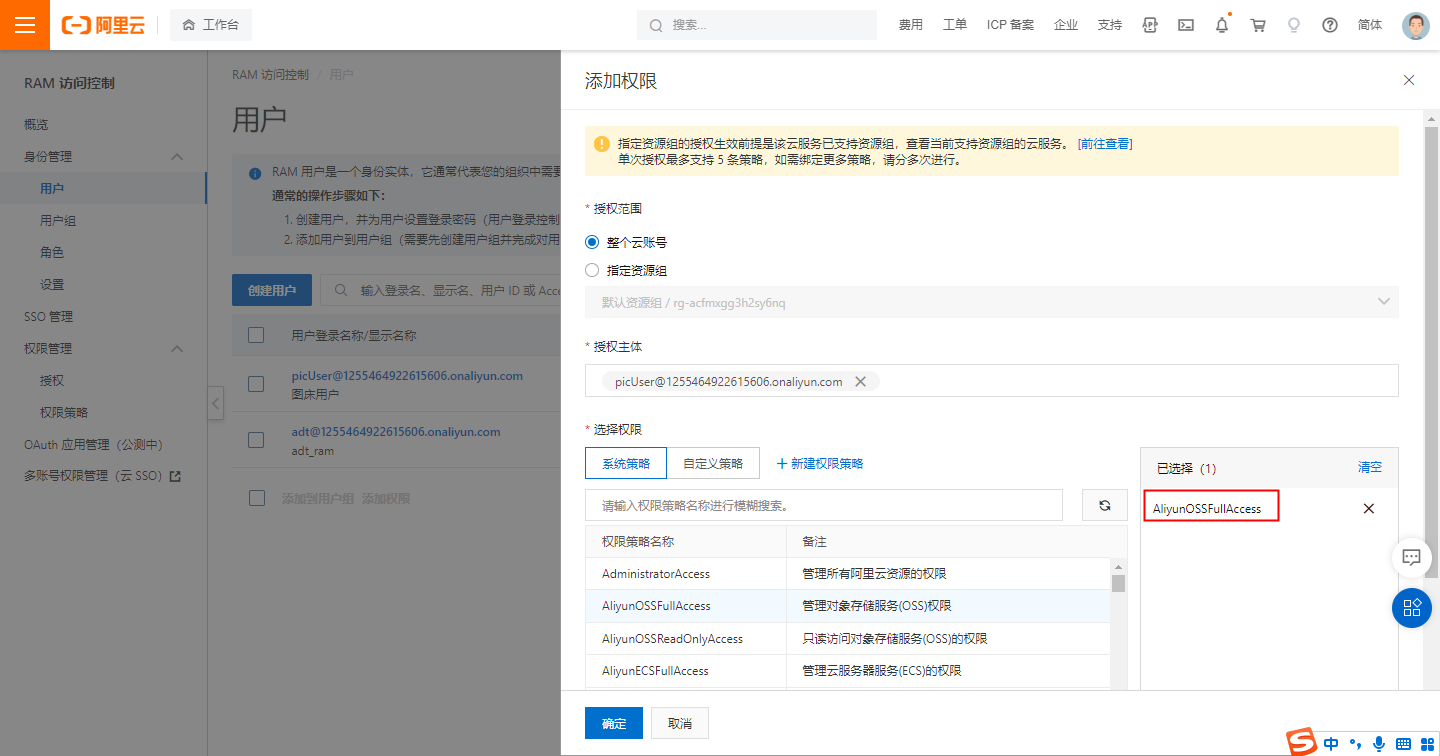
Personal image bed construction based on Alibaba Cloud OSS+PicGo

HDMI转MIPI CSI东芝转换芯片-TC358743XBG/TC358749XBG
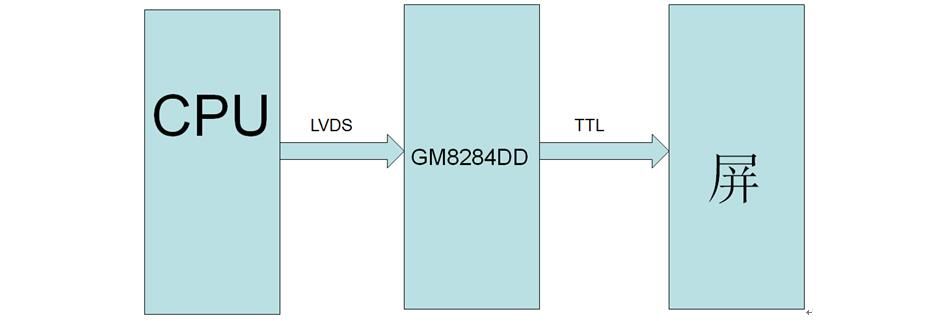
与TI的lvds芯片兼容-GM8284DD,GM8285C,GM8913,GM8914,GM8905C,GM8906C,国腾振芯LVDS类芯片,

【plang 1.4.3】定时器的使用
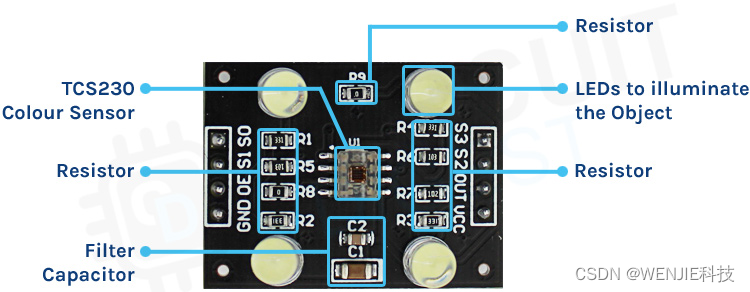
【TCS3200 颜色传感器与 Arduino 实现颜色识别】
随机推荐
NSIS来自己设定快捷方式的图标
树莓派入门(1)系统镜像烧录
分割回文串 DP+回溯 (LeetCode-131)
AD PCB导出Gerber文件(非常详细的步骤)
【TCS3200 颜色传感器与 Arduino 实现颜色识别】
Comparative analysis of OneNET Studio and IoT Studio
GM8775C规格书,MIPI转LVDS,MIPI转双路LVDS分享
本地数据库 sqlite3 编译和使用
字符串匹配(蛮力法+KMP)
【MQ-3 酒精检测器与 Arduino检测酒精】
[Popular Science Post] I2C Communication Protocol Detailed Explanation - Partial Software Analysis and Logic Analyzer Example Analysis
汇编语言跳转指令总结
How to remotely debug PLC?
GM8775C MIPI转LVDS调试资料分享
uniCloud address book combat
引擎开发日志:场景编辑器开发难点
MIPI解决方案 ICN6202:MIPI DSI转LVDS转换芯片
Host your own website with Vercel
【Arduino connects DHT11 humidity and temperature sensor】
[Arduino connected to GPS module (NEO-6M) to read positioning data]