当前位置:网站首页>Alien skin exposure X7 color filter plug-in, raw post-processing tool
Alien skin exposure X7 color filter plug-in, raw post-processing tool
2022-06-12 23:11:00 【Coco Macchiato】
Exposure X7 It is a new version of professional image editor for creative Photographers , It is an advanced non-destructive RAW Editor ,Exposure X7 The various functions of can help us create beautiful images efficiently .

One 、Exposure X7 new function
In order to make everyone create more beautiful photos more efficiently ,Exposure Some functional improvements and updates have been made , bring ExposureX7 More in line with our usage habits , Here is Exposure X7 Some new features of :
1、 New mask tool
You can easily separate the subject from the background . With just a few clicks, you can draw a rough border to indicate the selected area , and Exposure Smart algorithms can create accurate masks .
2、 Selectable workspaces organize the panels needed for specific tasks
Use built-in layout for culling 、 Editing and decorating , Or create your own custom workspace .
3、 Uniform clipping and transformation
To make it easier to use ,Exposure X7 The crop and transform panels have been unified into one easy-to-use interface .
4、 New composition guidelines
New golden ratio 、 The gold spiral 、 Golden Triangle and diagonal .
5、 Defective pixel removal
Automatically detect and eliminate single pixel artifacts caused by camera sensor defects ; Adjust the defect removal intensity to achieve the best effect .
6、 The color is real
Use customization DCP Color profile , Color reproduction is more realistic .
7、 Digital Color Fidelity
Improved DNG Color fidelity of documents .
8、 Noise reduction
Fine texture noise can be added to restore detail through active noise reduction .
9、 Polygon selection tool
Exposure X7 Added polygon selection tool ; Easily separate the theme from the background by drawing a polygon border ; Optimize your selection at any time by moving polygon points ; You can also use tags to exclude or include areas .
Two 、Exposure Complete function introduction
In order to let everyone better understand and use Exposure, I've sorted it out for you Exposure Complete function introduction :
1、 Creative adjustment
1.1 Advanced color editor
Better control over color modification
By hue 、 Saturation and brightness range select source color and alternate color
Perform multiple transformations in one step
Save the conversion as a preset for reuse
1.2 3D color mask
It can precisely control the position of application image adjustment
Specified by brightness 、 The area defined by the combination of hue and saturation
Mask preset supports one click selection of sky 、 Leaf 、 Skin color, etc
Use the straw tool to quickly select mask constraints
1.3 Nondestructive layer
layer style , Including presets and photo adjustments
There is no limit to the number of layers
Use the brush tool to seamlessly mix and adjust
Process layers in multiple photos at the same time
Adjust the opacity of each layer
1.4 brush
Portrait decoration : Enhance the iris 、 Soften the skin 、 Whitening teeth 、 Eliminate red eyes
Brighten or darken a portion of an image
Adjust the warmth 、 Clarity and contrast
Make presets affect specific areas
Stacking effect
Adjust the opacity
Brightness and saturation mask visualization options
Black background mask visualization options
Custom selection mask overlay hue and opacity
1.5 Linear and radial gradient tools
Selectively apply radial 、 Flat and half flat gradient effects
Adjust the opacity of the gradient
1.6 Spot repair tool
Repair or clone to embellish the portrait or eliminate small interferences in the photo
1.7 Creative focus tool
A scatter tool for creative focus effects : Radial blur used to focus attention on the subject 、 Plane blur can achieve the effect of tilt displacement
episode : The inset location tool displays the exact center of the inset on your image
1.8 superposition
Frame
texture
Lighting effect : Solar flares 、 The side 、 Corner and surround effects 、 The movable stacking layer can realize the precise placement and rotation of the light effect
Batch overlay import
Overlay blending mode - The opacity 、 Multiplication 、 The screen 、 superposition 、 A strong light
1.9 Grain tools
Use presets or customize your own
In shadow 、 Render particles in different ways in intermediate and highlights to accurately simulate film particles
1.10 Infrared tools
glow
Foggy Area
Halo
2、 Photo editing
2.1 Automatic adjustment
One click to select the optimization value of common controls
Auto adjust set white balance 、 Exposure 、 Haze 、 Contrast and hue
You can choose to automatically adjust the intensity to match your editing style
2.2GPU Optimize
Assign rendering tasks to CPU And available graphics cards , For the fastest possible editing experience
2.3 Core editing tools
Exposure 、 Contrast 、 Saturation and other basic adjustments
The adjustable overall intensity slider blends the effect with the original image
High quality raw processing algorithms can significantly enhance shadow and highlight details
The haze horizontal slider counteracts the contrast drop caused by atmospheric haze
2.4 White balance adjustment
White balance dropper
Temperature and tone control
The temperature slider uses Kelvin units
White balance presets for specific lighting scenes
Keyboard shortcut switch white balance selector
2.5 Color editing
Use the slider of a specific color to adjust the hue 、 Saturation and brightness
Use the targeted adjustment tool to adjust the color of the selected color HSL
Adjust shadows 、 The saturation of the intermediate harmonic highlights
Apply heating and cooling through simple slider adjustment
Apply a lens filter simulation using any color you choose
2.6 Black and white editing
Adjust the sensitivity of colors used in black-and-white conversion
Preset sensitivity conversion
Sensitivity adjustment tool for selecting colors from images
2.7 Noise reduction
Contour guided noise reduction is based on the characteristics of camera sensors
Adjust to remove brightness and chrominance noise
The smoothing option applies an adaptive algorithm , Further reduce noise while retaining sharp edges
2.8 Crop and transform tools
tailoring 、 Flatten and rotate
A guide to crop composition —— Trisection 、 Golden ratio 、 The gold spiral 、 Golden Triangle 、 Diagonal and aligned grid
Adjust vertical and horizontal trapezoidal distortion
Adjust the rotation 、 Scale and offset
Adjust aspect ratio
You can choose to display the mesh when you adjust the transform controls
2.9 Histogram
Overlay shows areas where highlights and shadows are clipped
The adjustable area allows you to edit a specific hue range
Use the shortcut keys to toggle highlight and shadow clip warnings
Specifies the black or white clip warning threshold
Displays the number of pixels below the cursor RGB value : Select sample size - Single pixel or 5×5 weighted average
2.10 Complete editing history
View the full editing history of the photo and view specific slider values
Hover over the previous edit to see how the photo looks at that point
Easily revert to previous editing steps
Options to limit the number of edit history entries
2.11 Lookup table (LUT) Support
Applying industry standards to photos LUT adjustment
Import on Internet Found on and exported by other photo and video editing programs LUT
Visually browse installed LUT To make it easier to choose
Adjust the intensity to reduce or enhance the effect
2.12 Hue curve editing
Use control points to precisely adjust the brightness of the image
Save the hue curve preset for reuse
Use the slider to adjust the shadow 、 Highlights and contrast
Adjust the intensity to reduce or enhance the effect
Pop up the hue curve into the resizable window
3、 Preset
3.1 Optional presets
Create presets that affect only certain settings
Include or exclude layers from presets
Factory presets no longer affect basic and detail panels
Copy / Optional settings can also be used when pasting
Choose to use “ Paste settings from the previous ” Which categories of settings are overwritten when the command is pasted
White balance is now a separate group
3.2 Listen to the preset
Compare multiple presets on the screen , Then click apply your selection
Flexible viewing options - vertical 、 level 、 Column 、 That's ok 、 quadrilateral 、 hexagon
Preset in the audition will be in “ preset ” Highlight... In the panel
View the complete preset list
4、 Complete Photo Manager
4.1 Camera profile provided by the user
take DCP The file is applied to RAW Photo
Controls the RAW Color interpretation of sensor data
Apply... At the beginning of the rendering pipeline
You can adjust the hue of all colors 、 Saturation and brightness
Achieve accurate color reproduction of the real world
Basic for fixed lighting conditions DCP
Dual light sources suitable for various lighting conditions DCP
Camera presets
Enable DCP Automatically apply to images from specific Cameras
Match by camera model or serial number
You can choose to press the lens or ISO matching ( accurate , At least , most , In scope )
You can choose to apply presets ( Such as details and noise reduction settings )
Automatically apply to : Folder monitor 、 Copy from card 、 Browse to the unmodified image 、 Reset ( And full reset )
4.2 Smart collection
Automatically populates the collection according to the criteria you specify
Organization standard —— The rating 、 Color label 、 Flags, etc
Photo standards —— Camera brand 、 Shooting time 、 time of exposure 、 Aperture value, etc
Metadata standards —— Copyright 、 full name 、 E-mail 、 title 、 Keywords, etc
Editorial standards —— Edit time 、 There are virtual copies, etc
Create a smart collection from the file list
4.3 Lightroom Migration tools
Lightroom Convert folder to exposure bookmark
Photo metadata is transferred to exposure : sign / The rating / label 、 Copyright / full name / E-mail / Address / title / title / Name of copy 、 key word 、 Collection 、 Direction and crop and rotate
Lightroom The adjusted image can be exported together with the original for reference
4.4 key word
Apply keywords to add descriptive tags to your photos
Apply keywords during image copying
Keep or delete keywords during image export
Manage keywords in the keyword library and create keyword sets
from Lightroom Import keyword set
Easily delete all keywords in photos
Export the keyword set to Lightroom
Copy keywords to clipboard
4.5 Virtual copies
Edit and export multiple variations of a single photo without taking up additional disk space
Create a new virtual copy by right clicking a preset
4.6 Collection
Quickly group images , No matter where they appear on your computer
Use subsets for detailed classification
Designate a collection as a quick collection , Quickly add photos by pressing the key
When creating a collection, you can choose to add all selected photos
4.7 Side by side image comparison view
View multiple photos at the same time to speed up image culling
Link views to synchronize pan and zoom of multiple images
Fix one or more pictures so that they are always visible
Flexible viewing options - vertical 、 level 、 Column 、 That's ok 、 quadrilateral 、 hexagon
4.8 View and edit photo metadata
Title and title metadata fields
Create and apply metadata presets from the metadata panel
The file sizes available in the metadata panel and information overwrite options
Collection information displayed in the metadata panel : Add photos to your favorites through text entry or menus 、 Navigate to the collection
4.9 Search and filter photos
Photo metadata full-text search
By metadata 、 Rating or keyword filtering
4.10 File and folder operations ( Copy 、 Move 、 rename 、 Delete )
File renaming uses a flexible naming template
rename RAW+JPEG Sync name when photos
4.11 Watermark photos when exporting or printing
The watermark is composed of multiple text and graphic elements
Text elements can include items from image metadata
Resize 、 Location 、 Opacity, etc
Save watermark settings in workflow presets for reuse
Use the precise move and rotate tool to place watermark elements
4.12 More organizational tools
Drag the file to Apple Finder or Windows Explorer to copy or move them
Drag an image or folder to Exposure To access the folder and create a bookmark
Batch file rename
Adjust the capture time
Full text search to find images by various criteria
Flexible selection and sorting options
Ability to create and manage workflow presets ( Import 、 export 、 classification 、 Rename, etc )
4.13 printing
Print one or more photos at a time
Preview the print job before sending it to the printer
Print multiple images per page , Flexible row and column options
Automatically rotate the image to best match the print area
Create a total bleed print with flexible margin adjustments
In inches 、 Specify the paper size in millimeters or pounds
Apply output sharpening to a specific paper type
Apply watermark to printed photos
Zoom fill options to fill the entire cell , And adjust the cropping of individual cells
Match the orientation of the printed photo to the cell options
Print one image per page option
Keep square option
Preset of print settings : preservation / Restore print set 、 preservation / Restore the selected printer and paper source ( Limited to Windows)、 The print dialog box will remember your previous settings 、 Factory preset
Common print sizes , Such as 4×6 and 5×7
Contact list
4.14 Supports many compact 、DSLR And a mirrorless camera
Check out the complete list of cameras we support
4.15 Complete lens correction solution
Automatically select lens correction profile from photo metadata
Select the lens profile to use or close it completely
Distortion correction : Profile based or manual correction : Apply barrel / Pillow transform to offset lens distortion
Halo correction : Offset edge dimming : Based on configuration file or manually
Color difference correction : Offset the focal length difference of each color caused by the physical properties of the light passing through the lens : Based on configuration file or manually
Save and reuse lens correction settings as presets
4.16 Edge removal tool
Fixed the color edge problem that cannot be offset by lens correction
Algorithm to detect and remove color fringes
Select the stripe color to be corrected using the predefined common stripe color or eyedropper
Save and reuse edge removal settings as presets
4.17 Supports multiple file types (RAW、TIFF、JPEG、DNG)
PSD Support : Browse Photoshop A thumbnail of the file 、 by Photoshop Compositing adds an exposure effect
Directly from Exposure start-up Photoshop As an external editor
4.18 Change direction
Rotate clockwise and counterclockwise 90°
Flip horizontally and vertically
5、 Nondestructive workflow
5.1 No catalog workflow
No need to import images
Easily move images between computers or external storage
Easy backup
Cloud synchronization makes it easy to work or collaborate on multiple computers
5.2 Copy from card
Displays a visual preview of the source image
Select the source image to copy
Apply one or more edit presets to the copy
Add to one or more collections in the replica
Add one or more keywords to the document
Keep file creation and modification time
File name in RAW+JPEG Keep your photos in sync
Number suffix file naming option for preserving camera sequences
The reset sequence can be selected for each use
Copy from more than one card at a time
Organize and edit photos while copying in the background
Apply metadata during card copying
Add photos to Favorites during card copying
Back up photos to a second location when copying
The photos in the latest card copy will be automatically added to the last copy in the card collection
DNG Converter integration can be automatically converted to during replication DNG Format
5.3 Send photos to an external editor
Start photos in other programs
Use Edit Copy In Send original file
Use Edit Copy In Send the exported image with exposure editing
Specify your favorite editor to start with the shortcut key
Edit Copy In Use the complete naming template 、 Customize resolution settings and presets
5.4 Monitored folders
Monitor any folders in the folders panel
Use with the camera manufacturer's online camera and online software
Automatically select a new file
Rename a new file using the file naming preset
Apply presets when adding files
When applying multiple presets , A virtual copy will be created for each preset
Apply metadata when adding files
Add keywords when adding files
Add to collection when adding files
5.5 Flexible file export
Export to JPEG、TIFF and PSD
Export destinations include folders 、 Special folders ( Such as desktop or picture ) Or every time
Use the advanced naming template to include various metadata in file and folder names
Exporting presets allows you to easily reuse common settings
The export target can create multiple subfolders and use metadata as the folder name
Quick export provides quick access to commonly used export recipes through mouse or keyboard shortcuts
Includes built-in for popular social media and print services 、 Customizable quick export configuration file
Apply output sharpening to a specific paper type
A quick preview of the watermark from the Export dialog
Custom text / Ask for options to prompt the text used in the file name or folder template
The file creation time is set to match the image capture time
Generate serial numbers in the order selected for sorting
Number suffix file naming option for preserving camera sequences
The reset sequence can be selected for each use
Reduce the image when exporting : By size 、 Long side 、 Short side 、 Height 、 Width 、 In megapixels or percentages
6、 The user interface
6.1 new ! Customizable workspace
new ! Show only the tools required for a specific activity
Used to remove 、 edit 、 Decorated new built-in layout
new ! Create a new workspace customized for the task
Reposition and hide the panel
Solo mode using one panel at a time
Show / Hide markup and filter controls
Grid view allows up to 20 Column
6.2 new ! Fast navigation
new ! Switch to the panel or change the workspace by hovering over the docking icon
6.3 Multi display and full screen support
You can choose to place left and right docks on the auxiliary window
6.4 Edit photos side by side
6.5 Automatic update program
Notify about available updates
6.6 User interface language
Simplified Chinese
6.7 High resolution display support
The user interface can be found in Mac Retina and Windows high DPI Zoom on the display
6.8 Configurable shortcuts
Used to increase / Keyboard shortcuts to reduce grid thumbnail size
Specify one or more keyboard shortcuts for editing and organizing functions
Shortcut key presets manage multiple key layouts
Contains Lightroom Compatible layouts simplify migration
Use the arrow keys to position the various preview controls :Shift- The arrow moves 10 times 、Alt-up/down rotate (shift-alt-up/down rotate 10 times )、 Applicable to fixed-point repair 、 Brush gradient 、 Scattered view area 、 Stack move / Rotate the handle and move the watermark / Rotary handle
Used to switch between single Dock Keyboard shortcuts for
Used to increase / Keyboard shortcuts to reduce grid thumbnail size
ExposureX7win- Installation package
https://wm.makeding.com/iclk/?zoneid=50011
ExposureX7Mac- Installation package
https://wm.makeding.com/iclk/?zoneid=50012
That's all Exposure X7 Function introduction of , More about raw Post processing content , You can go to Alien SkinExposure Download query trial .
边栏推荐
- Market trend report, technical innovation and market forecast of Chinese stump crusher
- C language: how to give an alias to a global variable?
- Anti aliasing / anti aliasing Technology
- DETR(Detection with Transformers) 学习笔记
- MySQL row to column, column to row, multiple columns to one row, one row to multiple columns
- PHP deletes data of the same item in a two-dimensional array
- [North Asia data recovery] data recovery cases in which the partitions disappear and the partitions are inaccessible after the server reinstalls the system
- lua 循环语句
- PyTorch常用参数初始化方法:【均匀分布、正态(高斯)分布、Xavier、kaiming、正交矩阵、稀疏矩阵、常数、单位矩阵、零填充】
- [Part 8] semaphore source code analysis and application details [key points]
猜你喜欢

Mysql concat_ WS, concat function use

Photoshop:ps how to enlarge a picture without blurring
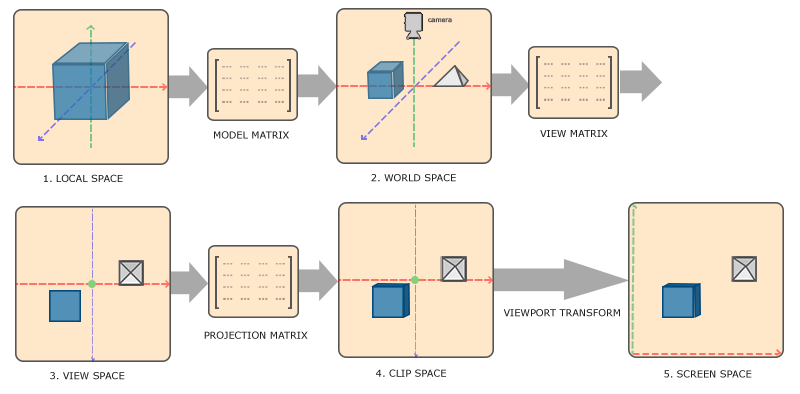
Coordinate transformation in pipelines

Embedded pipeline out of the box

Design a MySQL table for message queue to store message data

PostgreSQL 中文社区黑龙江分会和辽宁分会成立啦!
![[Part VI] source code analysis and application details of countdownlatch [key]](/img/6e/085e257c938a8c7b88c12c36df83e1.jpg)
[Part VI] source code analysis and application details of countdownlatch [key]

MYSQL 行转列、列转行、多列转一行、一行转多列

Hostvars in ansible

反走样/抗锯齿技术
随机推荐
管线中的坐标变换
【LeetCode】300. Longest ascending subsequence
Theory + practice will help you master the dynamic programming method
MOOG servo valve d634-341c/r40ko2m0nss2
Alien Skin Exposure X7调色滤镜插件,RAW后期处理工具
Shardingsphere-proxy-5.0.0 deployment table implementation (I)
Research Report on water sports shoes industry - market status analysis and development prospect forecast
InfoQ 极客传媒 15 周年庆征文|简述构建微服务架构的四大挑战
web3 原则和去中心化
Redis实现短信验证码登录
Design of traceid in the project
China Aquatic Fitness equipment market trend report, technical innovation and market forecast
C语言:如何给全局变量起一个别名?
Analysis report on investment and development trend of gap base of Chinese traditional medicine 2022 ~ 2028
The Milvus graphical management tool Attu is coming!
PHP deletes data of the same item in a two-dimensional array
〖Kubernetes指南⑤〗Label快速入门
Module 8 operation
80 lines of code to realize simple rxjs
Colab tutorial (super detailed version) and colab pro/colab pro+ usage evaluation