当前位置:网站首页>MongoDB快速入门与基本使用
MongoDB快速入门与基本使用
2022-07-30 05:40:00 【Tab_2021】
本篇我们讲一下 MongoDB 数据库的基本使用,希望能帮助大家快速上手
MongoDB 是什么?简单来讲,它是一个由 C++ 语言编写的基于分布式文件存储的数据库,旨在为WEB应用提供可扩展的高性能数据存储解决方案。

相关概念
数据库(database) 是一个独立的系统,和服务端语言无关,和任何服务端的语言、框架 都可连接。

web server、MongoDB与database间的关系如下。

MongoDB中database、collection及document之间的关系如下。

注:数据库(database)和集合(collection)都是数据容器,文档(document)是单条数据。
MongoDB的操作方式
MongoDB的常见操作方式主要有三种,分别是使用MongoDB Compass操作、终端操作以及使用Nodejs操作,展示如下。
使用MongoDB Compass
MongoDB Compass是MongoDB的可视化操作方式,通过可视化界面可以轻松实现Databases、Collections、Documents的增删改查,Documents的筛选、排序等操作。

终端操作
一些终端操作的常见命令列举如下。
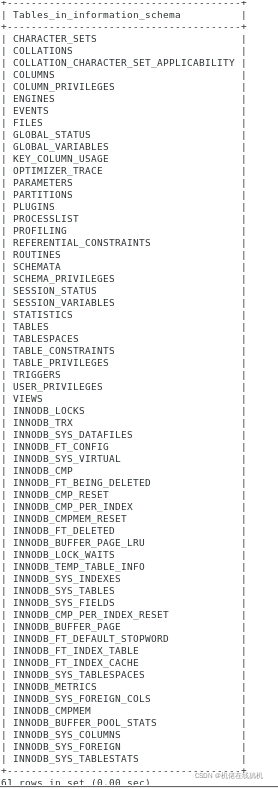
# 展示数据库列表
show dbs

# 进入某数据库
use <database name>

# 展示collections列表
show collections

# 插入一条document数据
db.<collection name>.insert({
    ...})

# 按条件展示documents数据
db.<collection name>.find({
    ...})

# 按条件排序documents数据
db.<collection name>.find({
    ...}).sort({
    ...})
Nodejs操作MongoDB
安装npm包:
npm i mongodb
示例代码(代码命名为server.js):
// nodejs为数据库的客户端client,为前端的服务端server

const MongoClient = require('mongodb').MongoClient

// 本地启动的 mongodb 服务的 url
// mongodb默认端口27017
const url = 'mongodb://localhost:27017'

// 要操作的数据库名称
const dbName = 'messageBoardDB'

// 建立客户端与数据库的连接
// MongoClient.connect(url, 配置, 回调函数)
MongoClient.connect(url, {

    useUnifiedTopology: true,
    useNewUrlParser: true,
}, (err, client) => {


    if (err) {

        console.error('--mongodb连接失败', err)
        return
    }
    console.log('--mongodb连接成功')

    const db = client.db(dbName) // 获取到目标数据库
    const userCollection = db.collection('users') // 获取到目标集合

    // 增删改查为异步操作

    // 增 (insertOne, insertMany)
    userCollection.insertOne({

        username: 'tom',
        password: '123',
        age: '33'
    }, (err, res) => {

        if (err) {

            console.error('新增失败', err)
            return
        }
        console.log('新增成功', res)
    })

    // 改 (updateOne, updateMany)
    userCollection.updateOne(
        {
     username: 'tom' },
        {
     $set: {
     age: 22 } },
        (err, res) => {

            if (err) {

                console.error('修改失败', err)
                return
            }
            console.log('修改成功', res)
        }
    )

    // 查 (find, findOne, findOneAndDelete, findOneAndReplace, findOneAndUpdate)
    userCollection.findOne(
        {
     username: 'tom' },
        (err, res) => {

            if (err) {

                console.error('查找失败', err)
                return
            }
            console.log('查找成功', res)
        }
    )
    // userCollection.find().sort({_id: -1}).toArray(
    // (err, res) => {

    // if (err) {

    // console.error('查找失败', err)
    // return
    // }
    // console.log('查找成功', res)
    // }
    // )

    // 删 (deleteOne, deleteMany)
    userCollection.deleteOne(
        {
     username: 'tom' },
        (err, res) => {

            if (err) {

                console.error('删除失败', err)
                return
            }
            console.log('删除成功', res)
        }
    )

    // 关闭客户端,断开连接。
    // client.close()
    // 因为增删改查为异步操作,断开连接为同步操作,所以此处不能直接断开,否则此处断开时还未进行增删改查,会报错。
})
运行以上代码,即终端运行node server.js,输出结果如下:
--mongodb连接成功
新增成功 {

  acknowledged: true,
  insertedId: new ObjectId("6266070977339f15b47848d0")
}
修改成功 {

  acknowledged: true,
  modifiedCount: 1,
  upsertedId: null,
  upsertedCount: 0,
  matchedCount: 1
}
查找成功 {

  _id: new ObjectId("6266070977339f15b47848d0"),
  username: 'tom',
  password: '123',
  age: 22
}
删除成功 {
     acknowledged: true, deletedCount: 1 }
使用mongoose
mongoose对Nodejs原生的MongoDB模块进行了进一步的优化封装,并提供了更多的功能。
安装npm包:
npm i mongoose
示例代码:
- mongoose链接数据库
/** * db.js * 连接数据库(mongodb服务端) */

const mongoose = require('mongoose')

const url = 'mongodb://localhost:27017'
const dbName = 'messageBoardDB'

// 连接数据库(mongodb服务端)
mongoose.connect(`${
      url}/${
      dbName}`, {

    useNewUrlParser: true,
    useUnifiedTopology: true,
})

// 连接错误处理
mongoose.connection.on('error', err => {

    console.error('mongoose connection failure', err)
})

module.exports = mongoose
- 定义
schema及model数据模型
/** * model.js * 定义model数据模型(用于规范数据格式) */

const mongoose = require('./db')

// 定义 schema (数据架构、数据规范)
const UserSchema = mongoose.Schema({

    username: {

        type: String, // 类型不一致则自动转换
        required: true, // 没有则报错
        unique: true, // 重复则报错
    },
    password: {

        type: String,
        required: true,
    },
    phone: Number,
    gender: {

        type: Number,
        default: 0, // 没有则设置默认值0,0保密 1男 2女
    },
}, {

    timestamps: true, // 时间戳,自动添加document创建时间、更新时间
})

// 定义model:mongoose.model(modelName: string, schema?: mongoose.Schema, collectionName?: string, ...)
const User = mongoose.model('user', UserSchema, 'users')
// 通常建议此处至少写三个参数
// 若不写第三个参数,则根据modelName自动判断collection(与此处modelName的复数形式对应,如army对应armies)
// 若在database中未找到对应的collection,则会自动创建

module.exports = User
- 使用定义好的数据模型操作数据库中的数据(增删改查)
/** * crud.js * 使用model操作数据(CRUD) * CRUD (create, read, update, delete) */

const User = require('./model')

!(async () => {


    // create
    const newUser = await User.create({

        username: 'sense',
        password: 123, // 与schema中类型不一致则会自动转换
        age: 22, // schema中没有此字段,则存储时不会保存此字段
        phone: 12345678901,
    })
    console.log('create success', newUser)

    // read
    const userList = await User.find().sort({
     _id: -1 }) // 返回数组
    console.log('read success', userList)
    const user = await User.findOne({
     username: 'sense' }) // 返回单个对象
    console.log('read success', user)

    // update
    const updateResult = await User.updateOne(
        {
     username: 'sense' }, // 条件
        {
     password: 'abcd'}, // 更新的内容
    )
    console.log('update success', updateResult)
    const updatedUser = await User.findOneAndUpdate(
        {
     username: 'bob' }, // 条件
        {
     password: '000' }, // 更新的内容
        {
     new: true } // 返回更新后的数据(否则会返回更新前的内容)
    )
    console.log('update success', updatedUser)

    // delete
    const deleteResult = await User.deleteOne(
        {
     username: 'sense' },
    )
    console.log('delete success', deleteResult)
    const deletedUser = await User.findOneAndDelete(
        {
     username: 'bob' },
    )
    console.log('delete success', deletedUser)

})()

console.log('---success---')
- 终端运行
node crud.js,输出如下:
---success---
create success {

  username: 'sense',
  password: '123',
  phone: 12345678901,
  gender: 0,
  _id: new ObjectId("62665fa1ba8d3c4b4e410e99"),
  createdAt: 2022-04-25T08:45:21.436Z,
  updatedAt: 2022-04-25T08:45:21.436Z,
  __v: 0
}
read success [
  {

    _id: new ObjectId("62665fa1ba8d3c4b4e410e99"),
    username: 'sense',
    password: '123',
    phone: 12345678901,
    gender: 0,
    createdAt: 2022-04-25T08:45:21.436Z,
    updatedAt: 2022-04-25T08:45:21.436Z,
    __v: 0
  },
  {

    _id: new ObjectId("6266553b0db4f782a8e64530"),
    username: 'bob',
    password: '123',
    phone: 12345678901,
    gender: 0,
    createdAt: 2022-04-25T08:00:59.337Z,
    updatedAt: 2022-04-25T08:00:59.337Z,
    __v: 0
  }
]
read success {

  _id: new ObjectId("62665fa1ba8d3c4b4e410e99"),
  username: 'sense',
  password: '123',
  phone: 12345678901,
  gender: 0,
  createdAt: 2022-04-25T08:45:21.436Z,
  updatedAt: 2022-04-25T08:45:21.436Z,
  __v: 0
}
update success {

  acknowledged: true,
  modifiedCount: 1,
  upsertedId: null,
  upsertedCount: 0,
  matchedCount: 1
}
update success {

  _id: new ObjectId("6266553b0db4f782a8e64530"),
  username: 'bob',
  password: '000',
  phone: 12345678901,
  gender: 0,
  createdAt: 2022-04-25T08:00:59.337Z,
  updatedAt: 2022-04-25T08:45:21.489Z,
  __v: 0
}
delete success {
     acknowledged: true, deletedCount: 1 }
delete success {

  _id: new ObjectId("6266553b0db4f782a8e64530"),
  username: 'bob',
  password: '000',
  phone: 12345678901,
  gender: 0,
  createdAt: 2022-04-25T08:00:59.337Z,
  updatedAt: 2022-04-25T08:45:21.489Z,
  __v: 0
}
对接路由
示例代码:
- 定义
schema数据规范及model数据模型(新建文件commentModel.js如下)
const mongoose = require('./db')

const commentSchema = mongoose.Schema({

    username: {

        type: String,
        required: true,
    },
    content: {

        type: String,
        required: true,
    },
})

const Comment = mongoose.model('comment', commentSchema, 'comments')

module.exports = Comment
- 对接路由(routes文件夹下新建
demo.js文件如下)
const router = require('koa-router')()
const Comment = require('../db/commentModel')

router.prefix('/demo')

router.get('/', async (ctx) => {

    const commentList = await Comment.find().sort({
     _id: -1 })

    ctx.body = {

        errno: 0,
        data: commentList,
    }
})

router.post('/', async (ctx) => {

    const requestBody = ctx.request.body // 获取请求体中的数据

    const newComment = await Comment.create({

        username: requestBody.username,
        content: requestBody.content,
    })

    // Koa会根据返回的数据的格式自动设置content-type
    ctx.body = {

        errno: 0,
        message: 'create success',
        data: newComment,
    }
})

module.exports = router
- 在
app.js文件中引入路由并且注册路由
// 引入路由
const demo = require('./routes/demo')

// 注册路由
app.use(demo.routes(), demo.allowedMethods())
- Postman发送POST请求,结果如下

- 浏览器发送GET请求,结果如下

至此,MongoDB的入门使用就介绍完了,希望对大家有所帮助~
如有疏漏之处欢迎评论区留言指正哦~
边栏推荐
- net start mysql MySQL service is starting. MySQL service failed to start.The service did not report any errors.
- Qt通过QSttings类读取*.ini配置文件
- 技术人该访问的论坛
- [Other] DS5
- 安装Nuxt.js时出现错误:TypeError:Cannot read property ‘eslint‘ of undefined
- Numpy 中 np.vstack() 和 np.hstack() 简单解析
- String类型字符串获取第一次或者最后一次出现的下标
- 646.最长数对链(动态规划)
- Different usage scenarios of subqueries as retrieval tables and the question of whether to add aliases
- Art-template 中文文档[详细篇]
猜你喜欢
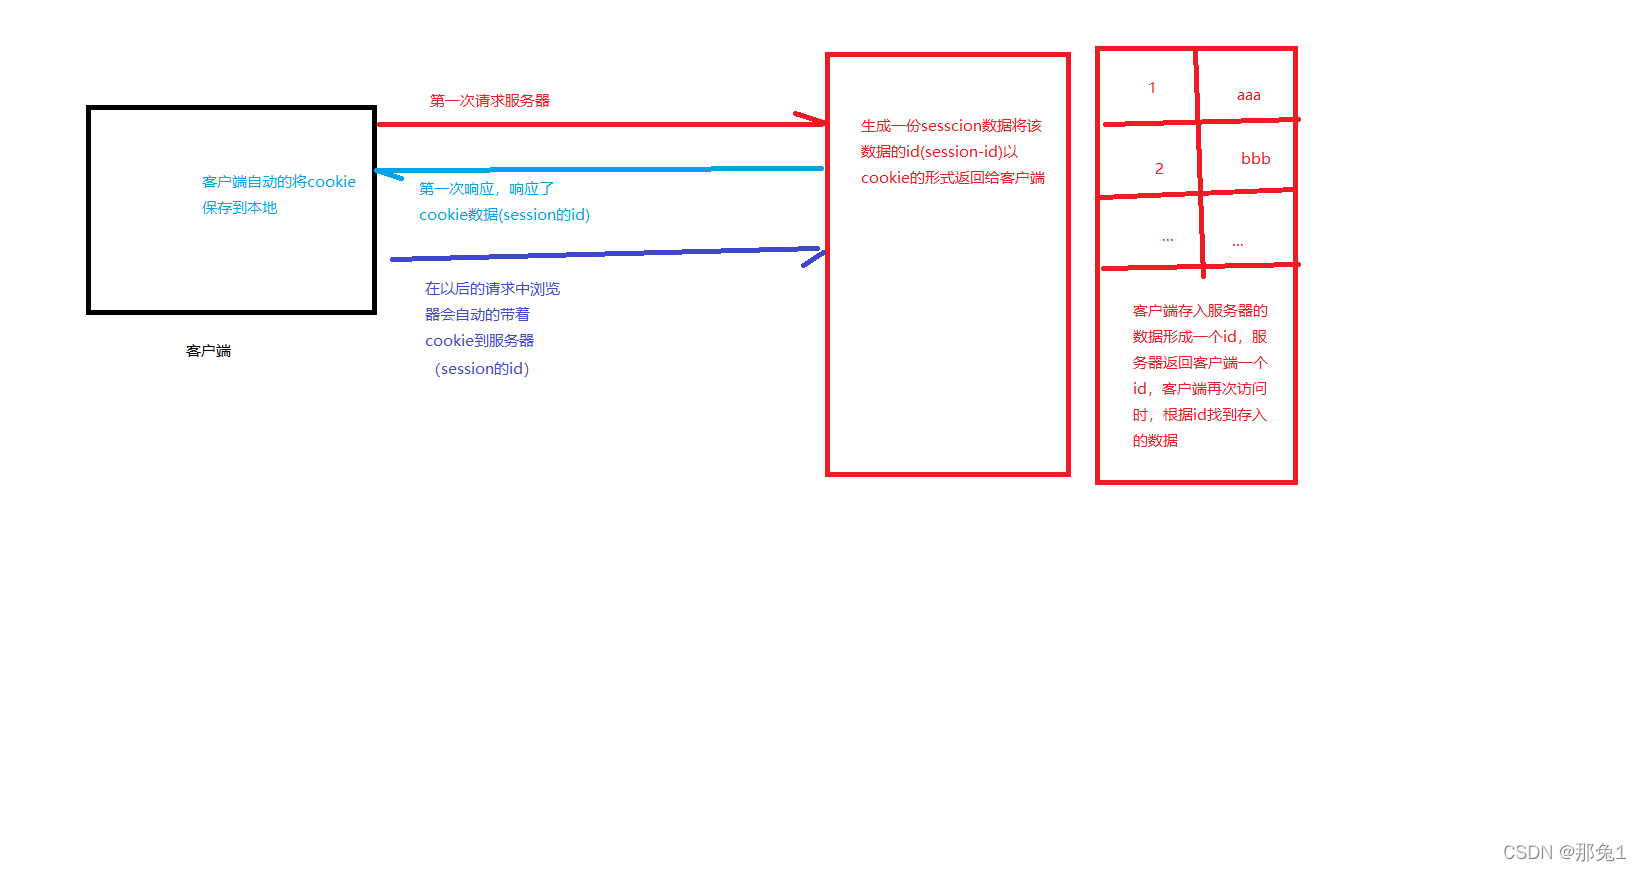
Difference between cookie and session

navicat新建数据库

Error: npm ERR code EPERM

pytorch中的线性代数

flask-socketio实现的网页聊天室(一)
MySQL user authorization

Memories · The last system design in the university era
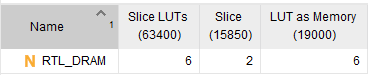
Learn FPGA from the underlying structure (6) ---- Distributed RAM (DRAM, Distributed RAM)

384.打乱数组

数据操作 / 数据预处理
随机推荐
海量号码需要保存,如何才能尽可能少地占用内存?
【C语言】三子棋(井字棋)的实现
Navicat new database
240.搜索二维矩阵II
208.实现Trie树(字典树与哈希表实现)
C语言(入门篇一)
flask的笔记
自定义异常类的使用
爬虫数据是如何收集和整理的?
51.N皇后(回溯法)
【Pytorch】torch.manual_seed()、torch.cuda.manual_seed() 解释
0基础玩转C语言—初识C语言(上)
Basic syntax of MySQL DDL and DML and DQL
php实现数据库的增删查改操作-教务管理系统
相对路径和绝对路径的区别
HCIP-第九天-BGP(边界网关协议)
81.搜索旋转排序数组II(数组旋转后二分查找)
[GStreamer] The name of the plugin should match GST_PLUGIN_DEFINE
G Bus Count (Google Kickstart2014 Round D Problem B) (DAY 89)
131.分割回文串