当前位置:网站首页>OPENCV学习DAY7
OPENCV学习DAY7
2022-08-03 09:48:00 【SKYWALKERS_2397】
Sobel算子
sobel算子是图像边缘检测的最重要的算子之一,在机器学习、数字媒体、计算机视觉等领域起着重要作用。
Sobel算子包含两组3×3的滤波器,分别对水平及垂直方向上的边缘敏感。
G x = [ x 1 x 2 x 3 x 4 x 5 x 6 x 7 x 8 x 9 ] = [ − 1 0 1 − 2 0 2 − 1 0 1 ] ∗ A (3) G_x= \left[\begin{matrix}x1 & x2 &x3 \\x4 & x5 & x6 \\x7 & x8 & x9\end{matrix}\right] =\left[\begin{matrix}-1 & 0 & 1 \\-2 &0 & 2 \\-1 & 0 & 1\end{matrix}\right] \tag{3}*A Gx=⎣⎡x1x4x7x2x5x8x3x6x9⎦⎤=⎣⎡−1−2−1000121⎦⎤∗A(3)
G y = [ x 1 x 2 x 3 x 4 x 5 x 6 x 7 x 8 x 9 ] = [ 1 2 1 0 0 0 − 1 − 2 − 1 ] ∗ A (3) G_y = \left[\begin{matrix}x1 & x2 &x3 \\x4 & x5 & x6 \\x7 & x8 & x9\end{matrix}\right] =\left[\begin{matrix}1 & 2 & 1 \\0 &0 & 0 \\-1 & -2 & -1\end{matrix}\right] \tag{3}*A Gy=⎣⎡x1x4x7x2x5x8x3x6x9⎦⎤=⎣⎡10−120−210−1⎦⎤∗A(3)
Sobel算法的本质是让两个方向模板分别沿着x轴、y轴与图像做卷积,方向是从上到下和从左到右。将模板的中心和图像上的某个像素重合,并将该像素周围的点 与模板上对应的系数相乘,其中Gx及Gy分别代表经横向及纵向边缘检测的图像梯度值。
只算左右方向
import cv2
import numpy as np
img = cv2.imread('img.jpg')
#dst = cv2.Sobel(src,ddepth,dx,dy,ksize,scale, delta, borderType)
#前四个为必须项,其后为可选参数
#ddepth:图形的深度
#dx和dy分别表示水平和竖直方向
#ksize是Sobel算子的大小
#scale是缩放导数的比例常数,默认情况下没有伸缩系数;
#delta是一个可选的增量,将会加到最终的dst中,同样,默认情况下没有额外的值加到dst中;
#borderType是判断图像边界的模式。这个参数默认值为cv2.BORDER_DEFAULT。
img_sobelx = cv2.Sobel(img,cv2.CV_64F,1,0,ksize=3)
cv2.imshow('img_sobelx', img_sobelx)
cv2.waitKey(0)
cv2.destroyAllWindows()
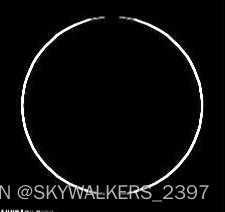
原图于运行结果:


因为从黑到白为正数,从白到黑为负数,所有的负数被截断成0,所以要去绝对值。
import cv2
import numpy as np
img = cv2.imread('img.jpg')
img_sobelx = cv2.Sobel(img,cv2.CV_64F,1,0,ksize=3)
img_sobelx = cv2.convertScaleAbs(img_sobelx)
cv2.imshow('img_sobelx', img_sobelx)
cv2.waitKey(0)
cv2.destroyAllWindows()
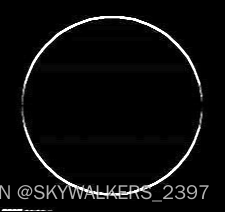
效果明显变好,边缘处既无错误判断,也能处理从白到黑的地方
只算上下方向
import cv2
import numpy as np
img = cv2.imread('img.jpg')
img_sobely = cv2.Sobel(img,cv2.CV_64F,0,1,ksize=3)
img_sobely = cv2.convertScaleAbs(img_sobely)
cv2.imshow('img_sobely', img_sobely)
cv2.waitKey(0)
cv2.destroyAllWindows()
两个方向的计算结果求和
import cv2
import numpy as np
img = cv2.imread('img.jpg')
img_sobelx = cv2.Sobel(img,cv2.CV_64F,1,0,ksize=3)
img_sobelx = cv2.convertScaleAbs(img_sobelx)
img_sobely = cv2.Sobel(img,cv2.CV_64F,0,1,ksize=3)
img_sobely = cv2.convertScaleAbs(img_sobely)
img_sobel = cv2.addWeighted(img_sobely,0.5,img_sobely,0.5,0)
cv2.imshow('img_sobel',img_sobel)
cv2.waitKey(0)
cv2.destroyAllWindows()
不建议直接计算两个方向,在融合的过程中会出现发散,效果不好
import cv2
import numpy as np
img = cv2.imread('img.jpg')
img_sobel = cv2.Sobel(img,cv2.CV_64F,1,1,ksize=3)
img_sobel = cv2.convertScaleAbs(img_sobel)
cv2.imshow('img_sobel',img_sobel)
cv2.waitKey(0)
cv2.destroyAllWindows()

补充:关于参数ddepth的使用
首先来说CV_8U, CV_16U, CV_16S, CV_32F 以及 CV_64F,都是opencv定义的数据类型。
具体定义如下
#define CV_8S 1
#define CV_16U 2
#define CV_16S 3
#define CV_32S 4
#define CV_32F 5
#define CV_64F 6
#define CV_16F 7
#define CV_8UC1 CV_MAKETYPE(CV_8U,1)
#define CV_8UC2 CV_MAKETYPE(CV_8U,2)
#define CV_8UC3 CV_MAKETYPE(CV_8U,3)
#define CV_8UC4 CV_MAKETYPE(CV_8U,4)
#define CV_8UC(n) CV_MAKETYPE(CV_8U,(n))

#define CV_8SC1 CV_MAKETYPE(CV_8S,1)
#define CV_8SC2 CV_MAKETYPE(CV_8S,2)
#define CV_8SC3 CV_MAKETYPE(CV_8S,3)
#define CV_8SC4 CV_MAKETYPE(CV_8S,4)
#define CV_8SC(n) CV_MAKETYPE(CV_8S,(n))

#define CV_16UC1 CV_MAKETYPE(CV_16U,1)
#define CV_16UC2 CV_MAKETYPE(CV_16U,2)
#define CV_16UC3 CV_MAKETYPE(CV_16U,3)
#define CV_16UC4 CV_MAKETYPE(CV_16U,4)
#define CV_16UC(n) CV_MAKETYPE(CV_16U,(n))

#define CV_16SC1 CV_MAKETYPE(CV_16S,1)
#define CV_16SC2 CV_MAKETYPE(CV_16S,2)
#define CV_16SC3 CV_MAKETYPE(CV_16S,3)
#define CV_16SC4 CV_MAKETYPE(CV_16S,4)
#define CV_16SC(n) CV_MAKETYPE(CV_16S,(n))

#define CV_32SC1 CV_MAKETYPE(CV_32S,1)
#define CV_32SC2 CV_MAKETYPE(CV_32S,2)
#define CV_32SC3 CV_MAKETYPE(CV_32S,3)
#define CV_32SC4 CV_MAKETYPE(CV_32S,4)
#define CV_32SC(n) CV_MAKETYPE(CV_32S,(n))

#define CV_32FC1 CV_MAKETYPE(CV_32F,1)
#define CV_32FC2 CV_MAKETYPE(CV_32F,2)
#define CV_32FC3 CV_MAKETYPE(CV_32F,3)
#define CV_32FC4 CV_MAKETYPE(CV_32F,4)
#define CV_32FC(n) CV_MAKETYPE(CV_32F,(n))

#define CV_64FC1 CV_MAKETYPE(CV_64F,1)
#define CV_64FC2 CV_MAKETYPE(CV_64F,2)
#define CV_64FC3 CV_MAKETYPE(CV_64F,3)
#define CV_64FC4 CV_MAKETYPE(CV_64F,4)
#define CV_64FC(n) CV_MAKETYPE(CV_64F,(n))

#define CV_16FC1 CV_MAKETYPE(CV_16F,1)
#define CV_16FC2 CV_MAKETYPE(CV_16F,2)
#define CV_16FC3 CV_MAKETYPE(CV_16F,3)
#define CV_16FC4 CV_MAKETYPE(CV_16F,4)
#define CV_16FC(n) CV_MAKETYPE(CV_16F,(n))
具体含义
S = 有符号整型 U = 无符号整型 F = 浮点型
CV_8U : 8位无符号整数
CV_8S : 8位有符号整数
CV_16U : 16位无符号整数
CV_16S : 16位有符号整数
CV_32S : 32位有符号整数
CV_32F : 32位浮点数
CV_64F : 64位浮点数
边栏推荐
猜你喜欢


随机推荐
SQL Daily Practice (Nioke New Question Bank) - Day 5: Advanced Query
go版本升级
报告:想学AI的学生数量已涨200%,老师都不够用了
STP生成树(端口状态+端口角色+收敛机制 )|||| STP优化技术( uplinkfast技术+Portfast技术+backbonefast技术 )详解
Promise 1: Basic Questions
Promise 二:关键问题
WinCheck Script
Redis和MySQL如何保持数据一致性
DOM0、DOM2、DOM3 事件
When deleting a folder, the error "Error ox80070091: The directory is not empty" is reported. How to solve it?
MySql的初识感悟,以及sql语句中的DDL和DML和DQL的基本语法
浅聊缓存函数
Flink Yarn Per Job - Submit application
pytorch安装错误
Go操作Redis数据库
DOM0, DOM2, DOM3 events
Oracle 数据如何迁移到MySQL 图文详细教程
AD环境搭建
Does setting the following sysctl settings require a system reboot?
Mysql OCP 27题