当前位置:网站首页>Project training experience 2
Project training experience 2
2022-07-27 06:42:00 【Heartbreaking blog】
project training 2
project training 2 Mainly about Nginx,k8s Use .
development environment :win10 CentOS 7
1.Nginx Use
1.Nginx install
1.Nginx Source code installation
cd /usr/local    Switch to the specified directory ( System level software )

wget http://nginx.org/download/nginx-1.19.6.tar.gz   download nginx

tar -zxvf nginx-1.19.6.tar.gz    decompression
2. Install dependencies
yum -y install gcc pcre pcre-devel zlib zlib-devel openssl openssl-devel
3. Configure the installation directory
cd /usr/local/nginx-1.19.6

./configure --prefix=/usr/local/nginx --sbin-path=/usr/bin/nginx     Configure installation properties
4. Compile and install
make && make install
5. Common commands
nginx			         start-up nginx
ps -ef | grep nginx		 see nginx Whether it has been started successfully
nginx -s reload			 Restart
nginx -s stop			 stop it nginx
nginx -v nginx -V        View version
nginx -t                 Check
nginx -T                 Display profile
nginx -s    stop quit reopen reload
nginx -?
Start after installation , adopt ip:80 visit , Generally, you need to turn off the firewall of the server , The following is through host mapping ( edit hosts File implementation ) visit :
,
Easy to develop and use , Set up Nginx Syntax highlighting
cd nginx-1.19.6 cd contrib cp -r vim/* /root/.vim/
2. modify Nginx Main directory and homepage
root Main catalog , The home page is index.html, The document is root.conf, Need to be in the main configuration file nginx.conf quote include root.conf;
listen    81;
server_name  localhost;
location / {

  root  /tmp/html;
  index  index.html index.htm;
}

error_page  500 502 503 504  /50x.html;
location = /50x.html {

  root  html;
} }
Half restart and half load after modification nginx -s reload 
3.autoindex Use
The document is autoindex.conf, Need to be in the main configuration file nginx.conf quote
 server {

        listen       81;
        server_name  localhost;
        location / {

            root   /tmp/html;
            autoindex on;
            # index  index.html index.htm;
        }
        error_page   500 502 503 504  /50x.html;
        location = /50x.html {

            root   html;
        }
    }
Half restart and half load after modification nginx -s reload 
4. Reverse proxy
Reverse proxy through request Tomcat Realization , Through the first Docker function Tomcat Containers
docker run -itd -p8080:8080 --name tomcat80 tomcat:8.0
 server {

        listen       81;
        server_name  localhost;

        location / {

            proxy_pass  http://localhost:8080;
           # root   /tmp/html;
           # index  index.html index.htm;
        }

        error_page   500 502 503 504  /50x.html;
        location = /50x.html {

            root   html;
        }
    }

5. Dynamic and static separation
Need to be in image Pictures under the directory
 server {

        listen       81;
        server_name  localhost;

        location / {

            proxy_pass  http://localhost:8080;
            root   /tmp/html;
            index  index.html index.htm;
        }
            location /image/ {

            alias   /tmp/image/;
        }

        error_page   500 502 503 504  /50x.html;
        location = /50x.html {

            root   html;
        }
    }

6. Load balancing
docker run -itd -p8080:8080 --name tomcat80 tomcat:8.0
docker run -itd -p8081:8080 --name tomcat9 tomcat:9
tomcat8.5 after ROOT stay webapps
It is necessary to enter the container
docker exec -it tomcat9 /bin/bash
cd webapps.dist/
cp -r ROOT …/webapps
upstream backend
{

  ##server Service address   weight For weight :1-10
  ##weight Nginx according to weight Configuration distributes requests more to highly configured back-end servers , Distribute relatively few requests to low configuration servers
  server 127.0.0.1:8080  weight=1;
  server 127.0.0.1:8081  weight=2;
}
 server {

        listen       81;
        server_name  localhost;

        location / {

            proxy_pass  http://backend;
            root   /tmp/html;
            index  index.html index.htm;
        }
        }

2. Project structures,
Just started to build through script wmSpringboot
docker run -itd --name wmSpringboo -p8081:8080 --network=jdnetwork wmboot
Then access through ports , Join after you can visit Nginx
 upstream backend
{

  ##server Service address   weight For weight :1-10
  ##weight Nginx according to weight Configuration distributes requests more to highly configured back-end servers , Distribute relatively few requests to low configuration servers
  server 47.113.192.187:8080  weight=1;
  server 47.113.192.187:8081  weight=2;
  ## If the down  The configuration will not take effect
  ##server 192.168.1.107:8001  weight=2 down;
  ##ip_hash  Per request by access ip Of hash Result distribution , Ensure to connect to the fixed load server , This is the solution session problem
  #ip_hash;
}
 server {

        listen       81;
        server_name  localhost;

        location / {

            proxy_pass  http://backend;
            root   /tmp/html;
            index  index.html index.htm;
        }

        error_page   500 502 503 504  /50x.html;
        location = /50x.html {

            root   html;
        }
    }

3.Nginx senior
1.Rewrite Jump
To write rewrite.conf ,nginx.conf Quote inside include jd/rewrite.conf;
 server {

        listen       81;
        server_name  localhost;
        rewrite  ^/$  https://cn.bing.com/  permanent;
        location / {

            root   /tmp/html;
            index  index.html index.htm;
        }
        error_page   500 502 503 504  /50x.html;
        location = /50x.html {

            root   html;
        }
    }
Half restart and half load after modification nginx -s reload The visit can jump to Bing
2.Url rewrite
 server {

        listen       82;
        server_name  localhost;
        location / {

            rewrite  ^/(.+)/(\d+) /$1?id=$2  permanent;
            root   /tmp/html;
            index  index.html index.htm;
        }
        error_page   500 502 503 504  /50x.html;
        location = /50x.html {

            root   html;
        }
    }
Running results :

3. Anti theft chain
Write reffer.conf ,nginx.conf introduce
 server {

        listen       81;
        server_name  localhost master master1;

        location / {

            root   /tmp/html;
            index  index.html index.htm;
        }
        location ~* \.(gif|jpg|png|swf|flv)$ {

            valid_referers none blocked master;
            if ($invalid_referer) {

                return 403;
            }
             root /tmp/image;
            index index.html index.htm;
        }
        error_page   500 502 503 504  /50x.html;
        location = /50x.html {

            root   html;
        }
    }
hosts Document allocation master master1
1. Direct access to images 
index.html Add image address
<img src="http://master:81/1.jpg" > </img>
Pass respectively master and master1 visit 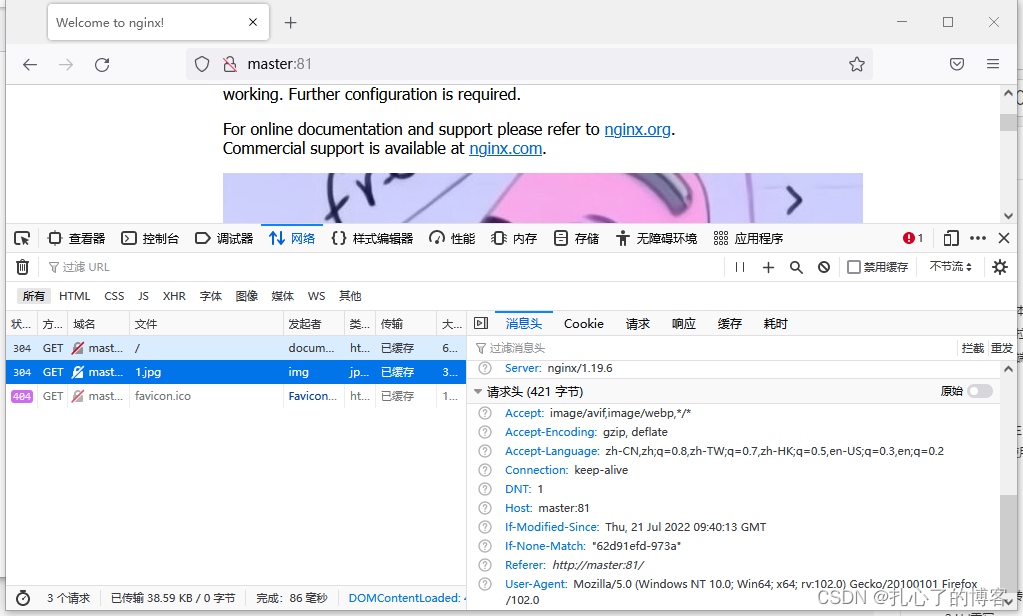
master1 The picture returns 403, Out of commission 1.jpg picture 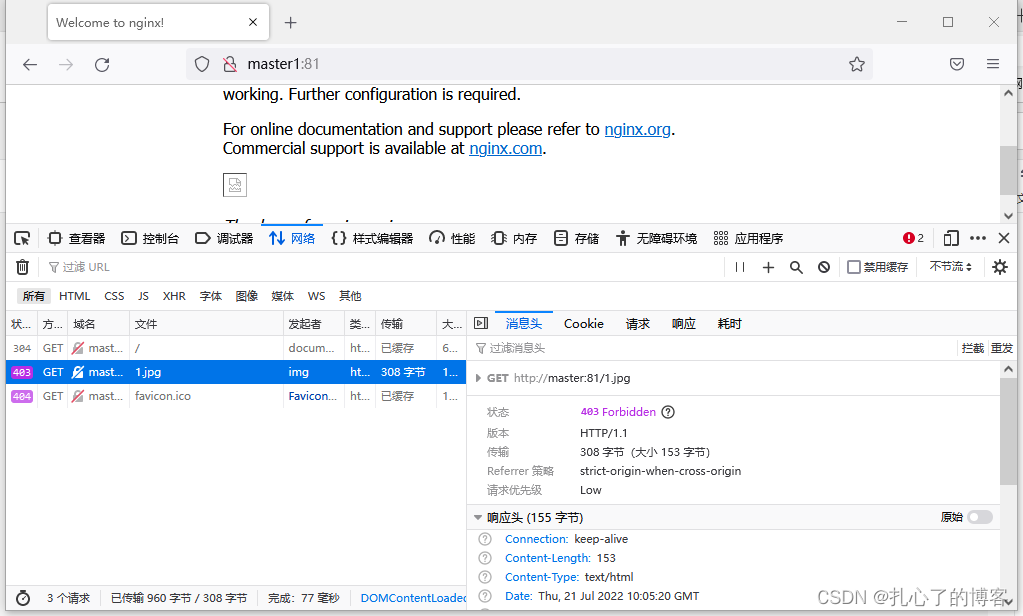

4.Nginx Performance testing tools
yum install -y httpd
Use ab test 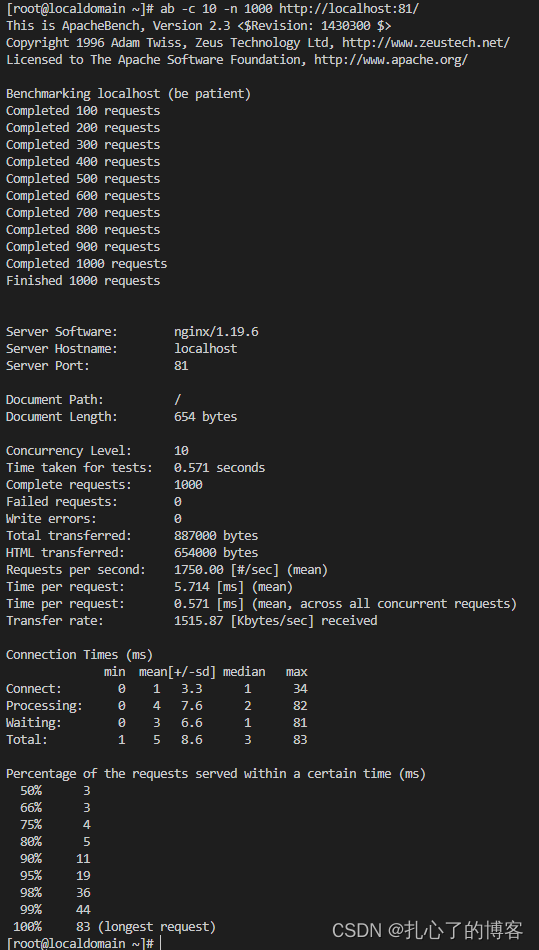
4.Kubernetes(k8s) install
1. Use KubeKey install k8s
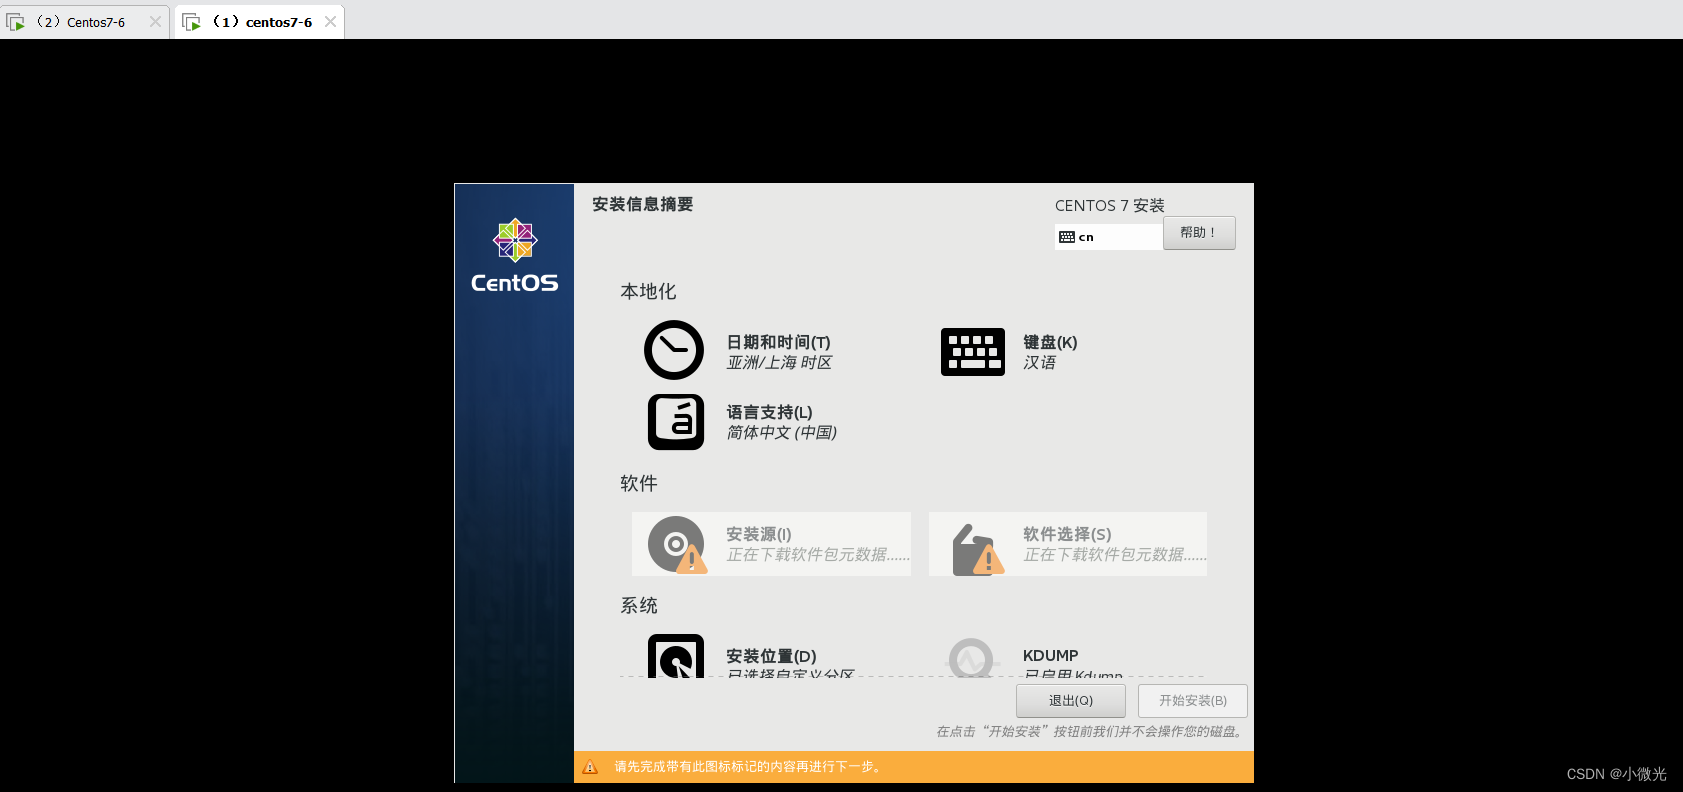
stay Linux In order to All-in-One Mode installation KubeSphere
CentOS 7.x 2 nucleus CPU,4 GB Memory ,35 GB disk space
Bloggers practice Installation from : Use KubeKey install k8s
export KKZONE=cn

curl -sfL https://get-kk.kubesphere.io | VERSION=v2.2.1 sh -

chmod +x kk

./kk create cluster --with-kubernetes v1.22.10

 Errors encountered : [ERROR] socat ie required

 adopt yum install           yum install -y socat      -y  There is no need to confirm the installation

yum Continue installation after installation   ./kk create cluster --with-kubernetes v1.22.10

kubectl get pod -A     test

kubectl apply -f https://addons.kuboard.cn/kuboard/kuboard-v3.yaml

kubectl get pods -n kuboard
Post installation inspection kubectl get pod -A, Only 9 individual ·kube-system Namespace 
kubectl apply -f https://addons.kuboard.cn/kuboard/kuboard-v3.yaml
kubectl get pods -n kuboard
produce 5 individual kuboard Namespace 
2. Use Kuboard visit k8s
Access... Through a browser : Default port 30080
Default user name :admin password :Kuboard123

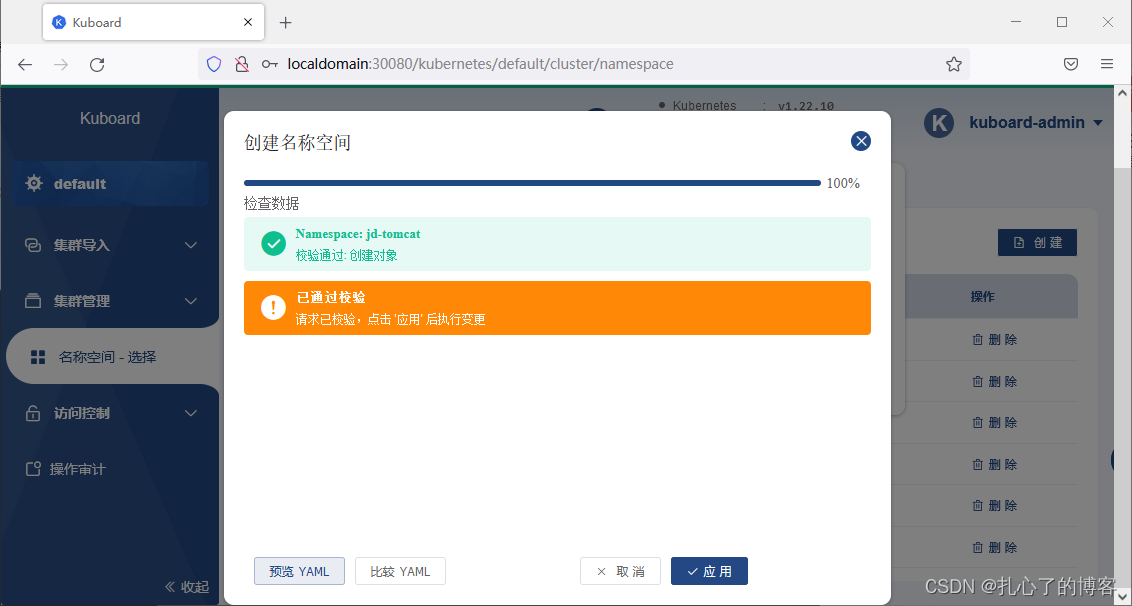
1. Create a namespace
After successful login, you can create a namespace , Click on default , Use admin after , You need to import the cluster for the first time 
Select Create namespace 
2. Create a workload
choice jd-tomcat after , Create a workload 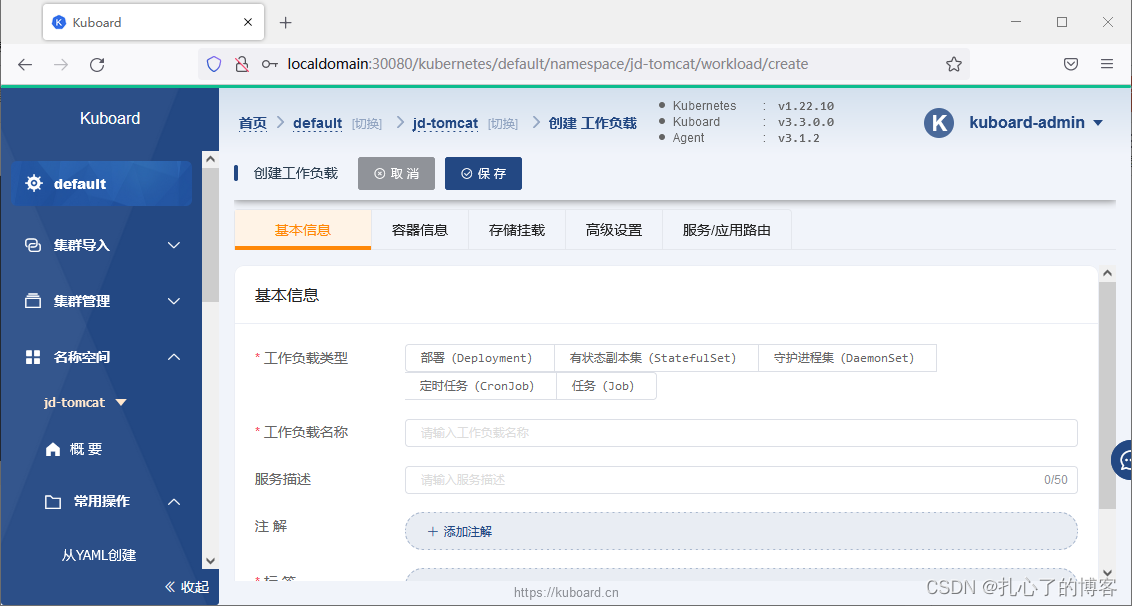
3. Workload controller creation pod

4.pod Created in nginx Of docker object
Fill in the basic information and select Add work container , Fill in the image name tomcat:8.0 And configure ports

Generate container after application 
Browser access 
5.k8s Realize the persistence of database
1. Create a stateful replica set

2. Create a work container
Fill in the container name , Image name mysql:5.6, Configure password port 
3. Select storage mount
Click OK after selection , Save again 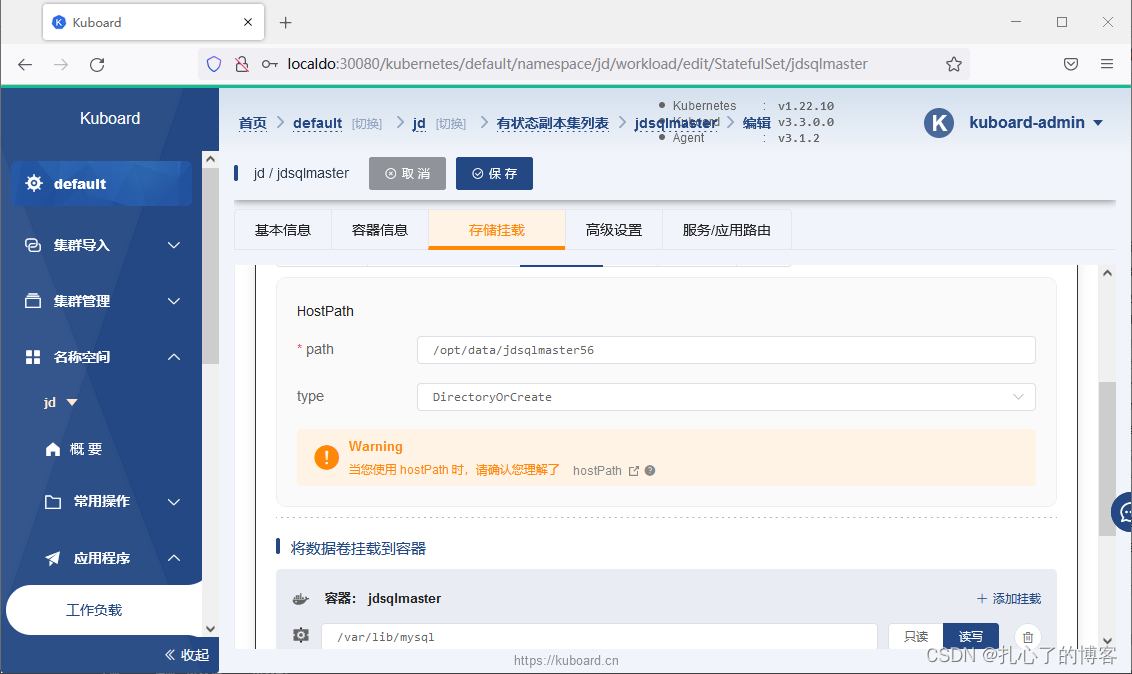
4. Build container to start testing
1. Container generation 
2.sqlyog Connect 
3. Create databases and tables 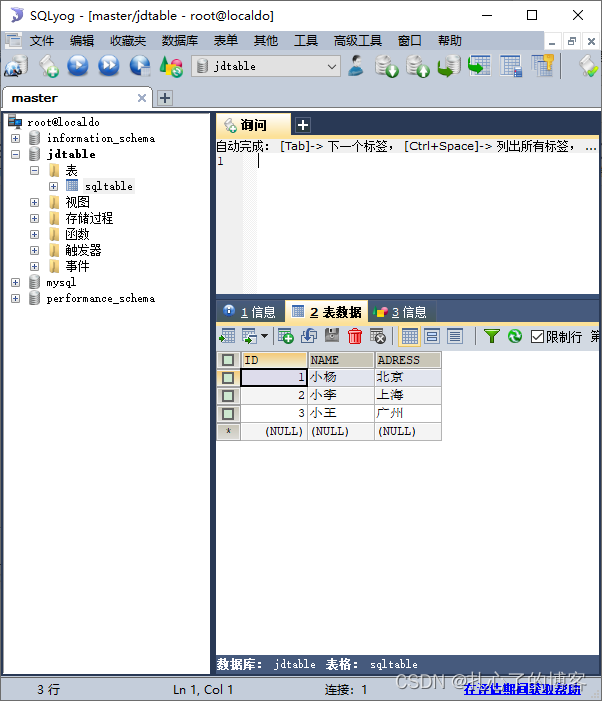
5. Restart container

6. View the data
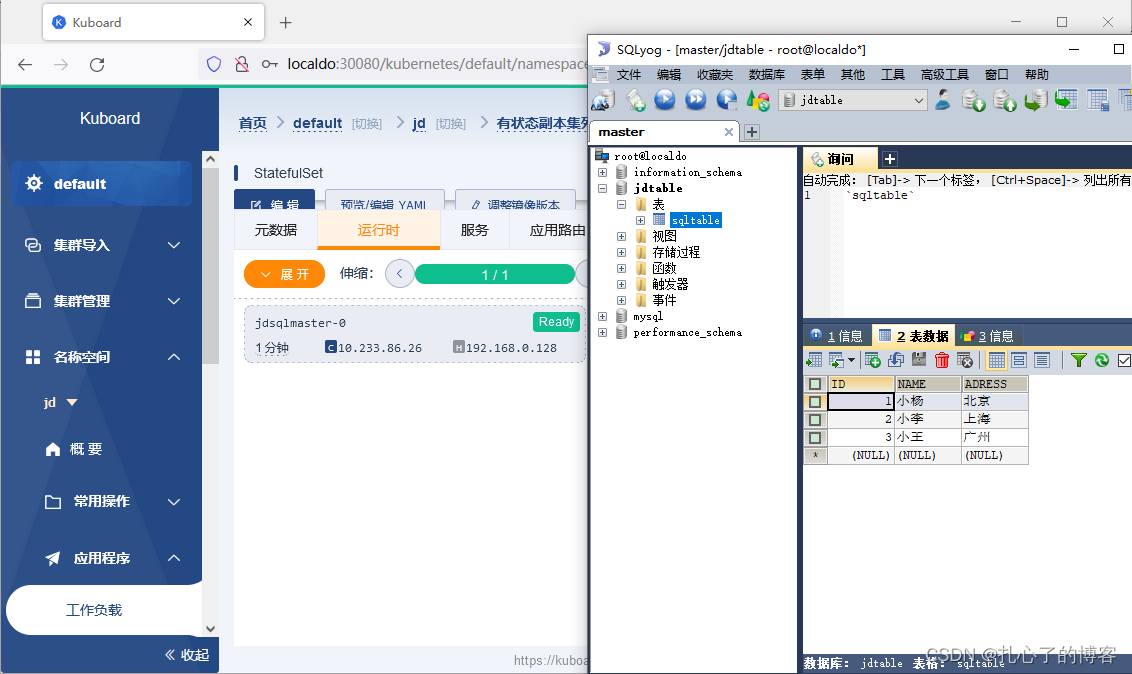
6. Realize master-slave replication of database
1. Configuration master ConfigMap
Configure in the configuration dictionary , Configure the database password in the ciphertext 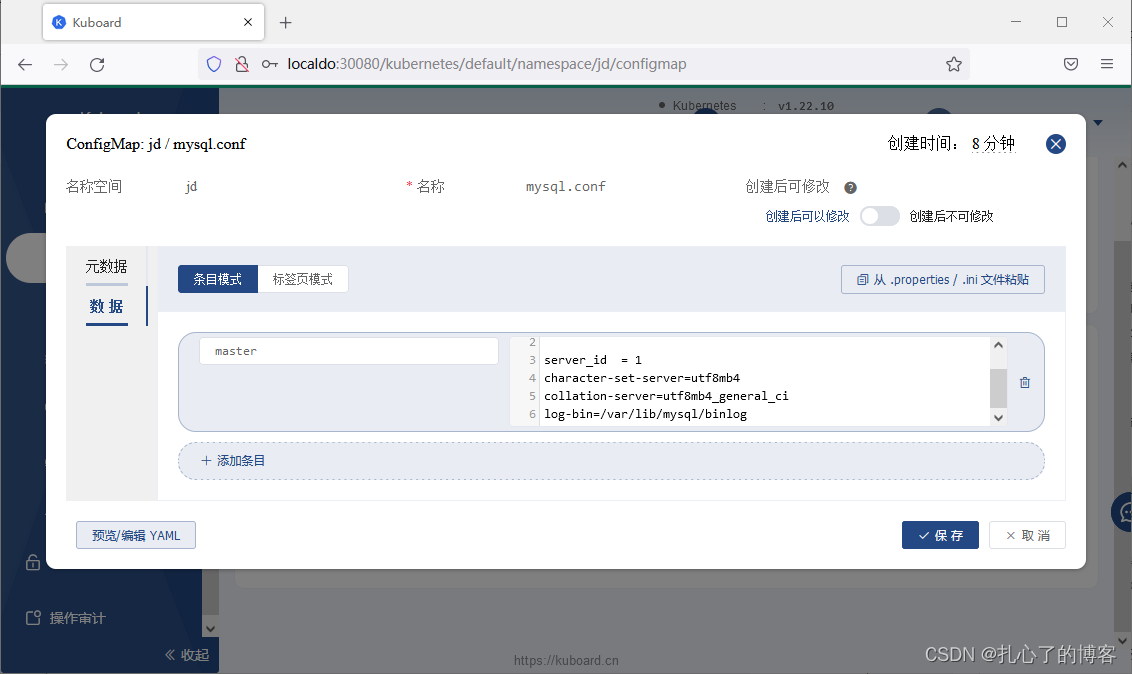
2. Store and mount the configuration data dictionary
Container path :/etc/mysql/mysql.conf.d/mysqld.cnf
3.mastersql start-up

4. Configure from ConfigMap

5. Copy workload

6. Modify container information

7.slavesql start-up

8. Connection between master and slave


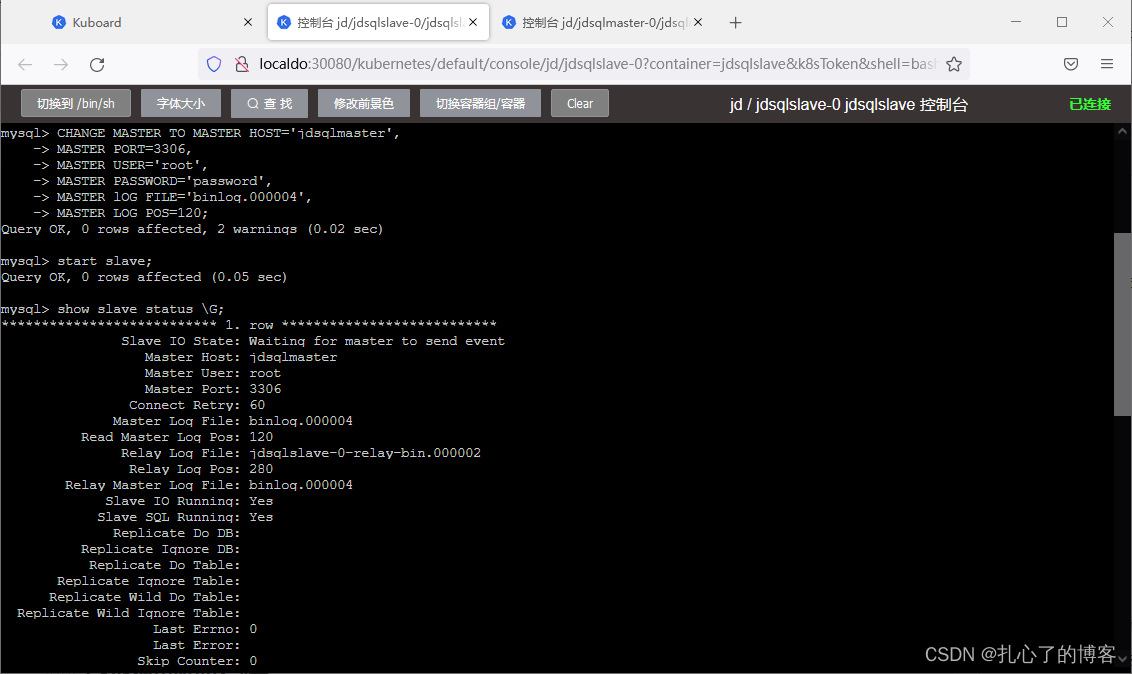
9. Test master write slave read
By using master Build table , Inquire about slave

7.k8s Use Nginx Deploy
1.nginx Mirror boot container
1. Here is how to change its configuration file after startup , Convenient for reverse proxy 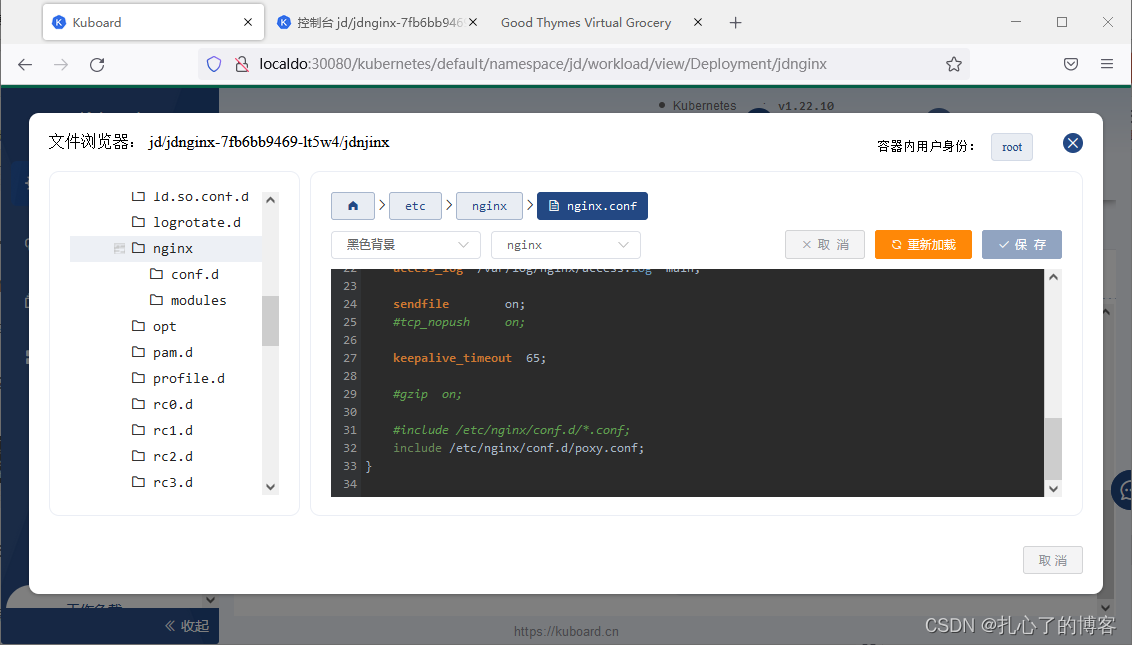

2. Server side start Docker Containers

3. Login display interface
Log in through the login interface and display the data in the database 

8.k8s Deployment project
1. Upload the project to Alibaba cloud
1. Create a local image warehouse 
2. Push database image 
3. Push project image 
2. Create persistence layer
1. Mainly the image name , Port configuration and password configuration 
2. Data persistence 
3. Start the database container 
4. Check the completed database 
3. establish API Gateway layer
1. Mainly the image name , port configuration 
2. Start the project container 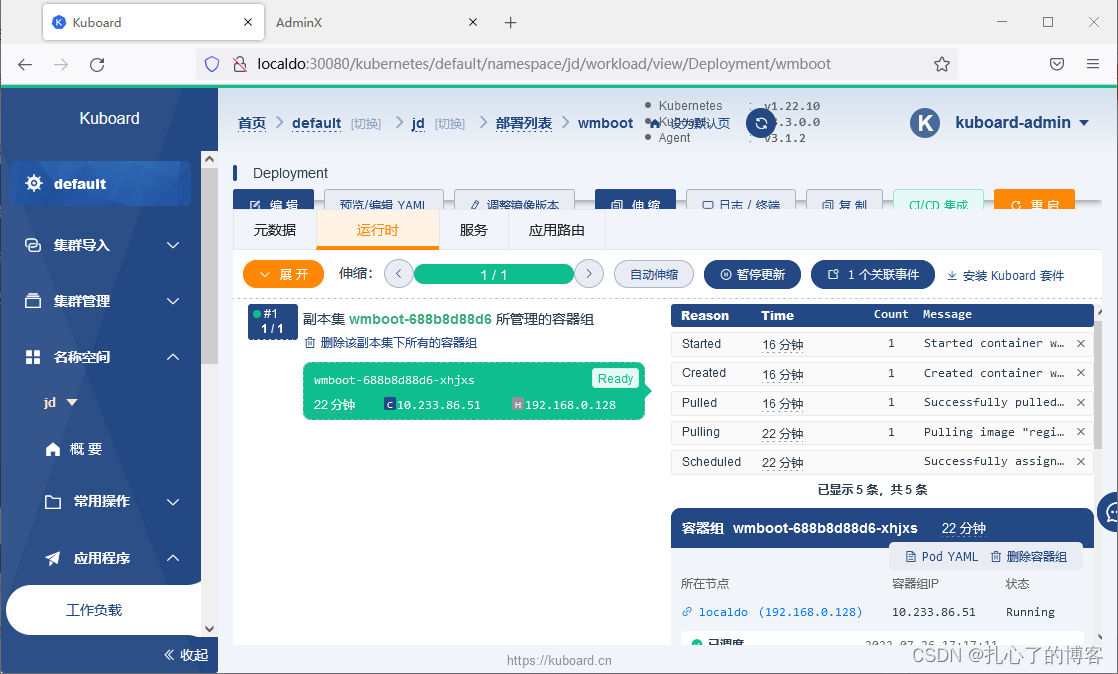
4. Visit the project
1. Login to access data 
Wrong password , After global exception processing, it shows 
2. Ciphertext change password

3. Modify storage mount , Ensure that the password is valid 
4. Finally, the data of the database is displayed 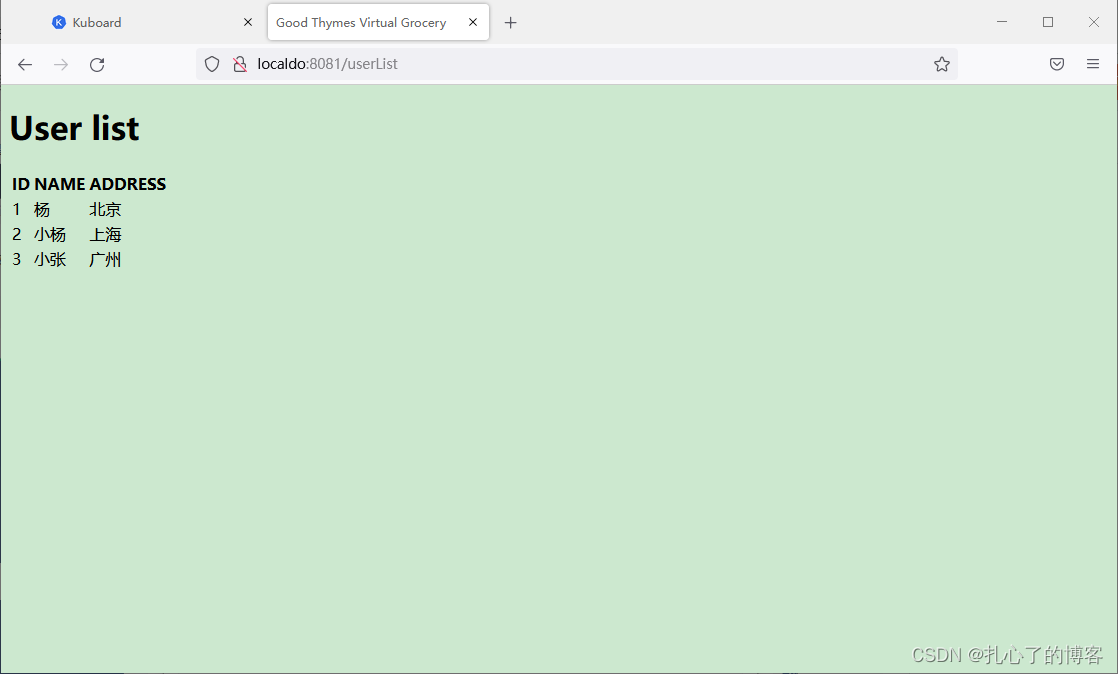
5.nginx Reverse proxy

Then enter the container ,nginx -s -reload
Login can access successful data

The project is right here k8s It's running on
边栏推荐
- Basic knowledge of English: juxtaposition structure
- 关于testng相关标签的使用
- Remote access and control
- Introduction to hash table
- where接自定义函数导致查询缓慢
- Soul持续发力社交渠道赴港上市,“Soul式社交”凭什么火出圈?
- Basic knowledge of English: Rules for the use of non predicates Part 1
- Decorator functions and the use of class decorators
- 测试基础概括
- Go语言学习
猜你喜欢


随机推荐
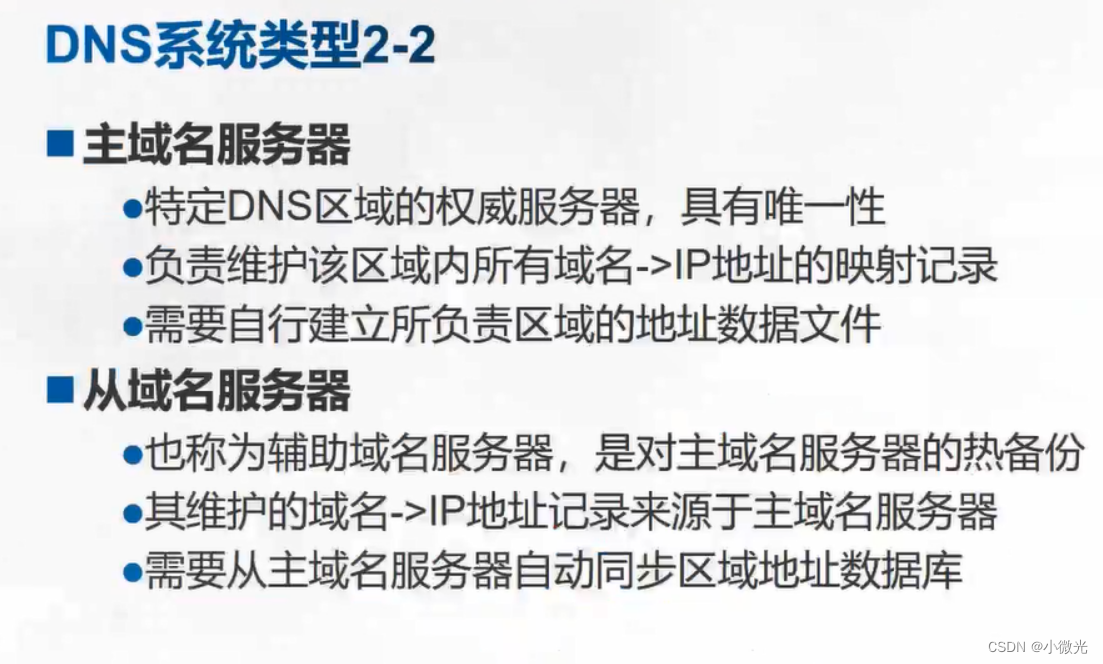
DNS fault analysis optimization
KVM command set management virtual machine
如何规范式编写yaml文件
Shell脚本编写格式
where接自定义函数导致查询缓慢
shell--条件语句(if语句、case语句)
pycharm在虚拟环境下跑jupyter notebook问题记录
数据库命令
Soul持续发力社交渠道赴港上市,“Soul式社交”凭什么火出圈?
网络故障排查:Ping和Tracert命令
Raid explanation and configuration
Stress performance test of website based on AB tool under Apache
shell编程规范与变量
Addition, deletion, modification and query of the database at the terminal
Shell -- operation of variables
基于Apache下ab工具进行网站压力性能测试
互联网简单协议概括
测试基础概括
Shell Scripting format
darknet-yolov3、yolo-fastect使用rtx30系显卡cuda环境在win10平台编译与训练的相关问题