当前位置:网站首页>[nilm] non intrusive load decomposition module nilmtk installation tutorial
[nilm] non intrusive load decomposition module nilmtk installation tutorial
2022-06-24 07:58:00 【Prodigal son loves freedom】
This tutorial focuses on Anaconda Of Python Installation in the environment nilmtk modular , Therefore, it is recommended to install nilmtk Install the module before Anaconda Software , The download link can be found in Download link . install nilmtk Modules are recommended in anconda Create in a virtual environment , So we need to use Conda Command to create a virtual environment , Download again nitmtk modular , install nilmtk modular .
1 conda Command to create a virtual environment
1.1 conda Tutorial on the use of commands
- Get version number
conda --version/conda -V
- get help
conda --help
conda -h
# View help for a command , Such as update Orders and remove command
conda update --help
conda remove --help
# Empathy , Of the above commands --help It can also be replaced by -h.- Environmental management
# View all command help for Environment Management
conda env -h
# establish python A virtual environment
conda create --name your_env_name #( Here you can rewrite the name of your virtual environment )
Input y Confirm creation .
- Create formulation python Version environment
# Create formulation python Version environment
conda create --name your_env_name python=2.7
conda create --name your_env_name python=3
conda create --name your_env_name python=3.5
# Create environments that contain certain packages
conda create --name your_env_name numpy scipy
#  List all current environments
conda info --envs
conda env list
#  Enter an environment
conda activate your_env_name# This is recommended
activate your_env_name
# Exit the current environment
conda deactivate
# Copy an environment
conda create --name new_env_name --clone old_env_name
# Delete an environment
conda remove --name your_env_name --all
# From yml File creation environment
conda env create -f environment.yml
# List all packages in the currently active environment
conda list
# List all packages in a given environment
conda list -n your_env_name
2 install nilmtk modular
2.1 download nilmtk modular
from github Download directly from nilmtk Module installation package , Download link https://github.com/nilmtk/nilmtk . Unzip the file
2.2 open Anaconda Prompt
Switch the current path to nilmtk In the decompression path , The switching command adopts cd Command switching , Before switching paths, you need to switch to the disk where the pressurized folder is located , Then switch to the specific path (C If you use a disc, you can use it directly cd Switch ). for example ‘E:\ experiment \ modular \nilmtk’ In the path , I'm going to switch to E disc , Switch to ‘E:\ experiment \ modular \nilmtk’ in . The order is as follows :
# Switch to E disc
E:
# Switch to specific path
cd E:\ experiment \ modular \nilmtk

2.3 structure Nilmtk Virtual environment for
This step mainly builds nilmtk Virtual environment for nilmtk-env, If it has been established in other ways nilmtk-env, You need to delete the directory first , Otherwise, the operation fails , The first part of the deletion method has already introduced . The create command is as follows :
conda env create -f environment.yml2.4 Switch to nilmtk Virtual environment for nilmtk-env
Build complete specifically for nilm Module installation python Environmental Science , Need to switch to nilm-env Environment , To use the installed nilmtk modular ,anaconda The modules of the module must be in nilmtk-env The environment exists , Need to switch to nilmtk-env in , use pip install XXX Command to install . Specific commands
conda activate nilmtk-env
# perhaps
activate nilmtk-env
# Out of the environment
conda deactivate

2.5 install nilmtk modular
Switch to nillmtk-env After the virtual environment, enter the corresponding command to install nilmtk modular , In this way, you can also nilmk-metadata Install well .
python setup.py developAfter running the command , Will run for a while , Wait for the run to finish , If no error is reported during the operation, it will be ok,
After running, use the following two commands to test .
conda list
nosetests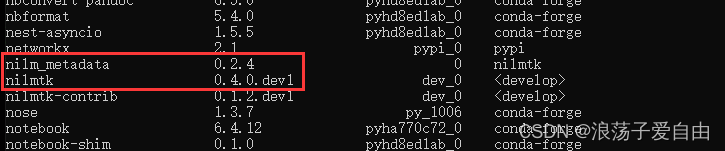
If conda list The above modules are displayed , Indicates successful installation .
You can test it with the following code ,low_freq Express redd The original path of the dataset , among REDD Dataset address :http://redd.csail.mit.edu/, user name : redd ; password : disaggregatetheenergy
from nilmtk.dataset_converters import convert_redd
convert_redd(r'D:\MyProject\NILMTK\low_freq',r'D:\MyProject\NILMTK\low_freq\redd.h5')
If the operation is successful, the installation is successful .
3 install Spyder Editor
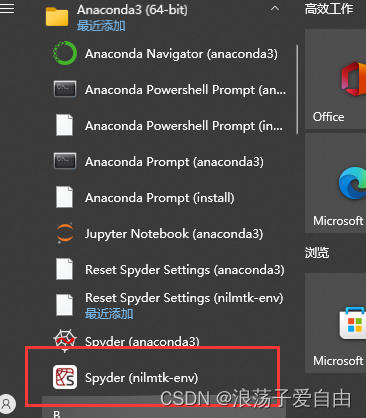
anaconda Bring one with you. spyder Editor , To write python The program is very convenient , however nilmtk-env The module does not spyder Tools , In order to write nilmtk Related codes , Run the load decomposition program , Need to be in nilmtk-env Environmental installation spyder. Use command :
conda install spyderCan pass conda list Or view the folder directory in the start menu bar . The effect is shown below .
4 install nilmtk-contrib modular
This module contains the use of NILMTK A quick experiment of API All state-of-the-art algorithms for the energy decomposition task implemented . The installation method is the same as nilmtk The modules are the same , To download nilmtk-contrib Module installation package , Then unzip the installation package , stay nilmtk-env Switch to nilmtk-contrib Folder , function python setup.py develop, And then run conda list Check whether the installation is successful .
nilmtk-contrib Installation package download path :https://github.com/nilmtk/nilmtk-contrib
5 Installation package download
If github Unable to access download , You can go to the following link to download nilmtk and nilmtk-contrib Etc .
https://download.csdn.net/download/weixin_56516468/85698419
【 Reference material 】
1.https://blog.csdn.net/wangwy_hoveringeagle/article/details/121177790
2.https://blog.csdn.net/wangwy_hoveringeagle/article/details/121143285
边栏推荐
- 语料库数据处理个案实例(读取多个文本文件、读取一个文件夹下面指定的多个文件、解码错误、读取多个子文件夹文本、多个文件批量改名)
- Timer usage notes
- Wechat cloud hosting hot issues Q & A
- opencvsharp二值图像反色
- 4-operation list (loop structure)
- Terminal network in VPN client connection settings of router
- 从 jsonpath 和 xpath 到 SPL
- Hongmeng development IV
- Duilib display memory picture
- 毕业两年月薪36k,说难也不难吧
猜你喜欢

Vulnhub靶机:BOREDHACKERBLOG: SOCIAL NETWORK
希尔伯特-黄变换

From jsonpath and XPath to spl

第 2 篇:绘制一个窗口
ImportError: cannot import name ‘process_pdf‘ from ‘pdfminer.pdfinterp‘错误完全解决
ImportError: cannot import name ‘process_ pdf‘ from ‘pdfminer. Pdfinterp 'error completely resolved

Chapter 3: drawing triangles

基于Distiller的模型压缩工具简介

鸿蒙os开发三

OpenGauss数据库在 CentOS 上的实践,配置篇
随机推荐
Wechat cloud hosting hot issues Q & A
New features of PHP: bytecode cache and built-in server
4-operation list (loop structure)
『C语言』系统日期&时间
Pair class notes
Redolog and binlog
Exploration on Optimization of elastic expansion engineering
Mysql database recovery case sharing
Oracle-高级SQL限定查询
Moonwell Artemis is now online moonbeam network
Los Angeles p1051 who won the most Scholarships
Error:Kotlin: Module was compiled with an incompatible version of Kotlin. The binary version of its
调用Feign接口时指定ip
Detailed explanation of PHP data serialization test example
How to cancel the display of the return button at the uniapp uni app H5 end the autobackbutton does not take effect
运行npm run eject报错解决方法
Teach you how to use the reflect package to parse the structure of go - step 2: structure member traversal
These dependencies were not found: * core JS / modules / es6 array. Fill in XXX
Opencvsharp binary image anti color
一文理解同步FIFO