当前位置:网站首页>玩转MongoDB—搭建MongoDB集群
玩转MongoDB—搭建MongoDB集群
2022-07-01 13:37:00 【Barry Yan】
1 概述
如题,本次玩转MongoDB我们从搭建集群开始,话说MongoDB一共有三种搭建集群的方式,但是由于版本更新,据说在4.0版本之后第一种方式,也就是主从复制的方式被遗弃掉了,大概是因为这种方式的效率不高吧,因为目前我们使用的是5.x版本,因此就不花时间讲解第一种方式了,在其他的文章上摘录了一下,可供大家参考。重点还是要放在后两种。
2 方式一:主从复制
(1)准备三个机器一个主机两个备机
mongod --port 27007 --dbpath /data/master/ --bind_ip 0.0.0.0 --master --oplogSize 50
mongod --port 27008 --dbpath /data/slave1 --bind_ip 0.0.0.0 --slave --source 127.0.0.1:27007 --only ymx
mongod --dbpath /data/slave2 --port 27009 --bind_ip 0.0.0.0 --slave --source 127.0.0.1:27007 --only ymx --slavedelay 30
(2)主从复制的选项
- –master :主节点
- –slave :从节点
- –source [server:port] :为从节点时从哪个主节点复制<>
- –only [库名] : 为从节点时只复制主节点的那个库
- –slavedelay [秒数]:从节点延迟多长时间复制主节点 秒
- –autoresync :从机数据不是最新是自动重新同步数据
- –oplogSize :主节点的操作日志单位是M
(3)查看集群状态
rs.help();
rs.slaveOk(); //开启从机查询
3 方式二:Replica Set(副本集)
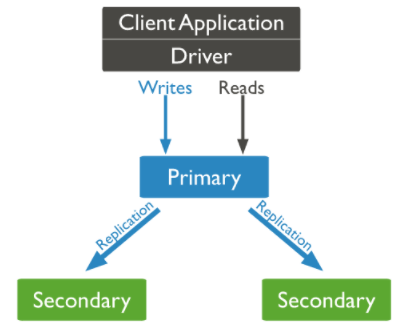
(图片来自:https://www.mongodb.com/docs/manual/replication/)
Replica Set概念翻译过来就是副本集 ,也是相当于主从复制的意思,主节点负责读写数据,从节点负责备份数据,当主节点宕机后,剩余从节点会自动的选取出主节点进行数据的读写。
(图片来自:https://www.mongodb.com/docs/manual/replication/)
两个角色:
- Primary:主节点,负责数据的交互
- Secondary:从节点,负责数据的备份
3.1 总体流程
环境:一台Linux虚拟机,三个MongoDB节点(一主二从)
1. 创建对应目录
2. 根据目录和端口以及其他集群参数启动各个节点
3. 在主节点进行集群配置
4. 进入各个从节点观察
5. 配置成功
3.2 具体流程
3.2.1 创建对应目录
[email protected]:/data$ sudo mkdir db1
[email protected]:/data$ sudo mkdir db2
[email protected]:/data$ sudo mkdir db3
[email protected]:/data$ ls -al
drwxrwxrwx  6 root root  0 6月  26 16:28 .
drwxr-xr-x 19 root root  0 6月  26 07:37 ..
drwxrwxrwx  4 root root  0 6月  26 21:52 db1
drwxrwxrwx  4 root root  0 6月  26 21:52 db2
drwxrwxrwx  4 root root  0 6月  26 21:52 db3
[email protected]:/data$ cd ..
[email protected]:/$ sudo chmod 777 -R data/
3.2.2 启动各个节点
mongod --port 27011 --dbpath /data/db1 --bind_ip 0.0.0.0 --replSet  ymx/localhost:27012
mongod --port 27012 --dbpath /data/db2 --bind_ip 0.0.0.0 --replSet  ymx/localhost:27013
mongod --port 27013 --dbpath /data/db3 --bind_ip 0.0.0.0 --replSet  ymx/localhost:27011
语法:
[命令] --port [端口] --dbpath [目录] --bind_ip [绑定IP] --replSet [副本集名称]/[相邻接点主机名:端口号]
mongod --port 27011 --dbpath /data/db1 --bind_ip 0.0.0.0 --replSet  ymx/localhost:27012
概念:
3.2.3 进入配置
语法:
var config = {

    _id:[副本集名称],
    members:[
        {
    _id:0,host:[节点主机名:端口号]},
        {
    _id:1,host:[节点主机名:端口号]},
        ......
    }
rs.initiate(config);
实例:
[email protected]:~/Desktop/mongodb/bin$ ./mongo 127.0.0.1:27011
......
> use admin
switched to db admin
>
> var config = {

...     _id:"ymx",
...     members:[
...         {
    _id:0,host:"localhost:27011"},
...         {
    _id:1,host:"localhost:27012"},
...         {
    _id:2,host:"localhost:27013"}]
...     }
> rs.initiate(config);
{

        "ok" : 1,
        "$clusterTime" : {

                "clusterTime" : Timestamp(1656250256, 1),
                "signature" : {

                        "hash" : BinData(0,"AAAAAAAAAAAAAAAAAAAAAAAAAAA="),
                        "keyId" : NumberLong(0)
                }
        },
        "operationTime" : Timestamp(1656250256, 1)
}
ymx:SECONDARY>
ymx:PRIMARY>
ymx:PRIMARY> show databases
admin   0.000GB
config  0.000GB
local   0.000GB
3.2.4 进入其他节点观察
[email protected]:~/Desktop/mongodb/bin$ ./mongo 127.0.0.1:27012
......
ymx:SECONDARY>
[email protected]:~/Desktop/mongodb/bin$ ./mongo 127.0.0.1:27013
......
ymx:SECONDARY>
3.2.5 配置成功

3.3 注意点
3.3.1 Driver的URL
mongodb://127.0.0.1:27017,127.0.0.1:27018,127.0.0.1:27019/ems(库名)?replcaSet=spock(副本集名称)
3.3.2 从节点访问数据
从节点是不能直接访问数据的,如果需要访问,则可以使用rs.slaveOk();
4 方式三:Sharding(分片)

(图片来自:https://www.mongodb.com/docs/manual/sharding/)
三个角色:
- Router:路由,客户端由此接入,且让整个集群看上去像单一数据库。
- Config Servers:mongod实例,存储了整个 ClusterMetadata,即元数据。
- Shard:用于存储实际的数据块,实际生产环境中一个shard server角色可由几台机器组个一个replica set承担,防止主机单点故障
4.1 总体流程
环境:一台Linux虚拟机,一个Router、两个Shard、两个Config Servers
1. 创建数据目录
2. 根据端口和目录启动Shard节点
3. 根据端口和目录启动Config Servers节点
4. 配置Config Servers节点副本集
5. 启动Router节点
6. 利用mongos进入路由配置分片节点
7. 利用mongos配置分片数据库和集合以及片键信息
4.2 具体流程
4.2.1 创建数据目录
[email protected]:/$ cd data/

[email protected]:/data$ sudo mkdir shard_test
请输入密码:
验证成功
[email protected]:/data$ cd shard_test/
[email protected]:/data/shard_test$ ls
[email protected]:/data/shard_test$ sudo mkdir db1 db2 config1 config2
[email protected]:/data/shard_test$ ls
config1  config2  db1  db2
[email protected]:/data/shard_test$ cd ..
[email protected]:/data$ sudo chmod 777 -R shard_test/
4.2.2 启动Shard节点
mongod --port 27021 --dbpath /data/shard_test/db1 --bind_ip 0.0.0.0 --shardsvr --replSet "shards"/localhost:27022
mongod --port 27022 --dbpath /data/shard_test/db2 --bind_ip 0.0.0.0 --shardsvr --replSet "shards"/localhost:27021
进入Shard节点进行配置:
[email protected]:~/Desktop/mongodb/bin$ ./mongo 127.0.0.1:27011
......
> use admin
switched to db admin
>
> var config = {

...     _id:"shards",
...     members:[
...         {
    _id:0,host:"localhost:27022"},
...         {
    _id:1,host:"localhost:27021"},]
...     }
> rs.initiate(config);
{

        "ok" : 1,
        "$clusterTime" : {

                "clusterTime" : Timestamp(1656250256, 1),
                "signature" : {

                        "hash" : BinData(0,"AAAAAAAAAAAAAAAAAAAAAAAAAAA="),
                        "keyId" : NumberLong(0)
                }
        },
        "operationTime" : Timestamp(1656250256, 1)
}
4.2.3 启动Config Servers节点
mongod --port 27100 --dbpath /data/shard_test/config1 --bind_ip 0.0.0.0 --replSet "configs"/localhost:27101 --configsvr
mongod --port 27101 --dbpath /data/shard_test/config2 --bind_ip 0.0.0.0 --replSet "configs"/localhost:27100 --configsvr
4.2.4 配置Config Servers节点副本集
use admin
var config = {

	 	_id:"configs",
		configsvr: true,
	 	members:[
	   	{
    _id:0,host:"localhost:27100"},
	   	{
    _id:1,host:"localhost:27101"}]
}
rs.initiate(config);
实例:
[email protected]:~/Desktop/mongodb/bin$ ./mongo -port 27999
......
mongos> use admin
switched to db admin
mongos> var config = {

	 	_id:"configs",
		configsvr: true,
	 	members:[
            {
    _id:0,host:"localhost:27100"},
            {
    _id:1,host:"localhost:27101"}
	   	]
	   	}
mongos> rs.initiate(config);
4.2.5 启动Router节点
./mongos --port 27999 --configdb "configs"/localhost:27100,localhost:27101 --bind_ip 0.0.0.0
注意: config为上面的副本集名称
4.2.6 利用mongos进入路由配置分片节点
./mongo -port 27999

use admin

db.runCommand({
     addshard:"localhost:27021","allowLocal":true });

db.runCommand({
     addshard:"localhost:27022","allowLocal":true });
4.2.7 利用mongos配置分片数据库和集合以及片键信息
设置分片的库:db.runCommand({ enablesharding:“[库名]” });
设置库中集合和片键信息:
db.runCommand({ shardcollection: “[库名].users”, key: { _id:1}}) //按照id分片
db.runCommand({ shardcollection: “[库名].users”, key: { _id: “hashed”}}) //按照hash分片
5 总结
总结下三种类型的优缺点吧:
- 主从复制:
- 优点:配置简单
- 缺点:被不推荐使用了
- Replica Set:
- 优点:高可用,能够自动故障转移
- 缺点:占用存储空间过多,数据冗余
- Sharding:
- 优点:存储空间的利用率较高
- 缺点:节点类型复杂
see you~
边栏推荐
- Research Report on China's software outsourcing industry investment strategy and the 14th five year plan Ⓡ 2022 ~ 2028
- 7. Icons
- 开源者的自我修养|为 ShardingSphere 贡献了千万行代码的程序员,后来当了 CEO
- Summary of interview questions (1) HTTPS man in the middle attack, the principle of concurrenthashmap, serialVersionUID constant, redis single thread,
- La taille de la pile spécifiée est petite, spécifiée à la sortie 328k
- 孔松(信通院)-数字化时代云安全能力建设及趋势
- Grafana reports an error: error= "failed to send notification to email addresses: [email protected] : 535 Error:
- 啟動solr報錯The stack size specified is too small,Specify at least 328k
- spark源码(五)DAGScheduler TaskScheduler如何配合提交任务,application、job、stage、taskset、task对应关系是什么?
- Computer network interview knowledge points
猜你喜欢

QT学习管理系统
终端识别技术和管理技术

MySQL 66 questions, 20000 words + 50 pictures in detail! Necessary for review

8 popular recommended style layout

Qtdeisgner, pyuic detailed use tutorial interface and function logic separation (nanny teaching)
介绍一种对 SAP GUI 里的收藏夹事务码管理工具增强的实现方案

Explain IO multiplexing, select, poll, epoll in detail

学会使用LiveData和ViewModel,我相信会让你在写业务时变得轻松

流量管理技术

Beidou communication module Beidou GPS module Beidou communication terminal DTU
随机推荐
8 popular recommended style layout
Investment analysis and prospect prediction report of global and Chinese dimethyl sulfoxide industry Ⓦ 2022 ~ 2028
进入前六!博云在中国云管理软件市场销量排行持续上升
SAP intelligent robot process automation (IRPA) solution sharing
ArrayList capacity expansion mechanism and thread safety
[安网杯 2021] REV WP
Uni app realizes advertisement scroll bar
当你真的学会DataBinding后,你会发现“这玩意真香”!
La taille de la pile spécifiée est petite, spécifiée à la sortie 328k
Google Earth engine (GEE) - Global Human Settlements grid data 1975-1990-2000-2014 (p2016)
Yan Rong looks at how to formulate a multi cloud strategy in the era of hybrid cloud
Google Earth Engine(GEE)——全球人类居住区网格数据 1975-1990-2000-2014 (P2016)
Three questions about scientific entrepreneurship: timing, pain points and important decisions
Terminal identification technology and management technology
Kongsong (Xintong Institute) - cloud security capacity building and trend in the digital era
流量管理技术
Simplex, half duplex, full duplex, TDD and FDD
分布式事务简介(seata)
Investment analysis and prospect prediction report of global and Chinese p-nitrotoluene industry Ⓙ 2022 ~ 2027
Spark source code (V) how does dagscheduler taskscheduler cooperate with submitting tasks, and what is the corresponding relationship between application, job, stage, taskset, and task?