当前位置:网站首页>Create a project to realize login and registration, generate JWT, and send verification code
Create a project to realize login and registration, generate JWT, and send verification code
2022-07-27 08:30:00 【qishaoawei】
Create project virtual environment and install related dependencies
Create a project and open the settings within the project
First step 
The second step 
Open the project terminal to check whether the virtual environment is successful
If it fails, you need to start it manually 
After the virtual environment is configured, install relevant dependencies
Say that there are files with dependent names placed in the project
Then open the project terminal for installation
After installation, you can enter pip list Check whether all are installed 
establish flask structure
Use engineering mode to create app
Created in the root directory create_app.py file
Write in it
from flask import Flask  # Import Flask
from flask_cors import CORS  # Cross domain
def create_app(config):
    flask_app=Flask(__name__)   # Instantiation flask object
    # Load configuration items
	flask_app.config.from_object(config)
    # Registered blueprint

    # binding db

    #  Cross domain
    CORS(flask_app)

    return flask_app
Create in project settings Create in directory config.py file
Write the configuration items required by the sequence pair inside
class DefaultConfig:
    SECRET_KEY='asdasfjsfagfasfa'   #cookie Secret key
    SQLALCHEMY_DATABASE_URI=''   # Database configuration items
    SQLALCHEMY_TRACK_MODIFICATIONS=False #  Tracking data modification signals
    SQLALCHEMY_ECHO=True  #  Whether to print out on the console sql sentence
    JSON_AS_ASCII=False    #json Whether the type is converted

# Inherit from the above class , Avoid future modifications
class DevConfig(DefaultConfig):
    #  Database type + Database operation engine :// user name : password @ Host name : port / Database name
    SQLALCHEMY_DATABASE_URI = 'mysql+pymysql://root:mysql password @127.0.0.1:3306/ Database name '
Project root creation app.py file Import configuration items inside app example create_app
from create_app import create_app  # Import the created create_app
from settings.config import DevConfig  # Import configuration items

app=create_app(DevConfig)

# The object is created by function
You can write main Operational framework
You can also configure the operation in the debug configuration dialog box 


After configuration, you can click start next time to run 
Configure blueprints inside
Create within the project views Create in directory users.py file
Write in it
from flask import Blueprint  # Import blueprint
from flask_restful import Api,Resource
# # url_prefix #  Specify the prefix of all routes under the current blueprint
user_dp=Blueprint('user_dp',__name__,url_prefix='/users') # Instantiate blueprint objects

api=Api(user_dp)  # Instantiate the blueprint collector # Instantiate a Api object  Api Object is used to collect routes

# Define class view   Inherited from Resource class , adopt Api To collect instantiated objects
class UserView(Resource):
    def get(self):       # Test success
        return 'ssss'
# Add route
api.add_resource(UserView,'/user') # The full address is  /users/user
And then in create_app.py Register in the library
from flask import Flask  # Import Flask
from views.users import user_dp  # Import the instantiated blueprint object
from flask_cors import CORS
def create_app(config):
    flask_app=Flask(__name__)   # Instantiation flask object
    # Load configuration items
    flask_app.config.from_object(config)

    # Registered blueprint
    flask_app.register_blueprint(user_dp)

    # binding db

    #  Cross domain
    CORS(flask_app)

    return flask_app
Register database configuration
Create in directory models Create in directory model.py File to write model classes
from flask_sqlalchemy import SQLAlchemy  # Import

db=SQLAlchemy()  # Instantiate database connection object

# Create model classes
class UserModel2(db.Model):
    uid=db.Column(db.Integer,primary_key=True,autoincrement=True,comment=' user ID')
    mobile=db.Column(db.String(11),comment=' cell-phone number ')
    username=db.Column(db.String(32),default='',comment=' user name ')
    img=db.Column(db.String(300),default='',comment=' Head portrait ')
    reg_login=db.Column(db.DateTime,default=datetime.now,comment=' Registration time ')
    intro=db.Column(db.String(256),default=' This man is lazy , Nothing left ',comment=' brief introduction ')
    status=db.Column(db.Boolean,default=False,comment='true: frozen  false: normal ')
And then in create_app.py Register in the library
from flask import Flask  # Import Flask
from views.users import user_dp  # Import the instantiated blueprint object
from models.model import db   # Import the instantiated database connection object
from flask_cors import CORS
def create_app(config):
    flask_app=Flask(__name__)   # Instantiation flask object
    # Load configuration items
    flask_app.config.from_object(config)

    # Registered blueprint
    flask_app.register_blueprint(user_dp)

    # binding db
    db.init_app(flask_app)

    #  Cross domain
    CORS(flask_app)

    return flask_app
Created in the root directory manage.py File configuration migration items
from flask_script import Manager #Manager Class operation is to run the file from the command line , Add some commands
from app import app   # Import app
from flask_migrate import MigrateCommand,Migrate    #  Import migration classes and migration command classes
from models.model import db    # Import the instantiated database object

manage=Manager(app)  # Instantiate the command line management object
migrate=Migrate(app,db)  # Instantiate the migration execution class
manage.add_command('db',MigrateCommand)  # Add a set of commands to the command line management object


#  Pay attention to start it when it is written
if __name__ == '__main__':
    manage.run()
stay python The terminal runs the command to migrate
#   Initialize migration file   #  initialization , It only needs to be initialized once
python manage.py db init

#  Generate migration file
python manage.py db migrate

#  Perform the migration
python manage.py db upgrade

#  Migration completed
Register login
Ronglian cloud information
Create a Ronglian cloud account , Add a test phone number
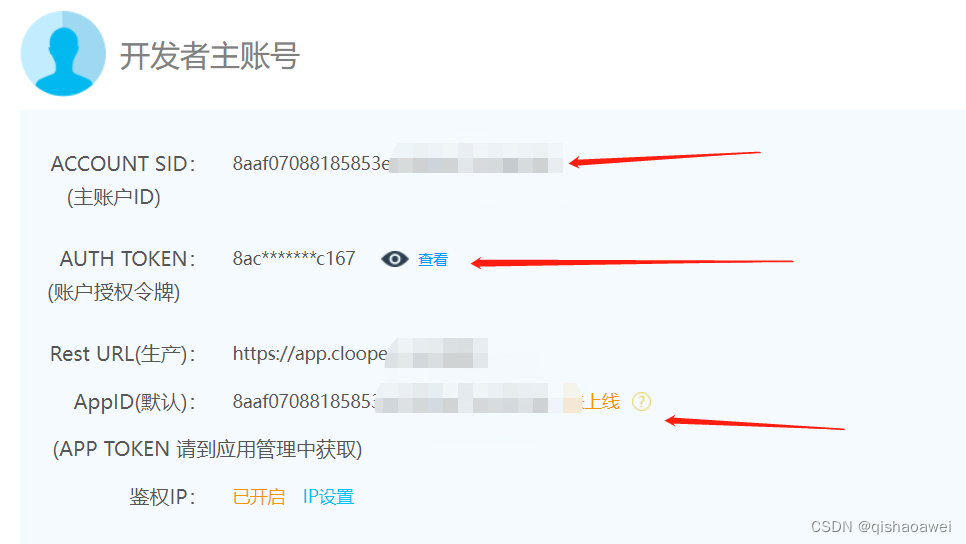
Then log in and find the master account id Token, etc 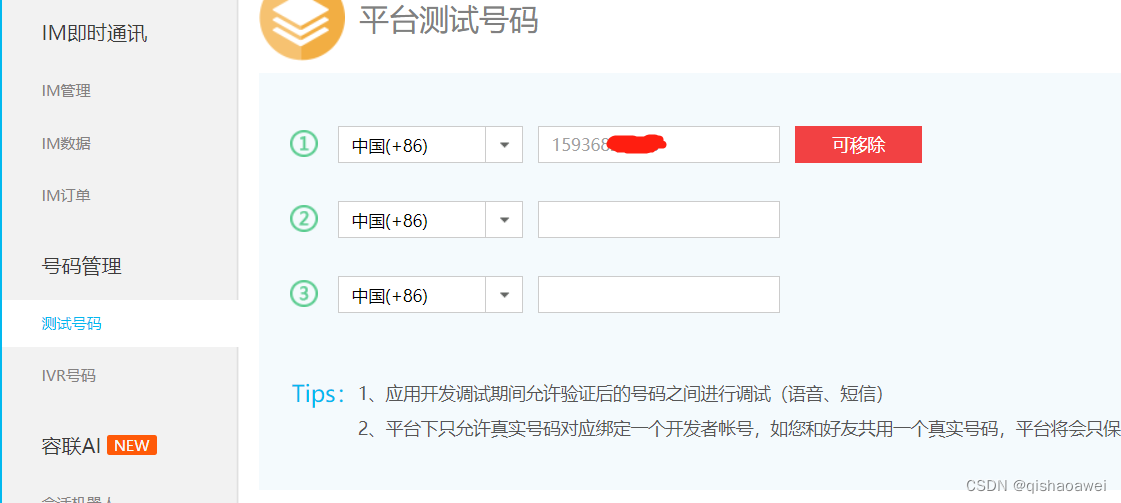
Verification code function implementation
In the created settings Create under directory sevret.py file
Used to store Ronglian cloud information and redis database information
class SecretConfig():
    RL_ACC_ID='8aaf07088185853e01**********'  #ACCOUNT SID( Master account ID)
    RL_ACC_TOKEN='8ac934ad5ddf44a4a************'   #AUTH TOKEN( Account authorization token )
    RL_APP_ID='8aaf07088185853e0************'       #AppID( Default )
    RL_TID='1'          # SMS template ID
    RDS_HOST='127.0.0.1'  #redis database host
    RDS_PORT=6379        #redis Port number
    RDS_PASSWORD=' password '  #redis password
stay settings In the catalog config.py Inherit from the file
from settings.secret import SecretConfig # Import encapsulated configuration items
                    # Inherit
class DefaultConfig(SecretConfig):
    SECRET_KEY='asdasfjsfagfasfa'   #cookie Secret key
    SQLALCHEMY_DATABASE_URI=''   # Database configuration items
    SQLALCHEMY_TRACK_MODIFICATIONS=False #  Tracking data modification signals
    SQLALCHEMY_ECHO=True  #  Whether to print out on the console sql sentence
    JSON_AS_ASCII=False    #json Whether the type is converted
    SMS_TIME=5  # Numbers 5  Used to set the expiration time

# Inherit from the above class , Avoid future modifications
class DevConfig(DefaultConfig):
    #  Database type + Database operation engine :// user name : password @ Host name : port / Database name
    SQLALCHEMY_DATABASE_URI = 'mysql+pymysql://root: Database password @127.0.0.1:3306/ Database name '
Create in the root directory utils Create in directory SmsTools.py file
from ronglian_sms_sdk import SmsSDK  # Import Ronglian cloud sdk pip install ronglian_sms_sdk
from settings.secret import SecretConfig  # Import encapsulated configuration items
from flask import current_app  # Get configuration item data
import json,redis
class SmsTool(SecretConfig):
    '''  Send a text message  '''
    def __init__(self):
        accId = current_app.config.get('RL_ACC_ID')     # Get encapsulated ACCOUNT SID( Master account ID)
        accToken = current_app.config.get('RL_ACC_TOKEN')   #AUTH TOKEN( Account authorization token )
        appId = current_app.config.get('RL_APP_ID')         #AppID( Default )
        self.sdk = SmsSDK(accId, accToken, appId)   # Encapsulate the sdk

        host=current_app.config.get('RDS_HOST')     # Get stored in secret.py Inside host
        port=current_app.config.get('RDS_PORT')    # obtain port
        pwd=current_app.config.get('RDS_PASSWORD')  # obtain redis password
        self.rds=redis.Redis(host=host,port=port,password=pwd)  # encapsulation redis
    def send(self,phone,code):    # Receive the entered mobile number and random verification code
        '''  Send SMS interface  :param phone:  cell-phone number  :param code:  Verification Code  :return: Bool  Send successfully failed  '''
        tid=current_app.config.get('RL_TID')
        t=current_app.config.get('SMS_TIME')  # The number taken out is 5  The period of validity   Get... From the configuration file
        # Save the CAPTCHA to redis Inside
        key='sms_%s'%phone
        self.rds.set(key,code,ex=t*60)   # Set expiration date 5 minute

        # Send a text message
        datas=(code,t)  # Verification code and validity period
        rs=self.sdk.sendMessage(tid,phone,datas)  # The return is json character string
        rs_data=json.loads(rs)  # convert to json Format
        #  If the returned status code is 000000  correct   Note that when checking the status code, it must be a string
        if rs_data['statusCode']=='000000':
            return True
        return False

if __name__ == '__main__':  # You can test it here first
    from app import app
    with app.app_context():
        s=SmsTool()
        s.send('15936829517','6666')
Realize... In the blueprint
from flask import Blueprint,jsonify  # Import blueprint
from flask_restful import Api,Resource,fields,marshal,reqparse
from models.model import UserModel2,db    # hold model.py Import in the file
from utils.SmsTools import SmsTool   # Import the function that generates the verification code
import random   # Random function
# # url_prefix #  Specify the prefix of all routes under the current blueprint
user_dp=Blueprint('user_dp',__name__,url_prefix='/users') # Instantiate blueprint objects

api=Api(user_dp)  # Instantiate the blueprint collector # Instantiate a Api object  Api Object is used to collect routes

# Define class view   Inherited from Resource class , adopt Api To collect instantiated objects
class SmsView(Resource):
    def post(self):
        rep=reqparse.RequestParser()
        rep.add_argument('phone')
        args=rep.parse_args()
        code=random.randint(100000,999999)
        s=SmsTool()     # Call the class that sends the verification code
        rs=s.send(args['phone'],code)   # Send the generated random verification code according to the entered mobile phone number
        if rs:
            return jsonify({

                'code':200,
                'msg':' Send successfully ',
            })
        return jsonify({

            'code':400,
            'msg':' fail in send '
        })
# Add route
api.add_resource(SmsView,'/sms') # The full address is  /users/sms

Login function realizes generation jwt
After creating the utils Create under directory jwtTools.py file
import jwt    # Import jwt pip install pyjwt
from flask import current_app   # Get configuration item data
import time  # Time module

class JwtTools():  # Class name
    ''' jwt management  '''
    def create(self,payload,ex=3600):   # Generate jwt
        '''  Generate jwt :param payload:  load  :return: string jwt '''
        payload['exp']=int(time.time())+ex  # The default time is one hour   The key name is exp Words  decode Function will automatically verify

        secret_key=current_app.config.get('SECRET_KEY')   # obtain session Secret key
        token=jwt.encode(payload,secret_key,algorithm='HS256')   # Generate jwt
        print('aaaaaaaaaaaaaaaaaaaaaaaaaaaaa', token) # Print whether the generation is successful
        return token       # return return

    # check token
    def valid(self,token):
        '''  check jwt :param token: jwt :return: Dict payload '''
        secret_key=current_app.config.get('SECRET_KEY')  # obtain session Secret key
        try:
            payload=jwt.decode(token,secret_key,algorithms='HS256')  # Decrypt token
            print(payload)
            return payload
        except Exception as a:
            print(a)
            return False

if __name__ == '__main__':   # You can test here
    from app import app
    with app.app_context():
        j=JwtTools()
        jwt_token=j.create({

            'aaa':'bbb'
        })
        a=j.valid(jwt_token)
        print(a)
Login and carry in the blueprint jwt token function
from flask import Blueprint,jsonify  # Import blueprint
from flask_restful import Api,Resource,fields,marshal,reqparse
from models.model import UserModel2,db
from utils.jwtTools import JwtTools  # Import build jwt Class
from utils.SmsTools import SmsTool   # Import the class that generates the verification code
import random
# # url_prefix #  Specify the prefix of all routes under the current blueprint
user_dp=Blueprint('user_dp',__name__,url_prefix='/users') # Instantiate blueprint objects

api=Api(user_dp)  # Instantiate the blueprint collector # Instantiate a Api object  Api Object is used to collect routes
# Define class view   Inherited from Resource class , adopt Api To collect instantiated objects
class SmsView(Resource):  # Send verification code
    def post(self):
        rep=reqparse.RequestParser()
        rep.add_argument('phone')
        args=rep.parse_args()
        code=random.randint(100000,999999)
        s=SmsTool()     # Call the class that sends the verification code
        rs=s.send(args['phone'],code)   # Send the generated random verification code according to the entered mobile phone number
        if rs:
            return jsonify({

                'code':200,
                'msg':' Send successfully ',
            })
        return jsonify({

            'code':400,
            'msg':' fail in send '
        })
class UserView(Resource):
	    def post(self):
        # To obtain parameters
        req=reqparse.RequestParser()
        req.add_argument('phone')
        req.add_argument('code')

        # Calibration parameters
        args=req.parse_args()
        # Check whether the verification code is correct
        # Connect first redis database
        s=SmsTool()

        # Take out the corresponding verification code according to the mobile phone number
        key = 'sms_%s' % args['phone']
        code_byte=s.rds.get(key)  #  The return value is bute type
        if not code_byte:
            return jsonify({

                'code':400,
                'msg':' The verification code has expired '
            })
        # comparison
        if args['code']!=code_byte.decode():
            return jsonify({

                'code':400,
                'msg':' Verification code error '
            })
        # Query whether the following database has this user
        user_info=UserModel2.query.filter(UserModel2.mobile==args['phone']).first()

        if not user_info:
            # If you don't register first
            # register : Insert user information into the database
            u=UserModel2(mobile=args['phone'],username=' tourists %s'%args['phone'][-4:])
            db.session.add(u)
            db.session.commit()
        # If there is , Direct login
        user_data = UserModel2.query.filter(UserModel2.mobile==args['phone']).first()

        lists=marshal(user_data,{

            'username':fields.String,
        })

        token=JwtTools().create({

            'username':user_data.username,
            'uid':user_data.uid
        })
        print('sssssssssssssssssssssssssssssssss',token)
        # Return user information return JWT
        return jsonify({

            'code':200,
            'msg':' Landing successful ',
            'data':{

                'username':user_data.username,
                'token':token   #token It is used to maintain the state
            }
        })
    #JWT In the third part of
    #1. head , fixed
    #2.payload  load
    #3.1+2 Encrypted

# Add route
api.add_resource(SmsView,'/sms') # The full address is  /users/sms
api.add_resource(UserView,'/user') # The full address is  /users/user

边栏推荐
- Prevent cookies from modifying ID to cheat login
- OSI seven layer model and tcp/ip four layer (TCP and UDP) (notes)
- Login to homepage function implementation
- "Intermediate and advanced test questions": what is the implementation principle of mvcc?
- 面试官:什么是脚手架?为什么需要脚手架?常用的脚手架有哪些?
- Vcenter7.0 managing esxi7.0 hosts
- Use of string type "PHP Basics"
- List删除集合元素
- [geek challenge 2019] finalsql 1
- ERP生产作业控制 华夏
猜你喜欢

Eval and assert execute one sentence Trojan horse

Use of string type "PHP Basics"

"PHP Basics" PHP statements and statement blocks

The third letter to the little sister of the test | Oracle stored procedure knowledge sharing and test instructions

Interviewer: what is scaffolding? Why do you need scaffolding? What are the commonly used scaffolds?

百人参与,openGauss开源社区这群人都在讨论什么?

OSI seven layer model and tcp/ip four layer (TCP and UDP) (notes)
Hundreds of people participated. What are these people talking about in the opengauss open source community?

如何在qsim查看软件对象的实例?

Node installation and debugging
随机推荐
Solve the problem of slow batch insertion of MySQL JDBC data
Teach you to build a nail warning robot hand in hand
QT creator code style plug-in beautifier
Use of string type "PHP Basics"
情人节,我用字符画出了一个对象!
Interviewer: what is scaffolding? Why do you need scaffolding? What are the commonly used scaffolds?
[uni app advanced practice] take you hand-in-hand to learn the development of a purely practical complex project 1/100
regular expression
You may need an additional loader to handle the result of these loaders.
JS advanced knowledge - function
Realize SPU management in the background
帮忙发几个招聘,有兴趣可以看看
Debug: generic related "unresolved external symbols"
Dirsearch[directory scanning tool]
说透缓存一致性与内存屏障
Creation and simple application of QPushButton button button
【uni-app高级实战】手把手带你学习一个纯实战复杂项目的开发1/100
Fluent rendering mechanism - GPU thread rendering
Weekly learning summary
How does kettle handle text data transfer as' 'instead of null