当前位置:网站首页>Pytoch deep learning quick start tutorial -- mound tutorial notes (I)
Pytoch deep learning quick start tutorial -- mound tutorial notes (I)
2022-07-26 12:02:00 【TARS_ 90%Honesty】
Pytorch Introduction learning ( One )
Dataset class
Dataset Class knowledge
Dataset Class is to get the data in the dataset and its label.
The goal is : Get the information of each data , Get the size of the dataset .
jupyter notebook On the input
Dataset??Check out the official documents , Attention should be paid to :- Custom classes need to inherit Dataset class
- rewrite __init__ Method , Initial global variable
- rewrite __getitem__ Method , return img and label
- rewrite __len__ Method , Return length
Read for the first storage method of data set
The first way to store data sets is as follows :

Data reading code
#  Use Dataset Class to read data sets
from torch.utils.data import Dataset
import os
from PIL import Image

class MyData(Dataset):
    # root_dir: Root file path
    # label_dir: Tag file path , Here, the tag file path is the tag name
    def __init__(self, root_dir, label_dir):
        # self The role of : Define global variables , So that it can be passed between different functions
        self.root_dir = root_dir
        self.label_dir = label_dir
        #  Use os.path.join Method to join paths , Get the path of the folder where the pictures are located ( It's divided into training and testing )
        #  The advantages of this connection method , in the light of win and linux Different operating systems , Different file path symbols will be automatically generated
        self.path = os.path.join(self.root_dir, self.label_dir)
        #  Use os.listdir Method to obtain the sub file name under the corresponding file ( Here is the picture name ), Store in a list
        self.img_path_list = os.listdir(self.path)

    def __getitem__(self, idx):
        #  Get the name of the picture , According to the table below idx
        img_name = self.img_path_list[idx]
        #  Get the path of the picture
        img_item_path = os.path.join(self.root_dir, self.label_dir, img_name)
        #  Get picture information img
        img = Image.open(img_item_path)
        #  Get picture tags label
        label = self.label_dir
        return img, label

    def __len__(self):
        return len(self.img_path_list)

#  Instantiation MyData class
root_dir = "dataset/train"
ants_label_dir = "ants"
bees_label_dir = "bees"
ants_dataset = MyData(root_dir, ants_label_dir)
bees_dataset = MyData(root_dir, bees_label_dir)

#  utilize + Data set with the same splicing size , Splice in front and back order
train_dataset = ants_dataset + bees_dataset
img, label = train_dataset[0]
#  display picture
img.show()
print(label)
Read for the second storage method of data set
The second way to store data sets is as follows :


Data reading code
#  According to the different storage methods of data sets , It's written here Dataset Class the second way to read data
import os
from torch.utils.data import Dataset
from PIL import Image

class MyData(Dataset):
    def __init__(self, root_dir, image_dir, label_dir):
        self.root_dir = root_dir
        self.image_dir = image_dir
        self.label_dir = label_dir
        self.image_path = os.path.join(self.root_dir, self.image_dir)
        self.label_path = os.path.join(self.root_dir, self.label_dir)
        self.image_path_list = os.listdir(self.image_path)
        self.label_path_list = os.listdir(self.label_path)
        #  because image and label Same file name , Do the same sort , It can guarantee the extracted data and label It's one-to-one
        self.image_path_list.sort()
        self.label_path_list.sort()

    def __getitem__(self, idx):
        img_name = self.image_path_list[idx]
        label_name = self.label_path_list[idx]
        img_item_path = os.path.join(self.root_dir, self.image_dir, img_name)
        label_item_path = os.path.join(self.root_dir, self.label_dir, label_name)
        img = Image.open(img_item_path)

        with open(label_item_path, 'r') as f:
            label = f.readline()

        return img, label

    def __len__(self):
        assert len(self.image_path_list) == len(self.label_path_list)
        return len(self.image_path_list)

if __name__ == '__main__':
    root_dir = "dataset2/train"
    ants_image_dir = "ants_image"
    ants_label_dir = "ants_label"
    train_ants_dataset = MyData(root_dir, ants_image_dir, ants_label_dir)
    print(" Number of ant pictures in the training data set :{}".format(len(train_ants_dataset)))

    bees_image_dir = "bees_image"
    bees_label_dir = "bees_label"
    train_bees_dataset = MyData(root_dir, ants_image_dir, ants_label_dir)
    print(" Number of bee pictures in the training data set :{}".format(len(train_bees_dataset)))

    train_datast = train_ants_dataset + train_bees_dataset
    print(" The total number of pictures in the training data set :{}".format(len(train_datast)))

    #  test
    img, label = train_datast[124]
    img.show()
    print(label)
tensorboard
add_scalar()
- Draw the relationship between variables
from torch.utils.tensorboard import SummaryWriter

#  Instantiation SummaryWriter class , And define the storage path and name of the event file logs
writer = SummaryWriter("logs")

# add_scalar() The method has three arguments :
# tag Title
# scalar_value by y Axis variable
# global_step by x Axis variable , Other parameters default
for i in range(100):
    writer.add_scalar("y=2x", 2*i, i)
#  Don't forget to close
writer.close()
- terminal Command line
tensorboard --logdir=logs --port="8008"- logdir Specify the storage path of the event file
- port Specify port number , If not specified, the default is 6006
- tensorboard It is shown as follows

add_image()
- Show the image
from torch.utils.tensorboard import SummaryWriter
from PIL import Image
import numpy as np
writer = SummaryWriter("logs_image")
# add_images(tag, img_tensor, global_step, walltime, dataformats) Method parameter :
# tag Title
# img_tensor Input image for , Note that the type of image is torch.Tensor, numpy.array, or string/blobname, It can't be PIL
# dataformats Specifies the of the image shape, The default is (N, 3, H, W), Other types NHWC, CHW, HWC, HW, WH, etc. You need to specify .
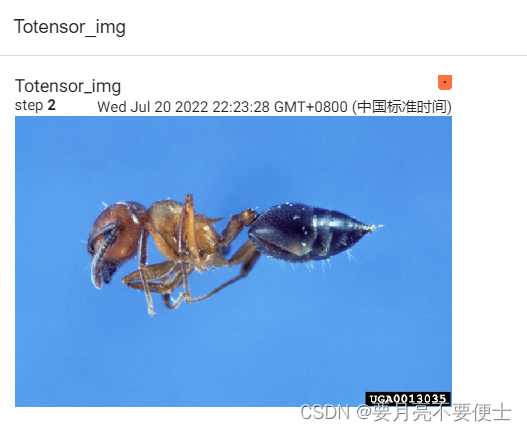
image_path = "dataset/train/ants/0013035.jpg"
img_PIL = Image.open(image_path)
print(type(img_PIL))
# PIL The image type needs to be converted to tensor perhaps array, Here it's converted into array
img_array = np.array(img_PIL)
print(type(img_array))
# (512, 768, 3) by HWC, You need to specify dataformats Parameters
print(img_array.shape)
# global_step by 1, Designate the 1 Step
writer.add_images("img", img_array, 1, dataformats="HWC")
writer.close()
- Terminal command line
tensorboard --logdir=logs_image - tensorboard It is shown as follows

transforms
ToTensor class
- take PIL perhaps numpy Image type conversion to Tensor type , For neural network input
from torch.utils.tensorboard import SummaryWriter
from torchvision import transforms
from PIL import Image

img_path = "dataset/train/ants/0013035.jpg"
img_PIL = Image.open(img_path) # PIL type

#  Instantiation ToTensor class
trans_totensor = transforms.ToTensor()
# ToTensor The role of classes : take PIL perhaps numpy Image type conversion to tensor type
#  Input is  PIL Image or numpy.ndarray
#  Output is  tensor image
img_tensor = trans_totensor(img_PIL) # Tensor type
print(img_tensor.shape) # torch.Size([3, 512, 768])

writer = SummaryWriter("logs")
writer.add_images("Totensor_img", img_tensor, 2, dataformats="CHW")
writer.close()
- tensor Image type compared to other types , Contains the parameters needed for neural network training , The input image type of neural network is tensor.

- Webpage display
__call__ Method
#  test __call__(self, args) The role of methods
class Person:
    def __call__(self, name):
        print("__call__" + "hello" + name)

    def hello(self, name):
        print("hello" + name)

person = Person()
#  Use __call__ Method , Add input variables directly in parentheses
person(" swan goose ")
#  The display call is equivalent to the implicit writing above
person.__call__(" swan goose ")
#  Use hello Method , need .
person.hello(" swan goose ")
- __forward__ Methods and __call__ Use the same method , You can input parameters directly and implicitly .
Normalize class
- Yes tensor The image is normalized ,
mean and standard deviation - Calculation formula
output[channel] = (input[channel] - mean[channel]) / std[channel]
# Normalize class , The input image type is tensor image, Conduct mean and standard deviation
# output[channel] = (input[channel] - mean[channel]) / std[channel]
import torch
import torchvision
from PIL import Image
from torch.utils.tensorboard import SummaryWriter

writer = SummaryWriter("logs")

img_path = "images/pytorch.png"
img_PIL = Image.open(img_path)

# ToTensor
trans_totensor = torchvision.transforms.ToTensor()
img_tensor = trans_totensor(img_PIL)
#  Don't specify global_step Parameters , The default is 0, namely tensorboard Displayed as step 0
writer.add_images("tenosr", img_tensor, dataformats='CHW')

# Normalize
trans_norm = torchvision.transforms.Normalize([0.5, 0.5, 0.5], [0.5, 0.5, 0.5])
img_norm = trans_norm(img_tensor)
#  Don't specify global_step Parameters , The default is 0, namely tensorboard Displayed as step 0
writer.add_images("norm", img_norm, dataformats='CHW')

writer.close()
- Be careful add_images In the method , If global_step Parameter not specified , The default is 0, namely tensorboard Displayed as step 0.
- tensorboard Show

Resize class
# Resize Method , this pytroch edition , There are no restrictions on the type of input image , But lower versions may require PIL
#  If you enter an image type torch, Yes shape When required [..., H, W]
#  Parameters size If the time is (h,w), Change according to this size , If it's a single integer int, Then the minimum edge of the image is int, On the other side, carry out equal proportion transformation .
import torchvision
from PIL import Image

img_path = "images/pytorch.png"
img_PIL = Image.open(img_path)

# ToTensor
trans_totensor = torchvision.transforms.ToTensor()
img_tenosr = trans_totensor(img_PIL)

# Resize
#  The input image type is tensor,size by (h,w)
print(img_tenosr.shape) # tensor The original image size is torch.Size([3, 364, 701])
trans_resize = torchvision.transforms.Resize([300, 300])
img_tenosr2 = trans_resize(img_tenosr)
print(img_tenosr2.shape) #  After cutting ,tensor The image size is torch.Size([3, 300, 300])

#  The input image type is tensor,size by int
print(img_tenosr.shape) # tensor The original image size is torch.Size([3, 364, 701])
trans_resize = torchvision.transforms.Resize(182)
img_tensor3 = trans_resize(img_tenosr)
print(img_tensor3.shape) #  After cutting ,tensor The image size is torch.Size([3, 182, 350])

#  The input image type is PIL,size by (h,w)
print(img_PIL) # PIL The original image size is 701x364
trans_resize = torchvision.transforms.Resize([300, 300])
img_PIL2 = trans_resize(img_PIL)
print(img_PIL2) #  After cutting ,PIL The image size is 300*300
#  If add_images Show , It needs to be converted into tensor type
img_PIL3 = trans_totensor(img_PIL2)
print(img_PIL3.shape) # torch.Size([3, 300, 300])
Compose class
- You can combine a series transforms Transformation
- We want to achieve the right PIL image, Cut it into (300,300) The size of the , To convert tensor type
#  Realize a series of transforms A combination of transformations
#  Realize to PIL image, Cut it into (300,300) The size of the , To convert tensor type
import torchvision
from PIL import Image
from torchvision import transforms

img_path = "images/pytorch.png"
img = Image.open(img_path)

# Resize
trans_resize = torchvision.transforms.Resize((300,300))

# ToTensor
trans_totensor = torchvision.transforms.ToTensor()

# Compose
trans_compose = torchvision.transforms.Compose([trans_resize, trans_totensor])
print(img) # <PIL.PngImagePlugin.PngImageFile image mode=RGB size=701x364 at 0x2082E60E908>
img2 = trans_compose(img)
print(img2.shape) # torch.Size([3, 300, 300])

#  improvement , To streamline the code
trans_compose = torchvision.transforms.Compose([torchvision.transforms.ToTensor(),
                                                torchvision.transforms.Resize((300, 300))])
print(img) # <PIL.PngImagePlugin.PngImageFile image mode=RGB size=701x364 at 0x21D43C56808>
img3 = trans_compose(img)
print(img3.shape) # torch.Size([3, 300, 300])

#  Be careful :
#  One thing to note is that compose The input image type of needs and the first transforms The input image type of transformation is consistent , Here is and ToTensor() The input image type is consistent .
#  first transforms Transform the output image type and the second transforms The input image type of transformation is consistent , When more than one transforms Transformation time , And so on .
- Be careful :
- One thing to note is that compose The input image type of needs and the first transforms The input image type of transformation is consistent , Here is and ToTensor() The input image type is consistent .
- first transforms Transform the output image type and the second transforms The input image type of transformation is consistent , When more than one transforms Transformation time , And so on .
RandomCrop class
- Random cutting , This version also does not limit the type of input image
- size if (h, w), Then the original image size is transformed according to this . if int, Then the original image size is transformed into (int, int)
# RandomCrop  Random cutting , This version also does not limit the type of input image
# size if (h, w), Then the original image size is transformed according to this . if int, Then the original image size is transformed into (int, int)
import torchvision
from PIL import Image
from torch.utils.tensorboard import SummaryWriter

img_path = "images/pytorch.png"
img = Image.open(img_path) # <PIL.PngImagePlugin.PngImageFile image mode=RGB size=701x364 at 0x286152D1708>


trans_randomcrop = torchvision.transforms.RandomCrop((216))
trans_compose = torchvision.transforms.Compose([trans_randomcrop,
                                                torchvision.transforms.ToTensor()])
writer = SummaryWriter("logs")
for i in range(10):
    img_crop = trans_compose(img)
    print(img_crop.shape) # torch.Size([3, 216, 216])
    writer.add_images("RandomCrop", img_crop, i, dataformats='CHW')
writer.close()
- tensorboard Show

torchvision Data set usage in -dataset
Easy to use - download
- With CIFAR10 For example
#  Use torchvision Data set provided CIFAR10
import torchvision

#  Parameters root Represents the storage path of the downloaded data set
#  Parameters train by True, Represents the training set downloaded ; by False, Represents the test set downloaded .
#  Parameters download by True, On behalf of online download , And put it in root Next ; by Falsse, It means that the local has downloaded , No need to download .
train_dataset = torchvision.datasets.CIFAR10("./dataset", train=True, download=True)
test_dataset = torchvision.datasets.CIFAR10("./dataset", train=False, download=True)
print(test_dataset[0])
# (<PIL.Image.Image image mode=RGB size=32x32 at 0x14FAE24E408>, 3)
print(test_dataset.classes)
# ['airplane', 'automobile', 'bird', 'cat', 'deer', 'dog', 'frog', 'horse', 'ship', 'truck']

img, target = test_dataset[0]
print(img) # <PIL.Image.Image image mode=RGB size=32x32 at 0x19776615488>
print(target) # 3
print(test_dataset.classes[target]) # cat
img.show() #  display picture
- If the data set downloaded online is slow , You can copy the download link and download it locally through Xunlei and other channels , Store in root Under the path .
- The download link is at the following location :

- The download link is at the following location :
take torchvision Each image in the dataset is processed the same transoforms Transformation
- Parameters transform
#  Yes torchvision Every picture in the data set transforms Transformation
import torchvision

#  Using parameter transform, take CIFAR10 The types of all pictures in are determined by PIL Transformation for tensor.
from torch.utils.tensorboard import SummaryWriter

train_dataset = torchvision.datasets.CIFAR10("./dataset", train=True, transform=torchvision.transforms.Compose([
    torchvision.transforms.ToTensor()]), download=True)
test_dataset = torchvision.datasets.CIFAR10("./dataset", train=False, transform=torchvision.transforms.Compose([
    torchvision.transforms.ToTensor()]), download=True)

print(test_dataset[0])

writer = SummaryWriter("logs")
for i in range(10):
    img, target = test_dataset[i]
    #  because img Of shape yes (3, H, W) In the form of , You need to specify dataformats Parameters
    writer.add_images("test_img", img, i, dataformats='CHW')
writer.close()
- tensorboard Show

dataloader
Simple understanding
- Load the data into the neural network
- Equivalent to from a deck of cards , Touch two cards at a time , Or touch four cards at one time , By its parameters
batch_sizedecision - Parameters batch_size Every time (batch) How many samples to take (samples), That is, touch several cards at one time
- Parameters shuffle For the first round of cards , Start shuffling , Is the stack order of the second round the same as that of the first round , by True Represents disruption , by False, It means not to disturb .
- Parameters num_workers Is the program run in multi process or single process , The default is 0, Adopt the main thread
- Parameters drop_last, There are 100 card , Every touch 3 card , The remaining 1 Cards are discarded , Still don't discard ,True discarded ,False Do not discard
- When sampling , Random sampling
- if writer Show dataloader Packaged packets , use writer.add_images(), Instead of writer.add_image()
#  Parameters dataset
#  Parameters batch_size  Every time (batch) How many samples to take (samples), That is, touch several cards at one time
#  Parameters shuffle  For the first round of cards , Start shuffling , Is the stack order of the second round the same as that of the first round , by True Represents disruption , by False, It means not to disturb .
#  Parameters num_workers  Is the program run in multi process or single process , The default is 0, Adopt the main thread
#  Parameters drop_last, There are 100 card , Every touch 3 card , The remaining 1 Cards are discarded , Still don't discard ,True discarded ,False Do not discard
import torchvision

#  Prepared test data set
from torch.utils.data import DataLoader
from torch.utils.tensorboard import SummaryWriter

test_dataset = torchvision.datasets.CIFAR10("./dataset", train=False, transform=torchvision.transforms.Compose([
    torchvision.transforms.ToTensor()]), download=True)

test_loader = DataLoader(dataset=test_dataset, batch_size=4, shuffle=True, num_workers=0, drop_last=False)

#  The first picture in the test data set and target
img, target = test_dataset[0]
print(img.shape) # torch.Size([3, 32, 32])
print(target) # 3

# dataloader Pack in order dataset Four data in
# img0, target0 = dataset[0]
# img1, target1 = dataset[1]
# img2, target2 = dataset[2]
# img3, target3 = dataset[3]
#  take img0,img1,img2,img3 Separate packing imgs, take target0,target1,target2,target3 Separate packing targets, As dataloader Return in

#  How to take out dataloader Data packets in , use for loop
writer = SummaryWriter("dataloader")
step = 0
for data in test_loader:
    imgs, targets = data
    print(imgs.shape) # torch.Size([4, 3, 32, 32])  representative 4 A picture (batch_size by 4), Each picture is 3 passageway ,h by 32,w by 32
    #  It should be noted that dataloader Each time from dataset To grab 4 A picture , It's a random grab .sampler The sampler is randomSampler
    print(targets) # tensor([7, 4, 2, 6])
    #  because imgs It's multiple pictures packed , So using add_images, Instead of add_image
    writer.add_images("test_data", imgs, step) # here imgs Of shape by NCHW form , You don't have to specify dataformats
    step = step + 1
writer.close()
- tensorboard Show

take batch_size It is amended as follows 64, test drop_last Parameter effect
- drop_last by False, Do not discard the remaining pictures

- drop_last Parameter is True, Discard the remaining pictures

test shuffle Parameter effect
- shuffle = False, Do not change the deck order
import torchvision

#  Prepared test data set
from torch.utils.data import DataLoader
from torch.utils.tensorboard import SummaryWriter

test_dataset = torchvision.datasets.CIFAR10("./dataset", train=False, transform=torchvision.transforms.Compose([
    torchvision.transforms.ToTensor()]), download=True)
#  Parameters shuffle=False when , Do not change the deck order , Every round (epoch) Every time batch The pictures obtained are the same
#  Suggest shuffle=True, Shuffle the deck
test_loader = DataLoader(dataset=test_dataset, batch_size=64, shuffle=False, num_workers=0, drop_last=True)

#  The first picture in the test data set and target
img, target = test_dataset[0]
print(img.shape) # torch.Size([3, 32, 32])
print(target) # 3


writer = SummaryWriter("dataloader")
for epoch in range(2):
    step = 0
    for data in test_loader:
        imgs, targets = data
        writer.add_images("Epoch:{}".format(epoch), imgs, step)
        step = step + 1
writer.close()

- shuffle = True, Change the deck order
- During training , use shuffle=True

边栏推荐
猜你喜欢

3.2 create menu and game pages (Part 2)
剑指 Offer 24. 反转链表

MySQL组合索引(多列索引)使用与优化
浅谈低代码技术在物流运输平台中的搭建与管理

Audio and video technology development weekly | 255

Li Kai: the interesting and cutting-edge audio and video industry has always attracted me

V00 - 年纪大了,想做啥就做啥吧
On the construction and management of low code technology in logistics transportation platform

Cohere博客:在生产环境中运行大型语言模型-推理框架概览

JVM内存溢出和内存泄漏的区别
随机推荐
一些实用、常用、效率越来越高的 Kubernetes 别名
Test cases should never be used casually, recording the thinking caused by the exception of a test case
[ten thousand words long text] Based on LSM tree thought Net 6.0 C # realize kV database (case version)
Pytest interface automation test framework | use decorators to decorate the use cases that need to be run
Koin
MILA旗下初创企业Ubenwa获得250万美元投资,研究婴儿健康AI诊断
【活动早知道】LiveVideoStack近期活动一览
MICCAI2022论文 | 进化多目标架构搜索框架:在COVID-19三维CT分类中的应用
Wulin headlines - station building expert competition
物联网设备加密的意义
Pytest interface automation test framework | execute use cases through markup expressions
4.1 configure MySQL and register login module
11 "pocket" universities in China! Running on campus and leaving the school before accelerating
大佬们,cdc oracle 怎么设置从指定scn号开始读取,或是怎么设置只读全量的归档,不去读取快
Redis实现Single单点登入--系统框架搭建(一)
The latest heart-shaped puzzle applet source code + with flow master
pytest接口自动化测试框架 | 重新运行失败用例
Is it easy to find a job after programmer training?
了解string类
Understanding useref is enough