当前位置:网站首页>Interesting opencv - record image binarization and similarity
Interesting opencv - record image binarization and similarity
2022-08-03 20:45:00 【Public number: arigeweixin】
一、背景:
前面的文章提到,要实现两个功能
实现数字识别 Implement icon recognition
The previous article has already realized the recognition of numbers,However, the recognition rate was found to be relatively low,And the recognition error rate is also relatively high.It is considered because the background is more complicated and affects the recognition effect,This paper mainly addresses the simplification of complex backgrounds,and comparison of pictures
二、目标:
通过opencv对图片处理,Make the background and content more distinct,即二值化 通过opencvCompare the similarity of the binarized images,to identify the icon
三、实现过程:
opencv的集成
1. 下载opencv对应的版本 https://opencv.org/releases/
我使用了最新的4.6.0 的版本

2. 解压下载的zip得到demoand needs to be integratedmodule

3. Access your own projects
3.1、将2中得到的sdkas an independentmodule放到项目中
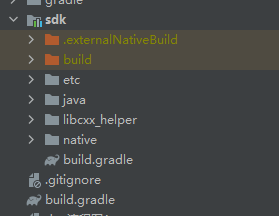
3.2、在项目的setting.gradle中引入sdk module

3.3、 在使用opencv的module中引入sdk module

4. 编译使用
The integration is now complete,But because of this usendk相关的功能,如果本地没有ndk环境的话,Environmental issues may need to be addressed,这里不再赘述
二值化处理
1. 先上代码
    public static Bitmap createBitmap(Bitmap bitmap) {
        Mat src = new Mat();
        Utils.bitmapToMat(bitmap, src); //将bitmap转换为Mat
        Mat thresholdImage = new Mat(src.size(), src.type()); //This binary image is used to find out the key information of the image

        //将图像转换为灰度图像
        Imgproc.cvtColor(src, thresholdImage, Imgproc.COLOR_RGBA2GRAY);

        //Convert the image to an edge binary image
        Imgproc.threshold(thresholdImage,thresholdImage,10.0,255.0, Imgproc.THRESH_BINARY_INV|Imgproc.THRESH_OTSU);

        Bitmap binaryBitmap = Bitmap.createBitmap(bitmap.getWidth(), bitmap.getHeight(), bitmap.getConfig());
        Utils.matToBitmap(thresholdImage, binaryBitmap);
        return binaryBitmap;
    }
2. 步骤拆解
2.1、先将bitmap转为 Mat方便opencv进行操作
2.2、 调用 Imgproc.cvtColor(src, thresholdImage, Imgproc.COLOR_RGBA2GRAY); 将图像转为灰度图像
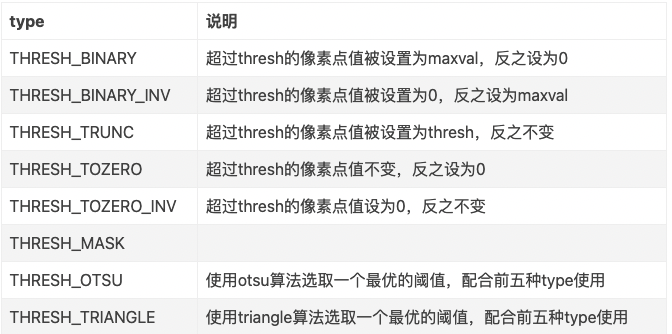
2.3、 调用 ` Imgproc.threshold(thresholdImage,thresholdImage,10.0,255.0, Imgproc.THRESH_BINARY_INV|Imgproc.THRESH_OTSU);
` Convert the image to a binary image. 这个方法非常的重要,Specifically speaking here
1. The first parameter is the image source
2. 第二个参数是输出的图像
3. 是一个标准.Each pixel is compared against this criterion.This will be used in conjunction with the last parameter.
4. In cases where the criteria for the third argument are met,要赋予的值
5. The fifth parameter controls the third、The usage of the fourth parameter
3. 效果展示


Similarity processing
1. 上代码
     public static Double similarity(Bitmap bitmap1, Bitmap bitmap2){
            // 计算每张图片的特征点
            MatOfKeyPoint descriptors1 = computeDescriptors(bitmap1);
            MatOfKeyPoint descriptors2 = computeDescriptors(bitmap2);
            // 比较两张图片的特征点
            DescriptorMatcher descriptorMatcher = DescriptorMatcher.create(DescriptorMatcher.FLANNBASED);
            List<MatOfDMatch> matches =new  ArrayList();
            // 计算大图中包含多少小图的特征点.
            // 如果计算小图中包含多少大图的特征点,结果会不准确.
            // 比如:若小图中的 50 个点都包含在大图中的 100 个特征点中,则计算出的相似度为 100%,显然不符合我们的预期
            if (bitmap1.getByteCount() > bitmap2.getByteCount() ) {
                descriptorMatcher.knnMatch(descriptors1, descriptors2, matches, 2);
            } else {
                descriptorMatcher.knnMatch(descriptors2, descriptors1, matches, 2);
            }
            Log.i("~~~", "matches.size: ${matches.size}");
            if (matches.isEmpty()) return 0.00;
            // 获取匹配的特征点数量
            int matchCount = 0;
            // 邻近距离阀值,这里设置为 0.7,该值可自行调整
            float nndrRatio = 0.7f;
            for (MatOfDMatch match:matches) {

                DMatch[] array = match.toArray();
                // 用邻近距离比值法(NNDR)计算匹配点数
                if (array[0].distance <= array[1].distance * nndrRatio) {
                    matchCount++;
                }
            }
            Log.i("~~~", "matchCount: $matchCount");
            return Double.valueOf(matchCount/ matches.size());
        }
2. 步骤拆解
2.1、 Find the feature points of the two images
   private static MatOfKeyPoint computeDescriptors(Bitmap bitmap){
            Mat mat = new Mat();
            Utils.bitmapToMat(bitmap, mat);
            MatOfKeyPoint keyPoints = new MatOfKeyPoint();
            siftDetector.detect(mat, keyPoints);
            MatOfKeyPoint descriptors = new MatOfKeyPoint();
            // 计算图片的特征点
            siftDetector.compute(mat, keyPoints, descriptors);
            return descriptors;
        }
2.2、 Choose the appropriate match mode
2.3、避免 Scenarios where the inclusion of a small image in a large image leads to the belief that the small image exactly matches the large image,So judge the size,Compare large and small images.
2.4、 Choose a proximity distance threshold
2.5、 Compare the difference in the eigenvalues of the two plots,,Record the number of differences that meet the threshold
2.6、 符合阈值的个数,than the total number of features,Get match rate
总结
opencvProvides a complete set of very completeapi,It can solve most of the scenarios we encounter,You can read more documents,学习起来.
关注公众号: arigeweixin ,取得更多联系

边栏推荐
猜你喜欢
随机推荐
Go语言为任意类型添加方法
算法--交错字符串(Kotlin)
tRNA-m5C转运RNA(tRNA)修饰5-甲基胞嘧啶(m5C)|tRNA修饰m1Am2A (2-methyladenosine)
ES6解构赋值--数组解构及对象解构
EasyCVR平台海康摄像头语音对讲功能配置的3个注意事项
chartjs自定义柱状图插件
Markdown语法
leetcode 231. Powers of 2
数据库定时备份winserver2012篇
How can a cloud server safely use local AD/LDAP?
回忆三年浮沉
leetcode 剑指 Offer 58 - II. 左旋转字符串
收藏-即时通讯(IM)开源项目OpenIM-功能手册
抖音web逆向教程
华为设备VRRP配置命令
华为设备配置VRRP负载分担
【HiFlow】经常忘记签到怎么办?使用腾讯云场景连接器每天提醒你。
若依集成easyexcel实现excel表格增强
charles配置客户端请求全部不走缓存
敏捷交付的工程效能治理

