当前位置:网站首页>案例实践 --- Resnet经典卷积神经网络(Mindspore)
案例实践 --- Resnet经典卷积神经网络(Mindspore)
2022-08-01 07:18:00 【swl.乌鸦】
目录
前言
本案例实践参考AI Gallery-开发者-华为云
因为神经网络训练步骤类似,就只总结相关代码和Resnet18网络结构。
类似训练步骤可参考http://t.csdn.cn/SSmos
调用Model高阶API进行训练和保存模型文件
此部分按照AI Gallery-开发者-华为云案例实践做的笔记,原代码详解很清楚,不理解可以官网查找Model API的详解——mindspore — MindSpore master documentation
import os,time
from mindspore import Model
from mindspore import load_checkpoint, load_param_into_net
from mindspore.train.callback import ModelCheckpoint, CheckpointConfig, LossMonitor, TimeMonitor

model = Model(network, loss_fn = net_loss, optimizer = net_opt, metrics = {'acc'}) #完成Model初始化

#训练参数
batch_num = mnist_ds_train.get_dataset_size() #训练数据集的规模
max_epochs = 1    #训练轮数

model_path = "./model/ckpt"  #训练好模型保存路径
os.system('rm -f {0}*.ckpt {0}*.meta {0}*.pb'.format(model_path))  #rm -f --->强制删除文件或者目录

#定义回调函数
config_ck = CheckpointConfig(save_checkpoint_steps=batch_num, keep_checkpoint_max=35)  #对ckpt的配置 保存步骤、保存最多ckpt文件数
ckpoint_cb = ModelCheckpoint(prefix="train_resnet_mnist", directory=model_path, config=config_ck)  #保存训练结束后的模型和参数

loss_cb = LossMonitor(batch_num)  # 用于输出损失
start_time = time.time()
model.train(max_epochs, mnist_ds_train, callbacks=[ckpoint_cb, loss_cb])  # 训练
res = model.eval(mnist_ds_test)  # 验证测试集
print("result: ", res)
cost_time = time.time() - start_time
print("训练总耗时: %.1f s" % cost_time)
Resnet18网络结构
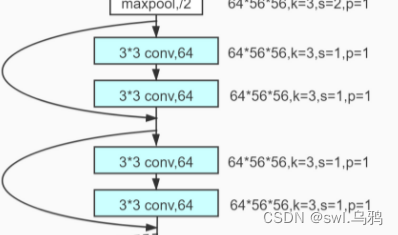
图解
【参考这位博主的文章http://t.csdn.cn/83wbR】


代码详解----基于Jupternotebook
第一步,构建一个残差单元
根据结构可知,每个残差单元不同的在于输入、输出通道数和步长,因此将这三个变量作为初始化参数 。
import mindspore.nn as nn
#构建一个残差单元
class basic_res(nn.Cell):
    """
    需要设置的参数:
    input_channels, output_channels, stride
    """
    def __init__(self, input_channels, output_channels, stride = 1):
        super(basic_res, self).__init__()
        self.conv1 = nn.Conv2d(in_channels = input_channels, out_channels = output_channels, kernel_size = 3, stride = stride, pad_mode="same")
        self.bn = nn.BatchNorm2d(output_channels)
        self.relu = nn.ReLU()
        self.conv2 = nn.Conv2d(in_channels = output_channels, out_channels = output_channels, kernel_size = 3, stride = 1, pad_mode="same") #第二个卷积层的步长都为1,不需要人为设置
        self.downsample = nn.Conv2d(in_channels = input_channels, out_channels = output_channels, kernel_size = 1, stride = stride, pad_mode="same") #保证残差的输入shape与残差输出shape相同
    def construct(self, x):
        out = self.conv1(x)
        out = self.bn(out)
        out = self.relu(out)
        out = self.conv2(out)
        identity = self.downsample(x)

        out = out + identity
        out = self.relu(out)

        return out
第二步,构建残差结构
在Resnet18结构中,每一个残差结构由两个残差单元组成,观察第二幅图示结构,可知,除了第一个残差结构外,后面三个残差结构中第一个残差单元步长均变为了2,因此只有第一个残差单元的步长需要设置。

#堆叠残差单元构建成一个残差结构
def build_res(input_channels, output_channels,blocks, stride = 1):

    res_build = nn.SequentialCell()

    res_build.append(basic_res(input_channels, output_channels, stride = stride)) #第一个残差单元步长会改变,为2,具有下采样功能

    for _ in range(1, blocks):
        res_build.append(basic_res(output_channels, output_channels, stride = 1))#在一个残差结构里,除了第一个残差单元,后面步长均为1

    return res_build
第三步,构建残差网络
基于定义好的残差结构,现在只需根据图式结构,构建输入层、隐藏层、输出层,设置相应的参数,便能搭建出Resnet18网络结构。
#构建残差网络
from mindspore import nn

class Resnet(nn.Cell):

    def __init__(self, layer_dims, num_classes):
        super(Resnet, self).__init__()

        #输入层--对原始输入进行卷积池化等预处理
        self.stem = nn.SequentialCell([nn.Conv2d(3, 64,  7, 2, pad_mode='same'),
                                nn.BatchNorm2d(64),
                                nn.ReLU(),
                                nn.MaxPool2d(3, 2, pad_mode='same')])
        #隐藏层---残差结构、卷积
        self.layer1 = build_res(64, 64, layer_dims[0])
        self.layer2 = build_res(64, 128, layer_dims[1], 2)
        self.layer3 = build_res(128, 256, layer_dims[2], 2)
        self.layer4 = build_res(256, 512, layer_dims[3], 2)

        #平均池化
        self.avgpool = nn.AvgPool2d(7, 1)

        #展开
        self.flatten = nn.Flatten()


        #全连接
        self.fc = nn.Dense(512, num_classes)

    def construct(self, x):
        #输入层
        out = self.stem(x)

        #隐藏层
        out = self.layer1(out)
        out = self.layer2(out)
        out = self.layer3(out)
        out = self.layer4(out)

        #输出层
        out = self.avgpool(out)
        out = self.flatten(out)
        out = self.fc(out)

        return out
第四步,实例化测试
#定义好每一个残差结构中残差单元数目
layer_dims = [2,2,2,2]
#建立测试数据
from mindspore import Tensor
from mindspore import numpy as np
x = Tensor(np.ones([1,3,224,224]))#实例化网络
resnet18 = Resnet(layer_dims, 10)
#输入数据
x_resnet18 = resnet18(x)输入数据x:

输出结果:
 Jupternotebook是真的很方便的进行代码调试,可以将搭建的结构拆开来,一步一步测试输入层、隐藏层和输出层,对于新手来说,非常有利于理解神经网络结构,以及检查数据在整个处理过程中的变化。
案例补充
在本案例中最后进行批量预测,因为较简单,但有几处需要理解一下,于是就稍做了一下总结
import numpy as np
from PIL import Image
import mindspore
import mindspore.ops as ops
from mindspore import Tensor

dic_ds_test = mnist_ds_test.create_dict_iterator(output_numpy = True) #创建迭代数据,返回字典类型,数据类型是数组
ds_test = next(dic_ds_test)  #取创建好的迭代数据

images_test = ds_test["image"]
labels_test = ds_test["label"]

output = model.predict(Tensor(images_test))   #开始预测,返回一个每一类的预测分数
pred_labels = ops.Argmax(output_type=mindspore.int32)(output)  #返回预测分数中最大值的索引,即预测值


print("预测值 -- > ", pred_labels)  # 打印预测值
print("真实值 -- > ", labels_test)  # 打印真实值


batch_img = np.squeeze(images_test[0])
for i in range(1, len(labels_test)):
    batch_img = np.hstack((batch_img, np.squeeze(images_test[i])))  # 将一批图片水平拼接起来,方便下一步进行显示
Image.fromarray((batch_img*255).astype('uint8'), mode= "L")  # 显示真实值
- next ()------我的理解是如果不采用next(),也可以遍历数据,当读到空元素时,不会检查到,可能会有问题,但使用next()时,遇到空元素,会自动终止并报错。详细原理可以参考:http://t.csdn.cn/OTTm2
预测结果显示:

边栏推荐
猜你喜欢


随机推荐
POJ1287联网题解
pytest接口自动化测试框架 | parametrize中ids的用法
七夕来袭——属于程序员的浪漫
The BP neural network based on MATLAB voice characteristic signal classification
Dell PowerEdge Server R450 RAID Configuration Steps
Detailed explanation of the crawler framework Scrapy
【MySQL】操作表DML相关语句
Vim简介
零代码网站开发利器:WordPress
头歌MySQL数据库实训答案 有目录
Using FiddlerScript caught poly FiddlerScript 】 【 download
图像基本操作的其他内容
研发过程中的文档管理与工具
关于App不同方式更新的测试点归纳
配置我的kitty
MVVM项目开发(商品管理系统一)
Generate pictures based on the content of the specified area and share them with a summary
special day to remember
Xiaobai's 0 Basic Tutorial SQL: An Overview of Relational Databases 02
"By sharing" northwestern university life service | | bytes a second interview on three sides by HR