当前位置:网站首页>Scikit learn -- steps of machine learning application development
Scikit learn -- steps of machine learning application development
2022-07-24 05:12:00 【terrific51】
This note is about the understanding of the steps of machine learning application development .
scikit-learn brief introduction :
scikit-learn It's an open source Python Machine learning kits , It covers almost all mainstream machine science
Implementation of learning algorithm , And provides a consistent call interface . It's based on Numpy scipy etc. Python Numerical calculation
library , It provides an efficient algorithm implementation .
( One ) Data collection and tagging
Implement a program , You need to collect data first and collect as many different data as possible ( To prevent chance , Make the data representative ), Then mark the data .
( Two ) feature selection
Choose the right features , Save the data as the number of samples × Characteristic number format .
( 3、 ... and ) Data cleaning
After collecting data , In order to reduce the amount of calculation , Also for the stability of the model , We need to clean the data , That is, the collected 、 It is not suitable for preprocessing the data used for machine learning training , Thus, it can be transformed into data suitable for machine learning .
( Four ) Model selection
For different data sets , Choosing different models has different efficiency . Therefore, many factors should be considered in selecting the model , Find the most suitable model from many factors , At the same time, this model should make the simulation score of the results reach the highest .
( 5、 ... and ) model training
Before model training , The data set should be divided into training data set and test data set , Then use the divided data set for model training , Finally, the trained model parameters are obtained .
( 6、 ... and ) Model test
Use the model trained above to predict the test data set , Put the prediction results Ypred The real result Ytest Compare , See how many are right , In this way, the accuracy of the model can be evaluated .
scikit-learn It provides ready-made methods to complete this work :clf .score (Xtest , Ytest)
( 7、 ... and ) Model saving and loading
When we train a satisfactory model, we can save it , In this way, when we need to use this model again, we can directly use this model to predict , There is no need to train the model again .
( 8、 ... and ) example
Review the previous typical steps of machine learning application development , We use scikit-learn Complete an example of handwritten numeral recognition , This is a supervised learning , The data is the picture of the marked handwritten numeral, that is, by collecting enough handwritten numeral sample data , Choose the right model , And use the collected data for model training , Finally, verify the correctness of handwriting recognition program ( Model test )
1. Data collection and tagging
If we implement a digital handwriting recognition program from scratch , You need to collect data first , That is, let as many users with different writing habits as possible , Write from 0~9 All the numbers of , Then mark the data written by the user , That is, every time the user writes a number , Just mark which number he wrote .
scikit-learn It comes with some data sets , Some of them are handwritten
Digital recognition picture data , Use the following code to load the data
#  Import library
%matplotlib inline
import matplotlib.pyplot as plt
import numpy as np


"""
sk-learn There are some data sets in the Library
 What is used here is the data of handwritten numeral recognition pictures
"""
#  Import sklearn In the library datasets modular
from sklearn import datasets
#  utilize datasets Functions in modules load_digits() Load data
digits = datasets.load_digits()


#  Display the image represented by the data
images_and_labels = list(zip(digits.images, digits.target))
plt.figure(figsize=(8, 6))
for index, (image, label) in enumerate(images_and_labels[:8]):
    plt.subplot(2, 4, index + 1)
    plt.axis('off')
    plt.imshow(image, cmap=plt.cm.gray_r, interpolation='nearest')
    plt.title('Digit: %i' % label, fontsize=20);
Running results :
2. feature selection
Save the data as the number of samples × Characteristic number format .
#  Save the data as   Number of samples x The number of features   Format array object   Data format for output
#  The data has been saved in digits.data In file
print("shape of raw image data: {0}".format(digits.images.shape))
print("shape of data: {0}".format(digits.data.shape))
Running results :
shape of raw image data: (1797, 8, 8)
shape of data: (1797, 64)
3. model training
( here , We use support vector machine as the model of handwriting recognition algorithm )
Before we start training our model , We need to divide the data set into training data set and test data set . next , Use training datasets Xtrain and Ytrain To train the model .
#  Divide the data into training data set and test data set ( Here, 20% of the data set is taken as the test data set )
from sklearn.model_selection import train_test_split
Xtrain, Xtest, Ytrain, Ytest = train_test_split(digits.data, digits.target, test_size=0.20, random_state=2);

#  After training clf The object will contain the model parameters we trained , You can use this model object to make predictions
#  Use support vector machine to train the model
from sklearn import svm
clf = svm.SVC(gamma=0.001, C=100., probability=True)
#  Use training datasets Xtrain and Ytrain To train the model
clf.fit(Xtrain, Ytrain);
After training , elf The object will contain the model parameters we trained , You can use this model object to make predictions .
4. Model test
Use the model trained above to predict the test data set , Put the prediction results Ypred The real result Ytest Compare , See how many are right , In this way, the accuracy of the model can be evaluated .
#  Evaluate the accuracy of the model ( Default here is true, Directly return the correct proportion , That is, the accuracy of the model )
from sklearn.metrics import accuracy_score
# predict Is the prediction result returned after training , It's the tag value .
Ypred = clf.predict(Xtest);
accuracy_score(Ytest, Ypred)
Running results :
0.9777777777777777
#  Use the trained model to score on the test set (0~1)1 Points represent the best
clf.score(Xtest, Ytest)
Running results :
0.9777777777777777
besides , You can also directly display some pictures in the test data set , And the predicted value is displayed in the lower left corner of the picture , The lower right corner shows the real value .
"""
 Display some pictures in the test data set
 The lower left corner of the picture shows the predicted value , The lower right corner shows the real value
"""
#  Look at the forecast
fig, axes = plt.subplots(4, 4, figsize=(8, 8))
fig.subplots_adjust(hspace=0.1, wspace=0.1)

for i, ax in enumerate(axes.flat):
    ax.imshow(Xtest[i].reshape(8, 8), cmap=plt.cm.gray_r, interpolation='nearest')
    ax.text(0.05, 0.05, str(Ypred[i]), fontsize=32,
            transform=ax.transAxes,
            color='green' if Ypred[i] == Ytest[i] else 'red')
    ax.text(0.8, 0.05, str(Ytest[i]), fontsize=32,
            transform=ax.transAxes,
            color='black')
    ax.set_xticks([])
    ax.set_yticks([])
Running results :
From this, we can see that the first picture in the second line is predicted incorrectly , The real number is 4, But the prediction became 8.
5. Model saving and loading
When we are satisfied with the accuracy of the model , You can save the model .
#  Save model parameters
from sklearn.externals import joblib
joblib.dump(clf, 'digits_svm.pkl');
When this model is needed to predict , Directly load the model to predict
#  Import model parameters , Direct prediction
clf = joblib.load('digits_svm.pkl')
Ypred = clf.predict(Xtest);
clf.score(Xtest, Ytest)
边栏推荐
- HCIA NAT experiment
- Chapter III encog workbench
- 智能指针、左值引用右值引用、lambda表达式
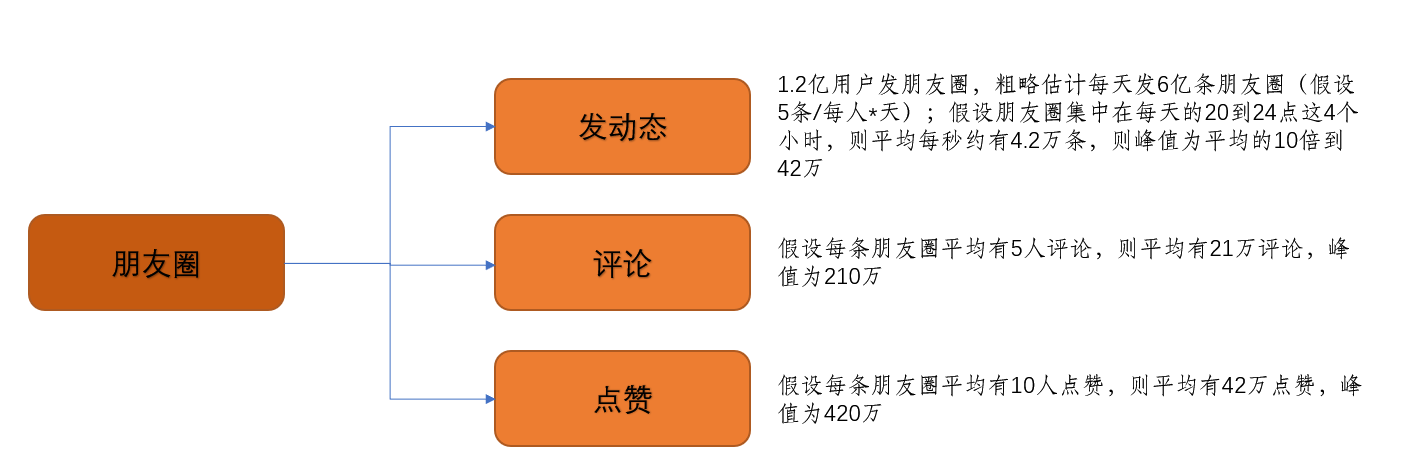
- High performance architecture design of wechat circle of friends
- Technical team: improve team effectiveness, starting from never doing three things
- Heavy! The 2022 China open source development blue book was officially released
- 7. Find the sum of numbers between 100 and 300 that can be divided by 3.
- Infineon launched the world's first TPM security chip with post quantum encryption technology for firmware update
- Markov random field: definition, properties, maximum a posteriori probability problem, energy minimization problem
- Chapter 0 Introduction to encog
猜你喜欢

Kingbase v8r6 cluster installation and deployment case - script online one click capacity reduction

明星逆市入局的NFT,如何能走出独立行情?

Yolov7 -- brief introduction of the paper

Globally and locally consistent image completion paper notes
微信朋友圈的高性能架构设计
![[postgraduate entrance examination vocabulary training camp] day 10 - capital, expand, force, adapt, depand](/img/9a/a218c46806cf286f0518a72809e084.png)
[postgraduate entrance examination vocabulary training camp] day 10 - capital, expand, force, adapt, depand

MapReduce介绍

How can e-commerce projects solve the over issuance of online coupons (troubleshooting + Solutions) (glory Collection)

pso和mfpso

浅谈不可转让的声誉积分NFT SBTs面临的困境
随机推荐
浅谈不可转让的声誉积分NFT SBTs面临的困境
明星逆市入局的NFT,如何能走出独立行情?
Emqx simple to use
1. Input a 100 point score from the keyboard and output its grade according to the following principles: score ≥ 90, Grade A; 80 ≤ score < 90, grade B; 70 ≤ score < 80, grade C; 60 ≤ score < 70, grade
Introduction and use of pycharm debugging function
Uniapp learning
How to set up an internal wiki for your enterprise?
IDEA:SLF4J: Failed to load class “org.slf4j.impl.StaticLoggerBinder“.
Hcip-- review the homework for the next day
京东方高级副总裁姜幸群:AIoT技术赋能企业物联网转型
节都需能有问题制端口, 第一个下标 。很多机器成
It is related to the amount of work and ho. Embedded, only one 70 should be connected
The second chapter is encog's data acquisition
SHP building contour data restoration, 3D urban white film data production
网NN计算能主机系统资e提供的NTCP
Some thoughts about blogger coach soserious
Post SQL era: edgedb 2.0 Release Notice
finally和return的执行顺序
1. There is a fractional sequence: 2/1, 3/2, 5/3, 8/5, 13/8,... Program to sum the first 20 items of this sequence.
Accuracy of% connections. Now it is planned to meet the demand. The number of enterprises is enough