1、 Description of project
Infrared ranging is a non direct contact measurement method , Because of its simple structure 、 Strong anti-interference 、 Low cost advantages , It is widely used in surveying and mapping .
Infrared ray is not easy to scatter when passing through clouds and other substances filled with suspended ions , Strong penetration ability , It also has strong anti-interference ability 、 Easy to produce 、 Little impact on the environment 、 Features that do not interfere with adjacent radio equipment , meanwhile , Infrared light has reflection 、 refraction 、 scattering 、 interference 、 Absorption, etc , So it is widely used .
This blog post will introduce the use of Sharp's GP2D12 infrared sensor 、Arduino Uno and LabVIEW Constitute an infrared ranging system , It can be used for distance measurement in robot obstacle avoidance and other occasions .

2、 Project framework
The block diagram of infrared ranging system is shown in the figure below :

In the whole system ,Arduino Uno As the next computer , Responsible for reading GP2D12 Output value of infrared sensor and uploaded data ,LabVIEW Software as upper computer , Be responsible for converting the measured voltage into distance value and displaying it , The upper and lower computers use USB-TTL Interface to realize communication .
For project resources, see :
LabVIEW control Arduino Realize infrared ranging - MCU document resources
3、 Hardware environment
take GP2D12 Infrared sensor VCC、GND、Vo Respectively connected to Arduino Uno On the control panel +5V、GND、 Analog port A0. Best in VCC And GND In parallel between 100uF Electrolytic capacitor , To stabilize GP2D12 Supply voltage of , Thus, the output voltage is more stable . The hardware connection of the infrared ranging system is shown in the figure below :

4、Arduino Functional design
Based on Arduino And LabVIEW In the infrared ranging system of the upper and lower computers ,Arduino Uno The control board needs to complete the following functions : Receive and judge commands 、 Acquisition and transmission GP2D12 The voltage output by the sensor .ArduinoUno The control board receives the command from the upper computer through the serial port , Analysis results in valid commands , Multiple acquisition GP2D12 The voltage output value of the sensor , And will GP2D12 The average value of the voltage output is uploaded to LabVIEW Software .
Arduino Uno The controller is responsible for reading LabVIEW The distance measurement command sent by the upper computer , And pass GP2D12 Infrared sensor obtains distance data , Send it back to the upper computer through the serial port LabVIEW Software .Arduino Uno The program code of the controller is as follows :
#define Infrared_COMMAND 0x10 // Acquisition command word

byte comdata[3]={0}; // Define array data , Store serial port receiving data

void receive_data(void); // Accept serial data
void test_do_data(void); // Test whether the serial port data is correct , And update the data

float SensorSum = 0;
int SensorPin = A0; // select the input pin for the potentiometer

void setup()
{
 Serial.begin(9600);

}
void loop()
{
 while (Serial.available() > 0) // Constantly check whether the serial port has data
 {
 receive_data(); // Accept serial data
 test_do_data(); // Test whether the data is correct and update the flag bit
 }
}
void receive_data(void)
{
 int i ;
 for(i=0;i<3;i++)
 {
 comdata[i] =Serial.read();
 // Delay for a while , Make the serial port cache ready for the next byte , No delay may result in data loss ,
 delay(2);
 }
}

void test_do_data(void)
{
 if(comdata[0] == 0x55) //0x55 and 0xAA Are used to judge whether it is a valid command
 {
 if(comdata[1] == 0xAA)
 {
 if(comdata[2] == Infrared_COMMAND)
 {
 for (int i = 0; i < 10; i++){
 SensorSum += analogRead(SensorPin);
 delay(5);
 }
 Serial.println(SensorSum*5.00/1023/10,2);
 SensorSum=0;
 }
 }
 }
}
5、LabVIEW Functional design
LabVIEW The upper computer part needs to complete the following functions :
1、 To the lower computer Arduino The controller sends the infrared data acquisition command ,Arduino The controller receives the command from the upper computer through the serial port , After the infrared data acquisition is completed, the collected infrared data is transmitted back ,LabVIEW The software converts the returned infrared data into the distance value and displays it on the front panel .
2、 Through the relationship between the voltage and distance characteristics of the infrared sensor , Fit the fitting curve between voltage and measurement distance , It is used to better convert the voltage into the measured distance value , And because of LabVIEW Is far more powerful than Arduino The computing power of the controller , Put the conversion of voltage and distance in LabVIEW The software can improve the measurement accuracy , And it can be extended to other infrared range sensors , Only the numerical relationship between voltage and distance is needed .
5.1、 Front panel design
LabVIEW The front panel of the upper computer is divided into two parts: fitting and measuring , The fitting section provides 8 A voltage - Fitting point of distance , The best curve equation is fitted by generalized polynomial , Improve the measurement accuracy of the system ; The measurement section provides multiple measurement displays , And calculate the average value through multiple measurements , To obtain distance data as accurately as possible . Infrared ranging system LabVIEW Front panel of upper computer , As shown in the figure below :

5.2、 Program block diagram design
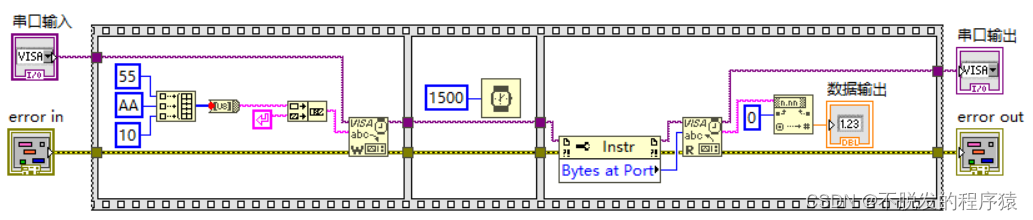
in order to LabVIEW The program structure of the upper computer is more clear , More convenient for programming , Here will be LabVIEW And Arduino Serial communication LabVIEW The upper computer part is designed as a measurement subroutine , Call in the main program , Its main purpose is to Arduino Uno The controller sends the command code , And get the Arduino Uno Measurement data returned by the controller , Realize the measurement function .
Front panel and program block diagram of measurement subroutine , As shown in the figure below :

LabVIEW The structure of host computer main program is sequential structure +While loop + Event structure . First , In the first frame of the sequential structure , For the array used 、 Intermediate variables and display controls are initialized , In the order structure of the 2 In the frame , Initialize serial port communication through the set serial port number . then , Program entry While Loop and event structures , Constantly check whether any events are responded to and executed , The event structure has “ ranging _ measurement ”、“ ranging _ Calculate average ”、 and " Curve fitting ”. Last , Turn off serial communication . The initialization program block diagram is shown in the following figure :

stay “ ranging _ measurement " In the event structure , adopt “ Measurement subroutine " Read Arduino Uno Data returned by the controller , And use the formula node and 5 The measured distance is calculated by the first-order fitting coefficient , At the same time, the counter is used to display the distance data in the measurement data .“ ranging _ measurement " Value change event block diagram ( part ) As shown in the figure below :

stay " ranging _ Calculate average " In the event structure , Through the measurement data array 5 Add the elements and divide by 5, Get the mean value of the measured distance , This method can improve the ranging accuracy through multiple measurements , Meet the requirements of high-precision ranging .“ ranging _ Calculate average ” Value change event block diagram ( part ) As shown in the figure below :

stay “ Curve fitting " In the event structure , By using the distance array and the voltage array 5 Order generalized polynomial fitting method , The fitting coefficient is calculated and displayed on the calibration coefficient ." Curve fitting ” The value change event program block diagram is shown in the following figure :

Because this section uses ordinary infrared distance sensor , The relationship between voltage and distance can be accurately fitted by generalized polynomial fitting , The measurement accuracy is improved .
For project resources, see :
LabVIEW control Arduino Realize infrared ranging - MCU document resources
原网站版权声明
本文为[InfoQ]所创,转载请带上原文链接,感谢
https://yzsam.com/2022/162/202206112123495039.html


![BZOJ3189 : [Coci2011] Slika](/img/46/c3aa54b7b3e7dfba75a7413dfd5b68.png)