当前位置:网站首页>Day112.尚医通:手机验证码登录功能
Day112.尚医通:手机验证码登录功能
2022-07-28 06:43:00 【焰火青年·】
目录
一、手机验证码接口实现
1、在service下创建service_user模块
详见课件

2、实现登录注册接口
1. 分析接口
*参数:LoginVo,请求
*返回值:map(登录标识、用户名)

2. controller
@Api(tags = "用户接口")
@RestController
@RequestMapping("/api/user")
public class UserInfoApiController {

    @Autowired
    private UserInfoService userInfoService;

    @ApiOperation(value = "会员登录")
    @PostMapping("login")
    public R login(@RequestBody LoginVo loginVo, HttpServletRequest request) {
        loginVo.setIp(IpUtils.getIpAddr(request));
        Map<String, Object> map = userInfoService.login(loginVo);
        return R.ok().data(map);
    }


}
3. service
@Service
public class UserInfoServiceImpl extends
        ServiceImpl<UserInfoMapper, UserInfo> implements UserInfoService {

    //会员登录
    @Override
    public Map<String, Object> login(LoginVo loginVo) {
        //1.数据校验
        String phone = loginVo.getPhone();
        String code = loginVo.getCode();
        if(StringUtils.isEmpty(phone)||StringUtils.isEmpty(code)){
            throw new YyghException(20001,"注册信息有误");
        }
        //2. TODO 校验验证码

        //3.根据手机号查询用户信息
        QueryWrapper<UserInfo> wrapper = new QueryWrapper<>();
        wrapper.eq("phone",phone);
        UserInfo userInfo = baseMapper.selectOne(wrapper);

        //4.用户信息为空,走注册功能
        if(userInfo==null){
            userInfo = new UserInfo();
            userInfo.setPhone(phone);
            userInfo.setStatus(1); //0锁定 1正常
            baseMapper.insert(userInfo);
        }
        //5.判断用户是否被锁定
        if(userInfo.getStatus()==0){
            throw new YyghException(20001,"用户已被锁定");
        }
        //6.补全用户信息
        //返回页面显示名称
        Map<String, Object> map = new HashMap<>();
        String name = userInfo.getName();
        if(StringUtils.isEmpty(name)) {
            name = userInfo.getNickName();
        }
        if(StringUtils.isEmpty(name)) {
            name = userInfo.getPhone();
        }
        //7. TODO 用户登录

        map.put("token", "");
        map.put("name", name);
        return map;
    }

}一、手机验证码登录生成token
1、单点登录方案:
1.Session广播(广播风暴、浪费带宽)
2.Redis+cookie
3. token+cookie
2、JWT工具:
JWT(Json Web Token)是为了在网络应用环境间传递声明而执行的一种基于JSON的开放标准。
JWT的声明一般被用来在身份提供者和服务提供者间传递被认证的用户身份信息,以便于从资源服务器获取资源。比如用在用户登录上
JWT最重要的作用就是对 token信息的防伪作用。
原理:一个JWT由三个部分组成:公共部分、私有部分、签名部分。最后由这三者组合进行base64编码得到JWT。
3、实现JWP整合
1. common_utils模块添加依赖
        <!--JWP-->
        <dependency>
            <groupId>io.jsonwebtoken</groupId>
            <artifactId>jjwt</artifactId>
        </dependency>
2. 添加JWT工具类
public class JwtHelper {
    private static long tokenExpiration = 24*60*60*1000;
    private static String tokenSignKey = "123456";

    public static String createToken(Long userId, String userName) {
        String token = Jwts.builder()
                .setSubject("YYGH-USER")
                .setExpiration(new Date(System.currentTimeMillis() + tokenExpiration))
                .claim("userId", userId)
                .claim("userName", userName)
                .signWith(SignatureAlgorithm.HS512, tokenSignKey)
                .compressWith(CompressionCodecs.GZIP)
                .compact();
        return token;
    }
    public static Long getUserId(String token) {
        if(StringUtils.isEmpty(token)) return null;
        Jws<Claims> claimsJws = Jwts.parser().setSigningKey(tokenSignKey).parseClaimsJws(token);
        Claims claims = claimsJws.getBody();
        Integer userId = (Integer)claims.get("userId");
        return userId.longValue();
    }
    public static String getUserName(String token) {
        if(StringUtils.isEmpty(token)) return "";
        Jws<Claims> claimsJws
                = Jwts.parser().setSigningKey(tokenSignKey).parseClaimsJws(token);
        Claims claims = claimsJws.getBody();
        return (String)claims.get("userName");
    }

    public static void main(String[] args) {
        String token = JwtHelper.createToken(1L, "55");
        System.out.println(token);
        System.out.println(JwtHelper.getUserId(token));
        System.out.println(JwtHelper.getUserName(token));
    }
}
3. 完善service方法,实现接口功能、
    //会员登录
    @Override
    public Map<String, Object> login(LoginVo loginVo) {
        ...
        //7. TODO 用户登录
        String token = JwtHelper.createToken(userInfo.getId(), userInfo.getName());

        map.put("token", token);
        map.put("name", name);
        return map;
二、申请、集成阿里云短信服,搭建接口
1. 开通鼎信短信服务 鼎信 (参考课件)
需要申请签名、模板


2. 在service模块下创建子模块service_msm

导入依赖:
    <dependencies>
        <!--阿里json工具-->
        <dependency>
            <groupId>com.alibaba</groupId>
            <artifactId>fastjson</artifactId>
        </dependency>
        <!--阿里云核心包-->
        <dependency>
            <groupId>com.aliyun</groupId>
            <artifactId>aliyun-java-sdk-core</artifactId>
        </dependency>
    </dependencies>
application.properties
# 服务端口
server.port=8204
# 服务名
spring.application.name=service-msm

spring.redis.host=192.168.86.86
spring.redis.port=6379
spring.redis.database= 0
spring.redis.timeout=1800000

spring.redis.lettuce.pool.max-active=20
spring.redis.lettuce.pool.max-wait=-1
#最大阻塞等待时间(负数表示没限制)
spring.redis.lettuce.pool.max-idle=5
spring.redis.lettuce.pool.min-idle=0
#最小空闲

#返回json的全局时间格式
spring.jackson.date-format=yyyy-MM-dd HH:mm:ss
spring.jackson.time-zone=GMT+8

# nacos服务地址
spring.cloud.nacos.discovery.server-addr=127.0.0.1:8848
添加网关配置
#设置路由id
spring.cloud.gateway.routes[3].id=service-msm
#设置路由的uri
spring.cloud.gateway.routes[3].uri=lb://service-msm
#设置路由断言,代理servicerId为auth-service的/auth/路径
spring.cloud.gateway.routes[3].predicates= Path=/*/msm/**
3. 实现controller
@Api(description = "发送验证码")
@RestController
@RequestMapping("/api/msm")
public class MsmController {
    @Autowired
    private MsmService msmService;
    @Autowired
    private RedisTemplate<String,String> redisTemplate;

    @ApiOperation(value = "发送验证码短信")
    @GetMapping(value = "/send/{phone}")
    public R send(@PathVariable String phone) {
        //1.根据手机号查询redis,获取验证码进行校验
        String redisCode = redisTemplate.opsForValue().get(phone);
        if(redisCode!=null){
            return R.ok();
        }
        //2。获取新的验证码,封装验证码
        String code = RandomUtil.getFourBitRandom();
        Map<String,String> paramMap = new HashMap<>();
        paramMap.put("code",code);

        //3.调用接口发送短信
        boolean isSend = msmService.send(phone,paramMap);

        //4.将验证码存入Redis,时效五分钟
        if(isSend){
            redisTemplate.opsForValue().set(phone,code,5, TimeUnit.MINUTES);
            return R.ok();
        }else {
            return R.error().message("发送短信失败");
        }
    }
}
4. service
@Service
public class MsmServiceImpl implements MsmService {
    //发送验证码短信
    @Override
    public boolean send(String phone, Map<String, String> paramMap) {
        //1.手机号验空
        if(StringUtils.isEmpty(phone)){
            return false;
        }

        //3.创建请求对象存入参数  AccessKey id、秘钥
        DefaultProfile profile =
                DefaultProfile.getProfile("default", "LTAI5tMGtK....", "baAdNzxAjnIMKU3....");
        IAcsClient client = new DefaultAcsClient(profile);

        CommonRequest request = new CommonRequest();
        //request.setProtocol(ProtocolType.HTTPS);
        request.setMethod(MethodType.POST);
        request.setDomain("dysmsapi.aliyuncs.com");
        request.setVersion("2017-05-25");
        request.setAction("SendSms");

        request.putQueryParameter("PhoneNumbers", phone);
        //要与申请的签名相同
        request.putQueryParameter("SignName", "我的谷粒在线教育网站");
        request.putQueryParameter("TemplateCode", "SMS_183195440");
        request.putQueryParameter("TemplateParam", JSONObject.toJSONString(paramMap));

        try {
            //4.使用客户端对象方法发送请求,获取响应
            CommonResponse response = client.getCommonResponse(request);

            //5.从响应中获取最终结果
            System.out.println(response.getData());
            return response.getHttpResponse().isSuccess();

        } catch (ClientException e) {
            e.printStackTrace();
            throw new YyghException(20001,"短信发送失败");
        }
    }
}
三、完成登录接口
1. 导入redis配置
#redis
spring.redis.host=192.168.86.86
spring.redis.port=6379
spring.redis.database= 0
spring.redis.timeout=1800000

spring.redis.lettuce.pool.max-active=20
spring.redis.lettuce.pool.max-wait=-1
#最大阻塞等待时间(负数表示没限制)
spring.redis.lettuce.pool.max-idle=5
spring.redis.lettuce.pool.min-idle=0
2. 修改service方法
@Autowired
    RedisTemplate<String, String> redisTemplate;

    //会员登录
    @Override
    public Map<String, Object> login(LoginVo loginVo) {
        //1.数据校验
        String phone = loginVo.getPhone();
        String code = loginVo.getCode();
        if(StringUtils.isEmpty(phone)||StringUtils.isEmpty(code)){
            throw new YyghException(20001,"注册信息有误");
        }
        //2. TODO 校验验证码
        //2.1 根据手机号从redis取出验证码
        String rediscode = redisTemplate.opsForValue().get(phone);
        //2.2 对比验证码
        //2.2 对比验证码,注意字符串空指针
        if(!code.equals(rediscode)){
            throw new YyghException(20001,"验证码有误");
        }
        //3.根据手机号查询用户信息
        QueryWrapper<UserInfo> wrapper = new QueryWrapper<>();
        wrapper.eq("phone",phone);
        UserInfo userInfo = baseMapper.selectOne(wrapper);

        //4.用户信息为空,走注册功能
        if(userInfo==null){
            userInfo = new UserInfo();
            userInfo.setPhone(phone);
            userInfo.setStatus(1); //0锁定 1正常
            baseMapper.insert(userInfo);
        }
        //5.判断用户是否被锁定
        if(userInfo.getStatus()==0){
            throw new YyghException(20001,"用户已被锁定");
        }
        //6.补全用户信息
        //返回页面显示名称
        Map<String, Object> map = new HashMap<>();
        String name = userInfo.getName();
        if(StringUtils.isEmpty(name)) {
            name = userInfo.getNickName();
        }
        if(StringUtils.isEmpty(name)) {
            name = userInfo.getPhone();
        }
        //7. TODO 用户登录
        String token = JwtHelper.createToken(userInfo.getId(), userInfo.getName());

        map.put("token", token);
        map.put("name", name);
        return map;
    }
四、前端页面实现
1.创建API接口方法
userinfo.js
import request from '@/utils/request'

const api_name = `/api/user`

export default {
    //登录验证
    login(userInfo) {
        return request({
            url: `${api_name}/login`,
            method: `post`,
            data: userInfo
        })
    }
}
msm.js
import request from '@/utils/request'

const api_name = `/api/msm`

export default {
    //发送验证短信
    sendCode(mobile) {
        return request({
            url: `${api_name}/send/${mobile}`,
            method: `get`
        })
    }
}
2. 修改layouts/myheader.vue
<template>
<div class="header-container">
<div class="wrapper">
<!-- logo -->
<div class="left-wrapper v-link selected">
<img style="width: 50px" width="50" height="50" src="~assets/images/logo.png">
<span class="text">尚医通 预约挂号统一平台</span>
</div>
<!-- 搜索框 -->
<div class="search-wrapper">
<div class="hospital-search animation-show">
<el-autocomplete class="search-input small" prefix-icon="el-icon-search" v-model="state"
:fetch-suggestions="querySearchAsync" placeholder="点击输入医院名称" @select="handleSelect">
<span slot="suffix" class="search-btn v-link highlight clickable selected">搜索 </span>
</el-autocomplete>
</div>
</div>
<!-- 右侧 -->
<!-- 右侧 -->
<div class="right-wrapper">
<span class="v-link clickable">帮助中心</span>
<span v-if="name == ''" class="v-link clickable" @click="showLogin()" id="loginDialog">登录/注册</span>
<el-dropdown v-if="name != ''" @command="loginMenu">
<span class="el-dropdown-link">
{
{ name }}<i class="el-icon-arrow-down el-icon--right"></i>
</span>
<el-dropdown-menu class="user-name-wrapper" slot="dropdown">
<el-dropdown-item command="/user">实名认证</el-dropdown-item>
<el-dropdown-item command="/order">挂号订单</el-dropdown-item>
<el-dropdown-item command="/patient">就诊人管理</el-dropdown-item>
<el-dropdown-item command="/logout" divided>退出登录</el-dropdown-item>
</el-dropdown-menu>
</el-dropdown>
</div>
</div>
<!-- 登录弹出层 -->
<el-dialog :visible.sync="dialogUserFormVisible" style="text-align: left;" top="50px" :append-to-body="true"
width="960px" @close="closeDialog()">
<div class="container">
<!-- 手机登录 #start -->
<div class="operate-view" v-if="dialogAtrr.showLoginType === 'phone'">
<div class="wrapper" style="width: 100%">
<div class="mobile-wrapper" style="position: static;width: 70%">
<span class="title">{
{ dialogAtrr.labelTips }}</span>
<el-form>
<el-form-item>
<el-input v-model="dialogAtrr.inputValue" :placeholder="dialogAtrr.placeholder"
:maxlength="dialogAtrr.maxlength" class="input v-input">
<span slot="suffix" class="sendText v-link" v-if="dialogAtrr.second > 0">{
{
dialogAtrr.second }}s </span>
<span slot="suffix" class="sendText v-link highlight clickable selected"
v-if="dialogAtrr.second == 0" @click="getCodeFun()">重新发送 </span>
</el-input>
</el-form-item>
</el-form>
<!--发送验证码或者进行登录 动态-->
<div class="send-button v-button" @click="btnClick()"> {
{ dialogAtrr.loginBtn }}</div>
</div>
<div class="bottom">
<div class="wechat-wrapper" @click="weixinLogin()"><span class="iconfont icon"></span>
</div>
<span class="third-text"> 第三方账号登录 </span>
</div>
</div>
</div>
<!-- 手机登录 #end -->
<!-- 微信登录 #start -->
<div class="operate-view" v-if="dialogAtrr.showLoginType === 'weixin'">
<div class="wrapper wechat" style="height: 400px">
<div>
<div id="weixinLogin"></div>
</div>
<div class="bottom wechat" style="margin-top: -80px;">
<div class="phone-container">
<div class="phone-wrapper" @click="phoneLogin()"><span class="iconfont icon"></span>
</div>
<span class="third-text"> 手机短信验证码登录 </span>
</div>
</div>
</div>
</div>
<!-- 微信登录 #end -->
<div class="info-wrapper">
<div class="code-wrapper">
<div><img src="//img.114yygh.com/static/web/code_login_wechat.png" class="code-img">
<div class="code-text"><span class="iconfont icon"></span>微信扫一扫关注
</div>
<div class="code-text"> “快速预约挂号”</div>
</div>
<div class="wechat-code-wrapper"><img src="//img.114yygh.com/static/web/code_app.png"
class="code-img">
<span class="iconfont icon"></span><div class="code-text"> 扫一扫下载</div>
<div class="code-text"> “预约挂号”APP</div>
</div>
</div>
<div class="slogan">
<div>xxxxxx官方指定平台</div>
<div>快速挂号 安全放心</div>
</div>
</div>
</div>
</el-dialog>
</div>
</template>3. JS实现
<script>
    import cookie from 'js-cookie'
    import Vue from 'vue'
    import userInfoApi from '@/api/userinfo'
    import msmApi from '@/api/msm'
    import hospitalApi from '@/api/hospital'
    //常量,默认初始化值
    const defaultDialogAtrr = {
        showLoginType: 'phone', // 控制手机登录与微信登录切换

        labelTips: '手机号码', // 输入框提示

        inputValue: '', // 输入框绑定对象
        placeholder: '请输入您的手机号', // 输入框placeholder
        maxlength: 11, // 输入框长度控制

        loginBtn: '获取验证码', // 登录按钮或获取验证码按钮文本

        sending: true,      // 是否可以发送验证码
        second: -1,        // 倒计时间  second>0 : 显示倒计时 second=0 :重新发送 second=-1 :什么都不显示
        clearSmsTime: null  // 倒计时定时任务引用 关闭登录层清除定时任务
    }

    export default {
        data() {
            return {
                userInfo: {  //登录对象
                    openid: "",
                    phone: "",
                    code: ""
                },
                dialogAtrr: defaultDialogAtrr, //弹出层对象
                dialogUserFormVisible: false, //弹出层是否展示
                name: "" //登录后用户名
            }
        },
        created() {
            //判断用户是否已登录
            this.showInfo()
        },
        methods: {
            //打开登录注册弹出层
            showLogin() {
                this.dialogUserFormVisible = true
                this.dialogAtrr = { ...defaultDialogAtrr } //对象存储运算符,开辟新内存空间
            },
            //发送验证码或者进行登录
            btnClick() {
                if (this.dialogAtrr.loginBtn == "获取验证码") {
                    //给手机号赋值
                    this.userInfo.phone = this.dialogAtrr.inputValue
                    //调用发送验证码方法
                    this.getCodeFun();
                } else {
                    //调用登录方法
                    this.login();
                }
            },
            //发送验证码
            getCodeFun() {
                //1.校验手机号
                if (!(/^1[34578]\d{9}$/.test(this.userInfo.phone))) {
                    this.$message.error("手机号码不正确")
                    return;
                }
                //2.更改弹出层对象值为登录
                this.dialogAtrr.inputValue = ''
                this.dialogAtrr.placeholder = '请输入验证码'
                this.dialogAtrr.maxlength = 6
                this.dialogAtrr.loginBtn = '立即登录'

                //3.判断是否重复发送验证码 sending
                if (!this.dialogAtrr.sending) {
                    this.$message.error("请勿重复发送")
                    return;
                }
                this.dialogAtrr.sending = false

                //4.发送验证码
                msmApi.sendCode(this.userInfo.phone)
                    .then(response => {

                        //倒计时方法
                        this.timeDown();
                    })
                    .catch(e => {
                        //5.发送失败回退之前界面
                        this.$message.error("发送验证码失败")
                        this.showLogin()
                    })
            },
            timeDown() {
                if (this.clearSmsTime) {
                    clearInterval(this.clearSmsTime);
                }
                this.dialogAtrr.second = 60;

                this.dialogAtrr.labelTips = '验证码已发送至' + this.userInfo.phone
                this.clearSmsTime = setInterval(() => {
                    --this.dialogAtrr.second;
                    if (this.dialogAtrr.second < 1) {
                        //清除定时器,需要成对出现
                        clearInterval(this.clearSmsTime);
                        this.dialogAtrr.sending = true;
                        this.dialogAtrr.second = 0;
                    }
                }, 1000);
            },
            //登录方法
            login() {
                //1.给验证码赋值
                this.userInfo.code = this.dialogAtrr.inputValue

                //2.校验参数合法性
                if (this.dialogAtrr.loginBtn == '正在提交...') {
                    this.$message.error('重复提交')
                    return;
                }
                if (this.userInfo.code == '') {
                    this.$message.error('验证码必须输入')
                    return;
                }
                if (this.userInfo.code.length != 4) {
                    this.$message.error('验证码格式不正确')
                    return;
                }
                this.dialogAtrr.loginBtn = '正在提交...'

                //3.提交登录信息,成功设置登录状态(name,cookie)
                userInfoApi.login(this.userInfo)
                    .then(response => {
                        //设置登录状态
                        this.setCookies(response.data.name, response.data.token)
                    })
                    .catch(e => {
                        //4.失败回退
                        this.dialogAtrr.loginBtn = '马上登录'
                    })
            },
            //设置登录状态
            setCookies(name, token) {
                //domain:作用范围
                cookie.set("name", name, { domain: 'localhost' })
                cookie.set("token", token, { domain: 'localhost' })
                window.location.reload()
            },
            //判断是否已登录
            showInfo() {
                let token = cookie.get("token")
                if (token) {
                    this.name = cookie.get("name")
                    console.log(this.name);
                }
            },
            //菜单方法 登出?
            loginMenu(command) {
                if ('/logout' == command) {
                    cookie.set('name', '', { domain: 'localhost' })
                    cookie.set('token', '', { domain: 'localhost' })

                    //跳转页面
                    window.location.href = '/'
                } else {
                    window.location.href = command
                }
            },

            handleSelect(item) {
                window.location.href = '/hospital/' + item.hoscode
            },
            //切换微信登录
            weixinLogin() {
                this.dialogAtrr.showLoginType = 'weixin'
            },
            //切换手机登录
            phoneLogin() {
                this.dialogAtrr.showLoginType = 'phone'
                this.showLogin()
            }
        }
    };
</script>
4. 测试

边栏推荐
- What if you are prompted that your connection to this website is not a private connection?
- CarSim simulation quick start (XII) - Driver Model (2)
- OSPF comprehensive experiment (7.12)
- feign 调用
- Fxksmdb.exe process description
- Meituan Er Mian: why does redis have sentinels?
- Allure use
- leetcode/单词长度的最大乘积
- 数字签名和CA证书
- Tell you step by step what you need to do to apply for PMP? What should I do?
猜你喜欢

CAT1 4G+以太网开发板232数据通过4G模块TCP发到服务器

Mysql-怎么添加用户和设置权限?

CarSim simulation quick start (XII) - Driver Model (2)
Oracle local network service

Understanding of spark operator aggregatebykey

JS thoroughly understand this point
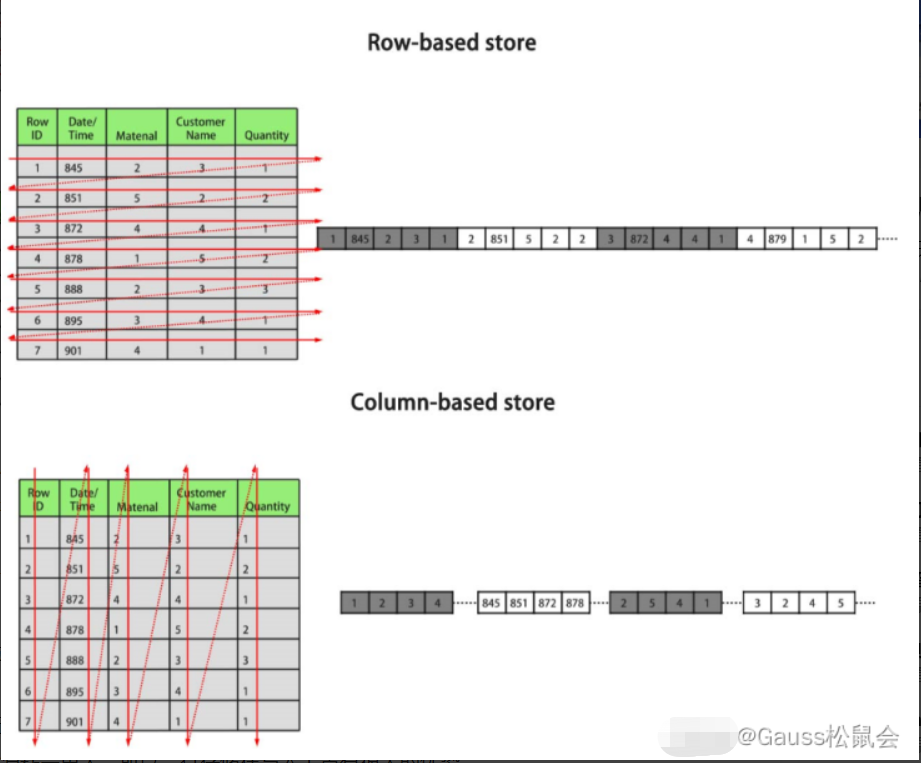
Talk about row storage and column storage of database

Deep browser rendering principles
![[Qt5] small software with 5 people randomly selected from the bid evaluation expert base](/img/ca/9f6bd6af45e2113c050edf3a65aaf2.png)
[Qt5] small software with 5 people randomly selected from the bid evaluation expert base

OSPF comprehensive experiment (7.12)
随机推荐
二维数组及操作
Get the clicked line number in qtablewidget
一键开关机电路
Qt使用信号量控制线程(QSemaphore)
leetcode/单词长度的最大乘积
[300 + selected interview questions from big companies continued to share] big data operation and maintenance sharp knife interview question column (VIII)
Regular expression for mobile number verification
PostgreSQL is the world's most advanced open source relational database
How to close the blocked program process?
EMC EMI磁珠的特性
js糖果消消乐小游戏源码
MySQL query error [err] 1046 - no database selected
Window 1 - > main window of the application (27)
Viewing vantage's self drive from the "three good" kitchen electricity standard and the value proposition of "serious life"
See how Google uses pre training weights in target detection tasks | CVPR 2022
Five screens, VR, projection, "Wei Xiaoli" rolled up on the intelligent cockpit
uniapp的swiper动态设置current值不生效解决办法
Characteristics of EMC EMI beads
leetcode/排序数组中两个数字之和
Opentsdb time series database