当前位置:网站首页>pytorch 多分类中的损失函数
pytorch 多分类中的损失函数
2022-07-03 05:45:00 【code bean】
前言
pytorch 中的损失函数:
- CrossEntropyLoss
- LogSoftmax
- NLLLoss
Softmax
在多分类的时候,我们希望输出是符合概率分布的,所以利用Softmax做了归一化的处理。

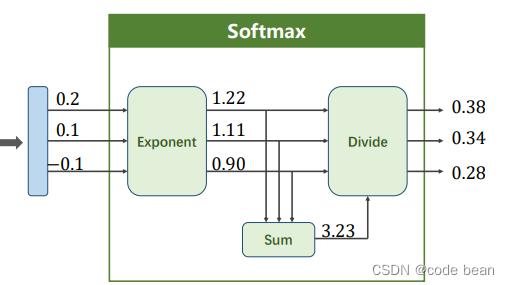
这个过程非常好理解,将所有的项相加得到分母,各项在作为分子,只不过这里加了一个e为底的指数函数,确保值都大于0。
多分类的神经网络的最后一层,一般就会用到Softmax,所以最后一层一般不用激活(详见最后的数字分类的代码),因为Softmax就相当于做了激活(将数据映射到0~1)。最终Softmax输出每个类别的概率值。
CrossEntropyLoss <==> LogSoftmax + NLLLoss
有了概率值之后,就开始构造损失函数了,这里还是用到交叉熵。
最大似然估计,散度,交叉熵_code bean的博客-CSDN博客

回忆一下二分类的交叉熵:当时我们的函数时BCE

criterion = torch.nn.BCELoss(size_average=True) # 二分类交叉熵损失函数这是式子是上面的展开,p=y q=(1-y) 而Y只有两种选择0和1,所以当Y等于1的时候,后面那一项就没了。所以当到了多分类其实也一样,Y只有两种选择0和1。当某一类为1时那么其他的类都是0.(这里分类是互斥的,就会有这个特性,你是猫就不会是狗的这种分类)
交叉熵公式,最终保存下的也只有一项。
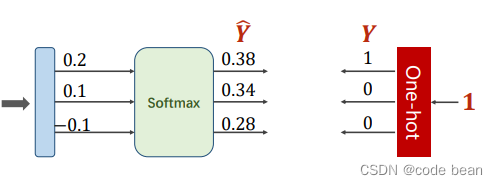
右侧的独热码,就是人判断的标签,也是人给的概率。互斥的这种多分类交叉熵最终就只有只有一项:

LogSoftmax
那LogSoftmax的含义就是对softmax的结果取了一个log

m = nn.LogSoftmax()
input = torch.randn(2, 3)
output = m(input)
那为啥输出的好好的概率,又加个log干什么呢?
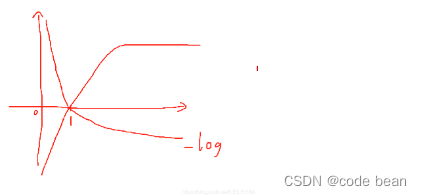
有种说法是,因为输出的概率是0~1,从log函数看出,如果概率越接近1,那么对应Y的绝对值越小。这种表示确定性越大,信息量越小,反之信息量越大。
那我觉得还有另外一个原因,就是LogSoftmax一般是和NLLLoss结合使用的。
NLLLoss
NLLLoss完成的就是交叉熵的部分:


而且 NLLLoss要求的输入值就是概率取对数的结果,那LogSoftmax和NLLLoss就可以无缝的链接了:
m = nn.LogSoftmax(dim=1)
loss = nn.NLLLoss()
# input is of size N x C = 3 x 5
input = torch.randn(3, 5, requires_grad=True)
# each element in target has to have 0 <= value < C
target = torch.tensor([1, 0, 4])
output = loss(m(input), target)
output.backward()
CrossEntropyLoss
那说了这么多,CrossEntropyLoss把几个人的活全部干了:

import torch
y = torch.LongTensor([0])
z = torch.Tensor([[0.2, 0.1, -0.1]])
criterion = torch.nn.CrossEntropyLoss()
loss = criterion(z, y)
print(loss)
一个数字识别的多分类的例子
最后在一个详细的例子里看一下,具体的用法
import torch
from torchvision import transforms
from torchvision import datasets
from torch.utils.data import DataLoader
import torch.optim as optim
import torch.nn.functional as F

# 准备数据集
batch_size = 64
transform = transforms.Compose([transforms.ToTensor(), transforms.Normalize((0.1307,), (0.3081,))])

train_dataset = datasets.MNIST(root='./dataset/mnist/', train=True, download=True, transform=transform)
train_loader = DataLoader(train_dataset, shuffle=True, batch_size=batch_size)
test_dataset = datasets.MNIST(root='./dataset/mnist/', train=False, download=True, transform=transform)
test_loader = DataLoader(test_dataset, shuffle=False, batch_size=batch_size)


# 构造网络模型
class Net(torch.nn.Module):
    def __init__(self):
        super(Net, self).__init__()
        self.l1 = torch.nn.Linear(784, 512)
        self.l2 = torch.nn.Linear(512, 256)
        self.l3 = torch.nn.Linear(256, 128)
        self.l4 = torch.nn.Linear(128, 64)
        self.l5 = torch.nn.Linear(64, 10)

    def forward(self, x):
        # 将C*W*H三维张量变为二维张量,用于深度深度学习处理
        x = x.view(-1, 784)
        x = F.relu(self.l1(x))
        x = F.relu(self.l2(x))
        x = F.relu(self.l3(x))
        x = F.relu(self.l4(x))
        # 最后一层不进行激活,不做非线性变换
        return self.l5(x)


model = Net()

# 构造损失函数和优化器
criterion = torch.nn.CrossEntropyLoss()  # 此函数,需要一个未激活的输入,它将 交叉熵 和 softmax 的计算进行融合。(这样计算更快更稳定!)
optimizer = optim.SGD(model.parameters(), lr=0.01, momentum=0.5)  # momentum:冲量


def train(epoch):
    running_loss = 0
    for batch_idx, data in enumerate(train_loader, 0):
        # 获得一个批次的输入与标签
        inputs, target = data
        # 开始训练
        optimizer.zero_grad()
        # 正向传播
        y_pred = model(inputs)
        # 计算损失
        loss = criterion(y_pred, target)
        # 反向传播
        loss.backward()
        # 更新梯度
        optimizer.step()

        running_loss = running_loss + loss
        if batch_idx % 300 == 299:
            print('[%d, %5d] loss: %.3f' % (epoch + 1, batch_idx + 1, running_loss / 300))
            running_loss = 0.0


def test():
    correct = 0
    total = 0
    # 不计算梯度
    with torch.no_grad():
        for data in test_loader:
            inputs, labels = data
            prec = model(inputs)
            '''
            torch.max(input, dim) 函数
            输入:
            input是softmax函数输出的一个tensor
            dim是max函数索引的维度0/1,0是每列的最大值,1是每行的最大值
            输出:
            函数会返回两个tensor,第一个tensor是每行的最大值,softmax的输出中最大的是1,
            所以第一个tensor是全1的tensor;第二个tensor是每行最大值的索引,这个索引的值正好和预测的数字相等。
            '''
            _, predicted = torch.max(prec.data, dim=1)  # predicated为维度(784,1)的张量
            total += labels.size(0)
            # 张量之间的比较运算
            correct += (predicted == labels).sum().item()
    print('accuracy on test set: %d %% ' % (100 * correct / total))


if __name__ == "__main__":
    for epoch in range(10):  # 每轮训练之后,都预测一次
        train(epoch)
        test()
输出结果:
[1,   300] loss: 2.166
[1,   600] loss: 0.820
[1,   900] loss: 0.422
accuracy on test set: 89 %
[2,   300] loss: 0.306
[2,   600] loss: 0.269
[2,   900] loss: 0.231
accuracy on test set: 94 %
[3,   300] loss: 0.185
[3,   600] loss: 0.172
[3,   900] loss: 0.152
accuracy on test set: 95 %
[4,   300] loss: 0.129
[4,   600] loss: 0.124
[4,   900] loss: 0.118
accuracy on test set: 96 %
[5,   300] loss: 0.103
[5,   600] loss: 0.094
[5,   900] loss: 0.095
accuracy on test set: 96 %
[6,   300] loss: 0.080
[6,   600] loss: 0.076
[6,   900] loss: 0.077
accuracy on test set: 97 %
[7,   300] loss: 0.062
[7,   600] loss: 0.067
[7,   900] loss: 0.059
accuracy on test set: 97 %
[8,   300] loss: 0.052
[8,   600] loss: 0.050
[8,   900] loss: 0.051
accuracy on test set: 97 %
[9,   300] loss: 0.036
[9,   600] loss: 0.045
[9,   900] loss: 0.042
accuracy on test set: 97 %
[10,   300] loss: 0.031
[10,   600] loss: 0.034
[10,   900] loss: 0.032
accuracy on test set: 97 %
参考资料:
边栏推荐
- EMD distance - example of use
- Using the ethtool command by example
- Jetson AgX Orin platform porting ar0233 gw5200 max9295 camera driver
- How do I migrate my altaro VM backup configuration to another machine?
- JS implements the problem of closing the current child window and refreshing the parent window
- 獲取並監控遠程服務器日志
- 32GB Jetson Orin SOM 不能刷机问题排查
- Notepad++ wrap by specified character
- Mapbox tasting value cloud animation
- Win10 install pytullet and test
猜你喜欢

【一起上水硕系列】Day 7 内容+Day8
![[function explanation (Part 1)] | | knowledge sorting + code analysis + graphic interpretation](/img/c2/991b8febd262cf9237017adc9d1221.jpg)
[function explanation (Part 1)] | | knowledge sorting + code analysis + graphic interpretation
redis 无法远程连接问题。

Altaro o365 total backup subscription plan
6.23星期四库作业
[together Shangshui Shuo series] day 7 content +day8
![[teacher Zhao Yuqiang] MySQL flashback](/img/93/75998e28fd309880661ea723dc8de6.jpg)
[teacher Zhao Yuqiang] MySQL flashback

Configure DTD of XML file

Qt读写Excel--QXlsx插入图表5
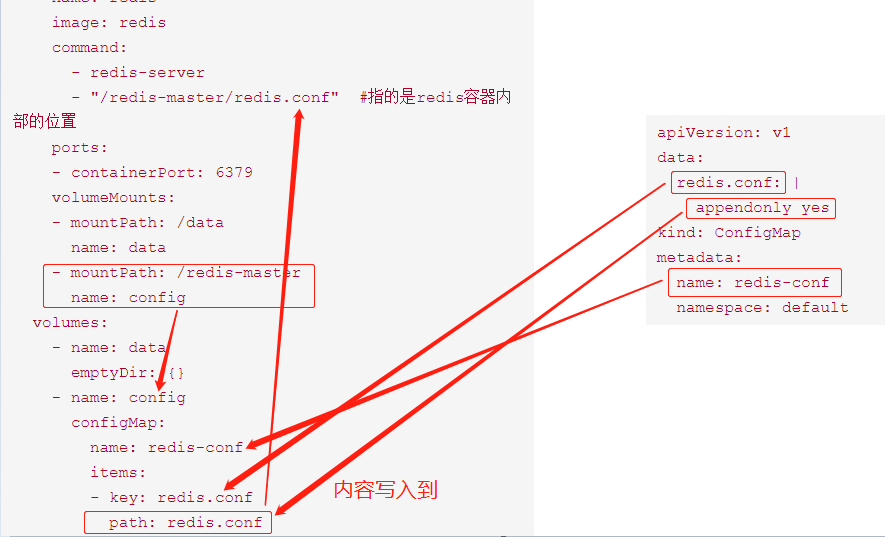
kubernetes资源对象介绍及常用命令(五)-(ConfigMap)
随机推荐
ansible防火墙firewalld设置
NG Textarea-auto-resize
2022.6.30DAY591
[untitled]
6.23 warehouse operation on Thursday
Training method of grasping angle in grasping detection
[Shangshui Shuo series together] day 10
AtCoder Beginner Contest 258(A-D)
[function explanation (Part 1)] | | knowledge sorting + code analysis + graphic interpretation
求质数的方法
Final review Day8
ninja: build stopped: subcommand failed.
[trivia of two-dimensional array application] | [simple version] [detailed steps + code]
MySQL 5.7.32-winx64 installation tutorial (support installing multiple MySQL services on one host)
Jetson AGX Orin 平台移植ar0233-gw5200-max9295相机驱动
70 shell script interview questions and answers
Making coco datasets
Redis使用Lua脚本简介
Final review (Day5)
[set theory] relational closure (relational closure related theorem)