当前位置:网站首页>Using CSDN to develop cloud and build navigation websites
Using CSDN to develop cloud and build navigation websites
2022-06-27 06:04:00 【A fishy summer】

This paper records the use of CSDN Developing the cloud The process of building the website , Take you hand in hand to build a navigation website , The content is for reference .
WordPress and WebStack brief introduction
There are many open source and free software on the Internet , for example WordPress、MeLog、Hexo、OneBlog wait , These open source systems can meet the needs of blogs . In addition to meeting blog needs , It also needs to provide the function of navigation .
So I finally chose WordPress and WebStack, Here's why :
- WordPress Powerful , Easy to install and deploy , The plug-in ecosystem is huge ;
- Use PHP Scripting language , It will be more convenient to modify the content ;
- WebStack Is a ready-made theme , It can be installed and used directly ;
- WordPress Chinese official website : Suitable for blogs to large websites CMS ( Content management system )
WebStack GitHub:https://github.com/owen0o0/WebStack
Installation and deployment
- Server environment construction LNMP
1.1 Buy Linux The server
You can choose Tencent cloud 、 Alibaba cloud 、 Hua Wei Yun 、CSDN Develop cloud and other domestic cloud manufacturers , Of course, if there is a server, you can also directly use the existing server to build .
Considering that the function of the website is very single , Just buy one of the lightest servers .
In the end I am CSDN Developing the cloud Buy an entry-level server on .
Why didn't you choose Alibaba cloud ? Alibaba cloud is called routine cloud , The routine is so deep , Although I have been guarding against , But it's still inevitable to get caught up . Want to know the routine of Alibaba cloud , Baidu “ Alibaba cloud Routine cloud ”, Know all kinds of routines .
Tencent cloud is also called conscience cloud , Less routine , More discounts , But it is only valid for some models of new customers , The price at the time of renewal may be ten times the price at the time of purchase , Regular users cannot enjoy low discounts . Here is my visit to Tencent cloud 618 Screenshot of the activity , Because I am a user of Tencent cloud , Can no longer enjoy preferential prices .
CSDN The price of is relative to the price of Tencent cloud which is not the first order , Still lower , This is my choice CSDN Why 
The next step is to install the required software Nginx、MariaDB、PHP.MariaDB Database management system is MySQL A branch of .
install LNMP
install Nginx
- Execute the following command , stay
/etc/yum.repos.d/Createnginx.repofile .
vi /etc/yum.repos.d/nginx.repo
- Press i Switch to edit mode , Write the following .
[nginx]
name = nginx repo
baseurl = https://nginx.org/packages/mainline/centos/7/$basearch/
gpgcheck = 0
enabled = 1
- Press Esc, Input :wq, Save the file and return to .
- Execute the following command , install nginx.
yum install -y nginx
- Execute the following command , open
default.conffile .
vi /etc/nginx/conf.d/default.conf
- find
server{...}, And willserverReplace the corresponding configuration information in braces with the following . The following configurations add a pair of .php Support for .
Tips:
- Press
EscExit edit mode , type100ddDelete 100 That's ok- Press i Switch to edit mode
server {
	listen       80;
	root   /usr/share/nginx/html;
	server_name  localhost;
	#charset koi8-r;
	#access_log  /var/log/nginx/log/host.access.log  main;
	#
	location / {
		  index index.php index.html index.htm;
	}
	#error_page  404              /404.html;
	#redirect server error pages to the static page /50x.html
	#
	error_page   500 502 503 504  /50x.html;
	location = /50x.html {
	  root   /usr/share/nginx/html;
	}
	#pass the PHP scripts to FastCGI server listening on 127.0.0.1:9000
	#
	location ~ .php$ {
	  fastcgi_pass   127.0.0.1:9000;
	  fastcgi_index  index.php;
	  fastcgi_param  SCRIPT_FILENAME  $document_root$fastcgi_script_name;
	  include        fastcgi_params;
	}
}
- Press Esc, Input :wq, Save the file and return to .
- Execute the following command to start Nginx.
systemctl start nginx
- Execute the following command , Set up Nginx For power on self starting .
systemctl enable nginx
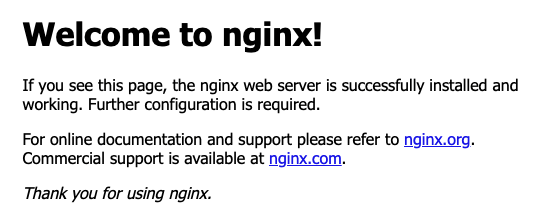
- Access the following address in your local browser , see Nginx Whether the service is running normally .
http:// The public network of the ECS instance IP
It is shown as follows , shows Nginx Installation configuration successful .
install MariaDB
MariaDB and MySQL Fully compatible with , And better performance .
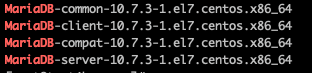
- Execute the following command , Check to see if... Is installed in the system MariaDB.
rpm -qa | grep -i mariadb
The returned results are similar to the following , It means that there is already MariaDB.
To avoid conflicts caused by different installation versions , Please execute the following command to remove the installed MariaDB.
yum -y remove Package name
- If the returned result is empty , It means that... Is not pre installed , Then go to the next step .
- Execute the following command , stay
/etc/yum.repos.d/CreateMariaDB.repofile .
vi /etc/yum.repos.d/MariaDB.repo
- Press i Switch to edit mode , Write the following , add to MariaDB Software library .
# MariaDB 10.7 CentOS repository list - created 2022-03-17 06:47 UTC
# http://downloads.mariadb.org/mariadb/repositories/
[mariadb]
name = MariaDB
baseurl = https://mirrors.cloud.tencent.com/mariadb/yum/10.7/centos7-amd64
gpgkey=https://mirrors.cloud.tencent.com/mariadb/yum/RPM-GPG-KEY-MariaDB
gpgcheck=1
To speed up installation , The above configuration uses Tencent cloud image source . You can go to MariaDB Official website Get other versions and operating systems MariaDB Software library installation information .
- Press Esc, Input :wq, Save the file and return to .
- Execute the following command , install MariaDB. This step takes a long time , Please pay attention to the installation progress , Wait for the installation to complete .
yum -y install MariaDB-client MariaDB-server
- Execute the following command , start-up MariaDB service .
systemctl start mariadb
- Execute the following command , Set up MariaDB For power on self starting .
systemctl enable mariadb
- Execute the following command , verification MariaDB Is the installation successful .
mysql
The results are as follows , The installation is successful .

- Execute the following command , sign out MariaDB.
\q
install PHP
- Execute the following commands in turn , to update yum in PHP Software source of .
rpm -Uvh https://mirrors.cloud.tencent.com/epel/epel-release-latest-7.noarch.rpm
rpm -Uvh https://mirror.webtatic.com/yum/el7/webtatic-release.rpm
- Execute the following command , install PHP 7.2 The package needed .
yum -y install mod_php72w.x86_64 php72w-cli.x86_64 php72w-common.x86_64 php72w-mysqlnd php72w-fpm.x86_64
- Execute the following command , start-up PHP-FPM service .
systemctl start php-fpm
- Execute the following command , Set up PHP-FPM The service is start-up .
systemctl enable php-fpm
Verify environment configuration
When you finish configuring your environment , It can be verified by LNMP Whether the environment is built successfully .
- Execute the following command , Create test file .
echo "<?php phpinfo(); ?>" >> /usr/share/nginx/html/index.php
- Execute the following command , restart Nginx service .
systemctl restart nginx
- Access the following address in the local browser , Check whether the environment configuration is successful .
http:// The public network of the virtual machine instance IP
The results are as follows , It indicates that the environment configuration is successful .

Only this and nothing more , It's done LNMP(Linux、Nginx、MariaDB、PHP) Configuration of
Configuration database
according to MariaDB edition , There are some differences in setting user authentication methods , Please refer to MariaDB Official website .
- Execute the following command , Get into MariaDB.
mysql
- Execute the following command , establish MariaDB database . for example “wordpress”.
CREATE DATABASE wordpress;
- Execute the following command , Create a new user . for example “wordpress”, The login password is
C123456.
CREATE USER 'wordpress'@'localhost' IDENTIFIED BY 'C123456';
- Execute the following command , Give users to “wordpress” Full permissions of the database .
GRANT ALL PRIVILEGES ON wordpress.* TO 'wordpress'@'localhost' IDENTIFIED BY 'C123456';
- Execute the following command , Set up root Account password .
MariaDB 10.7 stay CentOS ... has been added to the system root Account password free login function , For database security , Please perform the following steps to set up your root Account password and remember .
ALTER USER [email protected] IDENTIFIED VIA mysql_native_password USING PASSWORD('you_password');
- Execute the following command , Make all configurations effective .
FLUSH PRIVILEGES;
- Execute the following command , sign out MariaDB.
\q
install and configure WordPress
download WordPress
WordPress Can be obtained from WordPress Official website download WordPress The latest Chinese version and install , This tutorial uses WordPress Chinese version .
- Execute the following command , Delete the root directory of the website for testing PHP-Nginx Configured
index.phpfile .
rm -rf /usr/share/nginx/html/index.php
- Execute the following commands in turn , Get into
/usr/share/nginx/html/Catalog , And download and unzip WordPress.
cd /usr/share/nginx/html
wget https://cn.wordpress.org/wordpress-5.9.2-zh_CN.tar.gz
tar zxvf wordpress-5.9.2-zh_CN.tar.gz
modify WordPress The configuration file
- Execute the following commands in turn , Get into WordPress The installation directory , take
wp-config-sample.phpFile copy towp-config.phpIn file , And keep the original sample configuration file as a backup .
cd /usr/share/nginx/html/wordpress
cp wp-config-sample.php wp-config.php
- Execute the following command , Open and edit the newly created profile .
vi wp-config.php
- Press i Switch to edit mode , Find the file MySQL Part of , And modify the relevant configuration information to the following .
	// ** MySQL settings - You can get this info from your web host ** //
	/** The name of the database for WordPress */
	define('DB_NAME', 'wordpress');

	/** MySQL database username */
	define('DB_USER', 'wordpress');

	/** MySQL database password */
	define('DB_PASSWORD', 'C123456');

	/** MySQL hostname */
	define('DB_HOST', 'localhost');
Tips:
Press
iEnter edit mode . PressxDelete the current character . PressEscExit the current mode
- After the modification is completed , Press Esc, Input :wq, Save the file and return to .
Set directory permissions
Modify directory permissions , Ensure theme 、 plug-in unit 、 Upload pictures and other functions can be used normally
chmod 777  /usr/share/nginx/html/
chmod -R 777  /usr/share/nginx/html/wp-content/
You can also use the following methods to set directory permissions more safely , This only allows php The user owns web Directory permissions .
see /etc/php-fpm.d/www.conf user and group Definition , hold web Ownership of the directory to this user . Here, the author's users and user groups are apache. Use the following command to web The permission of the directory is given to the user apache.
chown -R apache:apache /usr/share/nginx/html/
verification WordPress install
- Type in the browser address bar
http:// Domain name or public network of ECS instance IP/wordpress Folder, for example :
http://202.xxx.xxx.xx/wordpress
Transferred to WordPress Installation page , Start configuration WordPress.
- according to WordPress The installation wizard prompts for the following installation information , single click 【 install WordPress】, Complete the installation .
| Information needed | explain |
|---|---|
| Site title | WordPress Website name . |
| user name | WordPress Administrator name . For safety reasons , It is recommended to set a different from admin The name of . Because it is different from the default user name admin comparison , The name is harder to crack . |
| password | You can use the default strong password or custom password . Do not reuse existing passwords , And make sure to keep the password in a safe place . |
| Your email | Email address used to receive notifications . |
Now you can log in with WordPress Blog , And started posting blog posts .
install WebStack The theme
(1) visit WordPress edition WebStack Navigation topics GitHub website , Download the source file
Github website : https://github.com/owen0o0/WebStack
Source file zip Address :https://codeload.github.com/owen0o0/WebStack/zip/refs/heads/master
(2) Access management console “ appearance ”-“ The theme ”, Upload WebStack The theme
Click on 【 appearance 】-> 【 Install theme 】-> 【 Upload theme 】 ,

choice WebStack Source file , Click on 【 Install now 】

(3) Access management console “ appearance ”-“ The theme ”, Enable WebStack The theme

(4) After enabling , You can see that the page has become WebStack The theme , But the contents are empty . Next, learn how to enter data , Make the empty website look like the following .
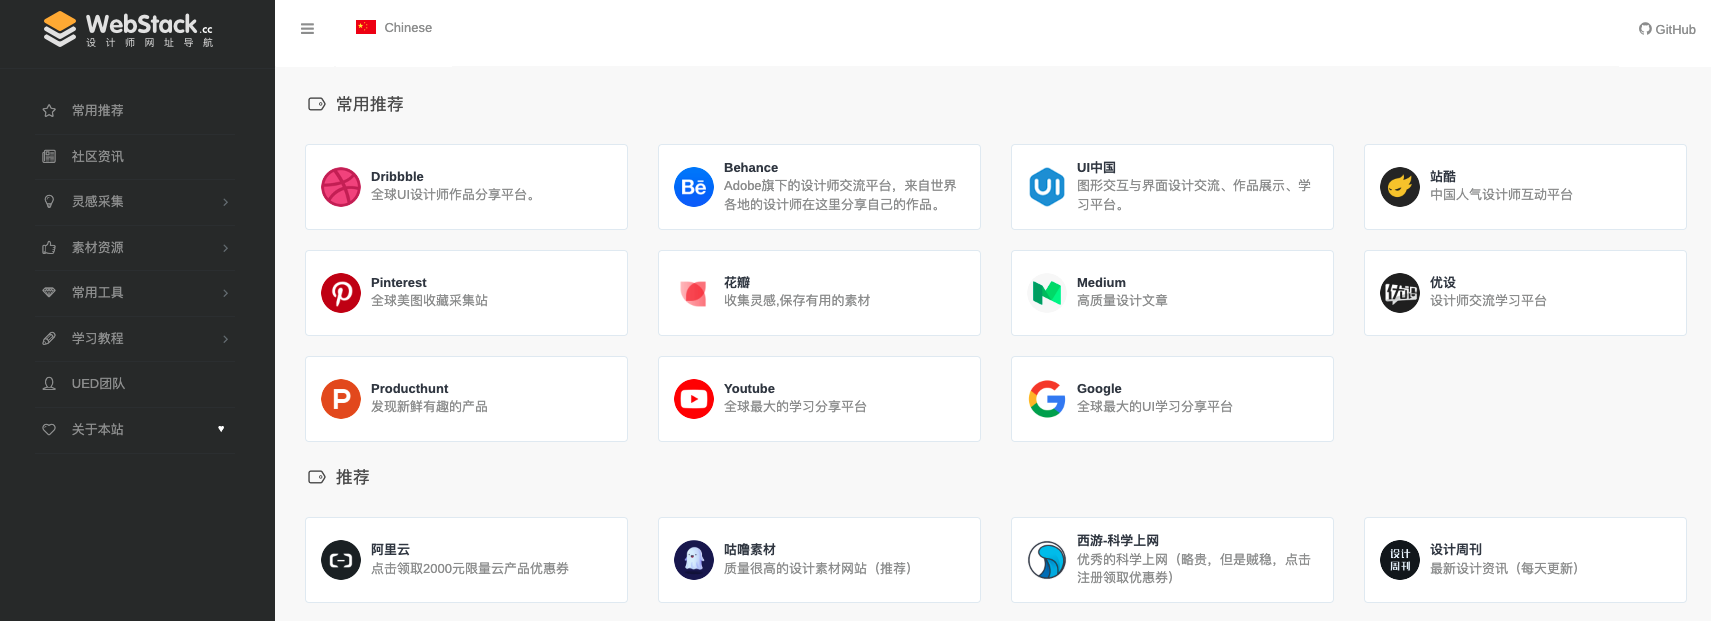
WebStack How to use
Configure left navigation
stay WebStack The left navigation in the middle is used in the system “ Web site classification ”. route : website - Web site classification , The left navigation column can be controlled by configuring the website classification .

Configure the content
The contents of each navigation , It corresponds to the web address ; By adding a web address , You can fill in the content . For example, filling CSDN, The operation is as follows .
- website : Click to jump to the website
- describe : Bottom description
- Sort : The location of the display , The bigger, the more forward
- Icon : Upload locally logo picture , You can also use api service . If api The effect of the pulled picture is not good , Then upload pictures locally .

install WordPress need Linux Systems and Web Knowledge of development , not a few WordPress Beginners lack the knowledge in this field , In the installation WordPress There are many difficulties in the process . On the other hand , Even if it's Linux A veteran of the system , install + Good configuration WordPress It also costs 1-2 Hours of time .
To solve the problem of difficult installation ,CSDN Developed and provided by the cloud Wordpress Mirror image Environmental Science , Preloaded with the official download Wordpress 5.9, PHP 7.4, MariaDB 10.7, Nginx And so on , One click deployment can be performed on ECs , And can be upgraded to the current official version with one click , Themes and plug-ins can be upgraded at will , Save the tedious installation and configuration process .
边栏推荐
猜你喜欢

汇编语言-王爽 第11章 标志寄存器-笔记

多线程基础部分Part3
创建一个基础WDM驱动,并使用MFC调用驱动

KubeSphere 集群配置 NFS 存储解决方案-收藏版

【QT小作】使用结构体数据生成读写配置文件代码
Thinking technology: how to solve the dilemma in work and life?

Open the door small example to learn ten use case diagrams
![Senior [Software Test Engineer] learning route and necessary knowledge points](/img/51/1be2e0812a6bca9e5e8d14bf254254.png)
Senior [Software Test Engineer] learning route and necessary knowledge points

Double position relay rxmd2-1mrk001984 dc220v

Asp.Net Core6 WebSocket 简单案例
随机推荐
How win 10 opens the environment variables window
【养成系】常用正则表达式
Multithreading basic Part3
Altium Designer 19 器件丝印标号位置批量统一摆放
线程间等待与唤醒机制、单例模式、阻塞队列、定时器
Implementation of easyexcel's function of merging cells with the same content and dynamic title
函数式 连续式
Kubesphere cluster configuration NFS storage solution - favorite
Dual position relay dls-34a dc0.5a 220VDC
Asp. Net core6 websocket simple case
Double position relay rxmd2-1mrk001984 dc220v
IP网络通信的单播、组播和广播
expect脚本中使用scp命令的方法,expect脚本中scp命令获取不了值的问题完美解决方法
Spark's projection
Software testing year end summary report template
Junda technology - centralized monitoring scheme for multi brand precision air conditioners
代码即数据
C# netcore中 配置帮助类IConfiguration
426-二叉树(513.找树左下角的值、112. 路径总和、106.从中序与后序遍历序列构造二叉树、654. 最大二叉树)
Configuration of vscode korofileheader