当前位置:网站首页>OpenGL development with QT (I) drawing plane graphics
OpenGL development with QT (I) drawing plane graphics
2022-07-27 07:01:00 【Manon Feifei】
List of articles
stay QT In the middle of OpenGL There are many ways to realize development , The simplest and most direct way is to subclass QOpenGLWindow Realization OpenGL Rendering and rendering .QOpenGLWindow It's used to show OpenGL Windows and QT There is no difference between other standard windows in , We can compare it with others QT Controls are grouped together .
QT adopt QOpenGLContext Class OpenGL The context state of OpenGL Control the rendering and rendering process . All our rendering and rendering operations are targeted at the current context , You can switch between different states by switching context . When rendering, you must set the corresponding context to the current context state , And then we draw .
In subclassing QOpenGLWindow When , We mainly implement the following three interfaces :
// This function is calling paintGL() and resizeGL() Called once before , Responsible for initializing drawing resources and status values
// This function sets the context activation to current , It is no longer necessary to call separately makeCurrent() Function .
void QOpenGLWindow::initializeGL();

//paintGL() and QWidget Of paintEvent() Function equivalence , Responsible for OpenGL Draw graphics , When you need to update or redraw
// This function will also be called when the interface
void QOpenGLWindow::paintGL();

// Called when the window size changes , By implementing this function , When the window size changes
// Adjust the drawn image
void QOpenGLWindow::resizeGL();
OpenGL After the window is built , We can draw the rendered image .OpenGL It provides a series of interfaces for drawing graphics . When developing cross platform applications , It is quite tedious to deal with the differences of these interfaces under different platforms . To solve the problem of cross platform ,QT These drawing interfaces are encapsulated for easy application of cross platform operation . stay QT In the application, we pass QOpenGLFunctions Class to access OpenGL Function of .
QOpenGLFunctions Class only provides OpenGL ES 2.0 The standard part API, These interfaces are supporting QT Most desktop systems and embedded systems of the framework can be called directly . But these interfaces are only some older interfaces , It may not be very convenient to use . If you want to use some relatively new interfaces , You can also separately reference fixed versions OpenGL function library , such as QOpenGLFunctions_3_3_Core Class contains OpenGL3.3 Version of function interface . Adopt the new version of function library class , The advantage is that the interface is rich and convenient , Disadvantages: there may be few supported platforms , It may not work on some platforms . Therefore, developers need to weigh according to their specific business scenarios .
In order to use QT Provided OpenGL The drawing function of , When we implement the customized window , You can inherit at the same time QOpenGLWindow Classes and QOpenGLFunctions class . Use this method to develop OpenGL When applying, we must distinguish QOpenGLFunctions Function provides the rendering interface and native OpenGL Drawing interfaces , Because if QOpenGLFunctions If there is no corresponding interface , In the application, it is likely that what you call is the native interface . Native interfaces may have problems across platforms . So if your application has cross platform requirements , Be sure to call QOpenGLFunctions Package interface provided . To solve this problem , We can also put QOpenGLFunctions Class as the private member variable of the window , Then access through member variables , In this way, we can ensure that what is called must be QT The rendering interface provided .
Calling QT Provided OpenGL Before the function interface , Must be in the current OpenGL context Call down initializeOpenGLFunctions() Function initializes the function interface . Generally, this initialization operation is in QOpenGLWindow::initializeGL() Interface .
Draw triangle
Triangles are OpenGL Basic elements drawn , Complex primitives will be split into small triangles for rendering . Here is an example of drawing triangle primitive QT OpenGL How to realize custom drawing :
//simpleglwindow.h
#ifndef SIMPLEGLWINDOW_H
#define SIMPLEGLWINDOW_H
#include <QOpenGLWindow>
#include <QOpenGLFunctions_1_1>

// The use of OpenGLFunction The version is 1.1
class SimpleGLWindow : public QOpenGLWindow, protected QOpenGLFunctions_1_1
{

public:
    SimpleGLWindow(QWindow *parent = 0);
protected:
    // Initialization operation
    void initializeGL();

    // Draw function
    void paintGL();

protected:
    // Event of window size change
    void resizeGL(int w, int h);
};

#endif // SIMPLEGLWINDOW_H
//simpleglwindow.cpp
#include "simpleglwindow.h"
#include <QDebug>

SimpleGLWindow::SimpleGLWindow(QWindow *parent) :
    QOpenGLWindow(NoPartialUpdate, parent)
{
    }
void SimpleGLWindow::initializeGL()
{

    // initialization OpenGL function
    if (!initializeOpenGLFunctions())
    {

        qDebug() << "init opengl functions failed";
    }

    // Set the default color when refreshing the display to RGB(255,255,255)
    glClearColor(1, 1, 1, 0);
}

void SimpleGLWindow::paintGL()
{

    // Clear color cache
    glClear(GL_COLOR_BUFFER_BIT);

    // take OpenGL The viewport and window remain the same
    glViewport(0, 0, width(), height());

    // Start triangle drawing mode
    // The point coordinates here are not absolute values , But the proportion to the boundary , The value range is (-1,1)
    // The number 1 Corresponding to the boundary ,-1 Corresponding to the left boundary
    // Color values are also proportional values ,1 Corresponding RGB Medium 255,0 Corresponding RGB Medium 0
    glBegin(GL_TRIANGLES);
    {

        // The vertices 1 coordinate XYZ(0,1,0) Color RGB(255,0,0)
        glColor3f(1, 0, 0);
        glVertex3f( 0.0f, 1.0f, 0.0f);

        // The vertices 2 coordinate XYZ(1,-1,0) Color RGB(0,255,0)
        glColor3f(0, 1, 0);
        glVertex3f( 1.0f,-1.0f, 0.0f);

        // The vertices 3 coordinate XYZ(-1,-1,0) Color RGB(0,0,255)
        glColor3f(0, 0, 1);
        glVertex3f(-1.0f,-1.0f, 0.0f);
    }
    // Finish drawing
    glEnd();
}

void SimpleGLWindow::resizeGL(int w, int h)
{

    Q_UNUSED(w);
    Q_UNUSED(h);
}
The display effect is as follows :
Anti aliasing configuration
By default ,OpenGL The rendering jagged effect of is very obvious . We can enable OpenGL Rendering with higher image quality , So as to achieve anti aliasing effect , The corresponding configuration is as follows :
SimpleGLWindow::SimpleGLWindow(QWindow *parent) :
    QOpenGLWindow(NoPartialUpdate, parent)
{

    // Set the value of multisampling
    QSurfaceFormat fmt = format();
    fmt.setSamples(18);
    setFormat(fmt);
}
Theoretically, the higher the value of multiple samples , The better the image quality . However, the higher the value of multi sampling, the greater the burden on hardware performance . If the value exceeds the hardware threshold , The program will also fail . So developers should choose the corresponding value according to the performance of their hardware platform , Don't blindly choose a large value .
The multi sampling rendering effect is as follows :
Draw points 、 Line 、 quadrilateral 、 polygon
Here are some other elements in OpenGL The drawing method in
Draw a single point
void SimpleGLWindow::paintGL()
{

    // Clear color cache
    glClear(GL_COLOR_BUFFER_BIT);

    // take OpenGL The viewport and window remain the same
    glViewport(0, 0, width(), height());

    // To show the default size of the modified point
    glPointSize(10.0f);

    // Start point drawing mode
    glBegin(GL_POINTS);
    {

        // Vertex coordinates XYZ(0,0,0) Color RGB(0,0,255)
        // The blue dot displayed in the center of the screen
        glColor3f(0, 0, 1);
        glVertex3f( 0.0f, 0.0f, 0.0f);
    }
    // Finish drawing
    glEnd();
}
The display effect is as follows :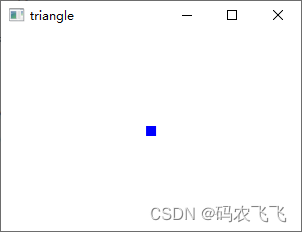
Draw multiple points
void SimpleGLWindow::paintGL()
{

    // Clear color cache
    glClear(GL_COLOR_BUFFER_BIT);

    // take OpenGL The viewport and window remain the same
    glViewport(0, 0, width(), height());

    // To show the default size of the modified point
    glPointSize(10.0f);

    // Start point drawing mode
    glBegin(GL_POINTS);
    {

        // Vertex coordinates XYZ(0,0,0) Color RGB(0,0,255)
        glColor3f(0, 0, 1);
        glVertex3f( 0.0f, 0.0f, 0.0f);

        // Vertex coordinates XYZ(0.5,0,0) Color RGB(255,0,0)
        glColor3f(1, 0, 0);
        glVertex3f( 0.5f, 0.0f, 0.0f);

        // Vertex coordinates XYZ(0,0.5,0) Color RGB(0,255,0)
        glColor3f(0, 1, 0);
        glVertex3f( 0.0f, 0.5f, 0.0f);

        // Vertex coordinates XYZ(-0.5,0,0) Color RGB(0,255,255)
        glColor3f(0, 1, 1);
        glVertex3f( -0.5f, 0.0f, 0.0f);

    }
    // Finish drawing
    glEnd();
}
The display effect is as follows : Draw a straight line
void SimpleGLWindow::paintGL()
{

    // Clear color cache
    glClear(GL_COLOR_BUFFER_BIT);

    // take OpenGL The viewport and window remain the same
    glViewport(0, 0, width(), height());

    // Start line drawing mode
    glBegin(GL_LINES);
    {

        // A straight line 1 The beginning and the end
        // Starting point coordinates XYZ(1,0,0) Color RGB(255,0,0)
        glColor3f(1, 0, 0);
        glVertex3f( 1.0f, 0.0f, 0.0f);

        // End coordinates XYZ(-1,0,0) Color RGB(0,255,0)
        glColor3f(0, 1, 0);
        glVertex3f( -1.0f, 0.0f, 0.0f);

        // A straight line 2 The beginning and the end
        // Starting point coordinates XYZ(0,-1,0) Color RGB(255,0,0)
        glColor3f(1, 0, 0);
        glVertex3f( 0.0f, -1.0f, 0.0f);

        // End coordinates XYZ(0,1,0) Color RGB(0,255,0)
        glColor3f(0, 1, 0);
        glVertex3f( 0.0f, 1.0f, 0.0f);

    }
    // Finish drawing
    glEnd();
}
The display effect is as follows :
Draw a quadrilateral
When drawing quadrangles, you must pay attention to , The sequence of drawing points in the program is the sequence of drawing . The same four points , If the order of drawing is different, the quadrilateral may appear differently . Therefore, we must pay attention to the drawing order of points .
void SimpleGLWindow::paintGL()
{

    // Clear color cache
    glClear(GL_COLOR_BUFFER_BIT);

    // take OpenGL The viewport and window remain the same
    glViewport(0, 0, width(), height());

    // Start quadrilateral drawing mode
    glBegin(GL_QUADS);
    {

        // The vertices 1 coordinate XYZ(1,0,0) Color RGB(255,0,0)
        glColor3f(1, 0, 0);
        glVertex3f( 1.0f, 0.0f, 0.0f);

        // The vertices 2 coordinate XYZ(0,1,0) Color RGB(0,255,0)
        glColor3f(0, 1, 0);
        glVertex3f( 0.0f, 1.0f, 0.0f);

        // The vertices 3 coordinate XYZ(-1,0,0) Color RGB(0,255,0)
        glColor3f(0, 1, 0);
        glVertex3f( -1.0f, 0.0f, 0.0f);

        // The vertices 4 mark XYZ(0,-1,0) Color RGB(255,0,0)
        glColor3f(1, 0, 0);
        glVertex3f( 0.0f, -1.0f, 0.0f);
    }
    // Finish drawing
    glEnd();
}
The display effect is as shown in the following figure :
Draw polygon
When drawing polygons, you should also pay attention to the order of drawing , Otherwise, it will have a great impact on the results .
void SimpleGLWindow::paintGL()
{

    // Clear color cache
    glClear(GL_COLOR_BUFFER_BIT);

    // take OpenGL The viewport and window remain the same
    glViewport(0, 0, width(), height());

    // Start polygon drawing mode
    glBegin(GL_POLYGON);
    {

        // The vertices 1 coordinate XYZ(-0.5,0,0)
        // The color is RGB(255,0,0)
        glColor3f(1, 0, 0);
        glVertex3f( -0.5f, 0.0f, 0.0f);

        // The vertices 2 coordinate XYZ(-0.25,0.5,0)
        glVertex3f( -0.25f, 0.5f, 0.0f);

        // The vertices 3 coordinate XYZ(0.25,0.5,0)
        glVertex3f( 0.25f, 0.5f, 0.0f);

        // The vertices 4 mark XYZ(0.5,0,0)
        glVertex3f( 0.5f, 0.0f, 0.0f);

        // The vertices 5 mark XYZ(0.25,-0.5,0)
        glVertex3f( 0.25f, -0.5f, 0.0f);

        // The vertices 6 mark XYZ(-0.25,-0.5,0)
        glVertex3f( -0.25f, -0.5f, 0.0f);
    }
    // Finish drawing
    glEnd();
}
The display effect is as shown in the following figure :
Draw a picture texture
Image texture is to paste an image on a specific figure according to a certain size correspondence . Here we paste an image onto a rectangular primitive . Before painting textures , We need to initialize the texture first , The corresponding implementation is as follows :
void SimpleGLWindow::initialTexture()
{

    // Initialize pictures and textures
    m_texture_image = new QImage(":/background.jpg");

    //OpenGL In coordinate system y Axis and picture coordinate system y Opposite axis direction , You need to mirror the image to make it right
    m_texture = new QOpenGLTexture(m_texture_image->mirrored());

    // Add filters for amplification and reduction
    m_texture->setMinificationFilter(QOpenGLTexture::LinearMipMapLinear);
    m_texture->setMagnificationFilter(QOpenGLTexture::Linear);
}
After adding the initialization operation , We will in OpenGL Call the initialization operation of texture in the initialization function of .
void SimpleGLWindow::initializeGL()
{

    // initialization OpenGL function
    if (!initializeOpenGLFunctions())
    {

        qDebug() << "init opengl functions failed";
    }
    // Initialize texture
    initialTexture();
    // Set the default color when refreshing the display to RGB(255,255,255)
    glClearColor(1, 1, 1, 0);
}
After initializing the texture , We can draw texture pictures in the corresponding functions . The drawing operation is as follows :
void SimpleGLWindow::paintGL()
{

    // Clear color cache
    glClear(GL_COLOR_BUFFER_BIT);
    // take OpenGL The viewport and window remain the same
    glViewport(0, 0, width(), height());
    // Reset the transformation matrix
    glLoadIdentity();
    // Bind texture
    if(m_texture)
    {

        m_texture->bind();
    }
    // Start texture
    glEnable(GL_TEXTURE_2D);
    // Start rectangle drawing mode
    glBegin(GL_QUADS);
    {

        // The four vertices of the rectangle correspond to the four vertices of the picture respectively
        // The vertices 1 coordinate XYZ(1,1,0) Texture coordinates (1,1)
        glTexCoord2d(1.0f, 1.0f);
        glVertex3f( 1.0f, 1.0f, 0.0f);

        // The vertices 2 coordinate XYZ(-1,1,0) Texture coordinates (0,1)
        glTexCoord2d(0.0f, 1.0f);
        glVertex3f(-1.0f, 1.0f, 0.0f);

        // The vertices 3 coordinate XYZ(-1,-1,0) Texture coordinates (0,0)
        glTexCoord2d(0.0f, 0.0f);
        glVertex3f( -1.0f, -1.0f, 0.0f);

        // The vertices 4 mark XYZ(1,-1,0) Texture coordinates (1,0)
        glTexCoord2d(1.0f, 0.0f);
        glVertex3f(1.0f, -1.0f, 0.0f);
    }
    // Finish drawing
    glEnd();
    // Turn off texture
    glDisable(GL_TEXTURE_2D);

}
The four vertices of the drawn rectangle correspond to the four vertices of the image texture , Therefore, the texture can completely tile the entire quadrilateral , The corresponding display effect is shown in the figure below :
The complete code of texture rendering is as follows :
//simpleglwindow.h
#ifndef SIMPLEGLWINDOW_H
#define SIMPLEGLWINDOW_H

#include <QOpenGLWindow>
#include <QOpenGLFunctions_1_1>
#include <QOpenGLTexture>

// The use of OpenGLFunction The version is 1.1
class SimpleGLWindow : public QOpenGLWindow, protected QOpenGLFunctions_1_1
{

public:
    SimpleGLWindow(QWindow *parent = 0);
protected:
    // Initialization operation
    void initializeGL();

    // Draw function
    void paintGL();

protected:
    // Event of window size change
    void resizeGL(int w, int h);

private:
    void initialTexture();
    //OpenGL texture
    QOpenGLTexture* m_texture = nullptr;
    // Texture image
    QImage* m_texture_image = nullptr;
};

#endif // SIMPLEGLWINDOW_H
//simpleglwindow.cpp
#include "simpleglwindow.h"
#include <QDebug>

SimpleGLWindow::SimpleGLWindow(QWindow *parent) :
    QOpenGLWindow(NoPartialUpdate, parent)
{

    // Set the value of multisampling
    QSurfaceFormat fmt = format();
    fmt.setSamples(25);
    setFormat(fmt);
}

void SimpleGLWindow::initializeGL()
{

    // initialization OpenGL function
    if (!initializeOpenGLFunctions())
    {

        qDebug() << "init opengl functions failed";
    }
    initialTexture();
    // Set the default color when refreshing the display to RGB(255,255,255)
    glClearColor(1, 1, 1, 0);
}

void SimpleGLWindow::paintGL()
{

    // Clear color cache
    glClear(GL_COLOR_BUFFER_BIT);
    // take OpenGL The viewport and window remain the same
    glViewport(0, 0, width(), height());
    // Reset the transformation matrix
    glLoadIdentity();

    if(m_texture)
    {

        m_texture->bind();
    }
    // Start texture
    glEnable(GL_TEXTURE_2D);
    // Start rectangle drawing mode
    glBegin(GL_QUADS);
    {

        // The vertices 1 coordinate XYZ(1,1,0) Texture coordinates (1,1)
        glTexCoord2d(1.0f, 1.0f);
        glVertex3f( 1.0f, 1.0f, 0.0f);

        // The vertices 2 coordinate XYZ(-1,1,0) Texture coordinates (0,1)
        glTexCoord2d(0.0f, 1.0f);
        glVertex3f(-1.0f, 1.0f, 0.0f);

        // The vertices 3 coordinate XYZ(-1,-1,0) Texture coordinates (0,0)
        glTexCoord2d(0.0f, 0.0f);
        glVertex3f( -1.0f, -1.0f, 0.0f);

        // The vertices 4 mark XYZ(1,0,0) Texture coordinates (1,0)
        glTexCoord2d(1.0f, 0.0f);
        glVertex3f(1.0f, -1.0f, 0.0f);
    }
    // Finish drawing
    glEnd();
    // Turn off texture
    glDisable(GL_TEXTURE_2D);

}

void SimpleGLWindow::resizeGL(int w, int h)
{

    Q_UNUSED(w);
    Q_UNUSED(h);
}

void SimpleGLWindow::initialTexture()
{

    // Initialize pictures and textures
    m_texture_image = new QImage(":/background.jpg");
    m_texture = new QOpenGLTexture(m_texture_image->mirrored());

    // Add filters for amplification and reduction
    m_texture->setMinificationFilter(QOpenGLTexture::LinearMipMapLinear);
    m_texture->setMagnificationFilter(QOpenGLTexture::Linear);
}
边栏推荐
- Deepsort工作原理分析
- Dsgan degenerate network
- Use -wall to clear code hidden dangers
- DNA coupled PbSe quantum dots | near infrared lead selenide PbSe quantum dots modified DNA | PbSe DNA QDs
- To improve the baby's allergy, take yiminshu. Azg and aibeca love la Beijia work together to protect the growth of Chinese babies
- DNA科研实验应用|环糊精修饰核酸CD-RNA/DNA|环糊精核酸探针/量子点核酸探针
- Details of cross entropy loss function in pytorch
- 基于SSM图书借阅管理系统
- Basic concepts of program, process, thread, coprocess, single thread and multi thread
- 脱氧核糖核酸DNA改性近红外二区砷化镓GaAs量子点|GaAs-DNA QDs|DNA修饰GaAs量子点
猜你喜欢

PNA modified polypeptide arms PNA PNA DNA suc aapf PNA suc - (ALA) 3 PNA

PSI | CSI and ROC | AUC and KS - memorandum

Mysql database
MangoDB

Norms of vectors and matrices

Two ways of multi GPU training of pytorch

ES6的新特性(2)
DNA科研实验应用|环糊精修饰核酸CD-RNA/DNA|环糊精核酸探针/量子点核酸探针

齐岳:巯基修饰寡聚DNA|DNA修饰CdTe/CdS核壳量子点|DNA偶联砷化铟InAs量子点InAs-DNA QDs

AI:业余时间打比赛—挣它个小小目标—【阿里安全×ICDM 2022】大规模电商图上的风险商品检测比赛
随机推荐
Event capture and bubbling - what is the difference between them?
DNA(脱氧核糖核酸)供应|碳纳米管载核酸-DNA/RNA材料|DNA/RNA核酸修饰磁性纳米颗粒
Speech and language processing (3rd ed. draft) Chapter 2 - regular expression, text normalization, editing distance reading notes
Norms of vectors and matrices
如何让最小 API 绑定查询字符串中的数组
Variance and covariance
Derivative, partial derivative and gradient
Ftx.us launched stock and ETF trading services to make trading more transparent
关于ES6的新特性
Pymysql query result conversion JSON
Analysis of pix2pix principle
The issuing process of individual developers applying for code signing certificates
DNA modified zinc oxide | DNA modified gold nanoparticles | DNA coupled modified carbon nanomaterials
采用QT进行OpenGL开发(一)绘制平面图形
TS学习(八) :TS中的类
MangoDB
Problems related to compilation and training of Darknet yolov3 and Yolo fast using CUDA environment of rtx30 Series graphics card on win10 platform
DNA修饰贵金属纳米颗粒|脱氧核糖核酸DNA修饰纳米金(科研级)
【11】 Binary code: "holding two roller handcuffs, crying out for hot hot hot"?
Express framework