当前位置:网站首页>lvs+keepalived项目实战
lvs+keepalived项目实战
2022-07-26 22:49:00 【面对危险】
文章目录
实验准备
| client | 192.168.4.10 |
|---|---|
| lvs | 192.168.2.20/192.168.4.20 |
| lvs1 | 192.168.4.30 |
| web1 | 192.168.2.200/192.168.4.200 |
| web2 | 192.168.2.200/192.168.4.200 |
本文2个实验(centos7)
1:lvsNAT实验
所用机器:client+lvs+web1+web2
2:lvsDR+keepalived实验
所用机器:client+lvs+lvs1+web1+web2
一、什么是lvs集群
LVS 是 Linux Virtual Server 的简写,意即 Linux虚拟服务器 ,是一个虚拟的服务器集群系统。
lvs工作模式有
NAT:网络地址转换
DR:路由模式
TUN:隧道模式
调度算法:支持的有10种,常见的4种
轮询rr:Real Server轮流提供服务
加权轮询wrr:Real Server根据权重,轮流提供服务
最少连接LC:根据Real Server的连接数数,分配请求
加权最少连接WLC:类似于wrr,给不同的服务器分配不同的权重
二、lvs+NAT实验
1.web1和web2安装httpd服务(关闭防火墙,selinux)
yum -y install httpd (2台机器)并能访问http

2.web1和web2配置网关
web1和web2同时做
因为lvs有2个地址把2.20当成网卡可以访问4.0网段的内容
[[email protected] ~]# nmcli connection modify eth1 ipv4.gateway 192.168.2.20
[[email protected] ~]# ifdown eth1; ifup eth1
[[email protected] ~]#  route -n
Kernel IP routing table
Destination     Gateway         Genmask         Flags Metric Ref    Use Iface
0.0.0.0         192.168.2.20    0.0.0.0         UG    100    0        0 eth1
192.168.2.0     0.0.0.0         255.255.255.0   U     100    0        0 eth1
3.配置lvs
开启lvs路由转发功
[[email protected] ~]# vim /etc/sysctl.conf
net.ipv4.ip_forward = 1
[[email protected] ~]# sysctl -p //使配置文件生效
net.ipv4.ip_forward = 1
安装lvs
yum install -y ipvsadm
ipvsadm语法
-A:添加虚拟服务器(虚拟IP)
-E:编辑虚拟服务器
-t|u:tcp或udp协议
-s:指定调度算法,如rr/wrr/lc/wlc
-a: 创建虚拟服务器后,向虚拟服务器中加入真实服务器
-r:真实服务器地址
-w: 设置权重,默认是1
-m:指定LVS的工作模式是NAT
-g:指定LVS的工作模式是DR
lvs NET配置
[[email protected] ~]# ipvsadm -A -t 192.168.4.20:80 -s rr //创建虚拟服务器调度算法是轮询
[[email protected] ~]# ipvsadm -a -t 192.168.4.20:80 -r 192.168.2.100 -w 1 -m //向虚拟服务器添加真实服务器web1 权重为1 nat模式
[[email protected] ~]# ipvsadm -a -t 192.168.4.20:80 -r 192.168.2.200 -w 2 -m
[[email protected] ~]# ipvsadm -Ln //查看具体配置
IP Virtual Server version 1.2.1 (size=4096)
Prot LocalAddress:Port Scheduler Flags
  -> RemoteAddress:Port           Forward Weight ActiveConn InActConn
TCP  192.168.4.20:80 rr
  -> 192.168.2.100:80             Masq    1      0          0
  -> 192.168.2.200:80             Masq    2      0          0
[[email protected] ~]# systemctl stop firewalld.service 关闭防火墙
客户机访问lvs调度器

三、lvs路由模式+keepalived项目实战
LVS的DR模式,LVS只需要一块网卡(4.0网段)
VIP:虚拟地址,提供给用户访问的地址
keepalived:用于实现高可用集群
1.配置web1,web2的vip:192.168.4.40(2台web机配置一样)
[[email protected] network-scripts]# cd /etc/sysconfig/network-scripts/
[[email protected] network-scripts]# cp ifcfg-lo ifcfg-lo:0
[[email protected] network-scripts]# vim ifcfg-lo:0
DEVICE=lo:0 //lo是本地
IPADDR=192.168.4.40 //配置虚拟地址
NETMASK=255.255.255.255 //这里一定要255.255.255.255否则出错
NETWORK=192.168.4.40
BROADCAST=192.168.4.40
ONBOOT=yes
NAME=lo:0
2.在2台web服务器上修改内核参数,使得它们不响应vip的查询请求
[[email protected] network-scripts]#  vim /etc/sysctl.conf
# System default settings live in /usr/lib/sysctl.d/00-system.conf.
# To override those settings, enter new settings here, or in an /etc/sysctl.d/<name>
.conf file
#
# For more information, see sysctl.conf(5) and sysctl.d(5).
net.ipv4.conf.all.arp_ignore = 1
net.ipv4.conf.lo.arp_ignore = 1
net.ipv4.conf.all.arp_announce = 2
net.ipv4.conf.lo.arp_announce = 2
[[email protected] network-scripts]# sysctl -p //配置生效
net.ipv4.conf.all.arp_ignore = 1
net.ipv4.conf.lo.arp_ignore = 1
net.ipv4.conf.all.arp_announce = 2
net.ipv4.conf.lo.arp_announce = 2
3. lvs安装keepalived
 yum install -y keepalived
 yum -y install ipvsadm
配置文件
[[email protected] ~]# vim /etc/keepalived/keepalived.conf
! Configuration File for keepalived

global_defs {

   notification_email {

     [email protected]            //收件人地址
   }
   notification_email_from [email protected].cn   //发件人地址
   smtp_server 127.0.0.1       //邮件服务器地址
   smtp_connect_timeout 30
   router_id lvs              //唯一标别ID
   vrrp_iptables               // 自动开启IPTABLES放行规则
   vrrp_skip_check_adv_addr
   vrrp_strict
   vrrp_garp_interval 0
   vrrp_gna_interval 0
}

vrrp_instance VI_1 {

    state MASTER
    interface eth0
    virtual_router_id 51
    priority 100
    advert_int 1
    authentication {

        auth_type PASS
        auth_pass 1111
    }
    virtual_ipaddress {

        192.168.4.40/24       // VIP地址
    }
}

virtual_server 192.168.4.40 80 {
       // LVS虚拟服务器
    delay_loop 6              //健康检查延迟6秒
    lb_algo rr                // 调度算法
    lb_kind DR                // 工作模式
    persistence_timeout 50    // 50秒内相同客户端调度到相同服务器
    protocol TCP

    real_server 192.168.4.100 80 {
        # real server配置
        weight 1              // 权重
	TCP_CHECK {
                  // 对real server健康检查的配置
	    connect_timeout 3    //连接超时时间
	    nb_get_retry    3    //健康检查重试次数
	    delay_before_retry 3 //两次检查的间隔
    }
    }
    real_server 192.168.4.200 80 {
        // real server配置
        weight 1              // 权重
	TCP_CHECK {
                  // 对real server健康检查的配置
	    connect_timeout 3    // 连接超时时间
	    nb_get_retry    3    //健康检查重试次数
	    delay_before_retry 3 //两次检查的间隔
	}
    }
}
启动服务查看配置
systemctl start keepalived.service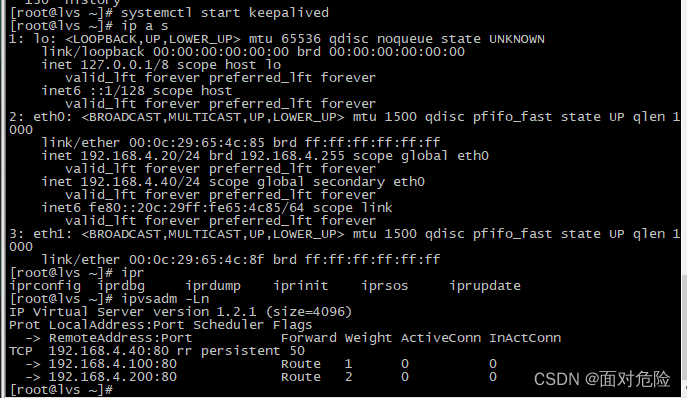
客户端访问
[[email protected] ~]# curl 192.168.4.40
woshiweb2
[[email protected] ~]# curl 192.168.4.40
woshiweb2
[[email protected] ~]# curl 192.168.4.40
woshiweb2
[[email protected] ~]# curl 192.168.4.40
woshiweb2
[[email protected] ~]# curl 192.168.4.40
woshiweb2
4. lvs1安装keepalived
 yum install -y keepalived
 yum -y install ipvsadm
配置文件
[[email protected]~]# vim /etc/keepalived/keepalived.conf
! Configuration File for keepalived

global_defs {
   notification_email {
     [email protected]
   }
   notification_email_from [email protected]
   smtp_server 127.0.0.1
   smtp_connect_timeout 30
   router_id lvs1  //主机名
   vrrp_iptables
   vrrp_skip_check_adv_addr
   vrrp_strict
   vrrp_garp_interval 0
   vrrp_gna_interval 0
}

vrrp_instance VI_1 {
    state BACKUP    //这里改备份模式
    interface eth0
    virtual_router_id 51
    priority 80 //优先级要比lvs低
    advert_int 1
    authentication {
        auth_type PASS
        auth_pass 1111
    }
    virtual_ipaddress {
        192.168.4.40/24
    }
}

virtual_server 192.168.4.40 80{
    delay_loop 6
    lb_algo rr
    lb_kind DR
    persistence_timeout 50
    protocol TCP

    real_server 192.168.4.100 80 {
        weight 1
    TCP_CHECK {
            connect_timeout 3
            nb_get_retry 3
            delay_before_retry 3
        }
    }
    real_server 192.168.4.200 80 {
        weight 2
    TCP_CHECK {
            connect_timeout 3
            nb_get_retry 3
            delay_before_retry 3
        }
    }
}
启动服务
systemctl start keepalived.service
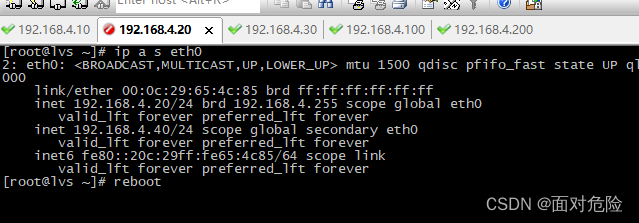
关机lvs 客户端访问

边栏推荐
- 动态路由rip协议实验
- [FPGA tutorial case 29] the second DDS direct digital frequency synthesizer based on FPGA - Verilog development
- npm报错, Error: EPERM: operation not permitted, mkdir
- 第三讲--GPIO输入输出库函数使用以及相关例程
- 7.7 SHEIN希音笔试
- 7.13 蔚来提前批笔试
- [FPGA tutorial case 30] DDS direct digital frequency synthesizer based on FPGA -- frequency accuracy analysis with MATLAB
- TCP的三次握手与四次挥手(简述)
- mgre的全连和星型拓扑实验
- 最新C语言入门与进阶 -史上最全最详细的C语言教程!! 第一节-总览C语言概括
猜你喜欢

静态综合实验(静态路由、环回接口、缺省路由、空接口、浮动静态的综合练习)
![[FPGA tutorial case 28] one of DDS direct digital frequency synthesizers based on FPGA -- principle introduction](/img/bf/ce4bc33d2a0fc7fe57105e20fbafcf.png)
[FPGA tutorial case 28] one of DDS direct digital frequency synthesizers based on FPGA -- principle introduction
![[详解C语言]一文带你玩转选择(分支)结构](/img/ca/7ee9f62a2478785c97684c7a0cc749.png)
[详解C语言]一文带你玩转选择(分支)结构

mgre的全连和星型拓扑实验

广域网技术实验
二层封装技术(HDLC、PPP--PAP\CHAP、GRE)实验练习

微信小程序:用户微信登录流程(附:流程图+源码)

HCIA Basics (1)
![[Database Course Design] SQLSERVER database course design (student dormitory management), course design report + source code + database diagram](/img/24/fe01d656a54086adf8a3702b82cc26.png)
[Database Course Design] SQLSERVER database course design (student dormitory management), course design report + source code + database diagram

TCP's three handshakes and four waves (brief introduction)
随机推荐
6.28 flush written test
TIM输出比较——PWM
STM32入门教程第一讲
机械硬盘选购指南——从选购经历谈起
Simple application of rip V2 (V2 configuration, announcement, manual summary, ripv2 authentication, silent interface, accelerating convergence)
OGeek Meetup第一期,携手CubeFS火热来袭
[详解C语言]一文带你认识C语言,让你醍醐灌顶
Golang - sync包的使用 (WaitGroup, Once, Mutex, RWMutex, Cond, Pool, Map)
6.30联发科笔试
Connect mysql detailed graphic operations in ECs docker (all)
2022 latest Tiktok live broadcast monitoring (II) streaming media download in live broadcast room
HCIA(网络初级综合实验练习)
ensp中的简单静态路由
Experiment of total connection and star topology of mGRE
二层封装技术(HDLC、PPP--PAP\CHAP、GRE)实验练习
6.28大华笔试
平面转换(位移、旋转、缩放)
2022最新直播监控24小时监控(三)直播间弹幕解析
HCIA静态路由综合实验
2022zui新抖音24小时循环值守直播监控(一)直播间开播监控