当前位置:网站首页>【Shader】Shader官方示例[通俗易懂]
【Shader】Shader官方示例[通俗易懂]
2022-07-31 11:55:00 【全栈程序员站长】
大家好,又见面了,我是你们的朋友全栈君。
官方示例原文地址:https://docs.unity3d.com/Manual/SL-SurfaceShaderExamples.html
Surface Shader示例 在表面着色器 。此页面上的示例显示如何使用内置照明模型。有关如何实现自定义光照模型的示例,请参阅Surface Shader光照示例。
简单着色器 例 我们将从一个非常简单的Shader开始,并在此基础上进行构建。这是一个将表面颜色设置为“白色”的着色器。它使用内置的Lambert(漫反射)光照模型。
Shader "Example/Diffuse Simple" {
    SubShader {
      Tags { "RenderType" = "Opaque" }
      CGPROGRAM
      #pragma surface surf Lambert
      struct Input {
          float4 color : COLOR;
      };
      void surf (Input IN, inout SurfaceOutput o) {
          o.Albedo = 1;
      }
      ENDCG
    }
    Fallback "Diffuse"
}效果
质地 一个全白的物体很无聊,所以让我们添加一个纹理。我们将为添加属性 块中的着色器,因此我们在材质中获得了一个纹理选择器。其他更改在下面以粗体显示。
Shader "Example/Diffuse Texture" {
    Properties {
      _MainTex ("Texture", 2D) = "white" {}
    }
    SubShader {
      Tags { "RenderType" = "Opaque" }
      CGPROGRAM
      #pragma surface surf Lambert
      struct Input {
          float2 uv_MainTex;
      };
      sampler2D _MainTex;
      void surf (Input IN, inout SurfaceOutput o) {
          o.Albedo = tex2D (_MainTex, IN.uv_MainTex).rgb;
      }
      ENDCG
    }
    Fallback "Diffuse"
}效果
法线贴图 让我们添加一些法线贴图:
Shader "Example/Diffuse Bump" {
    Properties {
      _MainTex ("Texture", 2D) = "white" {}
      _BumpMap ("Bumpmap", 2D) = "bump" {}
    }
    SubShader {
      Tags { "RenderType" = "Opaque" }
      CGPROGRAM
      #pragma surface surf Lambert
      struct Input {
        float2 uv_MainTex;
        float2 uv_BumpMap;
      };
      sampler2D _MainTex;
      sampler2D _BumpMap;
      void surf (Input IN, inout SurfaceOutput o) {
        o.Albedo = tex2D (_MainTex, IN.uv_MainTex).rgb;
        o.Normal = UnpackNormal (tex2D (_BumpMap, IN.uv_BumpMap));
      }
      ENDCG
    }
    Fallback "Diffuse"
}效果
轮廓照明 现在,尝试添加一些Rim Lighting以突出GameObject 的边缘。我们将根据曲面法线和视图方向之间的角度添加一些自发光。为此,我们将使用内置的viewDirSurface Shader变量。
Shader "Example/Rim" {
    Properties {
      _MainTex ("Texture", 2D) = "white" {}
      _BumpMap ("Bumpmap", 2D) = "bump" {}
      _RimColor ("Rim Color", Color) = (0.26,0.19,0.16,0.0)
      _RimPower ("Rim Power", Range(0.5,8.0)) = 3.0
    }
    SubShader {
      Tags { "RenderType" = "Opaque" }
      CGPROGRAM
      #pragma surface surf Lambert
      struct Input {
          float2 uv_MainTex;
          float2 uv_BumpMap;
          float3 viewDir;
      };
      sampler2D _MainTex;
      sampler2D _BumpMap;
      float4 _RimColor;
      float _RimPower;
      void surf (Input IN, inout SurfaceOutput o) {
          o.Albedo = tex2D (_MainTex, IN.uv_MainTex).rgb;
          o.Normal = UnpackNormal (tex2D (_BumpMap, IN.uv_BumpMap));
          half rim = 1.0 - saturate(dot (normalize(IN.viewDir), o.Normal));
          o.Emission = _RimColor.rgb * pow (rim, _RimPower);
      }
      ENDCG
    }
    Fallback "Diffuse"
}效果
细节纹理 对于不同的效果,让我们添加一个与基础纹理结合的细节纹理。细节纹理通常在材质中使用相同的UV但不同的Tiling,因此我们需要使用不同的输入UV坐标。
Shader "Example/Detail" {
    Properties {
      _MainTex ("Texture", 2D) = "white" {}
      _BumpMap ("Bumpmap", 2D) = "bump" {}
      _Detail ("Detail", 2D) = "gray" {}
    }
    SubShader {
      Tags { "RenderType" = "Opaque" }
      CGPROGRAM
      #pragma surface surf Lambert
      struct Input {
          float2 uv_MainTex;
          float2 uv_BumpMap;
          float2 uv_Detail;
      };
      sampler2D _MainTex;
      sampler2D _BumpMap;
      sampler2D _Detail;
      void surf (Input IN, inout SurfaceOutput o) {
          o.Albedo = tex2D (_MainTex, IN.uv_MainTex).rgb;
          o.Albedo *= tex2D (_Detail, IN.uv_Detail).rgb * 2;
          o.Normal = UnpackNormal (tex2D (_BumpMap, IN.uv_BumpMap));
      }
      ENDCG
    }
    Fallback "Diffuse"
}效果
在屏幕空间的细节纹理 屏幕空间中的细节纹理对于士兵头模型没有实际意义,但是在这里它用于说明如何使用内置screenPos输入:
Shader "Example/ScreenPos" {
    Properties {
      _MainTex ("Texture", 2D) = "white" {}
      _Detail ("Detail", 2D) = "gray" {}
    }
    SubShader {
      Tags { "RenderType" = "Opaque" }
      CGPROGRAM
      #pragma surface surf Lambert
      struct Input {
          float2 uv_MainTex;
          float4 screenPos;
      };
      sampler2D _MainTex;
      sampler2D _Detail;
      void surf (Input IN, inout SurfaceOutput o) {
          o.Albedo = tex2D (_MainTex, IN.uv_MainTex).rgb;
          float2 screenUV = IN.screenPos.xy / IN.screenPos.w;
          screenUV *= float2(8,6);
          o.Albedo *= tex2D (_Detail, screenUV).rgb * 2;
      }
      ENDCG
    }
    Fallback "Diffuse"
}效果
立方体贴图反射 这是一个使用内置worldRefl输入进行立方体贴图反射的着色器。它与内置的Reflective / Diffuse Shader 非常相似:
Shader "Example/WorldRefl" {
    Properties {
      _MainTex ("Texture", 2D) = "white" {}
      _Cube ("Cubemap", CUBE) = "" {}
    }
    SubShader {
      Tags { "RenderType" = "Opaque" }
      CGPROGRAM
      #pragma surface surf Lambert
      struct Input {
          float2 uv_MainTex;
          float3 worldRefl;
      };
      sampler2D _MainTex;
      samplerCUBE _Cube;
      void surf (Input IN, inout SurfaceOutput o) {
          o.Albedo = tex2D (_MainTex, IN.uv_MainTex).rgb * 0.5;
          o.Emission = texCUBE (_Cube, IN.worldRefl).rgb;
      }
      ENDCG
    }
    Fallback "Diffuse"
}效果 因为它将反射颜色指定为Emission,我们得到一个非常闪亮的士兵:
如果要进行受法线贴图影响的反射,则需要稍微复杂一些:INTERNAL_DATA需要添加到Input结构中,以及WorldReflectionVector用于在写入“正常”输出后计算每像素反射向量的函数。
Shader "Example/WorldRefl Normalmap" {
    Properties {
      _MainTex ("Texture", 2D) = "white" {}
      _BumpMap ("Bumpmap", 2D) = "bump" {}
      _Cube ("Cubemap", CUBE) = "" {}
    }
    SubShader {
      Tags { "RenderType" = "Opaque" }
      CGPROGRAM
      #pragma surface surf Lambert
      struct Input {
          float2 uv_MainTex;
          float2 uv_BumpMap;
          float3 worldRefl;
          INTERNAL_DATA
      };
      sampler2D _MainTex;
      sampler2D _BumpMap;
      samplerCUBE _Cube;
      void surf (Input IN, inout SurfaceOutput o) {
          o.Albedo = tex2D (_MainTex, IN.uv_MainTex).rgb * 0.5;
          o.Normal = UnpackNormal (tex2D (_BumpMap, IN.uv_BumpMap));
          o.Emission = texCUBE (_Cube, WorldReflectionVector (IN, o.Normal)).rgb;
      }
      ENDCG
    }
    Fallback "Diffuse"
}这是一个正常映射的闪亮士兵:
切片通过世界空间位置 这是一个Shader,通过丢弃像素 来“切片”GameObject 中的近水平环。它通过使用clip()基于像素的世界位置的Cg / HLSL函数来实现。我们将使用内置的worldPosSurface Shader变量。
Shader "Example/Slices" {
    Properties {
      _MainTex ("Texture", 2D) = "white" {}
      _BumpMap ("Bumpmap", 2D) = "bump" {}
    }
    SubShader {
      Tags { "RenderType" = "Opaque" }
      Cull Off
      CGPROGRAM
      #pragma surface surf Lambert
      struct Input {
          float2 uv_MainTex;
          float2 uv_BumpMap;
          float3 worldPos;
      };
      sampler2D _MainTex;
      sampler2D _BumpMap;
      void surf (Input IN, inout SurfaceOutput o) {
          clip (frac((IN.worldPos.y+IN.worldPos.z*0.1) * 5) - 0.5);
          o.Albedo = tex2D (_MainTex, IN.uv_MainTex).rgb;
          o.Normal = UnpackNormal (tex2D (_BumpMap, IN.uv_BumpMap));
      }
      ENDCG
    }
    Fallback "Diffuse"
}效果
使用顶点修改器进行正常挤出 可以使用“顶点修改器”功能,该功能将修改在的顶点着色器 的传入顶点数据。这可以用于程序动画和法线挤出等事情。Surface Shader编译指令vertex:functionName用于此,带有一个带inout appdata_full参数的函数。
这是一个着色器,它沿着法线按照材质中指定的量移动顶点:
Shader "Example/Normal Extrusion" {
    Properties {
      _MainTex ("Texture", 2D) = "white" {}
      _Amount ("Extrusion Amount", Range(-1,1)) = 0.5
    }
    SubShader {
      Tags { "RenderType" = "Opaque" }
      CGPROGRAM
      #pragma surface surf Lambert vertex:vert
      struct Input {
          float2 uv_MainTex;
      };
      float _Amount;
      void vert (inout appdata_full v) {
          v.vertex.xyz += v.normal * _Amount;
      }
      sampler2D _MainTex;
      void surf (Input IN, inout SurfaceOutput o) {
          o.Albedo = tex2D (_MainTex, IN.uv_MainTex).rgb;
      }
      ENDCG
    }
    Fallback "Diffuse"
}效果 沿着法线移动顶点会让一个肥胖的士兵:
每个顶点计算的自定义数据 使用顶点修改器函数,还可以在顶点着色器中计算自定义数据,然后将其按像素传递给Surface Shader函数。使用相同的编译指令vertex:functionName,但该函数应该采用两个参数:inout appdata_full和out Input。您可以在那里填写任何不是内置值的Input成员。
注意:以这种方式使用的自定义输入成员不得以“uv”开头的名称,否则它们将无法正常工作。
下面的示例定义了一个自定义float3 customColor成员,它在顶点函数中计算:
Shader "Example/Custom Vertex Data" {
    Properties {
      _MainTex ("Texture", 2D) = "white" {}
    }
    SubShader {
      Tags { "RenderType" = "Opaque" }
      CGPROGRAM
      #pragma surface surf Lambert vertex:vert
      struct Input {
          float2 uv_MainTex;
          float3 customColor;
      };
      void vert (inout appdata_full v, out Input o) {
          UNITY_INITIALIZE_OUTPUT(Input,o);
          o.customColor = abs(v.normal);
      }
      sampler2D _MainTex;
      void surf (Input IN, inout SurfaceOutput o) {
          o.Albedo = tex2D (_MainTex, IN.uv_MainTex).rgb;
          o.Albedo *= IN.customColor;
      }
      ENDCG
    }
    Fallback "Diffuse"
}在此示例customColor中设置为法线的绝对值:
更实际的用途可能是计算内置输入变量不提供的任何每顶点数据; 或优化着色器计算。例如,可以在GameObject的顶点处计算Rim光照,而不是在每像素的Surface Shader中进行计算。 最终颜色修改器 可以使用“最终颜色修改器”功能来修改由着色器计算的最终颜色。表面着色器编译指令finalcolor:functionName用于此,带有一个带Input IN, SurfaceOutput o, inout fixed4 color参数的函数。
这是一个简单的着色器,它将色调应用于最终颜色。这与仅对表面Albedo颜色应用色调不同:此色调还会影响来自Lightmaps的 任何颜色,光探针 和类似的额外来源。
Shader "Example/Tint Final Color" {
    Properties {
      _MainTex ("Texture", 2D) = "white" {}
      _ColorTint ("Tint", Color) = (1.0, 0.6, 0.6, 1.0)
    }
    SubShader {
      Tags { "RenderType" = "Opaque" }
      CGPROGRAM
      #pragma surface surf Lambert finalcolor:mycolor
      struct Input {
          float2 uv_MainTex;
      };
      fixed4 _ColorTint;
      void mycolor (Input IN, SurfaceOutput o, inout fixed4 color)
      {
          color *= _ColorTint;
      }
      sampler2D _MainTex;
      void surf (Input IN, inout SurfaceOutput o) {
           o.Albedo = tex2D (_MainTex, IN.uv_MainTex).rgb;
      }
      ENDCG
    }
    Fallback "Diffuse"
}使用最终颜色修改器定制雾 使用最终颜色修改器(见上文)的一个常见情况是在前向渲染中 实现完全自定义Fog 。雾需要影响最终的计算像素着色器颜色,这正是finalcolor修改器所做的。
这是一个根据距离屏幕中心的距离应用雾色调的着色器。这将顶点修改器与自定义顶点数据(fog)和最终颜色修改器组合在一起。在前向渲染中 使用时将添加剂传递,雾需要淡化为黑色。此示例处理该问题并执行检查UNITY_PASS_FORWARDADD。
Shader "Example/Fog via Final Color" {
    Properties {
      _MainTex ("Texture", 2D) = "white" {}
      _FogColor ("Fog Color", Color) = (0.3, 0.4, 0.7, 1.0)
    }
    SubShader {
      Tags { "RenderType" = "Opaque" }
      CGPROGRAM
      #pragma surface surf Lambert finalcolor:mycolor vertex:myvert
      struct Input {
          float2 uv_MainTex;
          half fog;
      };
      void myvert (inout appdata_full v, out Input data)
      {
          UNITY_INITIALIZE_OUTPUT(Input,data);
          float4 hpos = UnityObjectToClipPos(v.vertex);
          hpos.xy/=hpos.w;
          data.fog = min (1, dot (hpos.xy, hpos.xy)*0.5);
      }
      fixed4 _FogColor;
      void mycolor (Input IN, SurfaceOutput o, inout fixed4 color)
      {
          fixed3 fogColor = _FogColor.rgb;
          #ifdef UNITY_PASS_FORWARDADD
          fogColor = 0;
          #endif
          color.rgb = lerp (color.rgb, fogColor, IN.fog);
      }
      sampler2D _MainTex;
      void surf (Input IN, inout SurfaceOutput o) {
           o.Albedo = tex2D (_MainTex, IN.uv_MainTex).rgb;
      }
      ENDCG
    }
    Fallback "Diffuse"
}线性雾
Shader "Example/Linear Fog" {
  Properties {
    _MainTex ("Base (RGB)", 2D) = "white" {}
  }
  SubShader {
    Tags { "RenderType"="Opaque" }
    LOD 200

    CGPROGRAM
    #pragma surface surf Lambert finalcolor:mycolor vertex:myvert
    #pragma multi_compile_fog

    sampler2D _MainTex;
    uniform half4 unity_FogStart;
    uniform half4 unity_FogEnd;

    struct Input {
      float2 uv_MainTex;
      half fog;
    };

    void myvert (inout appdata_full v, out Input data) {
      UNITY_INITIALIZE_OUTPUT(Input,data);
      float pos = length(UnityObjectToViewPos(v.vertex).xyz);
      float diff = unity_FogEnd.x - unity_FogStart.x;
      float invDiff = 1.0f / diff;
      data.fog = clamp ((unity_FogEnd.x - pos) * invDiff, 0.0, 1.0);
    }
    void mycolor (Input IN, SurfaceOutput o, inout fixed4 color) {
      #ifdef UNITY_PASS_FORWARDADD
        UNITY_APPLY_FOG_COLOR(IN.fog, color, float4(0,0,0,0));
      #else
        UNITY_APPLY_FOG_COLOR(IN.fog, color, unity_FogColor);
      #endif
    }

    void surf (Input IN, inout SurfaceOutput o) {
      half4 c = tex2D (_MainTex, IN.uv_MainTex);
      o.Albedo = c.rgb;
      o.Alpha = c.a;
    }
    ENDCG
  }
  FallBack "Diffuse"
}贴花 贴图通常用于在运行时向材质添加细节(例如,子弹影响)。它们在延迟渲染中特别有用,因为它们在点亮之前会改变GBuffer,因此可以节省性能。
在典型的场景中,Decals应该在不透明对象之后呈现,并且不应该是阴影脚轮,如ShaderLab 下面示例 “标签”。
Shader "Example/Decal" {
  Properties {
    _MainTex ("Base (RGB)", 2D) = "white" {}
  }
  SubShader {
    Tags { "RenderType"="Opaque" "Queue"="Geometry+1" "ForceNoShadowCasting"="True" }
    LOD 200
    Offset -1, -1

    CGPROGRAM
    #pragma surface surf Lambert decal:blend

    sampler2D _MainTex;

    struct Input {
      float2 uv_MainTex;
    };

    void surf (Input IN, inout SurfaceOutput o) {
        half4 c = tex2D (_MainTex, IN.uv_MainTex);
        o.Albedo = c.rgb;
        o.Alpha = c.a;
      }
    ENDCG
    }
}发布者:全栈程序员栈长,转载请注明出处:https://javaforall.cn/128727.html原文链接:https://javaforall.cn
边栏推荐
- [Virtualization Ecological Platform] Platform Architecture Diagram & Ideas and Implementation Details
- 生信周刊第38期
- R语言做面板panelvar例子
- “带薪划水”偷刷阿里老哥的面经宝典,三次挑战字节,终成正果
- 无法将“node.exe”项识别为 cmdlet、函数、脚本文件或可运行程序的名称。
- 在 Excel 内使用 ODBC 消费 SAP ABAP CDS view
- Is the working process of the belt you know the story - actionreducerstore
- Android studio连接MySQL并完成简单的登录注册功能
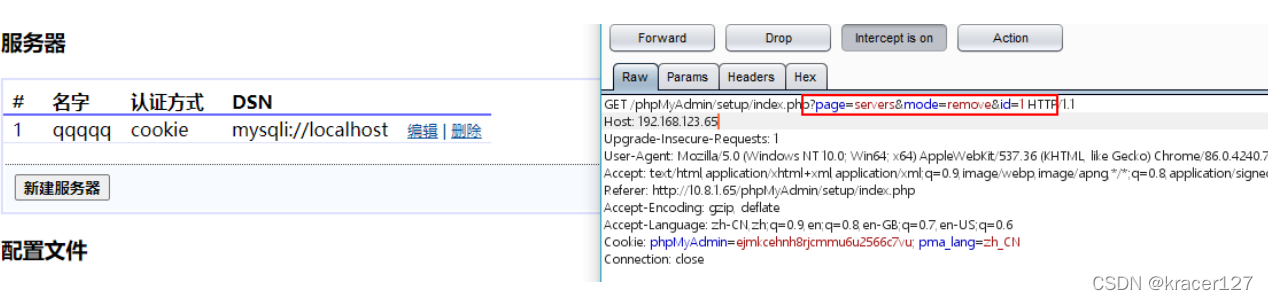
- 最全phpmyadmin漏洞汇总
- 透过开发抽奖小程序,体会创新与迭代
猜你喜欢


随机推荐
Read through the interface to call the artifact RestTemplate
Caused by: 类找不到: org.apache.flink.table.planner.delegation.ParserFactory或者ExecutorFactory
lotus-local-net 2k v1.17.0-rc4
准确率(Accuracy)、精度(Precision)、召回率(Recall)和 mAP 的图解
MySQL面试八股文(2022最新整理)
AWS Amazon cloud account registration, free application for 12 months Amazon cloud server detailed tutorial
无法将“node.exe”项识别为 cmdlet、函数、脚本文件或可运行程序的名称。
下课看着文档走回实验室,我重新拾起了遗忘的SQL运算符
In PLC communication error or timeout or download the prompt solution of the model
一文吃透接口调用神器RestTemplate
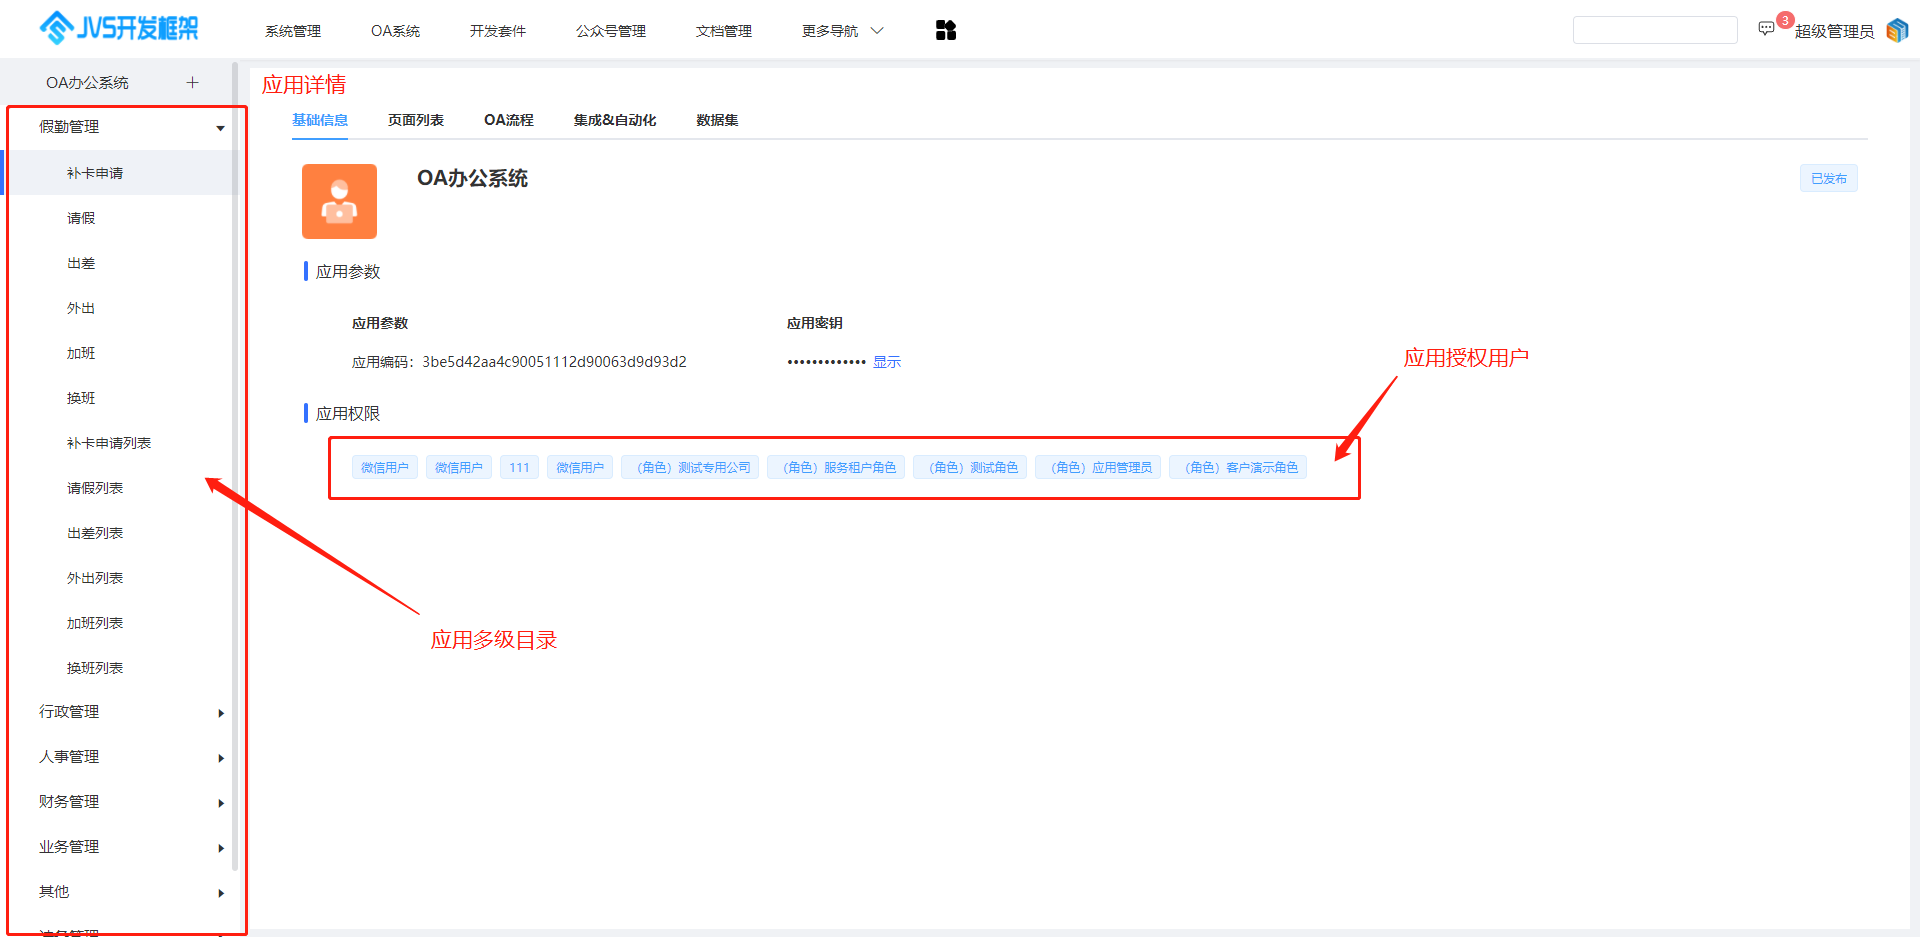
JVS应用中心
The item 'node.exe' was not recognized as the name of a cmdlet, function, script file, or runnable program.
【虚拟化生态平台】平台架构图&思路和实现细节
IDEA configure method annotation automatic parameters
Docker build Mysql master-slave replication
MySQL百万数据优化总结 一
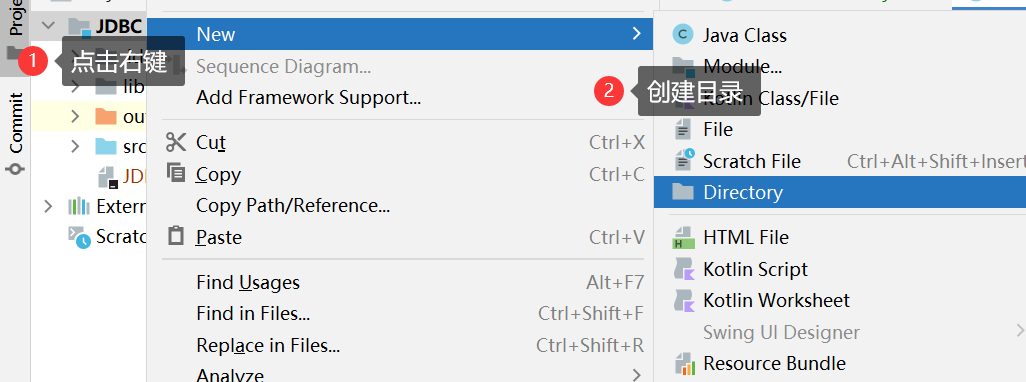
Initial JDBC programming
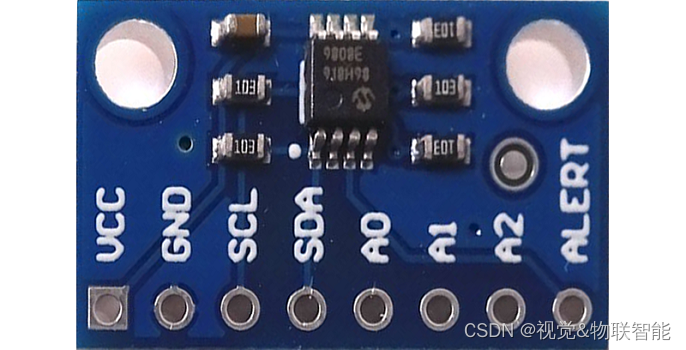
DCM middleware family welcomes a new member
一、excel转pdf格式jacob.jar
AWS亚马逊云账号注册,免费申请12个月亚马逊云服务器详细教程