1. Preface
The current design of this attendance system is mainly used in college classroom attendance , At present, there are many successful cases in the university management system , Course scheduling system , The educational administration management system management system 、 Student management system, etc , The application of these systems directly improves the work efficiency of teachers and students , Distribute class assignments , Check the class design report, etc , Can be operated directly on the Internet , Very convenient .
The current design is based on RFID Attendance system of , use C++ As a programming language ,UI The interface uses QT Design ,RFID Use the card swiping plug-in C++ Development ,RFID Card swiping equipment yes USB Interface protocol , The database adopts Huawei cloud MySQL(RDS for MySQL), Convenient for different classes 、 The software running on the device can synchronize attendance data .
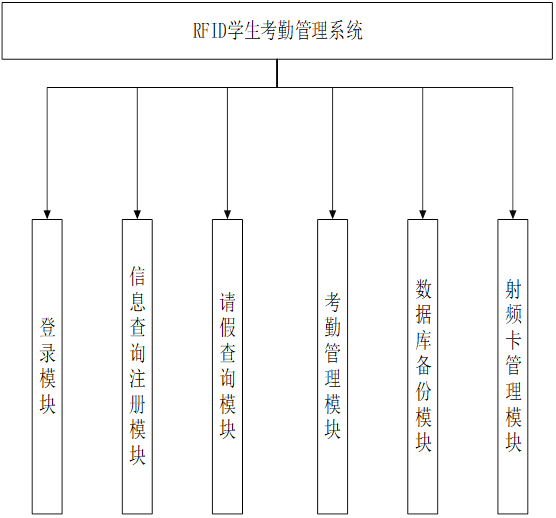
The current attendance system contains the following functional modules :
【1】 Login module : User name and password login , This design has three kinds of user names , Including system administrators , Teachers and students ;【2】 Student information management module : The increase of students' basic information , Delete , modify , Inquire about ;【3】 Attendance management module : Check in and out students ;【4】 RF card management module : Use the radio frequency card to record the attendance of students ;【5】 Query module : Administrators , Teachers' , Students can query the attendance results within their permission ;【6】 Leave inquiry module : adopt ID Inquire about the students' leave ;【7】 Data backup module : The system data shall be saved regularly , But it can help when the system server fails .
The system has 3 User permissions , Student operation page 、 Administrator action page 、 Teacher operation page . Student operation page , You can view your attendance records ; On the teacher operation page, you can view the attendance records of students in your class , Add attendance students ; Administrators can view attendance records of all people , Support all functions .


The online cloud database of Huawei cloud is used to store data in the current system MySQL,MySQL Database is one of the most popular open source databases , Its performance is excellent , collocation LAMP(Linux + Apache + MySQL + Perl/PHP/Python), Become WEB Efficient solutions developed . Huawei cloud RDS for MySQL The database is stable and reliable 、 Safe operation 、 Stretch and stretch 、 Easy to manage 、 It is economical and practical .
The cloud database mentioned above RDS(Relational Database Service, abbreviation RDS) It is a stable and reliable platform based on cloud computing 、 Stretch and stretch 、 Convenient online cloud database service . At present, Huawei cloud database RDS The following engines are supported :
MySQL
PostgreSQL
SQL Server
Cloud database RDS The service has perfect performance monitoring system and multiple safety protection measures , And provides a professional database management platform , Users can easily set up and expand cloud databases on the cloud . Through the cloud database RDS Management console for services , Users can perform all necessary tasks without programming , Simplify operational processes , Reduce the daily operation and maintenance workload , To focus on application development and business development .
2. Deploy (RDS for MySQL) Cloud database
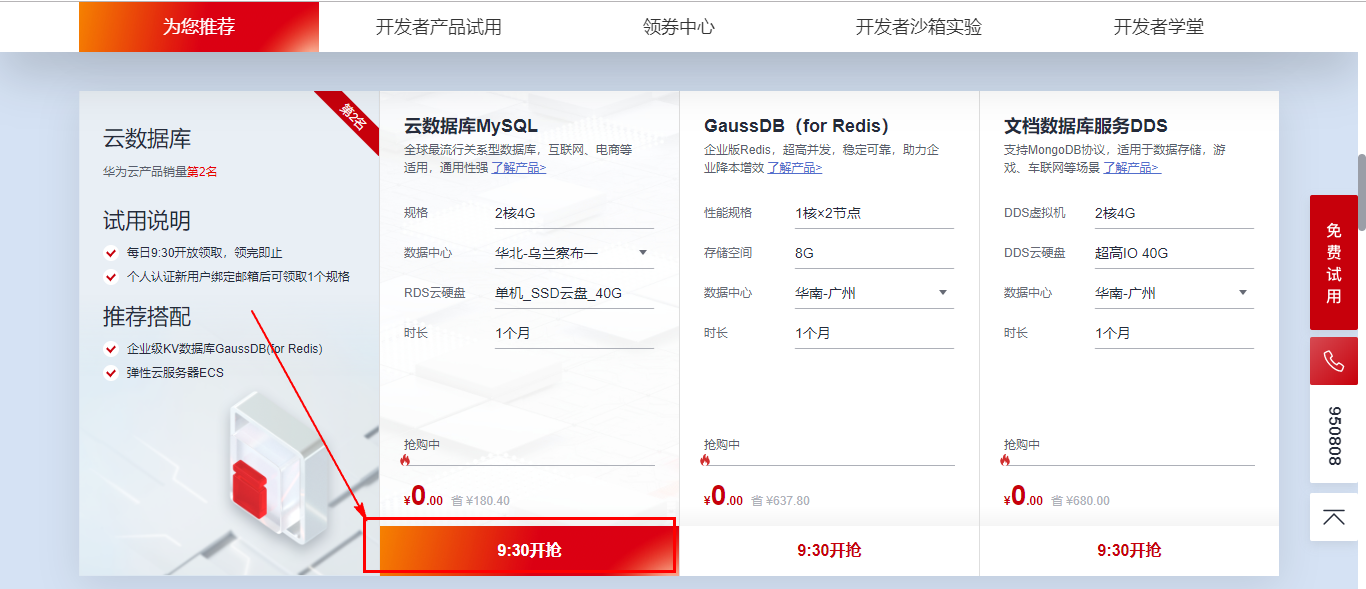
You can get one month's... Free of charge on the Huawei cloud official website (RDS for MySQL) Cloud database usage rights , You can take advantage of this free opportunity , Fully understand 、 Experience (RDS for MySQL) The effect of using the database .
Be careful : If you need internet access after the database is purchased and deployed , Public network binding is required IP Address , If you have purchased the public network before IP, When purchasing the database, pay attention to selecting the same region .
Official website address :https://activity.huaweicloud.com/free_test/index.html

Turn down , find MySQL database , Click to buy .
Fill in the information according to the guide page , Set database login password .


Finally complete the payment .


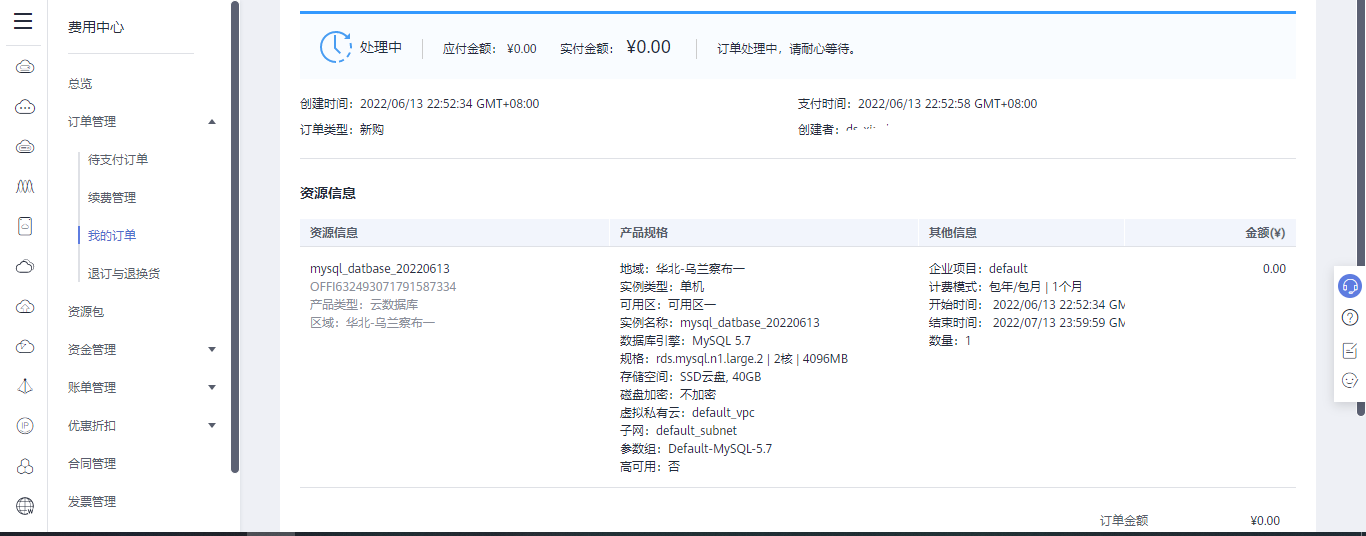
Check order details .
After successful purchase , Next, go to the console management page .
It will be finished after a while .

Then click the console in the upper left corner of the order details page .

Expand the service list , Find the cloud database RDS.

You can also find your own examples in resource management .

Select your own purchase area .
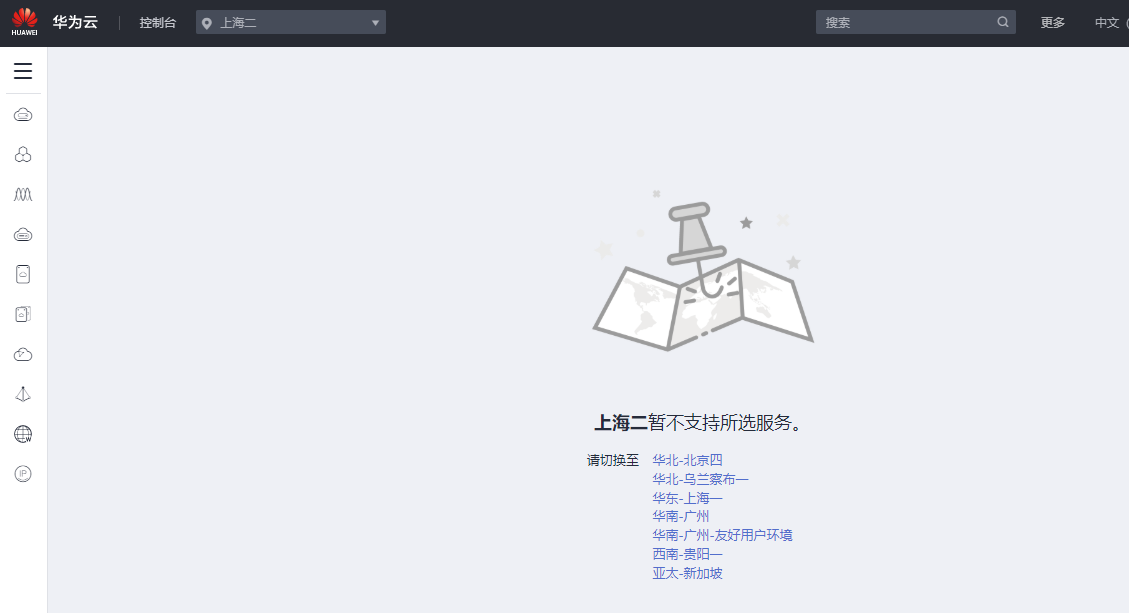
After selecting the correct area , You can see your order page .

Address : https://console.huaweicloud.com/rds/?agencyId=5fad13e389e142c09389a693ea18222b&locale=zh-cn®ion=cn-north-9#/rds/management/list
After entering, you can view the database information .

You can log in to the database directly on the intranet page .

After entering the account password , Click test connection .

After the measurement connection is successful , Click on login .


After login , Next, you can create a new database test . After the database is created, tables can be created 、 Fill in the data , The normal transaction operation of the database .

3. Binding public network IP Address
3.1 Purchase public network IP Address
To facilitate the database to support Internet connection , You need to bind the public network to the database instance IP Address .


There is no public network IP Click on the top right corner of the address to buy one .

If it is a trial period test , You can buy it for a month first .

Public network IP After the purchase is successful, you can see that it is in the unbound state , Next, you can bind .

Continue binding on the previous page .

Public network IP Address binding succeeded .

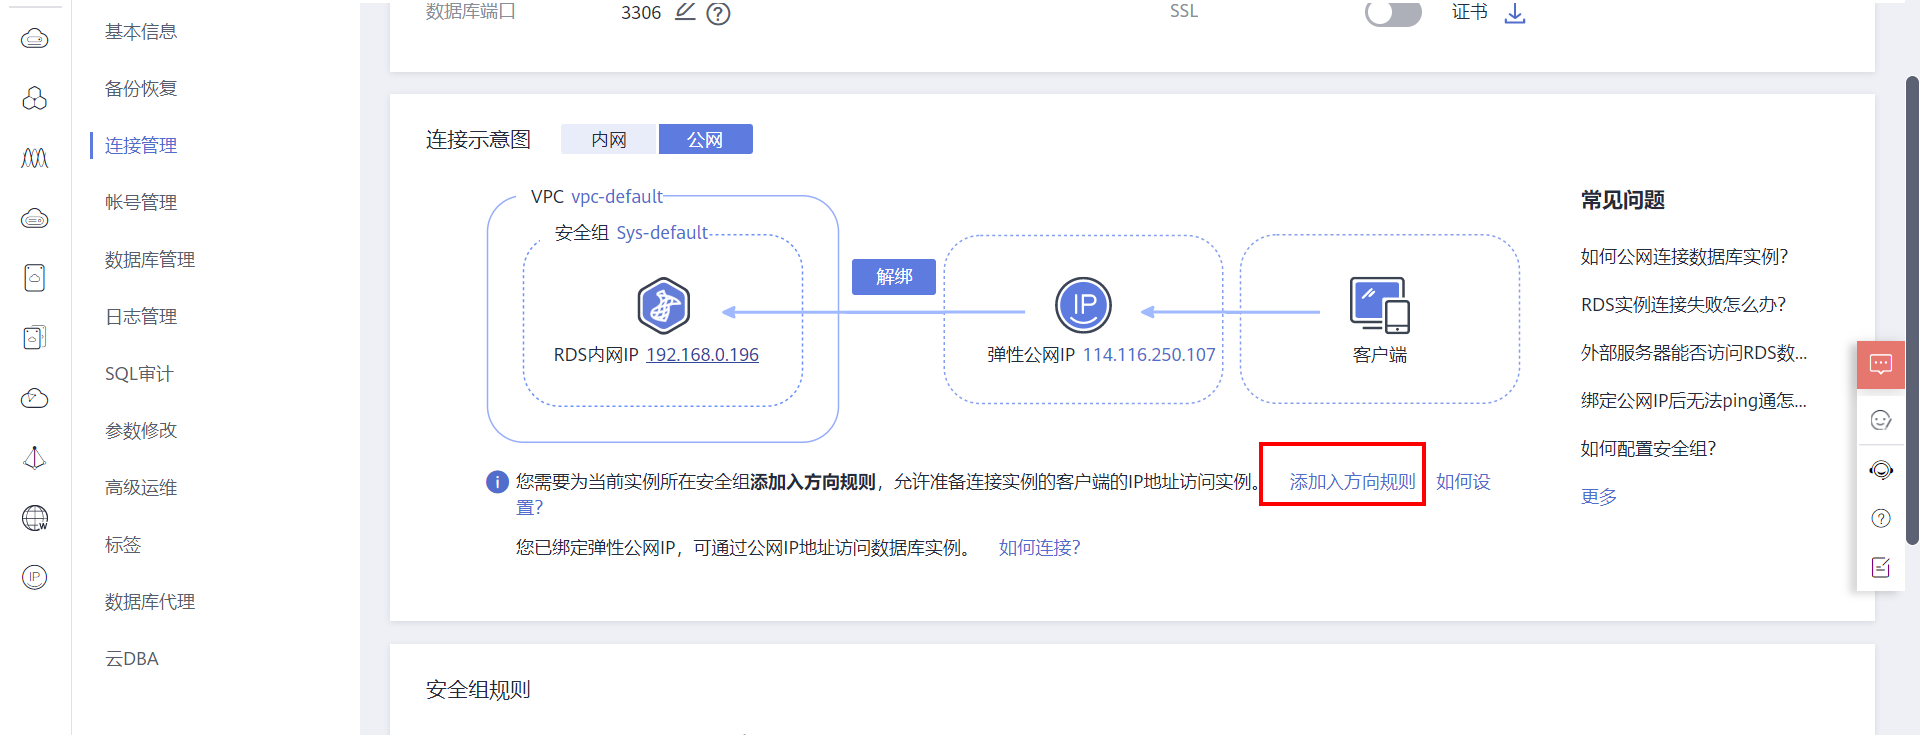
3.2 Add entry rule
Open the specified port according to your own needs 、IP Address range , This can effectively limit network attacks .


4. The attendance software is connected to the database RFID Card reader
4.1 Connect to database
The software uses QT The design of the , stay QT We need to connect in the library MySQL The database is still a little troublesome , You need to edit it yourself MQYSQL The library of .
Mainly Qt 5 In the higher version, the right to MySQL Database default support , Mainly because with the commercial version MySQL Introduction ,MySQL It's no longer a fully open source database ,Qt By default, only fully open source databases will be supported .
To use a database , Need to be in QT Of .pro Add... To the engineering documents
QT += sql
.
Here is QT Internal connection MQYSQL Main code :
LoginWindow::LoginWindow(QWidget *parent) :
 QWidget(parent),
 ui(new Ui::LoginWindow)
{
 ui->setupUi(this);

 this->setWindowTitle(" Student attendance management system ");
 // Set the theme style
 SetStyle(":/blue.css");
 // Set password box to password display mode
 ui->lineEdit_password->setEchoMode(QLineEdit::Password);
 // Set background prompt text
 ui->lineEdit_password->setPlaceholderText(" Please input a password ");
 // Set background prompt text
 ui->lineEdit_user_name->setPlaceholderText(" Please enter a user name ");

 // Read configuration
 read_config();

 // Read database

 // Set up and open the database
 if (QSqlDatabase::contains(LOG_IN_DATABASE_CONNECT_NAME))
 {
 database = QSqlDatabase::database(LOG_IN_DATABASE_CONNECT_NAME);
 }
 else
 {
 // Database type
 database = QSqlDatabase::addDatabase("QMYSQL");
 database.setDatabaseName(LOG_IN_DATABASE_NAME); // Database name
 database.setUserName("root"); // user name
 database.setPassword("12345678"); // Database login password
 database.setHostName("114.116.250.107"); // Connect to the local host
 database.setPort(3389);
 }

 // Open database , Open the database if it exists , Create automatically if it doesn't exist
 if(database.open()==false)
 {
 qDebug(" Database open failed . Please check the program running path and permissions .\n");
 }
 else
 {
 qDebug(" Successfully connected to database .\n");
 }

 // Build table -- Deposit account and password
 CreateUserPassTAB();
}
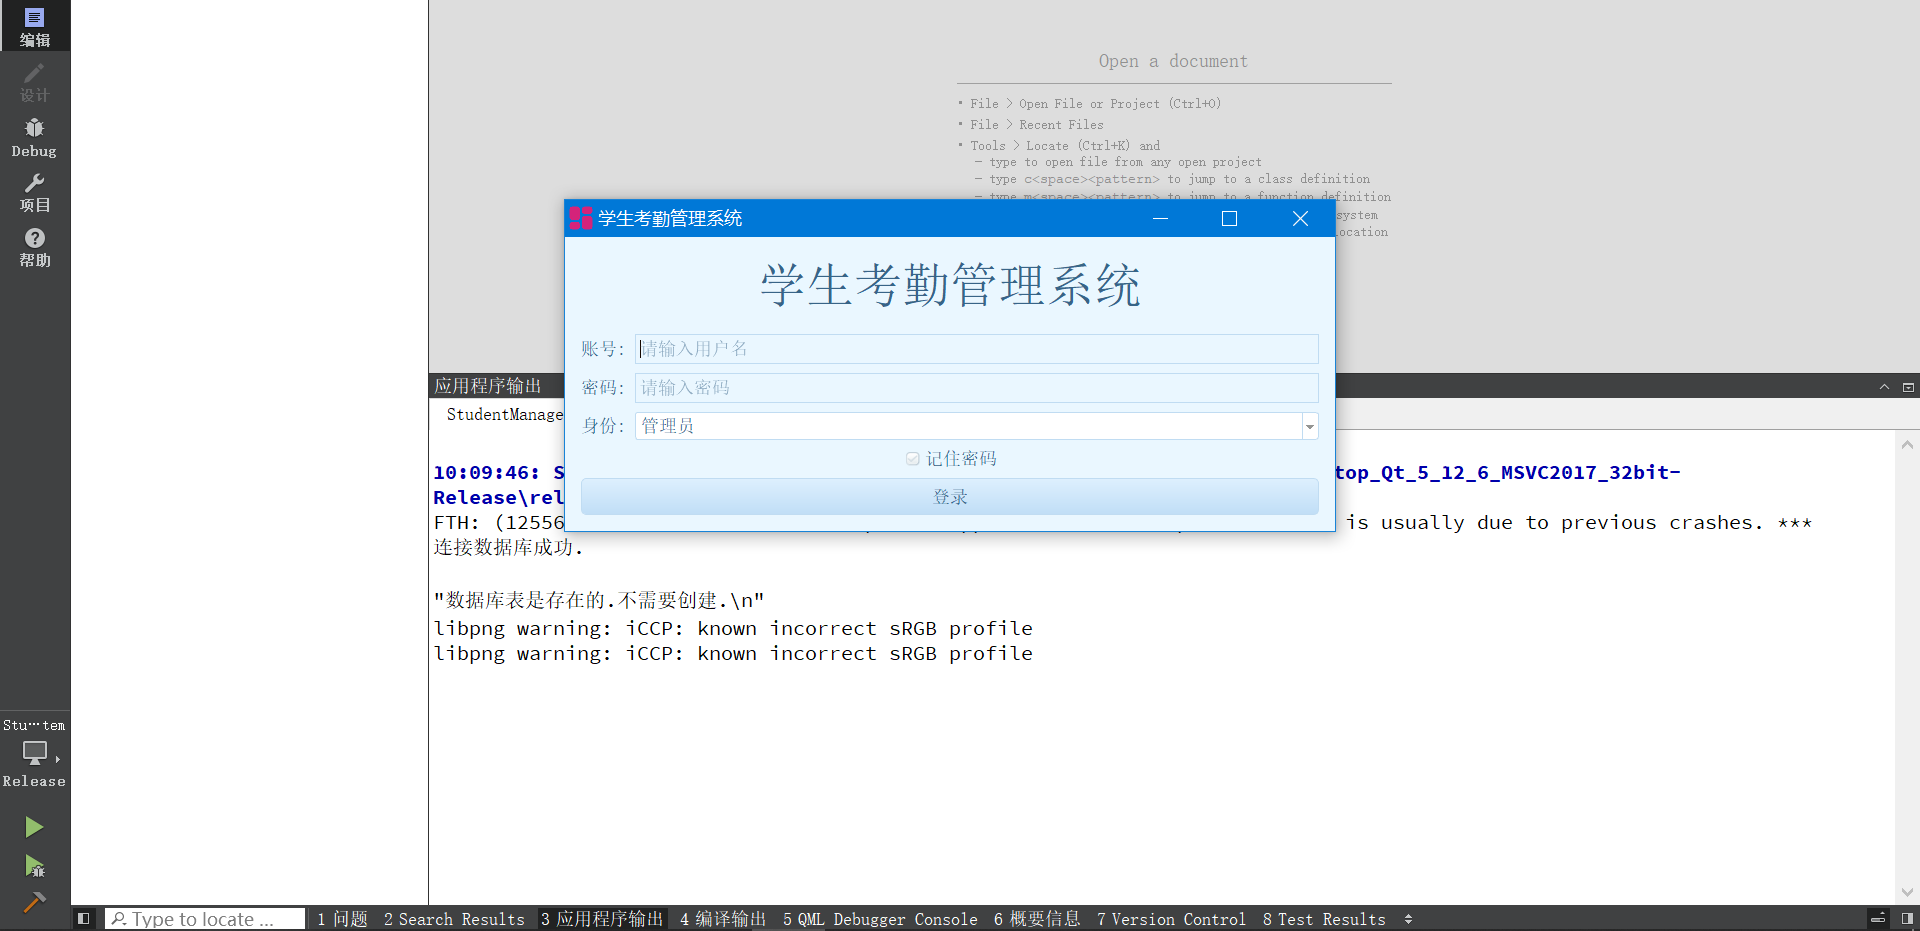
If the compilation is not set mySQL Library file , An error is reported at compile time .
QSqlDatabase: QMYSQL driver not loaded
QSqlDatabase: available drivers: QSQLITE QODBC QODBC3 QPSQL QPSQL7
The effect of system operation :

4.2 RFID Card swiping code
Adopted RFID Card reader yes USB Interface , The manufacturer provides DLL Dynamic library , Direct connection , call DLL The library can complete the call . Model is : RF-EYE Series non-contact IC Card reader .
So the code is very simple , To read the card number , Read and write data , Call corresponding DLL The library interface is OK .
//#ifdef _WIN32
//typedef HANDLE void*;
//#else
//typedef HANDLE int;
//#endif

#define HANDLE void*

extern "C"
{
HANDLE __stdcall rf_init(__int16 port,long baud);
__int16 __stdcall rf_beep(HANDLE icdev,unsigned short _Msec);
__int16 __stdcall rf_card(HANDLE icdev,unsigned char _Mode,unsigned long *_Snr);
};

// card reading -RFID
QString Widget::read_card()
{
 int st=0;
 unsigned long Snr;
 QString card_number;
 HANDLE icdev;

 icdev=rf_init(0,9600);

 // Set the buzzer
 rf_beep(icdev, 25);

 // card reading
 st=rf_card(icdev,1,&Snr);

 // Card number
 card_number=QString("%1").arg(Snr);

 if(st==0)
 {
 Log_Text_Display(QString(" Card number :%1\n").arg(Snr));
 }
 else
 {
 Log_Text_Display(QString(" Card number reading error .\n"));
 }
 return card_number;
}
4.3 compile MySQL drive
because Qt 5 In the higher version, the right to MySQL Database default support , To be in QT Continue to use mysql You need to compile the library yourself .
Source code download address : https://download.qt.io/archive/qt/5.12/5.12.6/submodules/
I'm using QT5.12.6, If other versions are used QT, Download the corresponding source code . If installing QT when , Installed by default QT Source code , You don't have to download the source code alone .
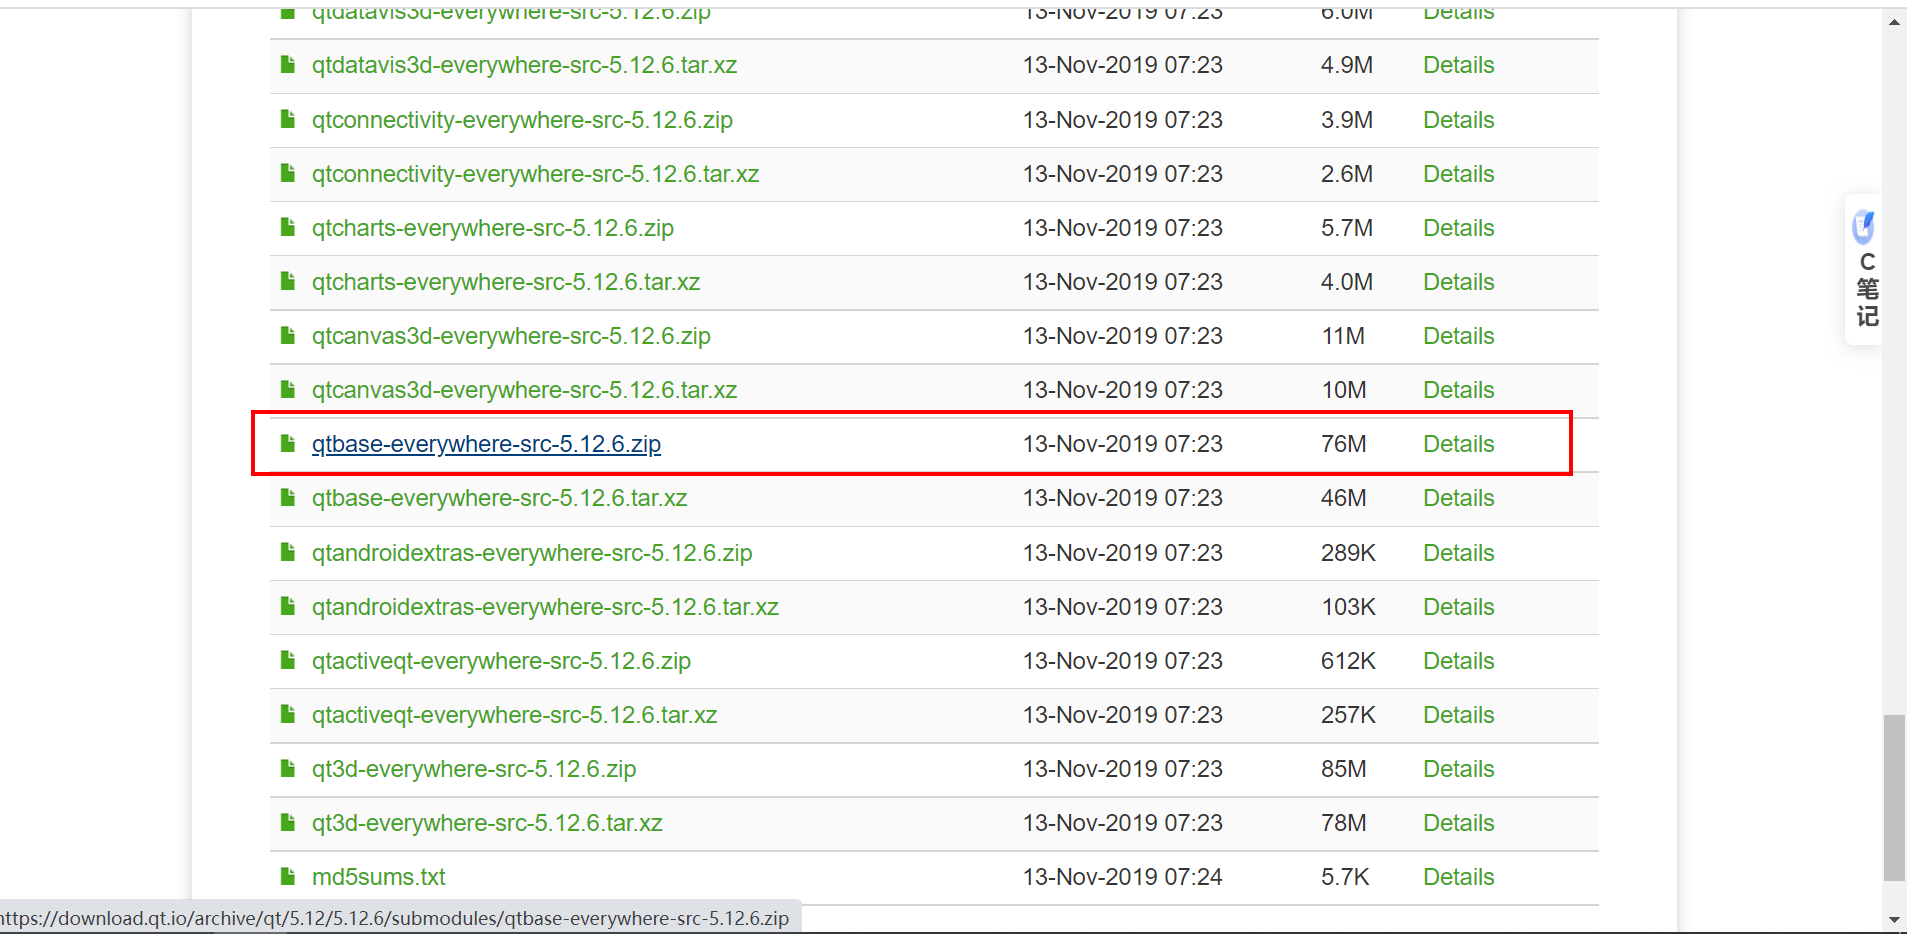
Decompress after downloading , Open the following project :

Project path :
qtbase-everywhere-src-5.12.6\src\plugins\sqldrivers\mysql
windows You also have to install it in advance MySQL, Version selection 5.7 Download link :https://dev.mysql.com/downloads/

The latest version is displayed on this page , If you want to download the historical version , Click on the page
archives
.
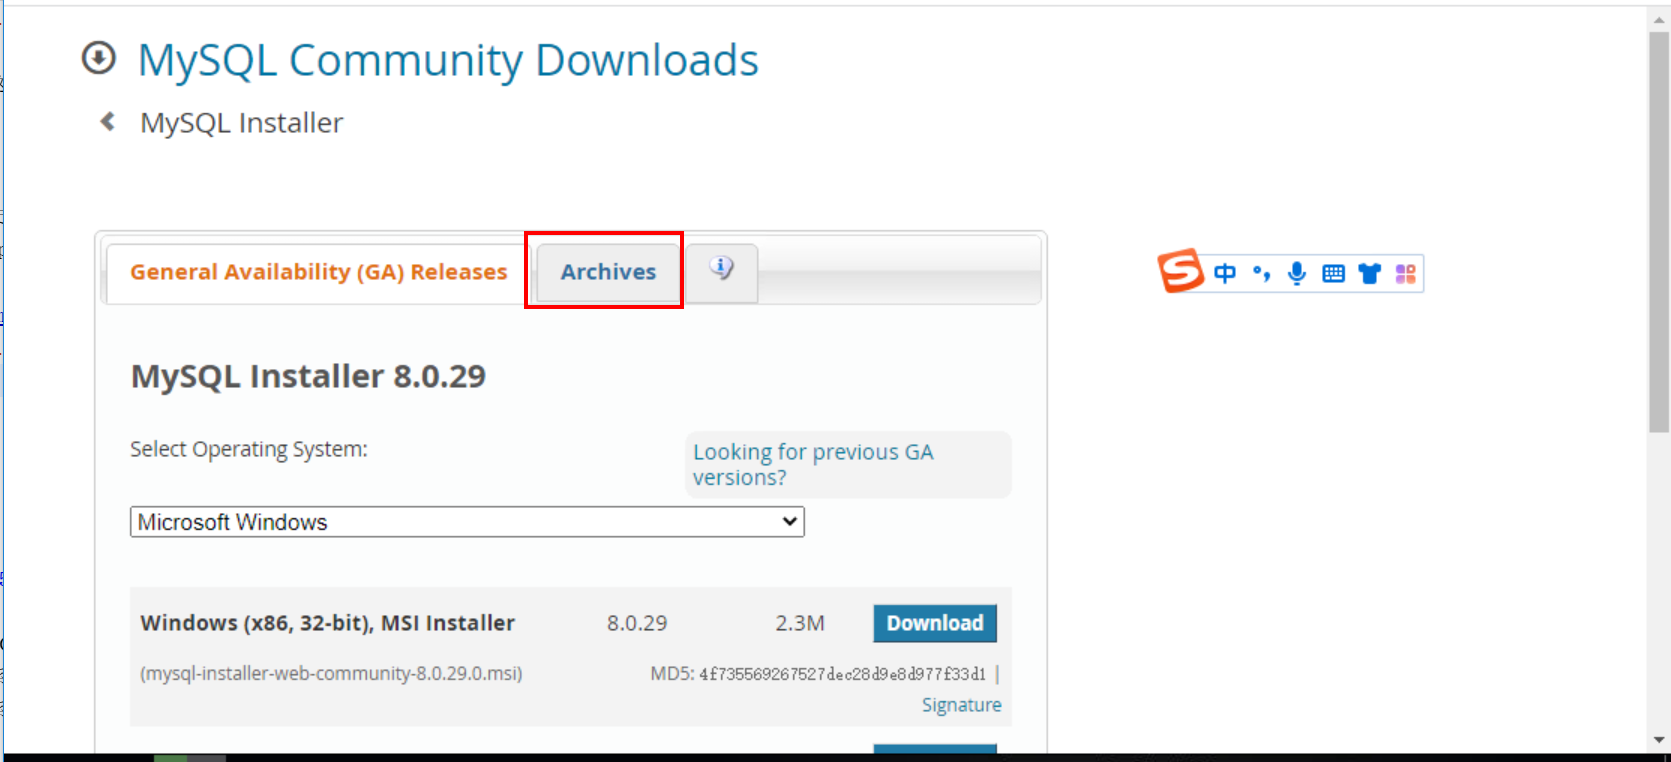
Download address of historical version :https://downloads.mysql.com/archives/installer/


Double click to install .

Developer Default: Developer default installation ——MySQL The server and MySQL Tools needed for application development . This setting type includes :MySQL The server 、MySQL Shell 、MySQL Router 、MySQL The workbench 、 be used for VisualStudio Of MySQL、MySQL The connector 、 Examples and tutorials 、 file .
Server only: Server only —— Install only MySQL The server .
Client only: Only for customers —— install MySQL Tools needed for application development , But does not include MySQL The server itself . This setting type includes :MySQL Shell 、MySQL Router 、MySQL The workbench 、MySQL Visual Studio plug-in unit 、MySQL The connector 、 Examples and tutorials 、 file .
Full: All —— Install all available products in this directory , Include MySQL The server 、MySQL Shell 、MySQL Router 、MySQL The workbench 、MySQL The connector 、 file 、 Examples and examples .
Custom: customized —— Allow accurate selection of products to be installed . This also allows you to select other server versions and architectures .

Or download
mysql-connector-c-6.1.11-win32
It's OK .https://downloads.mysql.com/archives/c-c/( This library is downloaded according to the version you need ).

I downloaded here X86_64bit and X86_32bit, Download and unzip the file as follows .( The screenshot is 32 Bit ,64 Bit is the same process )

Next, open the download just now QT Source project ,mysql engineering .

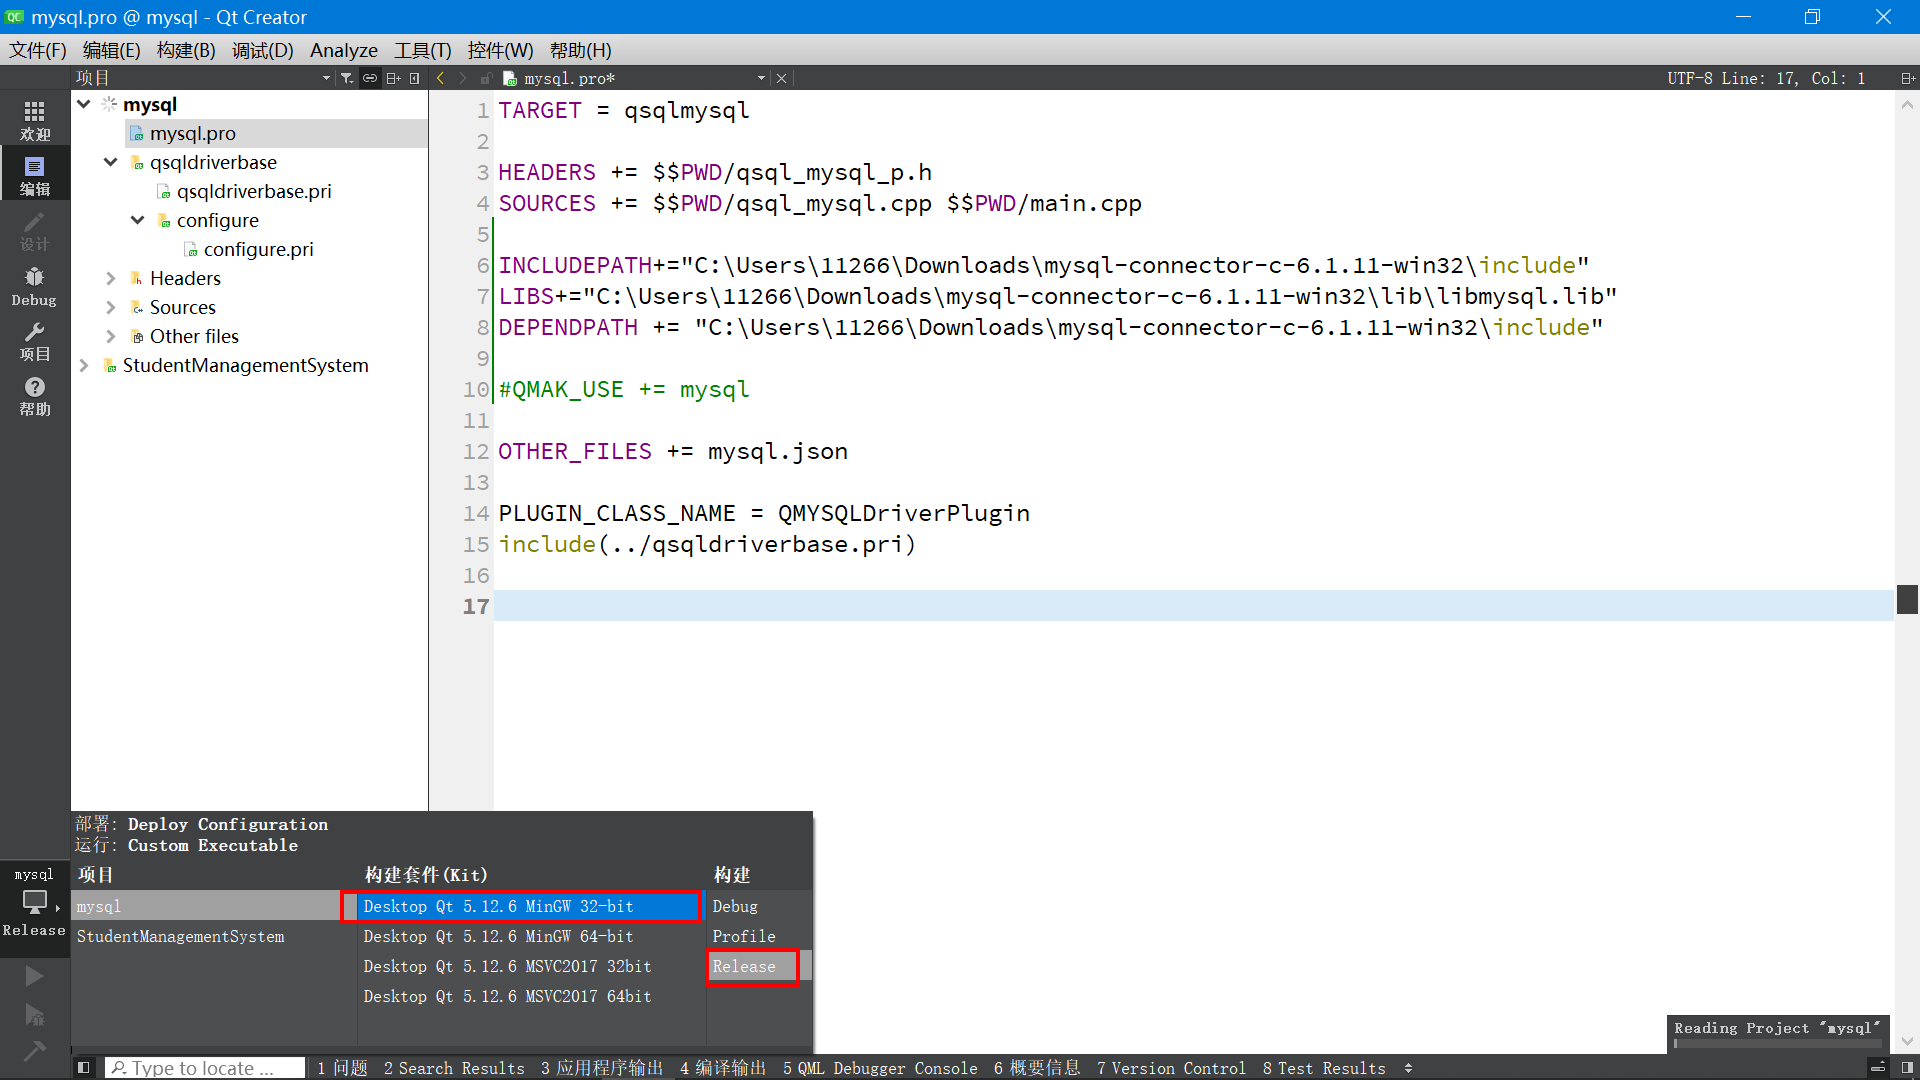
Then change the source code
mysql.pro
file .

This path should be modified according to your actual path , If you want to compile 32 Bit is set 32 Bit path ,64 Bit is set 64 Bit path .
INCLUDEPATH+="C:\Users\11266\Downloads\mysql-connector-c-6.1.11-win32\include"
LIBS+="C:\Users\11266\Downloads\mysql-connector-c-6.1.11-win32\lib\libmysql.lib"
DEPENDPATH += "C:\Users\11266\Downloads\mysql-connector-c-6.1.11-win32\include"

 You also need comments to call this line of code
#QMAK_USE += mysql
In short, remember :
Different versions and digits MYSQL It contains different libmysql.dll, Different libmysql.dll Must be matched with qsqlmysqld.dll (debug edition ) or qsqlmysql.dll(release edition ) Work together !
Then modify the source code
sqldriverbase.pri
file .

#include($$shadowed($$PWD)/qtsqldrivers-config.pri)
include(./configure.pri)
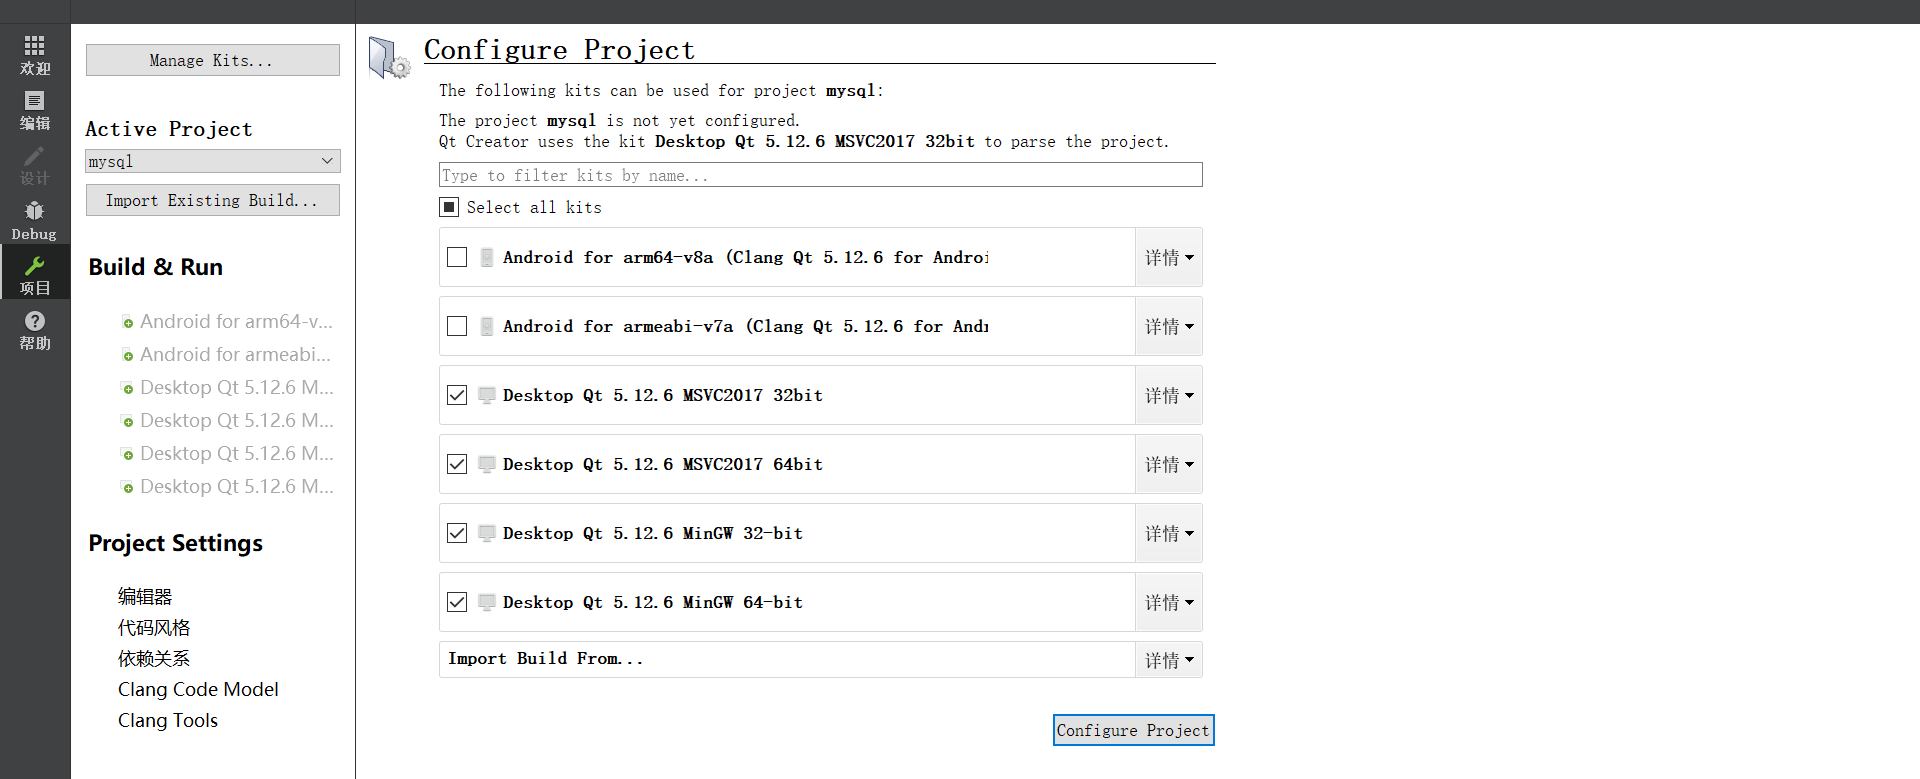
Save the code after modification , Click the hammer button in the lower left corner , Construction Engineering .
I'll compile it first 32 position , Here is the compiler selection of the construction project 32 Bit .
After the build is successful , A compiled directory will be generated under the source directory .
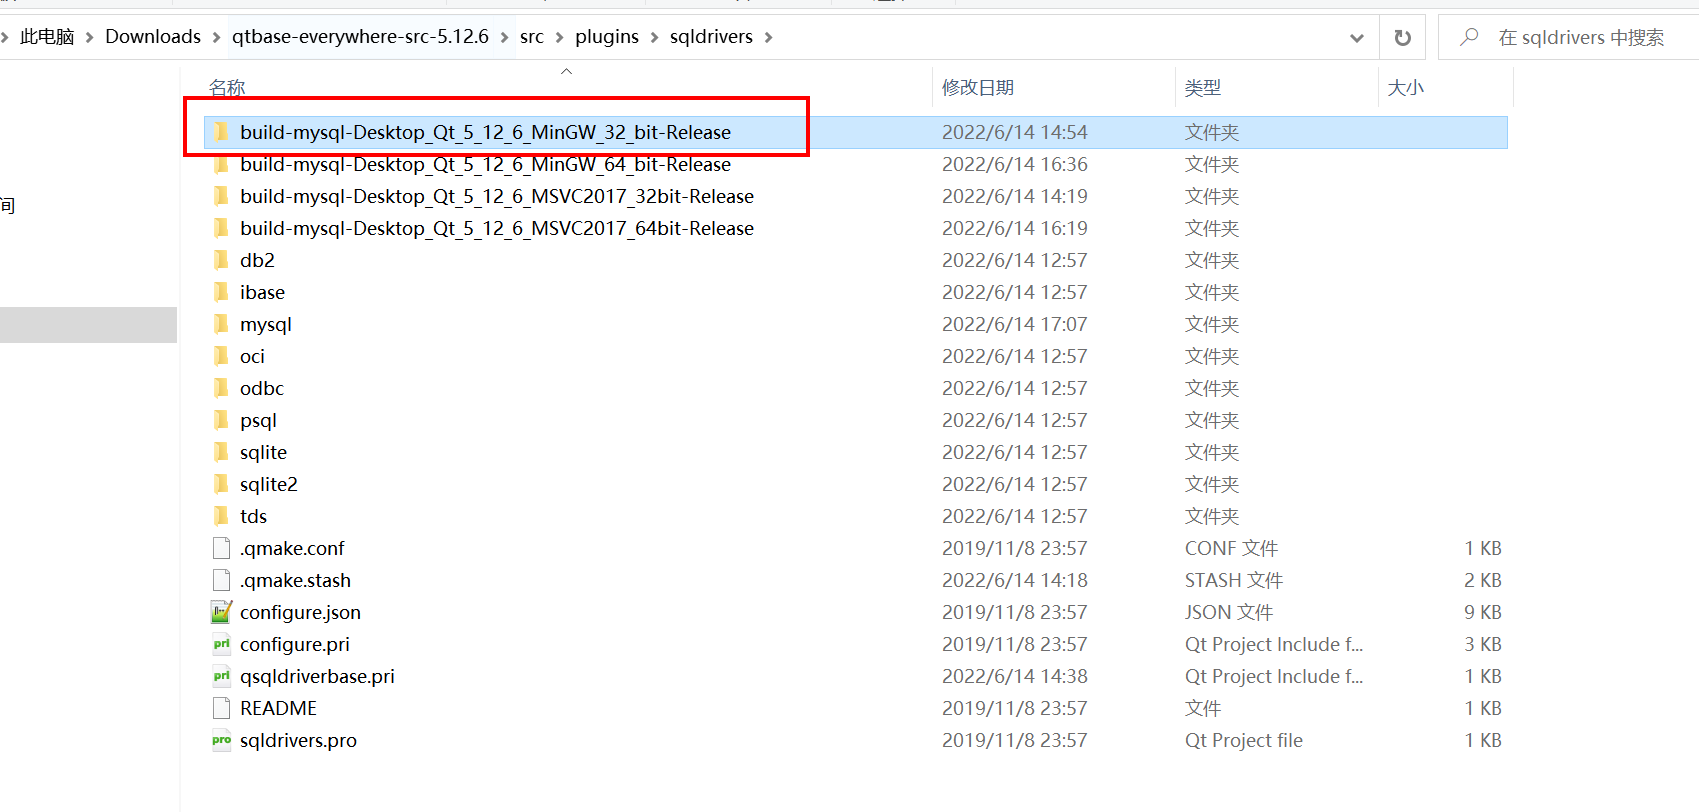
Then press... On the keyboard windows Picture keys , Pop up the window on the left , find QT The corresponding compiler .( What compiler do you use to build your own source code , The corresponding compiler window opens here )

After the open , perform cd command , Enter the project directory just created .
C:\Qt\Qt5.12.6\5.12.6\mingw73_32>cd /d C:\Users\11266\Downloads\qtbase-everywhere-src-5.12.6\src\plugins\sqldrivers\build-mysql-Desktop_Qt_5_12_6_MinGW_64_bit-Release
compiling 、 Just install the command .
mingw32-make
mingw32-make install
During the execution of the installation command , You can see that the required files have been generated , And copy it to the corresponding compiler directory .

C:\Users\11266\Downloads\qtbase-everywhere-src-5.12.6\src\plugins\sqldrivers\build-mysql-Desktop_Qt_5_12_6_MinGW_32_bit-Release>mingw32-make install
mingw32-make -f Makefile.Release install
mingw32-make[1]: Entering directory 'C:/Users/11266/Downloads/qtbase-everywhere-src-5.12.6/src/plugins/sqldrivers/build-mysql-Desktop_Qt_5_12_6_MinGW_32_bit-Release'
copy /y \plugins\sqldrivers\qsqlmysql.dll C:\Qt\Qt5.12.6\5.12.6\mingw73_32\plugins\sqldrivers\qsqlmysql.dll
 Copied  1  File .
C:\Qt\Qt5.12.6\5.12.6\mingw73_32\bin\qmake.exe -install qinstall \lib\cmake\Qt5Sql\Qt5Sql_QMYSQLDriverPlugin.cmake C:\Qt\Qt5.12.6\5.12.6\mingw73_32\lib\cmake\Qt5Sql\Qt5Sql_QMYSQLDriverPlugin.cmake
mingw32-make[1]: Leaving directory 'C:/Users/11266/Downloads/qtbase-everywhere-src-5.12.6/src/plugins/sqldrivers/build-mysql-Desktop_Qt_5_12_6_MinGW_32_bit-Release'
mingw32-make -f Makefile.Debug install
mingw32-make[1]: Entering directory 'C:/Users/11266/Downloads/qtbase-everywhere-src-5.12.6/src/plugins/sqldrivers/build-mysql-Desktop_Qt_5_12_6_MinGW_32_bit-Release'
copy /y \plugins\sqldrivers\qsqlmysqld.dll C:\Qt\Qt5.12.6\5.12.6\mingw73_32\plugins\sqldrivers\qsqlmysqld.dll
 Copied  1  File .
C:\Qt\Qt5.12.6\5.12.6\mingw73_32\bin\qmake.exe -install qinstall \lib\cmake\Qt5Sql\Qt5Sql_QMYSQLDriverPlugin.cmake C:\Qt\Qt5.12.6\5.12.6\mingw73_32\lib\cmake\Qt5Sql\Qt5Sql_QMYSQLDriverPlugin.cmake
mingw32-make[1]: Leaving directory 'C:/Users/11266/Downloads/qtbase-everywhere-src-5.12.6/src/plugins/sqldrivers/build-mysql-Desktop_Qt_5_12_6_MinGW_32_bit-Release'
Then open the QT The directory of the corresponding compiler under the installation directory .
C:\Qt\Qt5.12.6\5.12.6\mingw73_32\plugins\sqldrivers
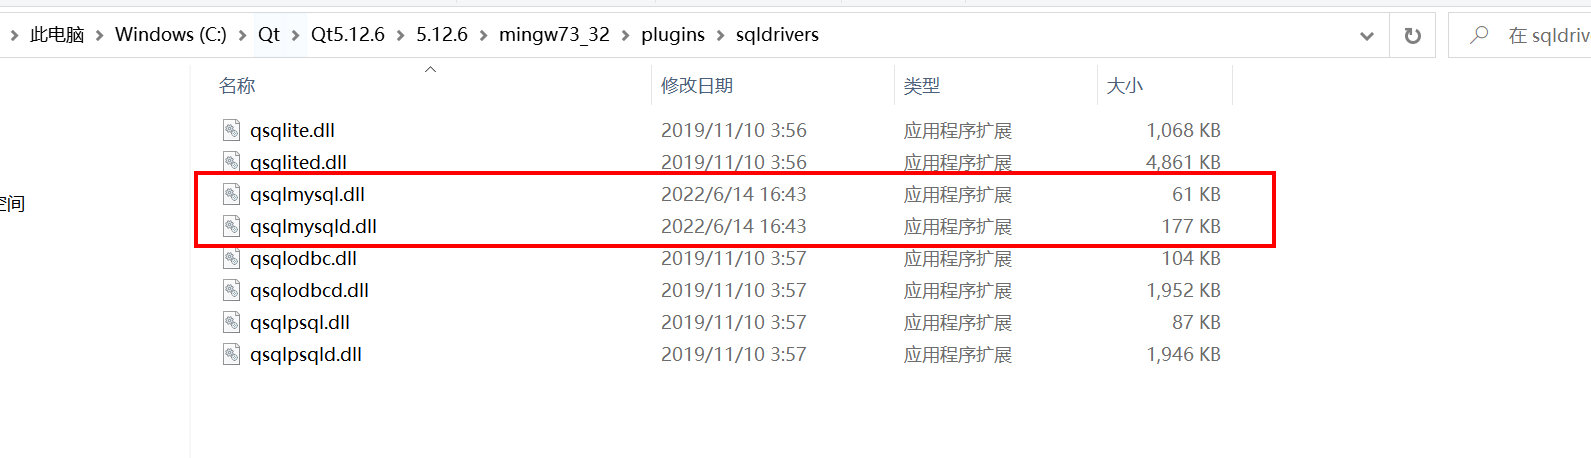
You can see , Corresponding
qsqlmysql.dll
The plug-in file has been generated .64 Bit compilers also operate in the same way , Generate corresponding plug-ins .
Finally, put MySQL Install under directory
libmysql.dll
File copy to QT Corresponding to the compiler
bin
Under the directory .

When it's done , stay QT Execute code under the code directory .
// Print Qt Supported database drivers
qDebug()<<QSqlDatabase::drivers();
The console will output :
("QSQLITE", "QMYSQL", "QMYSQL3", "QODBC", "QODBC3", "QPSQL", "QPSQL7")
You can see , It already contains QMYSQL Database support .
5. Software design process and ideas
5.1 Demand analysis
(1) Using range
This system is mainly used by college teachers ; In class , When students enter the classroom, they take out their student cards and open their attendance cards , You can apply for leave in the system and view all class attendance information during school .
Considering the large number of students in the whole school , Personal privacy issues , For this reason, each new student needs to log in to the student information management page by the administrator or his own head teacher to add student information , Add information about students ; Then the students themselves go to the login interface to register students , Improve your other information , After the prompt of successful registration , After entering the login interface and filling in the account and password at the time of registration, you can log in successfully , Finally, you can use the function modules of the student operation page . Teachers need to log in to the teacher management background through the specified teacher account and password , To use the function modules of the teacher's operation page . The system administrator needs to use the specified administrator account 、 Password login to the administrator background , To use the function modules of the administrator operation page . The operation pages of the three are independent of each other , All have permission restrictions .
(2)5.2 Student authority
Students can modify their account passwords in the password information management module ; You can also modify other information about yourself in the personal information management module , Student number 、 Telephone 、 Emergency contact 、 Dormitory number, etc ; You can view all your information in the student information management module , You can swipe your card to quickly read the card number information , Match to the specified student ; It can be added in the information management module 、 Ask for advice from yourself or others ; You can query your own score information in the score information management module ; You can check whether you have not signed in before in the attendance sign in reminder management module , Relevant information about lateness and query the system's evaluation records ; If you need to exit the system , Click... In the upper right corner XX Exit system module . If the student forgets the password , You can click the retrieve password button on the login interface of the software , Then fill in the relevant information to retrieve the password , Or the administrator can help change the password .
(3) Teacher and administrator permissions
Teachers can modify the password on the page of the password information management module ; Then you can modify various information about yourself on the personal information management module page , such as : Contact information , full name , Position, etc ; You can view your registration information on the registration teacher management module page , You can check other students registered in this class ; It can be added in the student information management module 、 Query students' information operation ; It can be added in the score management module 、 The operation of querying student achievement information ; It can be added in the fare information management module 、 Querying information about class activity expenses ; It can be added on the page of notification and announcement management module 、 Query the published notice announcement …… If you need to exit the system , You can click to exit the system module , You can also click the exit button in the upper right corner . The administrator is the highest authority of the current system , Teachers can also add to the operation modules 、 Query the operation of the teacher user .
5.2 System function module diagram

The function page mainly displays the home page 、 Attendance management module 、 Query module 、 Leave inquiry module 、 The user login 、 Management login interface . New students click the registration button on the login interface to register their personal information . Student 、 Administrators and teachers need to enter the operating platform through their respective login interfaces .

5.3 Students log in to the platform
(1) Student registration flow chart
Fill in the registration information on the student registration page , Students must fill in the relevant registration information , Otherwise, you cannot log in . The registration information to be filled in includes name 、 class 、 major 、 Student number 、 Contact information 、 Login password and password protected email, etc .

(2) Student login flowchart
Module process for students to fill in login information , The student account number should be the same as that filled in at the time of registration , The login password is the same as the password you entered when you completed the registration

(3) Flow chart of student retrieving password
Students fill in the module of retrieving password information , You need to enter the login account and security email ( It is consistent with the security mailbox entered by the student when registering ).

6. summary
This article introduces RDS for MySQL, Deploy , To the whole process actually used , Using a class attendance system software to introduce a practical application scenario of the database . Cloud database RDS for MySQL Use as soon as you have it 、 Stable and reliable 、 Safe operation 、 Stretch and stretch 、 Easy to manage 、 It is economical and practical . The architecture is mature and stable , Support for popular applications , Applicable to many fields and industries . The relational database service provided by Huawei cloud has a complete performance monitoring system and multiple security protection measures , And provides a professional database management platform , So that users can easily set up and expand the relational database in the cloud . Through the management console of Huawei cloud relational database service , Users can perform almost all the necessary tasks without programming , Simplify operational processes , Reduce the daily operation and maintenance workload , To focus on application development and business development .
原网站版权声明
本文为[InfoQ]所创,转载请带上原文链接,感谢
https://yzsam.com/2022/196/202207130915458351.html


