当前位置:网站首页>Touch and screen automatic rotation debugging
Touch and screen automatic rotation debugging
2022-07-03 11:13:00 【I thought the ending would change with lighting】
Last issue introduced tinkerboard2 Android11 Below adaptation DSI The way of the screen (https://blog.csdn.net/chenchen00000000/article/details/124721846), This issue introduces how to support touch and automatic screen rotation . Touch and screen automatic rotation is Android The standard functions on the device .
Hardware preparation
In the last article , Shenzhen fenghuolun as Asustek tinkerboard Official partner , Launched this screen adapter , Convert the interface of the screen to tinkerboard2 above DSI Interface , At the same time, the power supply , Touch and other pins . The screen adapter board is shown in the figure below .
Based on the wiring of the previous phase , Connect several touch related wires
TP_RST Reset the foot for touch , Pick up GPIO2_C2, That is to say tinkerboard2 40PIN Needle setting 36 foot
TP_INT Break the foot for touch , Pick up GPIO2_C3, That is to say tinkerboard2 40PIN Needle setting 11 foot
These two feet can also choose other GPIO, Just reuse the pin configuration as GPIO that will do
Besides , Touch chip also needs I2C, On the board DSI The interface already contains a set I2C, yes I2C8, Therefore, there is no need to connect it to the row needle , The wiring is as follows
Then support automatic rotation , An acceleration sensor must be connected , What I choose here is ST Of LSM6DSL, You can also choose other , Then just answer I2C, Don't interrupt , On the board 40PIN There is only one set of row needles I2C, Just connect it
Touch chip debugging
Touch and rotation involve source code modification , To download the complete SDK,SDK You can download it from the forum of Shenzhen fenghuolun , Bicong GIT The direct pull-up speed is fast , The address is https://www.tinkerboard.cn/thread-202-1-1.html
7 The touch chip of inch screen is GT911, This is the touch chip of huiding Technology , Support 7-8 Inch screen , most 5 Touch . The kernel comes with its own driver , Path is drivers/input/touchscreen/gt9xx. kernel config To put CONFIG_TOUCHSCREEN_GT9XX Set to Y
Then the device tree needs to gt911 Join in i2c8 Next , as follows
&i2c8 {
 [email protected] {
        compatible = "goodix,gt9xx";
        reg = <0x5d>;                                   // Also can be filled 0x14
        touch-gpio = <&gpio2 RK_PC3 GPIO_ACTIVE_LOW>;   // interrupt IO
        reset-gpio = <&gpio2 RK_PC2 GPIO_ACTIVE_LOW>;   // Reset IO
        max-x = <1024>;                                 //x Directional resolution
        max-y = <600>;                                  //y Directional resolution
        tp-size = <911>;                                // It is related to the configuration selected in the source code
        status = "okay";
    };
};By configuring GT911 Level sequence of interrupt pin and reset pin during power on , You can switch its I2C The address is 0x5d and 0x14 One of , This design is to solve I2C Conflict , You can choose any one here
touch-gpio It's a broken foot ,reset-gpio It's the reset foot , The configuration is consistent with the hardware wiring
max-x and max-y Namely x Direction and y Direction maximum , Fill in according to the resolution of the screen
tp-size The corresponding is the selection of touch configuration file in the source code , Fill in here 911
There are several points in the source code that need to be modified . stay gt9xx Found in the directory gt9xx.c,
There will be gtp_change_x2y Set to false, Don't swap x and y Coordinate reported value
And then find gt9xx_cfg.h, Replace the configuration file , Configuration files can be downloaded from Shenzhen fenghuolun From the network disk of , The file named GT911_Config_20220510_094105.cfg
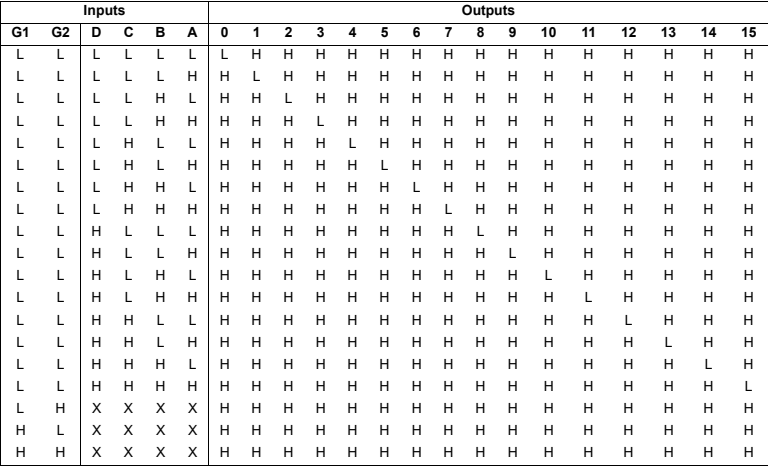
Here is a brief introduction to the principle , stay GT911 in , Register address from 0x8047 Start , To 0x8100, in total 186 Bytes , by GT911 Configuration file for ,datasheet The functions of some registers in are described as follows
The complete version can be consulted directly GT911 datasheet. The values of these registers are different from those of the outer screen , Touch chip fit , Strong correlation such as wiring , Generally, the screen factory will provide this information , Then put these values into a cfg In file . Below we can have a general look at its source code
stay gt9xx_cfg.h in , take GT911_Config_20220510_094105.cfg in 186 Bytes are assigned to the array gtp_dat_gt11
And then in gt9xx.c in , Put this gtp_dat_gt11 The content in memcpy To named config In the array , Then at initialization , It will be called config The contents of the array are written to 0x8047 In the beginning register . This is the principle of configuration file
After revising these places , Compiling the kernel , Burn it on the board , Then the boot information , You can see
explain GT911 Has been registered as a INPUT equipment .
stay Linux Next , mouse , keyboard , Touch these are INPUT equipment ,Android The upper level will monitor all INPUT Equipment reports events , If there are coordinates to report the event , Will respond
stay Android in , Open Settings - System - Developer options ( If the developer option is not found , You can open the settings - About tablets , Then click the version number several times , You can enter developer mode , Developer options will appear ) Pointer position in , The current touch point can be displayed , In this way , You can confirm whether the touch drive works normally , Whether the reported points are accurate .
Come here , The debugging of touch is finished .
Screen automatic rotation function debugging
Android The automatic rotation function inside , The essence is to rely on the acceleration sensor , Identify the orientation of the current device , Then automatically rotate the picture .
RK A sensor framework has been implemented , Specific development guidelines can be referred to SDK The documents inside (RKDocs/common/Sensors).
RK SDK There are already some drivers of acceleration sensors , Path is kernel/drivers/input/sensors/accel, If you want to add , You can directly refer to the addition .
For example, the author added here LSM6DSL, by ST Acceleration sensor , and SDK It comes with LSM330, For the same ST Acceleration sensor , Generally speaking , Of the same manufacturer IC, Data is read in a similar way , At most, the registers are different , Directly refer to its modification
at present RK Sensor frame , Is to achieve this called struct sensor_operate The structure of the body , And then in probe Function through sensor_register_device Register it . In this structure
struct sensor_operate lsm6dsx_acc_ops = {
 // name
    .name           = "lsm6dsx_acc",
 // type , The acceleration sensor is specified as SENSOR_TYPE_ACCEL
    .type           = SENSOR_TYPE_ACCEL,
 // This value should be in the kernel directory include/linux/sensor-dev.h In the definition of
    .id_i2c         = ACCEL_ID_LSM6DSX,
 // from id_reg The value obtained in the register must be equal to id_data
    .id_reg         = ST_LSM6DSX_REG_WHO_AM_I,
    .id_data            = LSM6DSL_DEVICE_ID,
 // These two default
    .precision          = 16,
    .range          = {-32768, 32768},
 // Without interruption , Keep default
    .trig               = IRQF_TRIGGER_HIGH | IRQF_ONESHOT,
 // Enabling and initializing functions
    .active         = lsm6dsx_acc_active,
    .init               = lsm6dsx_acc_init,
 // The application layer will call this regularly API, This API Include input The function of equipment reporting
    .report         = lsm6dsx_acc_report_value,
};Pay attention to this report function , The value it reports should be the same as Android Specified in the system X Y Z In the same direction , It is necessary to convert the original value read in the sensor
After writing the driver , Compiling the kernel , And then boot.img Burn it on the board , Notice this print message
Indicates that the device has been identified , And it has been registered successfully , Without this information , Need to check id_reg and id_data Whether the configuration is correct .
Then you can try to open Android Automatic screen rotation function , If the sensor is configured correctly , At this time, the screen will automatically rotate with the orientation of the device . If the rotation direction is wrong , You need to check the value of the sensor and Android System specified X Y Z Whether the conversion of direction is correct .
Come here , The function of automatically rotating the screen is debugged .
summary
In the last article tinkerboard2 docking 7 " 1024*600 Resolution DSI Based on the screen , Touch and automatic rotation are two functions that are closely related to display , The debugging method is also applicable to other touch chips and other types of acceleration sensors .
Thanks to the RK Of SDK Some mature frameworks above ,tinkerboard2 In the video output , Some customized features are much easier to develop than raspberry pie .
边栏推荐
- 历经一个月,终于拿到金蝶Offer!分享一下四面面经+复习资料
- Use ml.net+onnx pre training model to liven the classic "Huaqiang buys melons" in station B
- 如何成为一名高级数字 IC 设计工程师(1-2)Verilog 编码语法篇:Verilog 1995、2001、2005 标准
- Tencent micro app to get wechat user information
- Qt:qss custom qscrollbar instance
- Using activity to realize a simple inputable dialog box
- 【obs】obs的ini格式的ConfigFile
- The testing department of the company came to the king of the Post-00 roll, and the veteran exclaimed that it was really dry, but
- 可以写进简历的软件测试电商项目,不进来get一下?
- Clion debug
猜你喜欢
【Proteus仿真】74HC154 四线转12线译码器组成的16路流水灯

Do you really need automated testing?

T5 的尝试
The highest monthly salary of 18K has a good "mentality and choice", and success is poor "seriousness and persistence"~

Google Earth Engine(GEE)——GHSL 全球人口网格数据集250米分辨率

EPS电动转向系统分析

历经一个月,终于拿到金蝶Offer!分享一下四面面经+复习资料

Exclusive analysis | truth about resume and interview

公司测试部门来了个00后卷王之王,老油条感叹真干不过,但是...
T5 attempt
随机推荐
如何:配置 ClickOnce 信任提示行为
I, a tester from a large factory, went to a state-owned enterprise with a 50% pay cut. I regret it
T5 attempt
The five-year itch of software testing engineers tells the experience of breaking through bottlenecks for two years
php服务器 与redis交互大量CLOSE_WAIT分析
What is the salary level of 17k? Let's take a look at the whole interview process of post-95 Test Engineers
如何成为一名高级数字 IC 设计工程师(1-3)Verilog 编码语法篇:Verilog 行为级、寄存器传输级、门级(抽象级别)
ConstraintLayout跟RelativeLayout嵌套出现的莫名奇妙的问题
浅析-JMM内存模型
How can UI automated testing get out of trouble? How to embody the value?
在腾讯云容器服务Node上执行 kubectl
Hal -- writing hardware drivers
A simple method of adding dividing lines in recyclerview
值得关注的15种软件测试趋势
Software testing e-commerce projects that can be written into your resume, don't you come in and get it?
嵌入式软件测试怎么实现自动化测试?
QT: QSS custom qtabwidget and qtabbar instances
The highest monthly salary of 18K has a good "mentality and choice", and success is poor "seriousness and persistence"~
历经一个月,终于拿到金蝶Offer!分享一下四面面经+复习资料
Overview of testing theory