当前位置:网站首页>【木棉花】#夏日挑战赛# 鸿蒙小游戏项目——数独Sudoku(3)
【木棉花】#夏日挑战赛# 鸿蒙小游戏项目——数独Sudoku(3)
2022-08-01 18:43:00 【51CTO】
前言
在上期的分享中,笔者详细介绍了如何利用代码布局创建网格区域的UI。而在这期的分享中,笔者将围绕网格区域增加相应的游戏功能。
上期的内容回顾——>> https://ost.51cto.com/posts/14446
正文
本期,笔者将详细介绍游戏的一个重要功能——数字填入的制作方法。
这个功能的制作分为两部分。第一个部分是让白色的Button组件(即网格区域中的白色方格)在被用户点击的情况下能获得焦点,效果图如下:
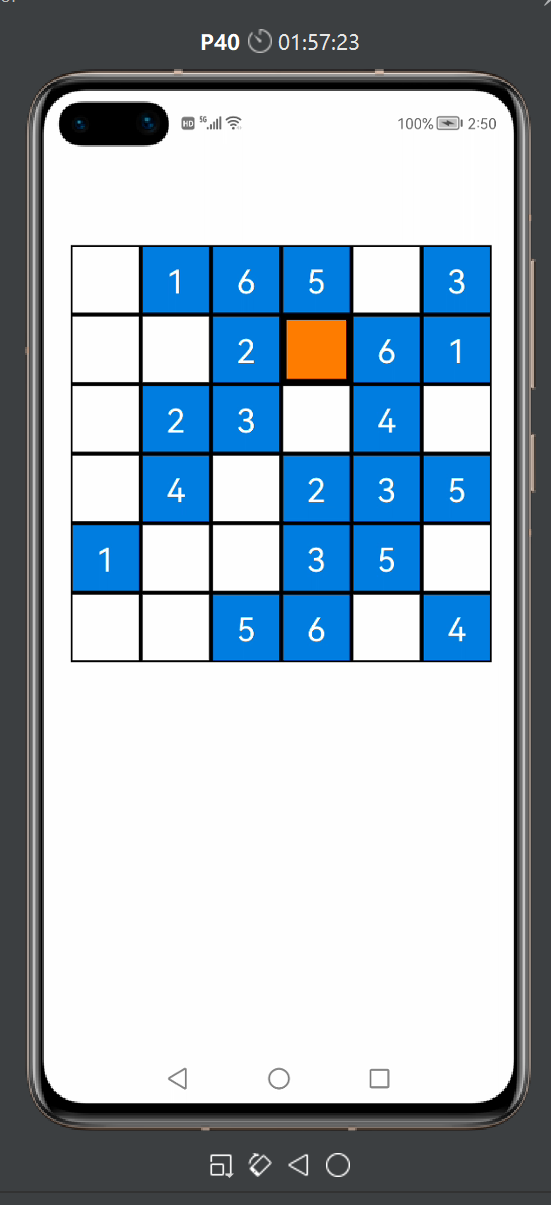
图中橙色的格子代表这个Button组件处于焦点状态(此方格是最后一个被用户点击的Button组件),可供用户输入数字。显然,这样做的好处在于定位用户想要交互的网格,以方便用户执行数字填入的操作。
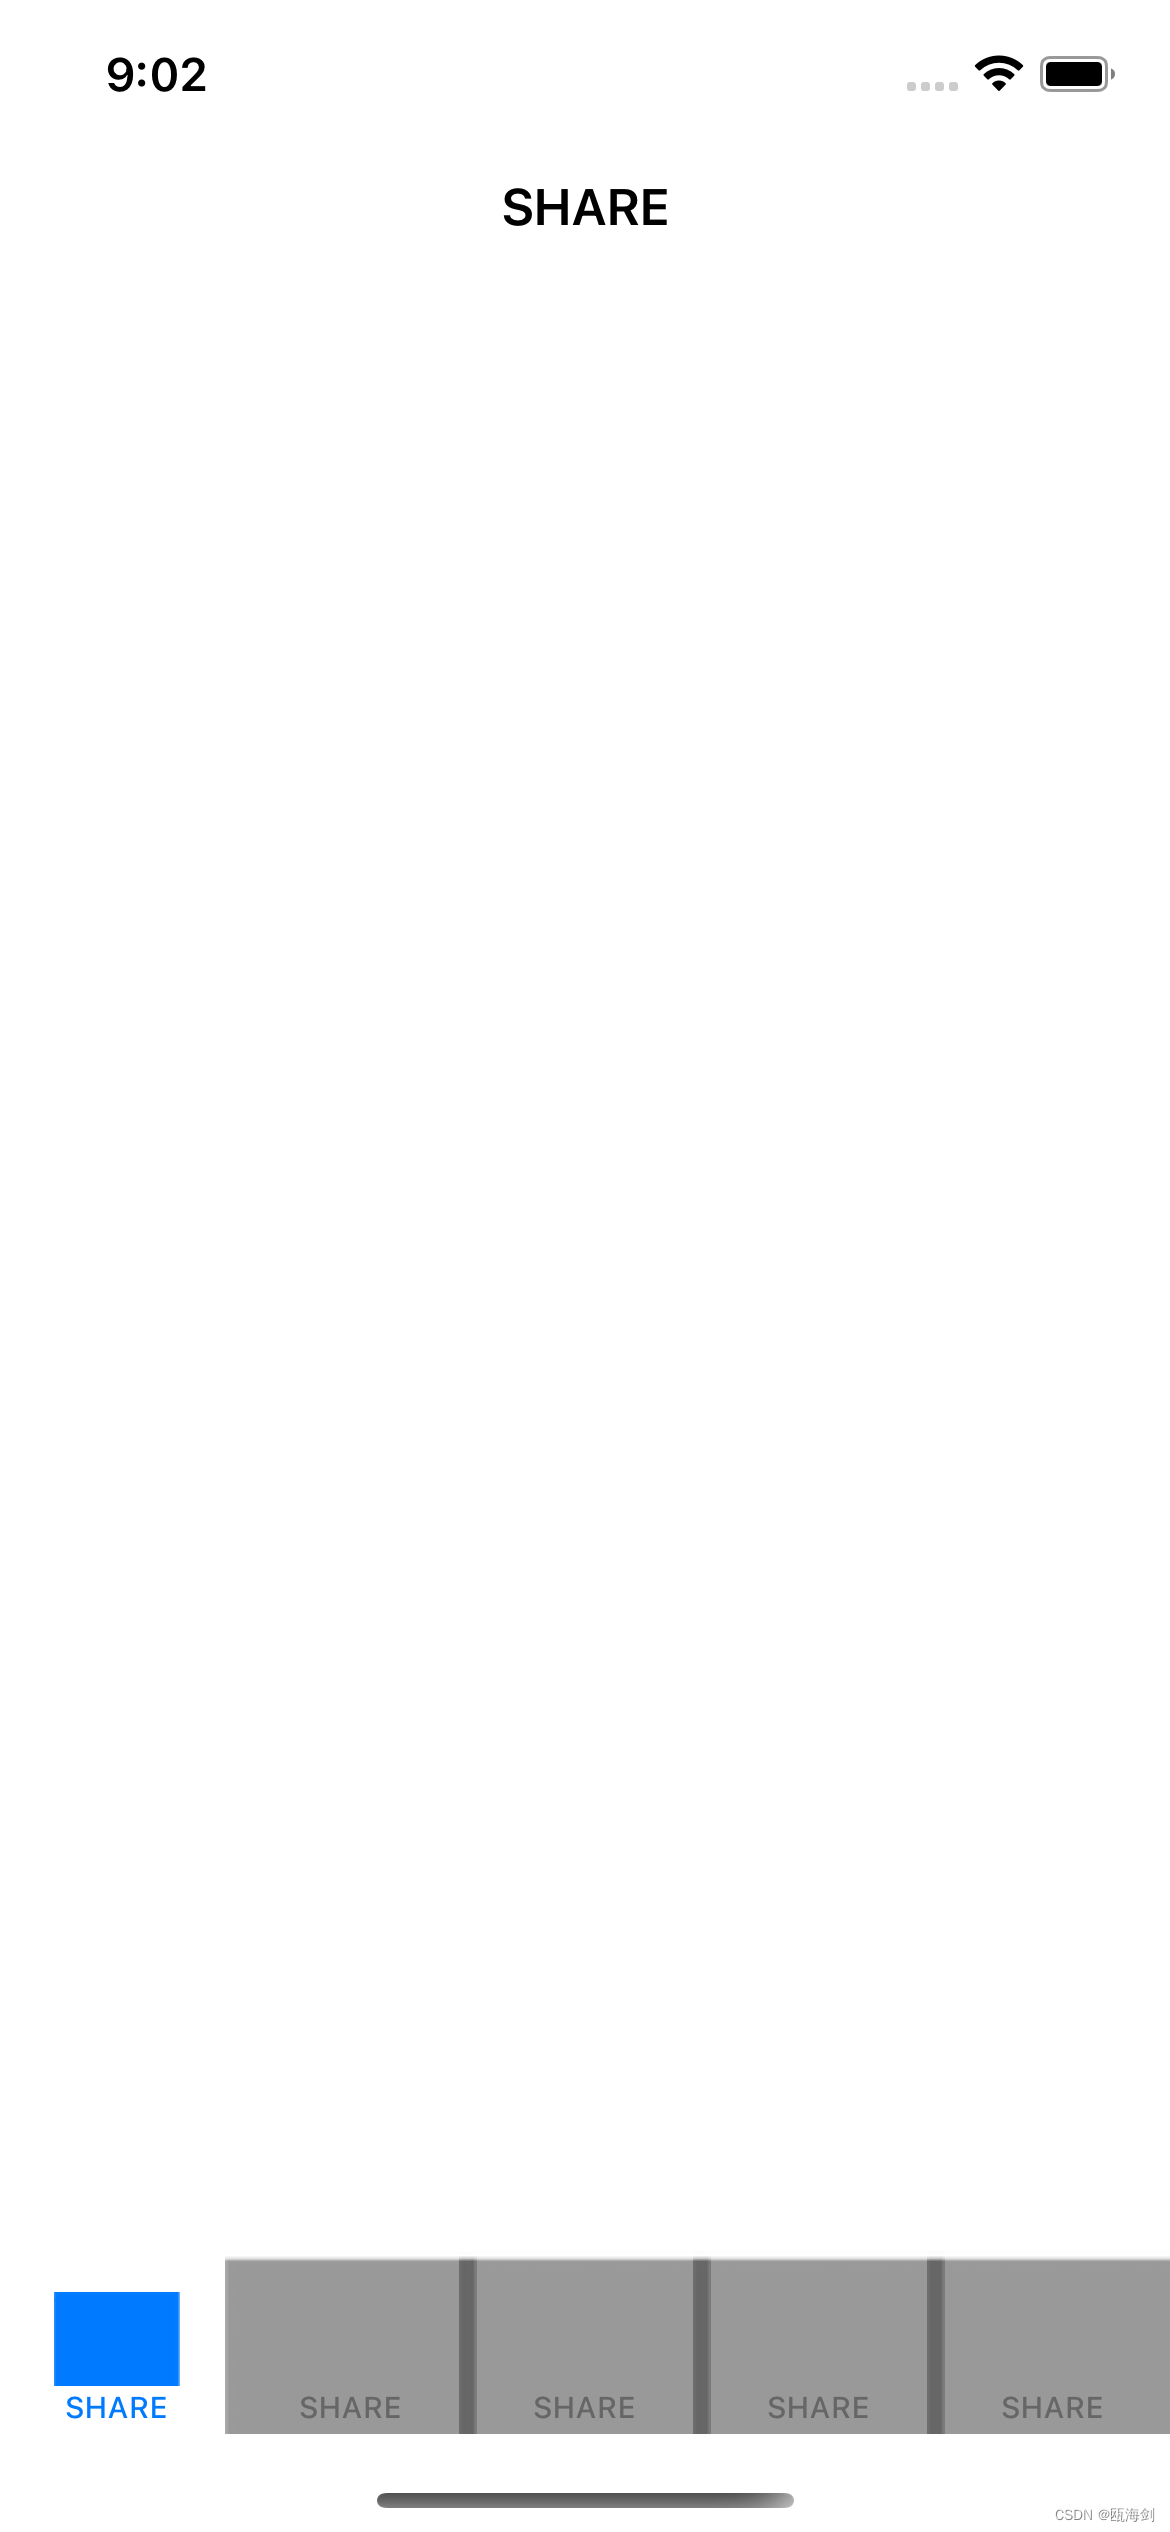
第二个部分则是提供数字填入的按钮以及增加填入数字的逻辑代码,效果图如下:

图中,笔者先是点击了网格区域中第二行第一列的白色格子,然后再点击标有数字5的圆形按钮,于是第二行第一列的格子内便生成数字5。如果点击其他圆形按钮,那么方格内就会生成其他数字。
下面笔者将介绍具体的步骤。
让白色方格能通过点击获得焦点
首先,我们先定义一个新的ShapeElement对象,在网格区域中的某个白色的Button组件获得焦点后,这个Button组件就会使用此ShapeElement对象定义背景元素(即变成橙色):
接着,我们先在GameAbilitySlice中找到上期写入的二重for循环的代码:
       for (

       y

       =

       0;

       y

       <

       6;

       y

       ++){


       for (

       x

       =

       0;

       x

       <

       6;

       x

       ++) {


       Button

       button

       =

       new

       Button(

       this);


       number

       =

       grid_c0[

       x][

       y];


       string0

       =

       String.

       valueOf(

       number);


       button.

       setText(

       string0);


       button.

       setTextColor(

       Color.

       WHITE);


       button.

       setTextSize(

       75);


       button.

       setComponentSize(

       160,

       160);


       button.

       setContentPosition(

       65

       +

       160

       *

       x,

       230

       +

       160

       *

       y);


       if (

       number

       ==

       0) {


       button.

       setText(

       "");


       button.

       setBackground(

       element0);


       button.

       setTextColor(

       Color.

       BLACK);


                }

       else{


       button.

       setBackground(

       element3);


                }


       layout1.

       addComponent(

       button);


            }


        }
- 1.
- 2.
- 3.
- 4.
- 5.
- 6.
- 7.
- 8.
- 9.
- 10.
- 11.
- 12.
- 13.
- 14.
- 15.
- 16.
- 17.
- 18.
- 19.
- 20.
- 21.
- 22.
- 23.
- 24.
- 25.
- 26.
- 27.
- 28.
- 29.
- 30.
- 31.
- 32.
- 33.
这段代码是本项目中非常重要的代码,他相当于整个游戏的基本框架。在后期的功能制作中,笔者将基于这个二重for循环的框架增加许多逻辑代码。
这里,我们在这段代码的基础上增加一些代码:
       for (

       y

       =

       0;

       y

       <

       6;

       y

       ++){


       for (

       x

       =

       0;

       x

       <

       6;

       x

       ++) {


       Button

       button

       =

       new

       Button(

       this);


       //将组件设置为可触摸获得焦点


       button.

       setTouchFocusable(

       true);


       button.

       setTextColor(

       Color.

       WHITE);


       button.

       setTextSize(

       75);


       button.

       setComponentSize(

       160,

       160);


       button.

       setContentPosition(

       65

       +

       160

       *

       x,

       230

       +

       160

       *

       y);


       if (

       number

       ==

       0) {


       button.

       setText(

       "");


       button.

       setBackground(

       element0);


       button.

       setTextColor(

       Color.

       BLACK);


       //设置焦点感知监听器


       button.

       setComponentStateChangedListener(

       new

       Component.

       ComponentStateChangedListener() {


       @Override


       public

       void

       onComponentStateChanged(

       Component

       component,

       int

       i) {


       if (

       ComponentState.

       isStateMatched(

       ComponentState.

       COMPONENT_STATE_FOCUSED,

       i)){


       button.

       setBackground(

       element1);


                            }

       else{


       button.

       setBackground(

       element0);


                            }


                        }


                    });


                }

       else{


       button.

       setBackground(

       element3);


                }


       layout1.

       addComponent(

       button);


            }


        }
- 1.
- 2.
- 3.
- 4.
- 5.
- 6.
- 7.
- 8.
- 9.
- 10.
- 11.
- 12.
- 13.
- 14.
- 15.
- 16.
- 17.
- 18.
- 19.
- 20.
- 21.
- 22.
- 23.
- 24.
- 25.
- 26.
- 27.
- 28.
- 29.
- 30.
- 31.
- 32.
- 33.
- 34.
- 35.
- 36.
- 37.
- 38.
- 39.
- 40.
- 41.
- 42.
- 43.
- 44.
- 45.
- 46.
- 47.
在上述代码中,笔者首先将for循环中的Button对象设置为可通过触摸获得焦点,接着在if的一个判断分路(number==0)中加入组件状态感知监听器:当某个满足number=0的Button组件(即网格区域中的白色方格)获得焦点时,它将改用element1作为背景元素;当它失去焦点时,它重新将element0作为其背景元素。
打开模拟机,便可查看相应的效果:
提供数字填入的按钮以及增加填入数字的逻辑代码
首先,我们先创建两个Button对象:
之后,我们还需要在二重for循环的内部写入相应代码:
       for (

       y

       =

       0;

       y

       <

       6;

       y

       ++){


       for (

       x

       =

       0;

       x

       <

       6;

       x

       ++) {


       Button

       button

       =

       new

       Button(

       this);


       button.

       setTouchFocusable(

       true);


       button.

       setTextColor(

       Color.

       WHITE);


       button.

       setTextSize(

       75);


       button.

       setComponentSize(

       160,

       160);


       button.

       setContentPosition(

       65

       +

       160

       *

       x,

       230

       +

       160

       *

       y);


       if (

       number

       ==

       0) {


       button.

       setText(

       "");


       button.

       setBackground(

       element0);


       button.

       setTextColor(

       Color.

       BLACK);


       //设置button的点击监听器


       button.

       setClickedListener(

       new

       Component.

       ClickedListener() {


       @Override


       public

       void

       onClick(

       Component

       component) {


       //当某个Button对象被点击时,这个Button对象将被赋给button_temp


       button_temp

       =

       button;


                        }


                    });


       button.

       setComponentStateChangedListener(

       new

       Component.

       ComponentStateChangedListener() {


       @Override


       public

       void

       onComponentStateChanged(

       Component

       component,

       int

       i) {


       if (

       ComponentState.

       isStateMatched(

       ComponentState.

       COMPONENT_STATE_FOCUSED,

       i)){


       button.

       setBackground(

       element1);


                            }

       else{


       button.

       setBackground(

       element0);


                            }


                        }


                    });


                }

       else{


       button.

       setBackground(

       element3);


       //设置Button对象的点击监听器


       button.

       setClickedListener(

       new

       Component.

       ClickedListener() {


       @Override


       public

       void

       onClick(

       Component

       component) {


       //当某个Button对象被点击时,这个Button对象将被赋给button_empty


       button_temp

       =

       button_empty;


                        }


                    });


                }


       layout1.

       addComponent(

       button);


            }


        }
- 1.
- 2.
- 3.
- 4.
- 5.
- 6.
- 7.
- 8.
- 9.
- 10.
- 11.
- 12.
- 13.
- 14.
- 15.
- 16.
- 17.
- 18.
- 19.
- 20.
- 21.
- 22.
- 23.
- 24.
- 25.
- 26.
- 27.
- 28.
- 29.
- 30.
- 31.
- 32.
- 33.
- 34.
- 35.
- 36.
- 37.
- 38.
- 39.
- 40.
- 41.
- 42.
- 43.
- 44.
- 45.
- 46.
- 47.
- 48.
- 49.
- 50.
- 51.
- 52.
- 53.
- 54.
- 55.
- 56.
- 57.
- 58.
- 59.
- 60.
- 61.
- 62.
在这次的修改中,我们为网格区域的白色网格与蓝色网格分别增加了两个监听器,使得这两种类型的网格被点击时,button_temp或者button_empty被赋予所点击的Button对象。
接着,我们需要在GameAbilitySlice的UI界面加入6个圆形按钮:
先创建这6个按钮的背景元素:
然后,我们利用代码布局创建6个button对象,代码如下:
       Button

       button_input1

       =

       new

       Button(

       this);


       button_input1.

       setText(

       "1");


       button_input1.

       setTextColor(

       Color.

       BLACK);


       button_input1.

       setTextSize(

       75);


       button_input1.

       setBackground(

       element2);


       button_input1.

       setComponentSize(

       150,

       150);


       button_input1.

       setPosition(

       70,

       1600);


       button_input1.

       setClickedListener(

       new

       Component.

       ClickedListener() {


       @Override


       public

       void

       onClick(

       Component

       component) {


       button_temp.

       setTextColor(

       Color.

       BLACK);


       button_temp.

       setText(

       "1");


            }


        });


       layout1.

       addComponent(

       button_input1);


       Button

       button_input2

       =

       new

       Button(

       this);


       button_input2.

       setText(

       "2");


       button_input2.

       setTextColor(

       Color.

       BLACK);


       button_input2.

       setTextSize(

       75);


       button_input2.

       setBackground(

       element2);


       button_input2.

       setComponentSize(

       150,

       150);


       button_input2.

       setPosition(

       70

       +

       160

       *

       1,

       1600);


       button_input2.

       setClickedListener(

       new

       Component.

       ClickedListener() {


       @Override


       public

       void

       onClick(

       Component

       component) {


       button_temp.

       setTextColor(

       Color.

       BLACK);


       button_temp.

       setText(

       "2");


            }


        });


       layout1.

       addComponent(

       button_input2);


       Button

       button_input3

       =

       new

       Button(

       this);


       button_input3.

       setText(

       "3");


       button_input3.

       setTextColor(

       Color.

       BLACK);


       button_input3.

       setTextSize(

       75);


       button_input3.

       setBackground(

       element2);


       button_input3.

       setComponentSize(

       150,

       150);


       button_input3.

       setPosition(

       70

       +

       160

       *

       2,

       1600);


       button_input3.

       setClickedListener(

       new

       Component.

       ClickedListener() {


       @Override


       public

       void

       onClick(

       Component

       component) {


       button_temp.

       setTextColor(

       Color.

       BLACK);


       button_temp.

       setText(

       "3");


            }


        });


       layout1.

       addComponent(

       button_input3);


       Button

       button_input4

       =

       new

       Button(

       this);


       button_input4.

       setText(

       "4");


       button_input4.

       setTextColor(

       Color.

       BLACK);


       button_input4.

       setTextSize(

       75);


       button_input4.

       setBackground(

       element2);


       button_input4.

       setComponentSize(

       150,

       150);


       button_input4.

       setPosition(

       70

       +

       160

       *

       3,

       1600);


       button_input4.

       setClickedListener(

       new

       Component.

       ClickedListener() {


       @Override


       public

       void

       onClick(

       Component

       component) {


       button_temp.

       setText(

       "4");


            }


        });


       layout1.

       addComponent(

       button_input4);


       Button

       button_input5

       =

       new

       Button(

       this);


       button_input5.

       setText(

       "5");


       button_input5.

       setTextColor(

       Color.

       BLACK);


       button_input5.

       setTextSize(

       75);


       button_input5.

       setBackground(

       element2);


       button_input5.

       setComponentSize(

       150,

       150);


       button_input5.

       setPosition(

       70

       +

       160

       *

       4,

       1600);


       button_input5.

       setClickedListener(

       new

       Component.

       ClickedListener() {


       @Override


       public

       void

       onClick(

       Component

       component) {


       button_temp.

       setText(

       "5");


                  }


        });


       layout1.

       addComponent(

       button_input5);


       Button

       button_input6

       =

       new

       Button(

       this);


       button_input6.

       setText(

       "6");


       button_input6.

       setTextColor(

       Color.

       BLACK);


       button_input6.

       setTextSize(

       75);


       button_input6.

       setBackground(

       element2);


       button_input6.

       setComponentSize(

       150,

       150);


       button_input6.

       setPosition(

       70

       +

       160

       *

       5,

       1600);


       button_input6.

       setClickedListener(

       new

       Component.

       ClickedListener() {


       @Override


       public

       void

       onClick(

       Component

       component) {


       button_temp.

       setText(

       "6");


            }


        });


       layout1.

       addComponent(

       button_input6);
- 1.
- 2.
- 3.
- 4.
- 5.
- 6.
- 7.
- 8.
- 9.
- 10.
- 11.
- 12.
- 13.
- 14.
- 15.
- 16.
- 17.
- 18.
- 19.
- 20.
- 21.
- 22.
- 23.
- 24.
- 25.
- 26.
- 27.
- 28.
- 29.
- 30.
- 31.
- 32.
- 33.
- 34.
- 35.
- 36.
- 37.
- 38.
- 39.
- 40.
- 41.
- 42.
- 43.
- 44.
- 45.
- 46.
- 47.
- 48.
- 49.
- 50.
- 51.
- 52.
- 53.
- 54.
- 55.
- 56.
- 57.
- 58.
- 59.
- 60.
- 61.
- 62.
- 63.
- 64.
- 65.
- 66.
- 67.
- 68.
- 69.
- 70.
- 71.
- 72.
- 73.
- 74.
- 75.
- 76.
- 77.
- 78.
- 79.
- 80.
- 81.
- 82.
- 83.
- 84.
- 85.
- 86.
- 87.
- 88.
- 89.
- 90.
- 91.
- 92.
- 93.
- 94.
- 95.
- 96.
- 97.
虽然这段代码看起来很长,但实际上每个Button对象的代码模板都是一样的。在这段代码中,每个Button对象都定义了6个属性和一个监听器,这6个属性包括——组件显示的文本(Text),组件的显示的文本的颜色(TextColor),组件的显示的文本的大小(TextSize),组件的背景元素(Background),组件的尺寸(ComponentSize),组件的坐标(Position),而监听器中设置的执行事件则是为button_temp定义文本内容(即在白色方格上生成数字)。可以看出,每个圆形按钮的点击监听器中的指令都是面向button_temp的,而button_temp又取决于用户所点击的网格区域的button组件。所以笔者在创建button_temp与button_empty时,并没有定义它们的属性,button_temp的作用是作为数字输入的桥梁,而button_empty的作用则是防止用户点击网格区域的蓝色网格时,上一个获得焦点的白色网格仍然可以输入这么一个BUG。
我们再重新捋一捋数字输入的逻辑:
首先,我们随机点击网格区域中的一个白色Button对象(即白色方格),这个白色Button对象获得焦点变成橙色,并且这个白色Button对象被赋给了button_temp(即button_temp=button);之后,我们点击标有数字5的圆形按钮,则button_temp的显示文本内容被设置成“5”,又因为:button_temp=button,所以前面的操作等价于将获得焦点的Button对象(即橙色方格)的显示文本内容设置成“5”,于是我们可以在模拟机上看到,橙色的格子生成数字5。当我们点击其他白色方格或者蓝色方格时,原先处于焦点状态的橙色方格因为失去焦点,颜色恢复为白色。
结尾
本期的内容就先分享到这里,更多关于数独小游戏项目精彩的内容我将在下期继续为大家揭晓。
边栏推荐
- 【Day_09 0427】 另类加法
- 云原生全景图详解
- Go GORM transaction instance analysis
- Leetcode72. 编辑距离
- 2022年 PHP面试问题记录
- MySQL Lock wait timeout exceeded; try restarting transaction 锁等待
- Prometheus's Recording rules practice
- The elder brother of the goldfish RHCA memoirs: CL210 experiment management it network - chapter
- 【Day_10 0428】井字棋
- 电商库存系统的防超卖和高并发扣减方案
猜你喜欢


随机推荐
What is the implementation principle of Go iota keyword and enumeration type
阿里云的域名和ip绑定
bat 批示处理详解-2
明尼苏达大学团队结合高通量实验与机器学习,实现有效可预测的特定位点重组过程,可调节基因编辑速度
三种方案解决:npm WARN config global --global, --local are deprecated. Use --location=global instead.
LeetCode 0151. Reverse a string of words
2022年 PHP面试问题记录
Go GORM事务实例分析
Detailed explanation of DBPack SQL Tracing function and data encryption function
Three solutions: npm WARN config global --global, --local are deprecated. Use --location=global instead.
突破性能天花板!亚信数据库支撑 10 多亿用户,峰值每秒百万交易
WinRAR | Generate multiple installers into one installer
屏:全贴合工艺之GFF、OGS、Oncell、Incell
How opencv implements image skew correction
顺序表的简单描述及代码的简单实现
[Neural Network] This article will take you to easily analyze the neural network (with an example of spoofing your girlfriend)
Industry Salon Phase II丨How to enable chemical companies to reduce costs and increase efficiency through supply chain digital business collaboration?
AntDB数据库亮相24届高速展,助力智慧高速创新应用
三维空间中点的插值
Map传值