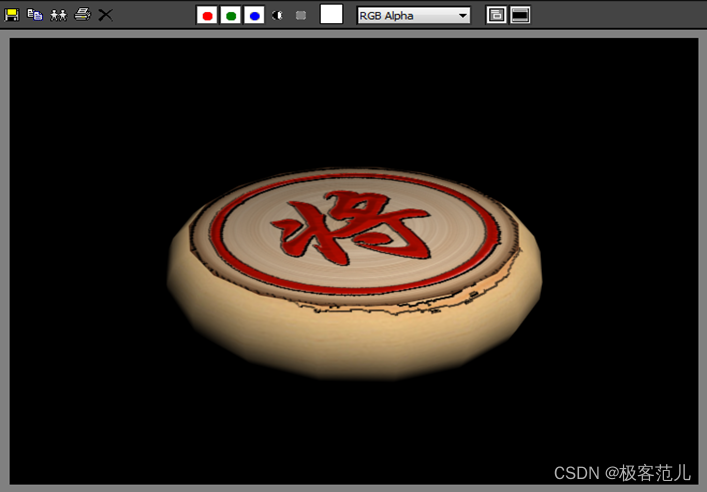
当前位置:网站首页>Use 3DMAX to make a chess piece
Use 3DMAX to make a chess piece
2022-07-01 23:03:00 【Geek style】
3D Studio Max By autodesk Three dimensional modeling launched by the company 、 Animation and rendering software , And easy to use texture 、 Animation and rendering tools , It provides users with a rich and flexible tool portfolio , Create advanced design through all-round artistic control , Built in Arnold The renderer provides a rich experience , Easily create what you need in a shorter time 3D works , Support for dealing with more complex roles 、 Scenes and effects .
List of articles
- One 、 Create chess
- Two 、 Select renderer
- 3、 ... and 、 Chess UV exhibition
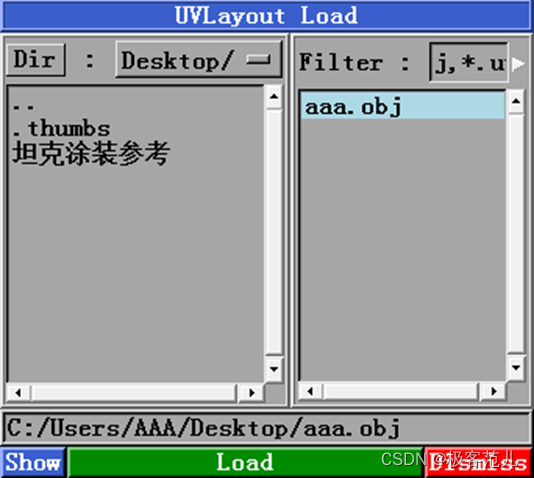
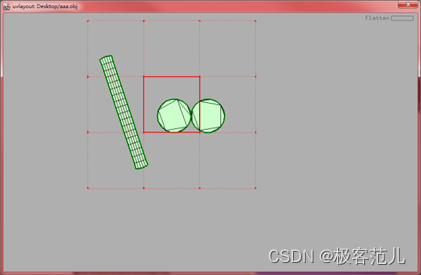
- 1、 stay 3DMAX Select export file , Format selection OBJ. Then open the UVlayout, Click on Load, Select the file you just saved . Left side Dir You can select a folder , Then the files in that folder will be displayed on the right
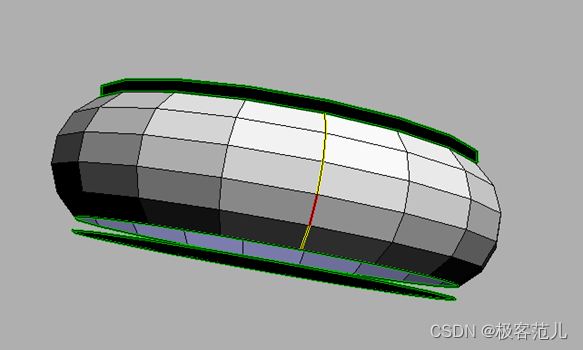
- 2、 On the model in the operation area UV For cutting , Cut the top and bottom surfaces . Hover the mouse over the edge to be selected , Press C The key will see that the edge is selected ( The red one is artificially selected , The yellow ones are extended by program intelligence ). Select a circle and press enter , You can see that the object is cut . The bottom is cut in the same way
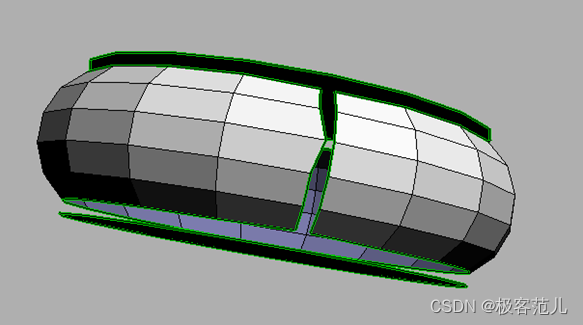
- 3、 Select a line on the side to cut . Put the mouse on one side , Press C healthy , After selecting all the edges on the cut , Press +S.
- 4、 Hover the mouse over the object , Press D Key into the flattening area
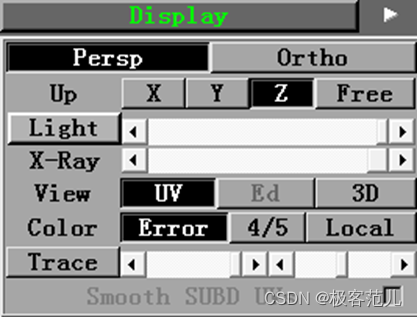
- 5、 Click on the left Display Expand menu , Then click on UV Button
- 6、 Hover the mouse over the object to be expanded , Press shift+f key , an UV, When nothing changes , By space , Then press the space after the object is fully expanded , In this way, expand the three parts in turn
- 7、 Space + Left click to rotate , Space + Middle key to move , Space + Right click to zoom , take UV Put it in the red box of the middle solid line . You can also press the button in the middle to automatically generate a red box
- 8、 Space + Left click to rotate , Space + Middle key to move , Space + Right click to zoom , take UV Put it in the red box of the middle solid line . You can also press the middle `` Automatically generate a red box
- 9、 take UV Save as a picture , open 3DMAX, Import the just saved OBJ file
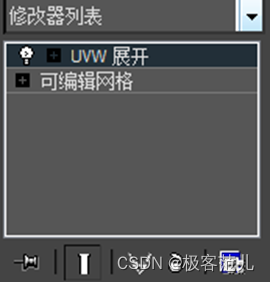
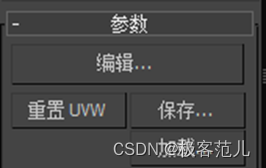
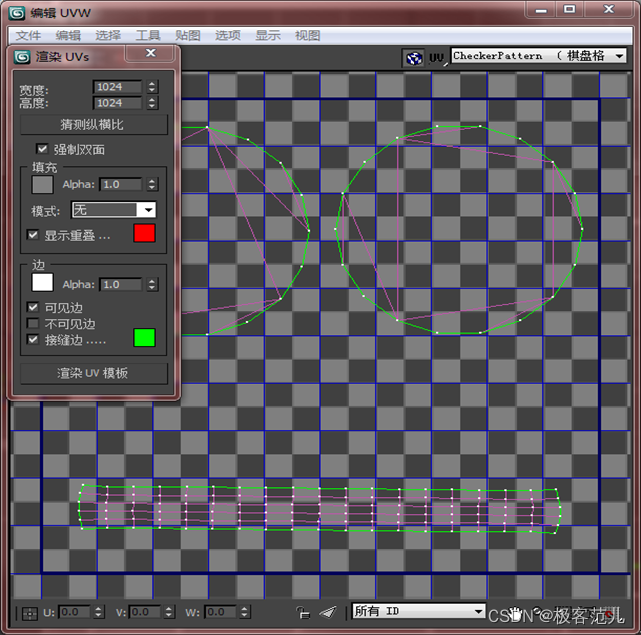
- 10、 take UV Save as a picture . Choose a model , Select... From the modifier list on the right UVW an , Then click the Edit button in the following parameters
- 11、 In the pop-up edit UVW In the window, you can see the expanded UV, Select tools in the menu bar ---- Rendering UV, Then set the width and height to 1024, Click render UV Template
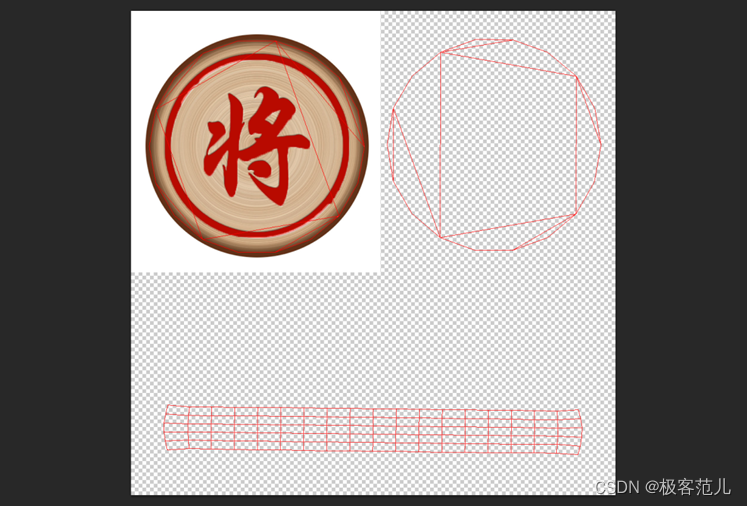
- 12、 In the pop-up window, click Save image in the upper left corner , choice PNG Format , You can also choose JPG Format
- Four 、 Make a map
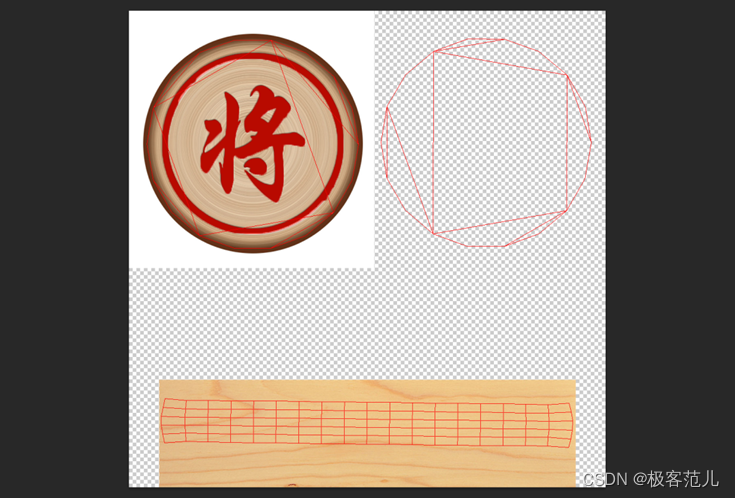
- 1、 Put the picture in PS open , Double click the layer on the right , Choose Stroke , size 1, Location inside , The color is red
- 2、 Import the scanned chess picture , Drag the layer on the right , Put it in UV Below the layer , Resize the picture , For its UV The sideline
- 3、 Cut some wood grain in the bottom scanning image , Adopt the method of replication ( Don't stretch , Otherwise, the texture is coarse ) Also put in PS, As a side map , And press UV Resize
- 4、 hide UV layer , Then save the picture
- 5、 New layer , Click Select... In the menu ---- Color range , Then click the color on the text , Adjust color tolerance , Show the words clearly , Click the menu bar to edit ----- fill , Choose black , Then hide all other layers
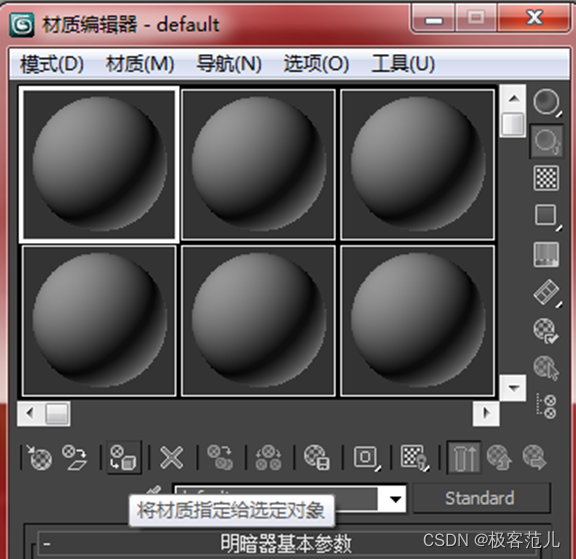
- 6、 Switch to 3DMAX, Click the material editor in the toolbar
- 7、 Click a standard shader , Then click Assign object
- 8、 Click the mapping option below , Click after the diffuse color none Button
- 9、 Select bitmap in the pop-up window , Then select the first saved jpg file
- 10、 Click... Behind the bump none Button , Select the second saved png picture , Adjust the value behind the bump to the appropriate state
- 11、 Render view status , It can be seen that the color depth of the top and side surfaces are not consistent enough , So we need to PS Adjust the color of the map in the , And then in 3DMAX Reload the map in
One 、 Create chess
1、“ Standard primitives ”->“ Cylinder diagram ”
2、 View control area
3、 Select object
Two 、 Select renderer
1、“ Rendering ”-〉“ Renderers ”->“ Develop renderer ” ->“ Product level :”-〉 selection “mental ray Renderers ”
The rendering effect is displayed in a separate window
2、 Make chess models
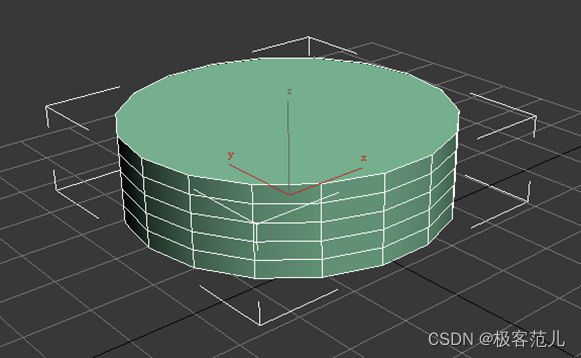
“ establish ”-〉“ Standard primitives ”->“ Cylinder ” -> Place the mouse on the coordinate center , Press the left key to pull out a circle of appropriate size , Lift left key , Press the left key again to pull out the height .
(1)“ modify ”-〉“ Modifier list ”->“ The tensile ” -> Stretch value :-0.1.
(2) If the edge line is not displayed on the graph , Can press F4, Show it 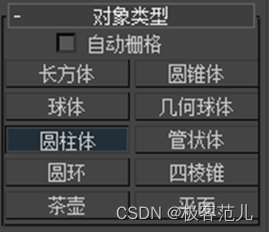
(3) Right click on the graph , Select convert to — Convert to editable poly , Then select the vertex in the modifier list in the upper right corner 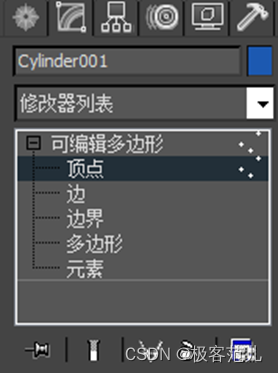
(4) Frame the middle rows of points in the front view (F- Front view ,P- Perspective ,T- Top view )( You can select the middle one first in the perspective view 4 side , Then press “ loop ” Button )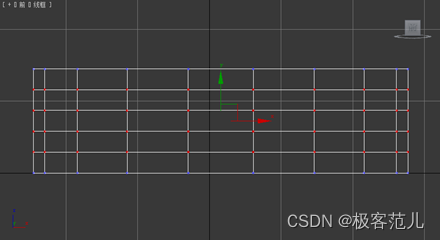
(5) Select the uniform zoom tool on the toolbar , Change the front view to the top view and zoom in , At the same time, observe the proportion of objects in the perspective 

(6) Then frame the points in the middle two rows in the front view , Then select the zoom tool to zoom in , At the same time, observe the proportion . At the same time, you can also adjust the height of the model , Adjust repeatedly to achieve the appropriate proportion 

(7) At present, this model is the initial parameter used , So the loop line on the side is only 4 strip , If the edge is not smooth enough , You can build the model at the beginning , Increase the number of height segments and sides
(8) Can also be converted to editable poly , Then select the edge in the modifier list in the upper right corner . Select the middle edge , Press “ loop ”, You can immediately select all the edges in the middle circle , And then zoom
3、 ... and 、 Chess UV exhibition
1、 stay 3DMAX Select export file , Format selection OBJ. Then open the UVlayout, Click on Load, Select the file you just saved . Left side Dir You can select a folder , Then the files in that folder will be displayed on the right
2、 On the model in the operation area UV For cutting , Cut the top and bottom surfaces . Hover the mouse over the edge to be selected , Press C The key will see that the edge is selected ( The red one is artificially selected , The yellow ones are extended by program intelligence ). Select a circle and press enter , You can see that the object is cut . The bottom is cut in the same way


3、 Select a line on the side to cut . Put the mouse on one side , Press C healthy , After selecting all the edges on the cut , Press +S.
4、 Hover the mouse over the object , Press D Key into the flattening area
5、 Click on the left Display Expand menu , Then click on UV Button
6、 Hover the mouse over the object to be expanded , Press shift+f key , an UV, When nothing changes , By space , Then press the space after the object is fully expanded , In this way, expand the three parts in turn


7、 Space + Left click to rotate , Space + Middle key to move , Space + Right click to zoom , take UV Put it in the red box of the middle solid line . You can also press the button in the middle to automatically generate a red box
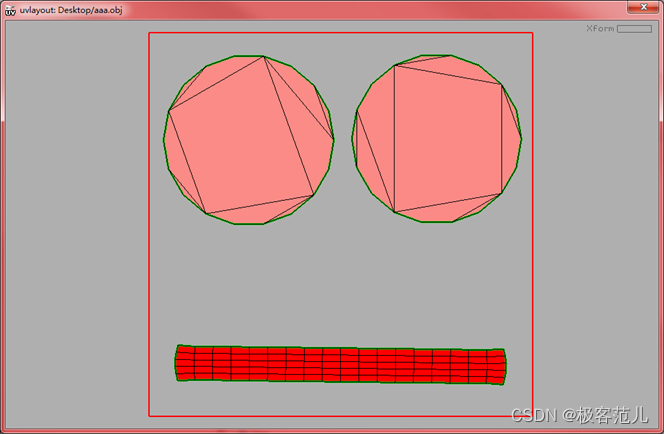
8、 Space + Left click to rotate , Space + Middle key to move , Space + Right click to zoom , take UV Put it in the red box of the middle solid line . You can also press the middle <Auto Fit> Automatically generate a red box

9、 take UV Save as a picture , open 3DMAX, Import the just saved OBJ file

10、 take UV Save as a picture . Choose a model , Select... From the modifier list on the right UVW an , Then click the Edit button in the following parameters
11、 In the pop-up edit UVW In the window, you can see the expanded UV, Select tools in the menu bar ---- Rendering UV, Then set the width and height to 1024, Click render UV Template
12、 In the pop-up window, click Save image in the upper left corner , choice PNG Format , You can also choose JPG Format
Four 、 Make a map
1、 Put the picture in PS open , Double click the layer on the right , Choose Stroke , size 1, Location inside , The color is red

2、 Import the scanned chess picture , Drag the layer on the right , Put it in UV Below the layer , Resize the picture , For its UV The sideline
3、 Cut some wood grain in the bottom scanning image , Adopt the method of replication ( Don't stretch , Otherwise, the texture is coarse ) Also put in PS, As a side map , And press UV Resize
4、 hide UV layer , Then save the picture
5、 New layer , Click Select... In the menu ---- Color range , Then click the color on the text , Adjust color tolerance , Show the words clearly , Click the menu bar to edit ----- fill , Choose black , Then hide all other layers

6、 Switch to 3DMAX, Click the material editor in the toolbar

7、 Click a standard shader , Then click Assign object
8、 Click the mapping option below , Click after the diffuse color none Button

9、 Select bitmap in the pop-up window , Then select the first saved jpg file
10、 Click... Behind the bump none Button , Select the second saved png picture , Adjust the value behind the bump to the appropriate state
11、 Render view status , It can be seen that the color depth of the top and side surfaces are not consistent enough , So we need to PS Adjust the color of the map in the , And then in 3DMAX Reload the map in
边栏推荐
- Réimpression de l'article csdn
- Groups and ranges of regular series
- Summary of "performance testing" of software testing, novice will know the knowledge points on the road
- The last packet sent successfully to the server was 0 milliseconds ago. The driver has not received
- Hide the creation and use of users
- Detailed explanation of twenty common software testing methods (the most complete in History)
- Where can the courses purchased by CSDN be accessed
- Data enhancement of semi supervised learning
- Some abilities can't be learned from work. Look at this article, more than 90% of peers
- 91. (cesium chapter) cesium rocket launch simulation
猜你喜欢

Sogou wechat app reverse (II) so layer
毕业季,既是告别,也是新的开始
104. SAP UI5 表格控件的支持复选(Multi-Select)以及如何用代码一次选中多个表格行项目

447 Bili Bili noodles warp 1
Turn -- the underlying debugging principle of GDB is so simple
Cisco -- an external tool for WAN's concept examination
![[target tracking] | single target tracking indicator](/img/07/033d5c07b07e3443330840e98940b3.png)
[target tracking] | single target tracking indicator
![[untitled]](/img/60/9a56e8b00c386779be13308515b24f.png)
[untitled]
window10安装wsl(一)(WslRegisterDistribution ERROR)

正则系列之组和范围(Groups and Ranges)
随机推荐
Explain ThreadLocal in detail
正则系列之量词(Quantifiers)
Fiori 应用通过 Adaptation Project 的增强方式分享
I graduated from college in 14 years and changed to software testing in 3 months. My monthly salary was 13.5k. At the age of 32, I finally found the right direction
Single step debugging analysis of rxjs observable of operator
转--拿来即用:分享一个检查内存泄漏的小工具
阿洛迷茫后的思考
Armbain系统根分区空间不足处理
What are the benefits of third party acceptance testing? Recommended by professional third-party software testing institutions
Tourism Management System
Explain JMM in detail
The last packet sent successfully to the server was 0 milliseconds ago. The driver has not received
Copy ‘XXXX‘ to effectively final temp variable
Two schemes of transforming the heat map of human posture estimation into coordinate points
Reprint CSDN article operation
Congratulations on the release of friends' new book (send welfare)
MySQL -- index of MyISAM storage engine
vSphere+、vSAN+来了!VMware 混合云聚焦:原生、快速迁移、混合负载
Advanced skills of testers: a guide to the application of unit test reports
【Kotlin 第三方 】coil koltin协程图片加载库Coil类似Glide的图片加载第三方