当前位置:网站首页>9 Tensorboard的使用
9 Tensorboard的使用
2022-06-26 15:30:00 【X1996_】
Tensorflow2.0下使用TensorBoard(Win10)
一、keras版本下使用
需要定义回调函数,并且设置参数 各个参数的含义
        log_dir:保存TensorBoard要解析的日志文件的目录路径。
        histogram_freq:默认为0。计算模型各层的激活值和权重直方图的频率(以epoch计)。如果设置为0,将不会计算直方图。若想直方图可视化,必须指定验证数据(或分割验证集)。
        write_graph:默认为True。是否在TensorBoard中可视化图形。当设置为True时,日志文件会变得非常大。
        write_images:默认为False。是否写入模型权重,在TensorBoard中将权重可视化为图像。
        update_freq:默认为"epoch"。可以是"epoch","batch" 或者整数。当使用"batch"时,在每个batch后将loss,metrics写入TensorBoard。"epoch"同理。如果使用整数,比如1000,则每经过1000个batch将loss,metrics写入到TensorBoard。过于频繁会减慢训练速度。
        profile_batch:默认为2。每过多少个batch分析一次Profile。profile_batch必须是非负整数或整数的元组。一对正整数表示要进入Profile的batch的范围。设置profile_batch=0会禁用Profile分析。
        embeddings_freq:默认为0。embedding在epochs中被可视化的频率。如果设置为0,embedding将无法可视化。
        embeddings_metadata:默认为None。没看懂。a dictionary which maps layer name to a file name in which metadata for this embedding layer is saved. See the details about metadata files format. In case if the same metadata file is used for all embedding layers, string can be passed.
keras下的实验,需要mnist数据集
from __future__ import absolute_import, division, print_function, unicode_literals

import tensorflow as tf

from tensorflow.keras.layers import Dense, Flatten, Conv2D
from tensorflow.keras import Model
import numpy as np
import datetime

# 按需,OOM
from tensorflow.compat.v1 import ConfigProto
from tensorflow.compat.v1 import InteractiveSession
config = ConfigProto()
config.gpu_options.allow_growth = True
session = InteractiveSession(config=config)

mnist = np.load("mnist.npz")
x_train, y_train, x_test, y_test = mnist['x_train'],mnist['y_train'],mnist['x_test'],mnist['y_test']

x_train, x_test = x_train / 255.0, x_test / 255.0

# Add a channels dimension
x_train = x_train[..., tf.newaxis]
x_test = x_test[..., tf.newaxis]

class MyModel(Model):
    def __init__(self):
        super(MyModel, self).__init__()
        self.conv1 = Conv2D(32, 3, activation='relu')
        self.flatten = Flatten()
        self.d1 = Dense(128, activation='relu')
        self.d2 = Dense(10, activation='softmax')
    @tf.function
    def call(self, x):
        x = self.conv1(x)
        x = self.flatten(x)
        x = self.d1(x)
        return self.d2(x)
model = MyModel()
model.compile(optimizer='adam',
              loss='sparse_categorical_crossentropy',
              metrics=['accuracy'])

# 设置回调函数
tensorboard_callback = tf.keras.callbacks.TensorBoard(log_dir="keras_logv2",
                                                      histogram_freq=1,
                                                      profile_batch = 100000000)

model.fit(x=x_train,
          y=y_train,
          epochs=20,
          validation_data=(x_test, y_test),
          callbacks=[tensorboard_callback])
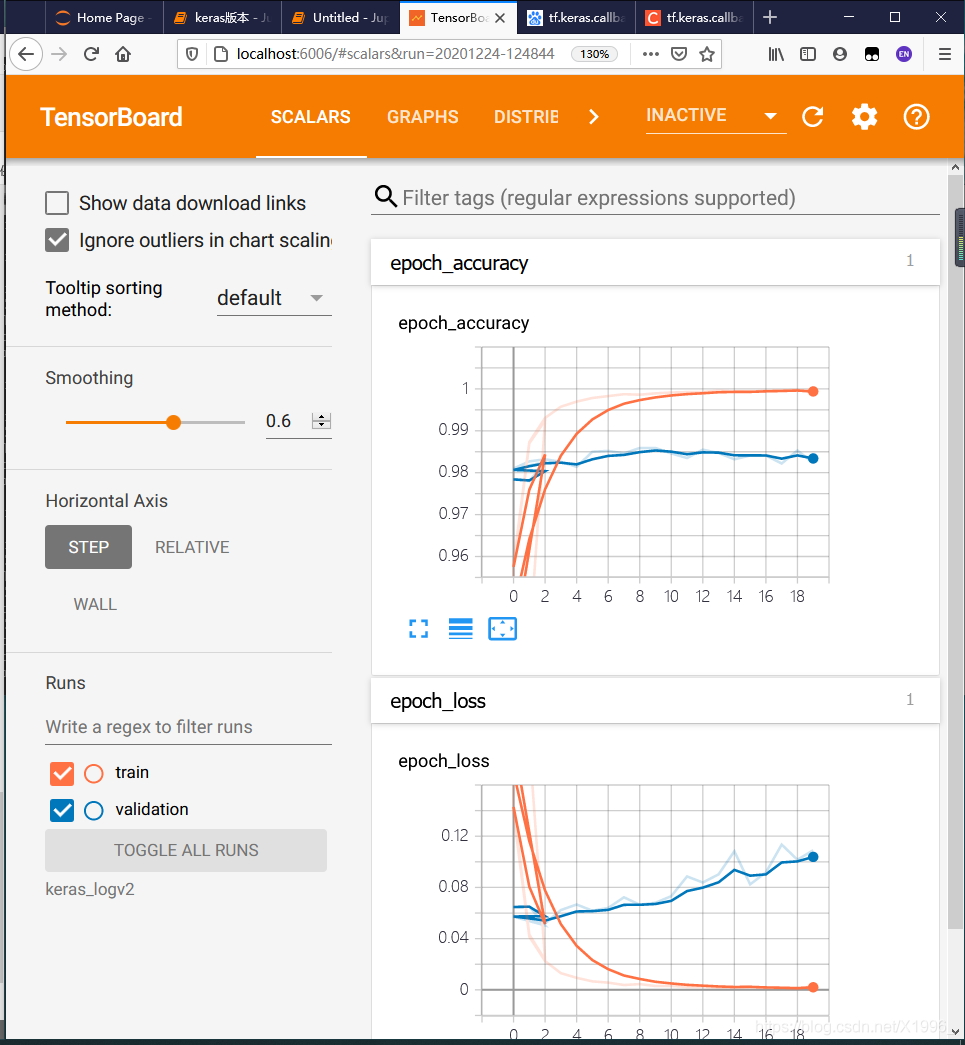
日志会保存在keras_logv2文件夹中。
在jupyter notebook中用win10直接打开我遇见了不少问题,没成功。
%load_ext tensorboard
%tensorboard --logdir keras_logv2
直接在Anaconda命令行中打开就好了
在日志所在的文件夹下输入:
tensorboard --logdir keras_logv2
keras_logv2为文件夹名字,注意需要激活使用的环境。然后回车会出现一个网址,复制到浏览器打开就好了:http://localhost:6006/
二、自定义训练使用TensorBoard
主要依赖tf.summary这个类
创建一个文件夹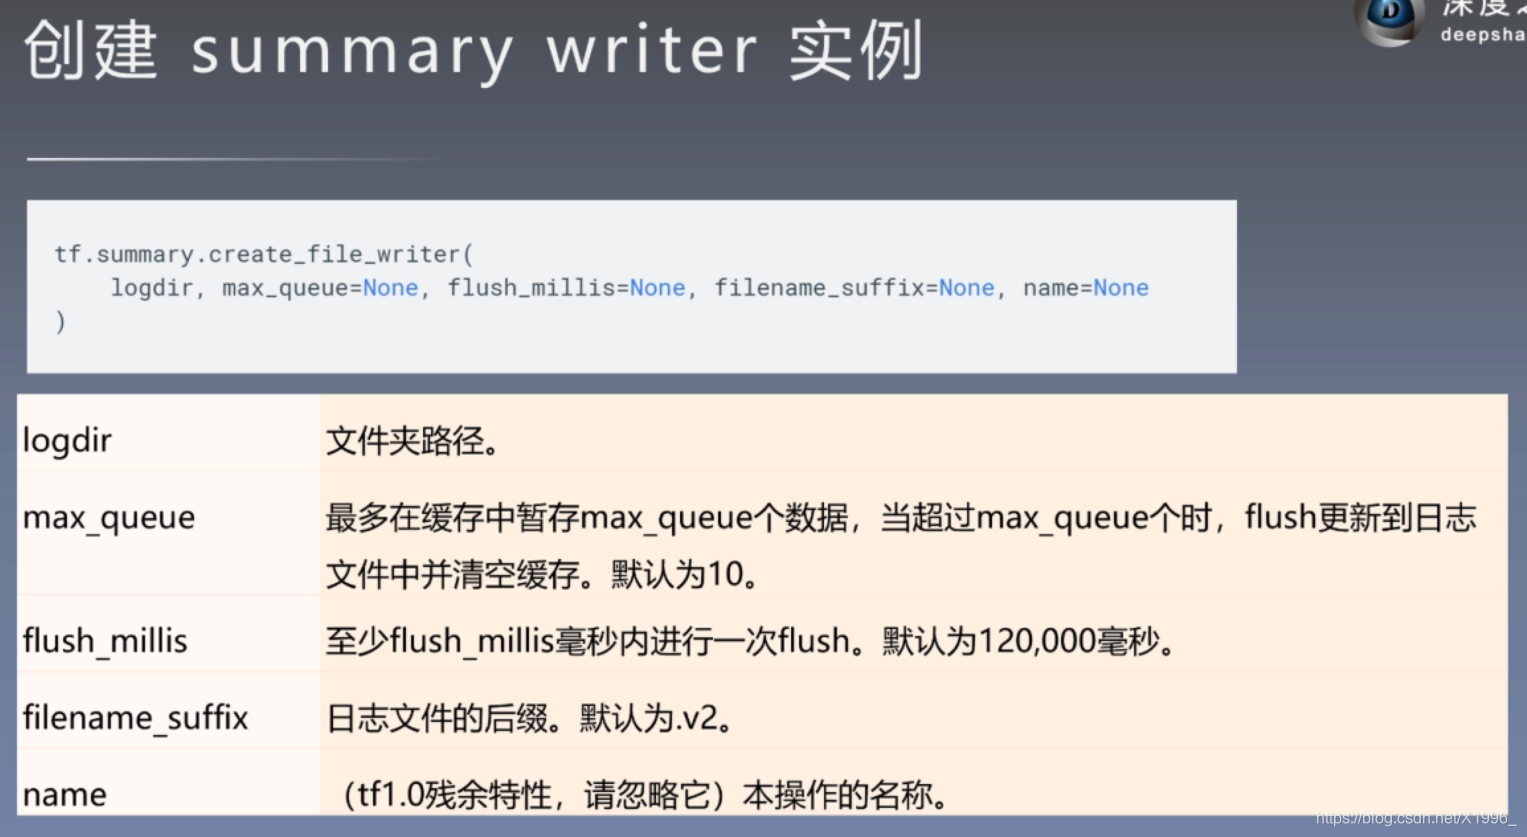 保存图片、标量、文本、模型分布、声音
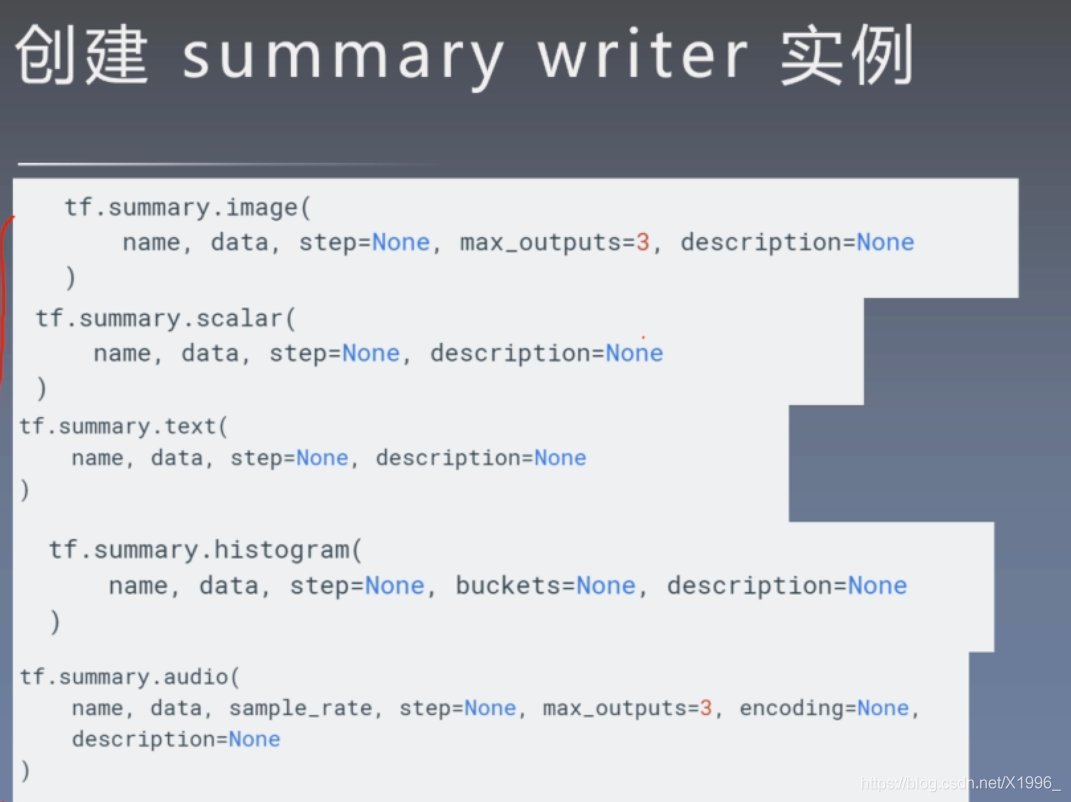 第一个比较重要
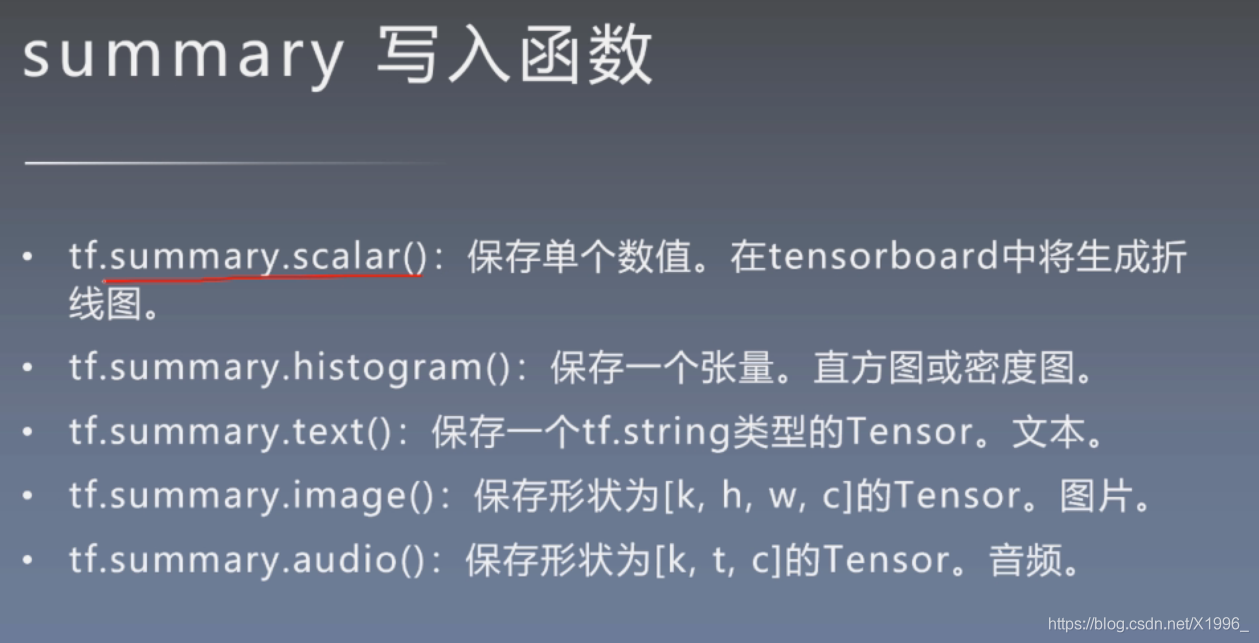


过程:创建文件夹 --> 开启跟踪 --> 写入 --> 导出
from __future__ import absolute_import, division, print_function, unicode_literals
import tensorflow as tf
from tensorflow.keras.layers import Dense, Flatten, Conv2D
from tensorflow.keras import Model
import numpy as np
import datetime
mnist = np.load("mnist.npz")
x_train, y_train, x_test, y_test = mnist['x_train'],mnist['y_train'],mnist['x_test'],mnist['y_test']
x_train, x_test = x_train / 255.0, x_test / 255.0
# Add a channels dimension
x_train = x_train[..., tf.newaxis]
x_test = x_test[..., tf.newaxis]
train_ds = tf.data.Dataset.from_tensor_slices(
(x_train, y_train)).shuffle(10000).batch(32)
test_ds = tf.data.Dataset.from_tensor_slices((x_test, y_test)).batch(32)
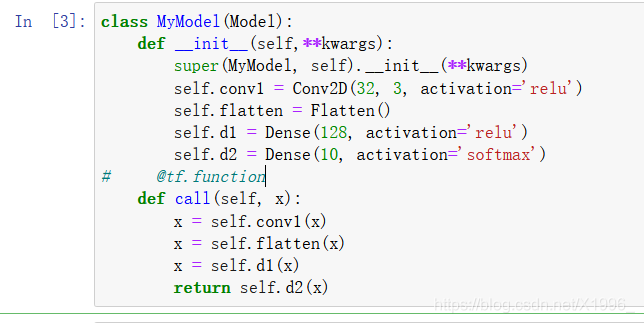
class MyModel(Model):
def __init__(self,**kwargs):
super(MyModel, self).__init__(**kwargs)
self.conv1 = Conv2D(32, 3, activation='relu')
self.flatten = Flatten()
self.d1 = Dense(128, activation='relu')
self.d2 = Dense(10, activation='softmax')
@tf.function
def call(self, x):
x = self.conv1(x)
x = self.flatten(x)
x = self.d1(x)
return self.d2(x)
loss_object = tf.keras.losses.SparseCategoricalCrossentropy()
optimizer = tf.keras.optimizers.Adam()
train_loss = tf.keras.metrics.Mean(name='train_loss')
train_accuracy = tf.keras.metrics.SparseCategoricalAccuracy(name='train_accuracy')
test_loss = tf.keras.metrics.Mean(name='test_loss')
test_accuracy = tf.keras.metrics.SparseCategoricalAccuracy(name='test_accuracy')
# @tf.function
def train_step(images, labels):
with tf.GradientTape() as tape:
predictions = model(images)
loss = loss_object(labels, predictions)
gradients = tape.gradient(loss, model.trainable_variables)
optimizer.apply_gradients(zip(gradients, model.trainable_variables))
train_loss(loss)
train_accuracy(labels, predictions)
# @tf.function
def test_step(images, labels):
predictions = model(images)
t_loss = loss_object(labels, predictions)
test_loss(t_loss)
test_accuracy(labels, predictions)
model = MyModel()
stamp = datetime.datetime.now().strftime("%Y%m%d-%H%M%S")
import os
logdir = os.path.join("logs/"+stamp)
# 创建文件夹
summary_writer = tf.summary.create_file_writer(logdir)
# 开启跟踪,# 开启Trace,可以记录图结构和profile信息
tf.summary.trace_on(graph=True, profiler=False)
EPOCHS = 5
for epoch in range(EPOCHS):
for (x_train, y_train) in train_ds:
train_step(x_train, y_train)
with summary_writer.as_default(): # 希望使用的记录器
tf.summary.scalar('train_loss', train_loss.result(), step=epoch)
tf.summary.scalar('train_accuracy', train_accuracy.result(), step=epoch) # 还可以添加其他自定义的变量
# for (x_test, y_test) in test_ds:
# test_step(x_test, y_test)
# # 跟踪测试集
# with summary_writer.as_default(): # 希望使用的记录器
# tf.summary.scalar('test_loss', test_loss.result(), step=epoch)
# tf.summary.scalar('test_accuracy', test_accuracy.result(), step=epoch) # 还可以添加其他自定义的变量
template = 'Epoch {}, Loss: {}, Accuracy: {}, Test Loss: {}, Test Accuracy: {}'
print(template.format(epoch + 1,
train_loss.result(),
train_accuracy.result() * 100,
test_loss.result(),
test_accuracy.result() * 100))
# Reset metrics every epoch
train_loss.reset_states()
test_loss.reset_states()
train_accuracy.reset_states()
test_accuracy.reset_states()
# 保存Trace信息到文件
with summary_writer.as_default():
tf.summary.trace_export(name="model_trace", step=5, profiler_outdir=None)
由于模型那里是定义的静态图,所以只能保存训练的,测试的不能保存

需要都保存的话把前向传播那里别定义成静态图,训练的时候定义成静态图

然后把测试的地方注释取消 这样训练出来训练集和测试集的各个图是分开的
边栏推荐
- How to handle 2gcsv files that cannot be opened? Use byzer
- When a project with cmake is cross compiled to a link, an error cannot be found So dynamic library file
- PCIe Capabilities List
- Comparative analysis of restcloud ETL and kettle
- 在重新格式化时不要删除自定义换行符(Don‘t remove custom line breaks on reformat)
- Particle filter PF - 3D CV target tracking with uniform motion (particle filter vs extended Kalman filter)
- A blog to thoroughly master the theory and practice of particle filter (PF) (matlab version)
- [thinking] what were you buying when you bought NFT?
- Particle filter PF -- Application in maneuvering target tracking (particle filter vs extended Kalman filter)
- Audio and video learning (I) -- PTZ control principle
猜你喜欢
![[C language practice - printing hollow upper triangle and its deformation]](/img/56/6a88b3d8de32a3215399f915bba33e.png)
[C language practice - printing hollow upper triangle and its deformation]

如何配置使用新的单线激光雷达

AbortController的使用

评价——TOPSIS
![[CEPH] MKDIR | mksnap process source code analysis | lock state switching example](/img/4a/0aeb69ae6527c65a67be535828b48a.jpg)
[CEPH] MKDIR | mksnap process source code analysis | lock state switching example
![[CEPH] cephfs internal implementation (IV): how is MDS started-- Undigested](/img/f9/8e2b55a33e1613a49e08e119ae0086.png)
[CEPH] cephfs internal implementation (IV): how is MDS started-- Undigested

【小程序实战系列】小程序框架 页面注册 生命周期 介绍
Inaccurate data accuracy in ETL process
![[CEPH] Introduction to cephfs caps](/img/41/7d59ecbc1129503c8858dc0304a3f9.png)
[CEPH] Introduction to cephfs caps

Binding method of multiple sub control signal slots under QT
随机推荐
# 粒子滤波 PF——三维匀速运动CV目标跟踪(粒子滤波VS扩展卡尔曼滤波)
安全Json协议
PCIe Capabilities List
AbortController的使用
买股票通过券商经理的开户二维码开户资金是否安全?想开户炒股
「干货」NFT 上中下游产业链全景分析
Golang 1.18 go work usage
NFT交易原理分析(1)
Transaction input data of Ethereum
北京房山区专精特新小巨人企业认定条件,补贴50万
反射修改final
【ceph】cephfs的锁 笔记
【小程序实战系列】小程序框架 页面注册 生命周期 介绍
How to configure and use the new single line lidar
Summer camp is coming!!! Chongchongchong
JS handwritten bind, apply, call
El dialog drag and drop, the boundary problem is completely corrected, and the bug of the online version is fixed
Don't remove custom line breaks on reformat
How to handle 2gcsv files that cannot be opened? Use byzer
我想知道如何通过线上股票开户?在线开户安全么?