当前位置:网站首页>EBS Oracle 11g cloning steps (single node)
EBS Oracle 11g cloning steps (single node)
2022-07-05 21:45:00 【Ruthless white】
List of articles
- One 、 Check the memory of the target environment server
- Two 、 Stop applications and databases
- 3、 ... and 、 Delete the old database
- Four 、 Restore control files 、 Data files
- 5、 ... and 、 Restore the configuration of the database
- 6、 ... and 、 Apply cloning
- 1. Backup xml file
- 2. There are two ways to clone
- 3.FIX Customized links
- 4. Change Password
- 5. Modify the node settings of the concurrency manager
- 6. Modify the output concurrency manager
- 7. perform adconfig
- 8. modify banner Content
- 9. modify web user password
- 10. Delete dblink
- 11. Handle SOA Gateway
- 12. Start the application
- 13. Deploy soa
- 14. modify XMLP Temporary directory
- 15. Check the login address
explain : This document is used for single node cloning 、 And the database and application are the existing environment , The database is restored by backup , The application overwrites the existing data by copying .
Reference documents :https://blog.csdn.net/m0_49929446/article/details/124084310?spm=1001.2014.3001.5501 (ASM Capacity expansion )
Local disk capacity :https://blog.csdn.net/m0_49929446/article/details/124375949?spm=1001.2014.3001.5501
Official documents :406982.1
One 、 Check the memory of the target environment server
Check whether the memory of the target environment is sufficient , If it's enough , Wait for the time to clone , If not enough , Need to expand .
Check the memory command in the case of shared disk
--asm.sql
column name format a20
column free_mb format 999,999,999
select name,to_char(sysdate,'YYYY-MM-DD HH24:MI') SYSTEM_DATETIME from v$database;
select (select name from v$database) db_name,name diskgroup_name,total_mb,free_mb,round(free_mb/total_mb*100,1) FREE_Uti_PCT from v$asm_diskgroup order by 4;
file system ( Local disk ) Check memory commands
df -h
If there is not enough memory , Apply for expansion ,ASM The expansion steps have been detailed in other articles :https://blog.csdn.net/m0_49929446/article/details/124084310?spm=1001.2014.3001.5501
Local disk expansion :https://blog.csdn.net/m0_49929446/article/details/124375949?spm=1001.2014.3001.5501
Two 、 Stop applications and databases
Stop all services
adstpall.sh apps/passwd
Stop concurrency
adcmctl.sh stop apps/apps_934199
--  Check whether the process is over
ps -ef |grep FNDLIBR
--  Execute without the end of the process
ps -fu app sit| grep FND| awk '{print $2}' | xargs kill -9  perhaps
adcmctl.sh abort apps/passwd # Production is not recommended
Stop the database
--  Stop the database in the case of a single machine
sqlplus / as sysdba
shutdown immediate;
--  Stop the database in the cluster mode , Only one node is needed to execute
srvctl stop  database -db HCCDB
3、 ... and 、 Delete the old database
ASM Disk steps :
1. Get into grid user
su - grid
asmcmd
2. Delete database file
rm -rf  CONTROLFILE/*
rm -rf  DATAFILE/*
rm -rf  PARAMETERFILE/*
rm -rf  PASSWORD/*
rm -rf  TEMPFILE/*
3. Recreate the database directory
mkdir   CONTROLFILE     PARAMETERFILE      PASSWORD    TEMPFILE
Local disk :
1. find data Catalog
cd  /ebs/sit/db/apps_st/data/SIT
2. Delete database file
rm -rf  archivelog datafile onlinelog
3. Recreate the deleted file directory
mkdir archivelog datafile onlinelog
Four 、 Restore control files 、 Data files
1. Start parameter file
Parameter file : Prepare a configured pfile Parameter file ( Specially used for cloning ), Start the memory space and process according to the configuration of the parameter file .
11g Standard parameter file configuration :
Start as database nomount state
sqlplus / as sysdba
startup nomount pfile='/home/orasit/forautodeploy/SIT/init.ora.clone';
2. Restore control files
If it's using nbu For backup, first check the path of the backup control file
cd /usr/openv/netbackup/bin
./bplist -C  ebshgdb1  -t 4 -l -R / |more
c-2379360884-20220520-22
3. Modify the script of recovery control file
vi restore_controlfile.rcv

run { allocate channel ch00 type 'SBT_TAPE';
      send 'NB_ORA_SERV=jtbackupvpra01,NB_ORA_CLIENT=erppprd01';restore controlfile from '/c-2379360884-         20220520-22';Release channel  ch00;}
Be careful :NB_ORA_SERV Backup server NB_ORA_CLIENT: Backup client ,c-2379360884- 20220520-22: Control files to be recovered ( Found on the backup server ).
4. Start to recover the control file
rman target / cmdfile=restore_controlfile.rcv # You need to enter the directory where the script is located to execute , Or write script absolute path
5. Modify the data file
Change the database state to mount
sqlplus / as sysdba
alter database mount;
Modify the recovery script
vi recover_database.rcv
run{
allocate channel ch00 type 'sbt_tape';
allocate channel ch01 type 'sbt_tape';
allocate channel ch02 type 'sbt_tape';
allocate channel ch03 type 'sbt_tape';
allocate channel ch04 type 'sbt_tape';
send 'NB_ORA_SERV=jtbackupvpra01,NB_ORA_CLIENT=erppprd01';
set newname for database to '/ebs/sit/db/apps_st/data/SIT/datafile/%b';
set until time "to_date('20-05-2022 18:00:00','dd-mm-yyyy hh24:mi:ss')";
restore database;
switch datafile all;
switch tempfile all;
recover database;
release channel  ch00;
release channel  ch01;
release channel  ch02;
release channel  ch03;
release channel  ch04;
}
Be careful :until time “to_date(‘20-05-2022 18:00:00’,‘dd-mm-yyyy hh24:mi:ss’)”; This time must be before the time of restoring the control file , Because the control file records log and physical file information .
6. Start restoring data files
Perform recovery in the background , Because it takes too long
cd  /home/ora sit/forautodeploy/ SIT
nohup rman target / cmdfile=recover_database.rcv & log=/home/ora sit/forautodeploy/ SIT/recover_database_$(date +%F).log &
5、 ... and 、 Restore the configuration of the database
1. Modify the online log file
Will find out sql perform
set lines 160 pages 9999
select 'alter database rename file '''||member||''' to '''||replace(member,'+EBSPRODDATA/ prod/onlinelog/','/ ebs/sit/db/apps_st/data/ SIT/onlinelog/')||''';' from v$logfile;SQL>

alter database rename file '+EBSPRODDATA/ prod/onlinelog/group_5.log' to '/ ebs/sit/db/apps_st/data/ SIT/onlinelog/group_5.log';
alter database rename file '+EBSPRODDATA/ prod/onlinelog/group_6.log' to '/ ebs/sit/db/apps_st/data/ SIT/onlinelog/group_6.log';
alter database rename file '+EBSPRODDATA/ prod/onlinelog/group_7.log' to '/ ebs/sit/db/apps_st/data/ SIT/onlinelog/group_7.log';
alter database rename file '+EBSPRODDATA/ prod/onlinelog/group_8.log' to '/ ebs/sit/db/apps_st/data/ SIT/onlinelog/group_8.log';
Be careful :+EBSPRODDATA/ prod/onlinelog/ Source system log file path / ebs/sit/db/apps_st/data/ SIT/onlinelog/ Target system log file path .
Log in to the database and check whether the log file is modified successfully
sqlplus / as sysdba
select * from v$logfile;# Check whether the path is modified successfully
2. Switch the database to resetlogs
use resetlogs Method to open the database , The serial number of the log is reset from 1 Start .
alter database disable block change tracking;# disable block
alter database set standby to maximize performance;  Change the protection mode to maximize performance
alter database flashback off;  close flashback
alter database noarchivelog;  Turn off Archive Mode
alter database open resetlogs;  Redo log
Be careful : Once the database is restored with the backup control file , You need to use resetlogs Method to open the database , however resetlogs It usually means incomplete recovery , And more importantly, once used resetlogs Method to open the database , The serial number of the log is reset from 1 Start .
alter database open resetlogs; resetlogs Method to open the database
3. Restart the database
shutdown immediate
startup mount pfile='/home/ora sit/forautodeploy/ SIT/init.ora.clone';
4. Use nid modify db_name
** explain :** Official documents : 224266.1 863800.1
nid target=sys/passwd dbname= SIT LOGFILE=nid_ SIT.log
Start database mount state , Redo log file
startup mount;
alter database open resetlogs;
5. Execute customized scripts
export NLS_LANG=American_America.ZHS16GBK
sqlplus apps/apps_password @cux_0_fnd_clone_setup_utl.pck

SQL> @cux_0_fnd_clone_setup_utl.pck
Package created.

begin
  cux_0_fnd_clone_setup_utl.main( 'FZUAT',  'N');
end;
/
6. Clean up node information
Be careful : After clearing nodes , Need to use adconfig.sh The script reconfigures the database .
sqlplus /nolog
conn apps/apps_password;
exec fnd_conc_clone.setup_clean;
commit;
7. Modify the user profile
User profile of , Usually default Of , and default Of profile default FAILED_LOGIN_ATTEMPTS The value is 10, That is to say, try 10 The account will be locked for times . Sure modify Unlimited :
sqlplus / as sysdba
alter profile AD_PATCH_MONITOR_PROFILE limit failed_login_attempts unlimited;
alter profile default limit failed_login_attempts unlimited password_lock_time 1/1440;
alter user apps account unlock;
exit;
8. perform adconfig
ls -l $CONTEXT_FILE
cd $ORACLE_HOME/appsutil/bin
./adconfig.sh  contextfile=$CONTEXT_FILE appspass=passwd
6、 ... and 、 Apply cloning
1. Backup xml file
Create backup directory
mkdir backupxml
Go to the backup file directory 、 Backup xml file
cd backupxml/
cp $CONTEXT_FILE .
cp $IAS_ORACLE_HOME/j2ee/forms-c4ws/config/server.xml ias.server.xml
cp $ORA_CONFIG_HOME/10.1.3/j2ee/oacore/config/server.xml ora.server.xml
cp $ORA_CONFIG_HOME/10.1.3/j2ee/oacore/application-deployments/oacore/orion-application.xml
2. There are two ways to clone
(1).adcfgclone.pl atTechStack
Because it is overwritten to the target environment in the way of backup and decompression of other environments , Just clone the technology stack at the target application node atTechStack
Use adcfgclone.pl appsTier Cloning
Delete and re extract the application
cd /ebs/sit
rm -rf apps
mv inst inst_old
mkdir inst
nohup tar -xzvf VGPROD_apps_220314.tar.gz &
Because of the apps Directory deleted , You need to perform adcfgclone.pl appsTier
cd /ebs/sit/apps/apps_st/comn/clone/bin
perl adcfgclone.pl appsTier /home/app sit/backupxml/ SIT_ erpvura01.xml
(2).adcfgclone.pl appsTier
New clones , To regenerate the $CONTEXT_FILE
adcfgclone.pl atTechStack clone
Don't delete apps Catalog , It can be extracted directly
cd /ebs/sit/apps/apps_st/comn/clone/bin
perl adcfgclone.pl atTechStack $CONTEXT_FILE
3.FIX Customized links
Unzip the copy of the source system cux Compressed package
cd $APPL_TOP
unlink cux
cd /ebs/sit/apps/apps_st/appl
tar -zxvf  PROD_cux_220521.tar.gz
4. Change Password
Change sys password , Commonly used in dg When configuring data synchronization , Copy the generated password file to dg The server
cd $ORACLE_HOME/dbs
orapwd file=$ORACLE_HOME/dbs/orapw$ORACLE_SID password=clone entries=5 force=y ignorecase=y
Password file , It is only used to restrict having sysdba perhaps sysoper Users with permissions connect to the password verification file of the database remotely . If there is no password file or the password file is missing , So in order to sysdba perhaps sysoper Users with permissions will not be able to log in and return an error :
alter system set remote_login_passwordfile=exclusive scope=spfile sid='*';
FNDCPASS Change Password sysadmin 、asadmin 、ALLORACLE
FNDCPASS apps/passwd 0 Y system/manager SYSTEM APPLSYS apps_934199

FNDCPASS apps/passwd 0 Y system/manager  USER sysadmin clone_92184

FNDCPASS apps/passwd   0 Y system/manager  USER asadmin asadmin

FNDCPASS apps/passwd 0 Y system/manager  ALLORACLE clone_92184
Other user passwords
alter user CRCDATATXN identified by clone;
alter user CUXSYSMONITER identified by clone;
alter user intf identified by clone;
5. Modify the node settings of the concurrency manager
FND_CONCURRENT_QUEUES, Each concurrency manager ( Concurrent queues ) Information about , Including the concurrency manager defined by the customer
sqlplus apps/passwd
set sqlblanklines on
select distinct node_name,node_name2 from applsys.FND_CONCURRENT_QUEUES;
 If the node information name found is equal to what you want, it does not need to be modified , Otherwise, use the following sql Make changes
UPDATE FND_CONCURRENT_QUEUES a
 SET a.node_name  = replace(a.node_name, 'ERPVPRA', '');
6. Modify the output concurrency manager
Will be bigger than the 20 The number of processes is modified to 20
--  Modify the output concurrency manager
update applsys.FND_CONCURRENT_QUEUES
set  TARGET_PROCESSES=20
where TARGET_PROCESSES>20;
commit;
--  Inquire about
set lines 200 pages 50000
select concurrent_queue_name,max_processes,running_processes,target_processes from applsys.FND_CONCURRENT_QUEUES;
Set the two opp Concurrency Manager
update applsys.FND_CONCURRENT_QUEUES
set  TARGET_PROCESSES=2
where concurrent_queue_name like '%OPP%';
commit;
--  Inquire about
select concurrent_queue_name,max_processes,running_processes,target_processes from applsys.FND_CONCURRENT_QUEUES where concurrent_queue_name like '%OPP%';
7. perform adconfig
ls -l $CONTEXT_FILE
cd $AD_TOP/bin
./adconfig.sh contextfile=/ebs/sit/inst/apps/SIT_ erpvura01/appl/admin/SIT_ erpvura01.xml appspass=passwd
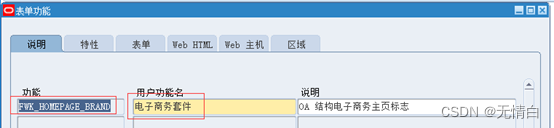
8. modify banner Content
FWK_HOMEPAGE_BRAND, modify banner Content
sqlplus apps/passwd
export NLS_LANG=American_America.ZHS16GBK
select v.FUNCTION_ID, t.user_function_name, v.FUNCTION_NAME from FND_FORM_FUNCTIONS_VL v, FND_FORM_FUNCTIONS f, FND_FORM_FUNCTIONS_tl t where v.FUNCTION_ID = f.function_id and v.FUNCTION_ID = t.function_id and v.FUNCTION_NAME = 'FWK_HOMEPAGE_BRAND';

update FND_FORM_FUNCTIONS_TL t set t.user_function_name = 'sit Environmental Science ' where t.function_id = 20556;
Or log in to the web page to modify
Application Developer > Application products > function
F11 clear
Input FWK_HOMEPAGE_BRAND
Press Ctrl+F11 Search for
Login password case 9829
SIGNON_PASSWORD_FAILURE_LIMIT Limit the number of login password failures 5792
SIGNON_PASSWORD_HARD_TO_GUESS The login password should be difficult to guess 3844
SIGNON_PASSWORD_LENGTH Login password length 2027
SIGNON_PASSWORD_NO_REUSE Login password that cannot be reused 4524
delete from applsys.fnd_profile_option_values where profile_option_id in (5792,3844,2027,4524) and level_id=10004;
9. modify web user password
declare
    cursor cur_fnd_user is
      select a.user_name
        from fnd_user a
       where a.user_id >= 1110
          AND a.user_name like  'SETUP%'
       order by a.user_id;
    l_change_stat varchar2(400);
  begin
    for rec_fnd_user in cur_fnd_user loop
      l_change_stat := fnd_web_sec.change_password(rec_fnd_user.user_name,
                                                   'clone');
      if l_change_stat = 'N' then
        dbms_output.put_line('USER:' || rec_fnd_user.user_name ||
                             'password not changed');
      end if;
    end loop;
  end;
/
10. Delete dblink
Delete the found
set lines 200 pages 50000
col object_name for a60
select owner,object_name from dba_objects where object_type='DATABASE LINK';


OWNER                                                        OBJECT_NAME
------------------------------------------------------------ ------------------------------------------------------------
SYS                                                          TO_INTERFACE.234.COM.CN
APPS                                                         TO_INTERFACE.234.COM.CN
APPS                                                         TO_EMDB.234.COM.CN
APPS                                                         TO_BMWMS.234.COM.CN
APPS                                                         SITTOODSTEST.CRC.COM.CN
APPS                                                         SITTOJTSIT.CRC.COM.CN
APPS                                                         EDW_APPS_TO_WH.234.COM.CN
APPS                                                         EDW_APPS_TO_WH
APPS                                                         APPS_TO_APPS.234.COM.CN
APPS                                                         APPS_TO_APPS
Delete dblink Such as :
drop DATABASE LINK "TO_INTERFACE.234.COM.CN";
drop DATABASE LINK "TO_EMDB.234.COM.CN";
drop DATABASE LINK "TO_EMDB.234.COM.CN";
Check again
No record means the deletion is successful
select 'drop public database link ' ||dd.DB_LINK||';' from dba_db_links dd
where dd.owner = 'PUBLIC';
11. Handle SOA Gateway
modify $ORA_CONFIG_HOME/10.1.3/j2ee/oafm/config/system-jazn-data.xml
Change the part of this to the content to !asadmin
<user>
           <name>ASADMIN</name>
           <guid>AF15AD90E6D811EBBFAA8D4E3A337D36</guid>
           <description>Used by SOAProvider for DB connection</description>
           <credentials>{903}jVC6oqf5Ap0o4mxKMT204oqYYreRUyic</credentials>
                        </user>
12. Start the application
adstrtal.sh apps/passwd
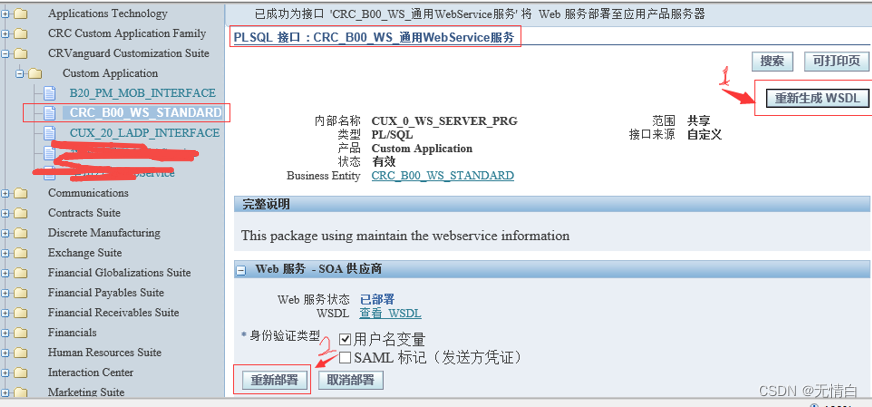
13. Deploy soa
soa Manual execution and deployment
cd $FND_TOP/bin
./soadeploy.sh irepname=CUX_0_WS_SERVER_PRG target=undeploy
cd $FND_TOP/bin
./soagenerate.sh irepname=CUX_0_WS_SERVER_PRG
cd $FND_TOP/bin
./soadeploy.sh irepname=CUX_0_WS_SERVER_PRG target=deploy
Or web deployment
Integrate SOA gateway > Integrated information base > Custom Application > Custom Application
Open the corresponding interface >>> To regenerate the WSDL
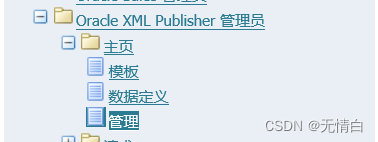
14. modify XMLP Temporary directory
System path :
System Administrator -> Oracle XML Publisher Administrators -> Home page -> management
15. Check the login address
cat $CONTEXT_FILE|grep login
边栏推荐
- 秋招将临 如何准备算法面试、回答算法面试题
- Analysis and test of ModbusRTU communication protocol
- Poj 3237 Tree (Tree Chain Split)
- Comprehensive optimization of event R & D workflow | Erda version 2.2 comes as "7"
- crm创建基于fetch自己的自定义报告
- Interviewer: will concurrent programming practice meet? (detailed explanation of thread control operation)
- Incentive mechanism of Ethereum eth
- Introduction of ArcGIS grid resampling method
- Image editor for their AutoLayout environment
- Golang (1) | from environmental preparation to quick start
猜你喜欢
Matlab | app designer · I used Matlab to make a real-time editor of latex formula
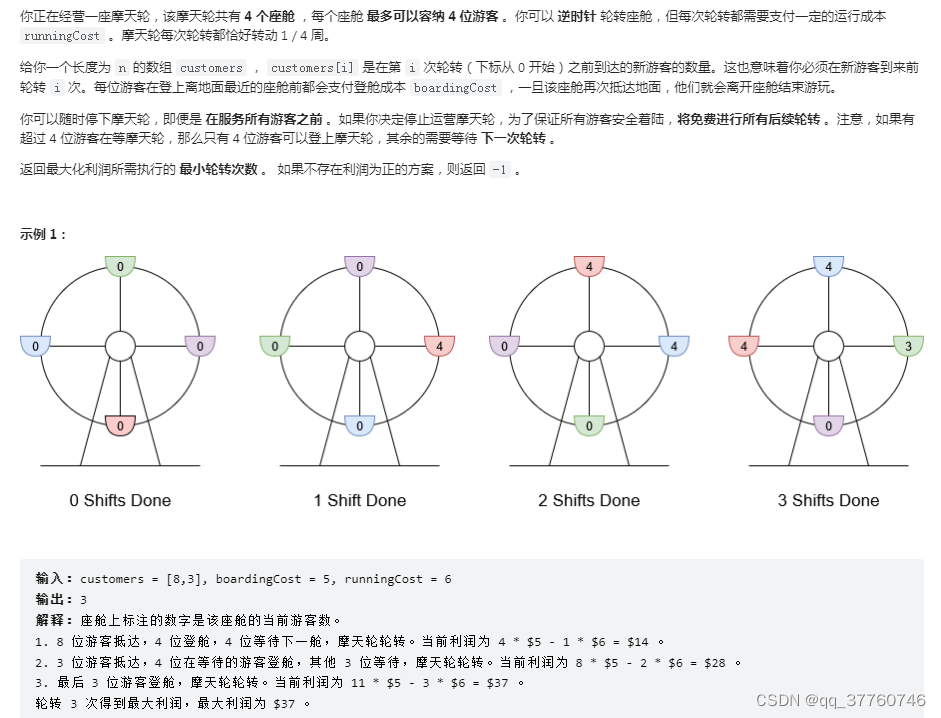
力扣------经营摩天轮的最大利润
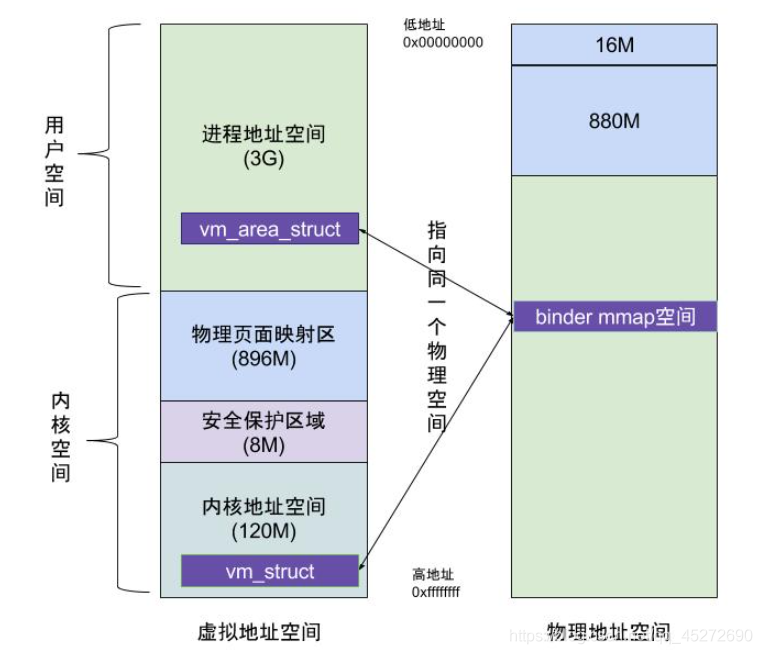
MMAP
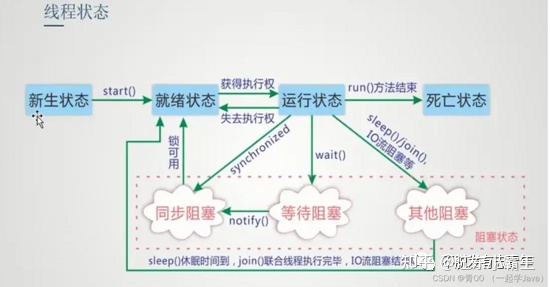
Interviewer: will concurrent programming practice meet? (detailed explanation of thread control operation)

Scenario interview: ten questions and ten answers about distributed locks
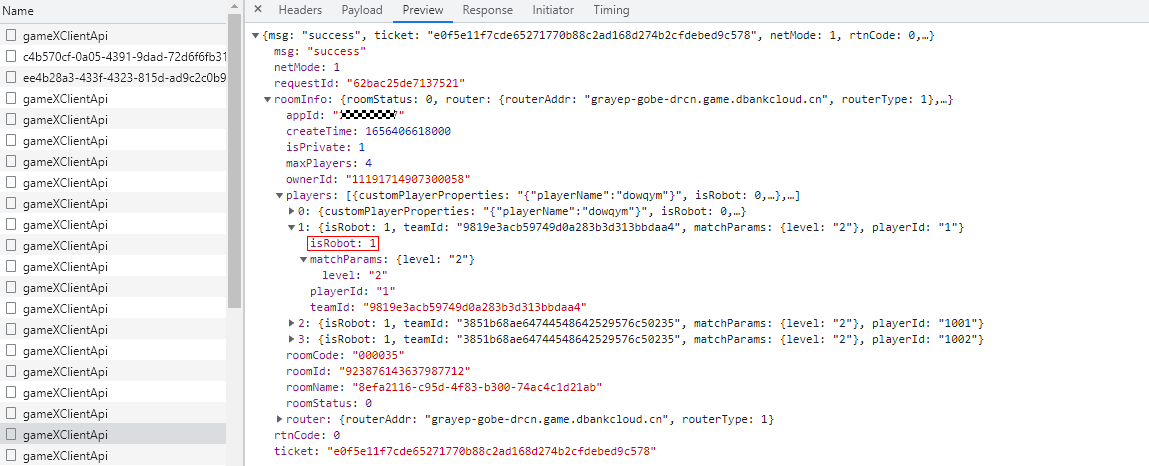
华为联机对战如何提升玩家匹配成功几率
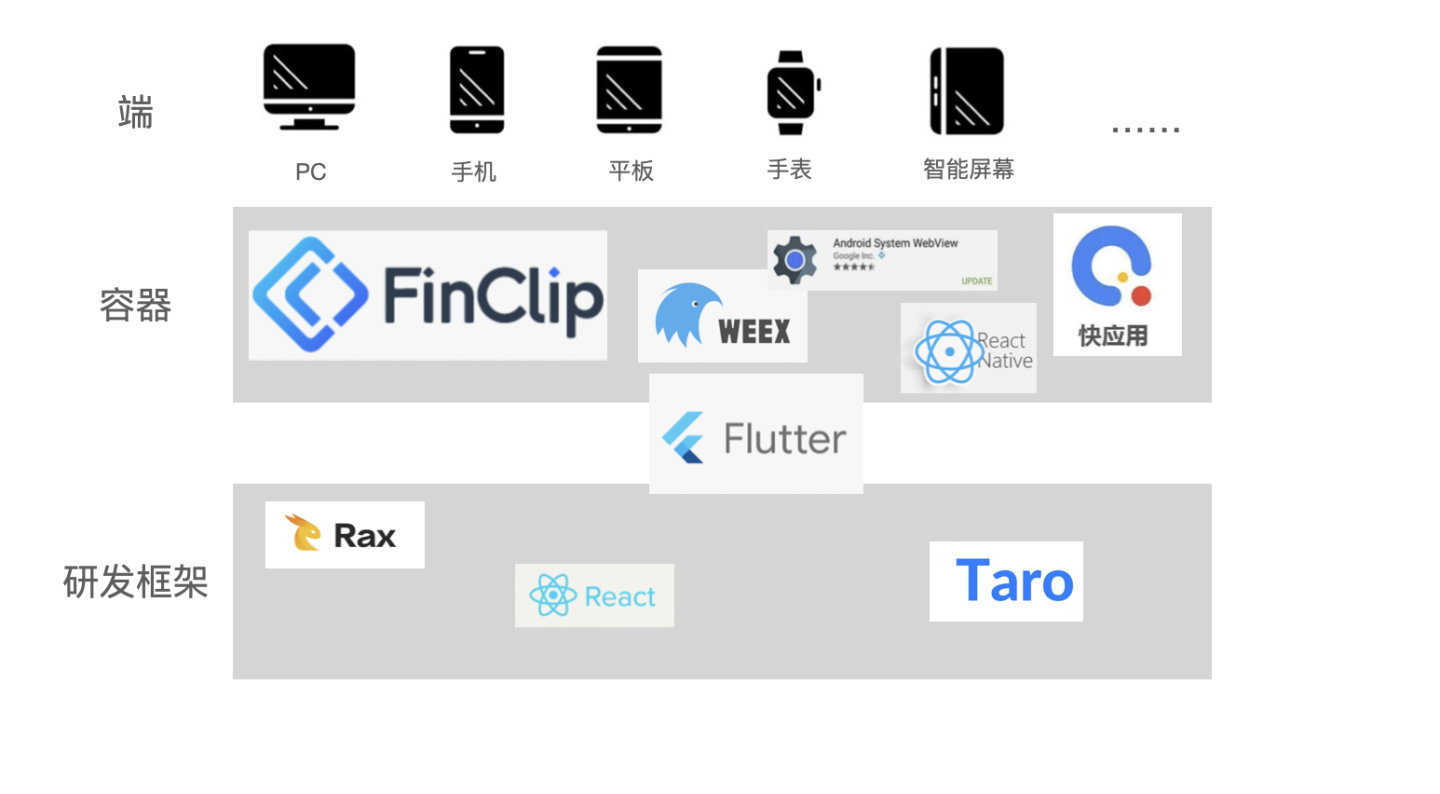
让开发效率飞速提升的跨端方案
面试官:并发编程实战会吗?(线程控制操作详解)
2.2.3 output of documents
Kingbasees v8r3 cluster maintenance case -- online addition of standby database management node
随机推荐
selenium 获取dom内验证码图片
What should I do to prepare for the interview algorithm position during school recruitment?
Some things make feelings nowhere to put
2.2.3 output of documents
QML reported an error expected token ";", expected a qualified name ID
Poj 3237 Tree (Tree Chain Split)
poj 3237 Tree(樹鏈拆分)
华为云ModelArts文本分类–外卖评论
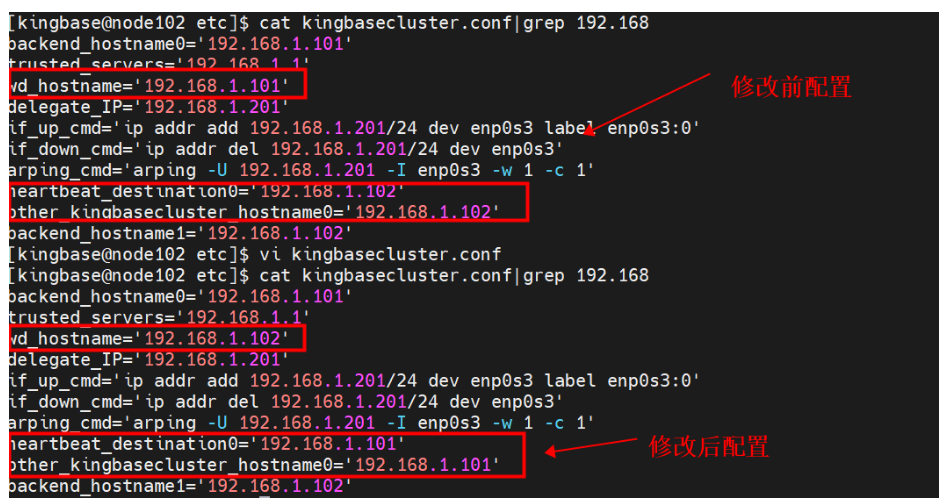
Kingbasees v8r3 cluster maintenance case -- online addition of standby database management node
Codeforces 12D ball tree array simulation 3 sorting elements
POJ 3237 tree (tree chain splitting)
Four components of logger
华为快游戏调用登录接口失败,返回错误码 -1
123456
Deeply convinced plan X - network protocol basic DNS
Teach yourself to train pytorch model to Caffe (III)
SQL knowledge leak detection
selenium 查找b或p标签的内容
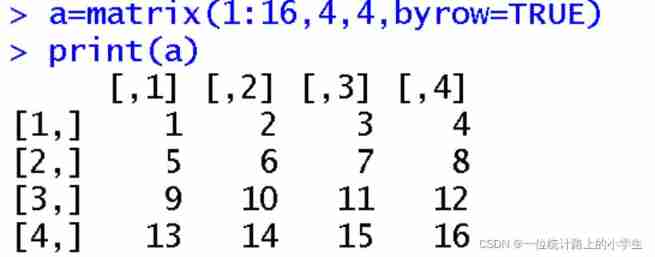
R language learning notes
Yolov5 training custom data set (pycharm ultra detailed version)