当前位置:网站首页>一款开源的Markdown转富文本编辑器的实现原理剖析
一款开源的Markdown转富文本编辑器的实现原理剖析
2022-06-13 04:16:00 【街角小林】
笔者平时写文章使用的都是Markdown,但是发布的时候就会遇到一些平台不支持Markdown的情况,重排是不可能重排的,所以都会使用一些Markdown转富文本的工具,比如markdown-nice,用的多了就会好奇是怎么实现的,于是就有了本篇文章。
markdown-nice是一个基于React构建的项目,先来看一下它的整体页面:

一个顶部工具栏,中间三个并列的区域,分别是编辑区域、预览区域、自定义主题区域,自定义主题区域默认是隐藏的。
大体上就是一个Markdown编辑器,增加了一些对各个平台的适配而已。
编辑器
编辑器使用的是CodeMirror,具体来说是一个二次封装的组件React-CodeMirror:
import CodeMirror from "@uiw/react-codemirror";

class App extends Component {
    render() {
        return (
        	<CodeMirror
                  value={this.props.content.content}
                  options={
   {
                    theme: "md-mirror",// 主题
                    keyMap: "sublime",// 快捷键
                    mode: "markdown",// 模式,也就是语言类型
                    lineWrapping: true,// 开启超长换行
                    lineNumbers: false,// 不显示行号
                    extraKeys: {// 配置快捷键
                      ...bindHotkeys(this.props.content, this.props.dialog),
                      Tab: betterTab,
                      RightClick: rightClick,
                    },
                  }}
                  onChange={this.handleThrottleChange}
                  onScroll={this.handleScroll}
                  onFocus={this.handleFocus}
                  onBlur={this.handleBlur}
                  onDrop={this.handleDrop}
                  onPaste={this.handlePaste}
                  ref={this.getInstance}
                />
        )
    }
}
快捷键、命令
markdown-nice通过extraKeys选项设置一些快捷键,此外还在工具栏中增加了一些快捷按钮:

这些快捷键或者命令按钮操作文本内容的逻辑基本是一致的,先获取当前选区的内容:
const selected = editor.getSelection()
然后进行加工修改:
`**${
      selected}**`
最后替换选区的内容:
editor.replaceSelection(`**${
      selected}**`)
此外也可以修改光标的位置来提升体验,比如加粗操作后光标位置会在文字后面,而不是*后面就是因为markdown-nice在替换完选区内容后还修改了光标的位置:

export const bold = (editor, selection) => {

  editor.replaceSelection(`**${
      selection}**`);
  const cursor = editor.getCursor();
  cursor.ch -= 2;// 光标位置向前两个字符
  editor.setCursor(cursor);
};
表格
Markdown的表格语法手写起来是比较麻烦的,markdown-nice对于表格只提供了帮你插入表格语法符号的功能,你可以输入要插入的表格行列数:

确认以后会自动插入符号:

实现其实就是一个字符串的拼接逻辑:
const text = this.buildFormFormat(this.state.rowNum, this.state.columnNum);

buildFormFormat = (rowNum, columnNum) => {

    let formFormat = "";
    // 最少会创建三行
    for (let i = 0; i < 3; i++) {

        formFormat += this.buildRow(i, columnNum);
    }
    // 超过三行
    for (let i = 3; i <= rowNum; i++) {

        formFormat += this.buildRow(i, columnNum);
    }
    return formFormat;
};

buildRow = (rowNum, columnNum) => {

    let appendText = "|";
    // 第一行为表头和内容的分隔
    if (rowNum === 1) {

        appendText += " --- |";
        for (let i = 0; i < columnNum - 1; i++) {

            appendText += " --- |";
        }
    } else {

        appendText += " |";
        for (let i = 0; i < columnNum - 1; i++) {

            appendText += " |";
        }
    }
    return appendText + (/windows|win32/i.test(navigator.userAgent) ? "\r\n" : "\n");
};
表格字符生成以后替换当前选区内容即可:
handleOk = () => {

    const {
    markdownEditor} = this.props.content;
    const cursor = markdownEditor.getCursor();

    const text = this.buildFormFormat(this.state.rowNum, this.state.columnNum);
    markdownEditor.replaceSelection(text);

    cursor.ch += 2;
    markdownEditor.setCursor(cursor);
    markdownEditor.focus();
};
同样修改了光标位置并且让编辑器重新聚焦。
图片上传
markdown-nice支持直接拖动图片到编辑区域进行上传和粘贴图片直接上传,这是通过监听CodeMirror编辑器的drop和paste事件实现的:
<CodeMirror
    onDrop={this.handleDrop}
	  onPaste={this.handlePaste}
/>
handleDrop = (instance, e) => {

    if (!(e.dataTransfer && e.dataTransfer.files)) {

        return;
    }
    for (let i = 0; i < e.dataTransfer.files.length; i++) {

        uploadAdaptor({
    file: e.dataTransfer.files[i], content: this.props.content});
    }
};
handlePaste = (instance, e) => {

    if (e.clipboardData && e.clipboardData.files) {

      for (let i = 0; i < e.clipboardData.files.length; i++) {

        uploadAdaptor({
    file: e.clipboardData.files[i], content: this.props.content});
      }
    }
}
判断如果拖拽或粘贴的数据中存在文件那么会调用uploadAdaptor方法:
export const uploadAdaptor = (...args) => {

    const type = localStorage.getItem(IMAGE_HOSTING_TYPE);
    if (type === IMAGE_HOSTING_NAMES.aliyun) {

        const config = JSON.parse(window.localStorage.getItem(ALIOSS_IMAGE_HOSTING));
        if (
            !config.region.length ||
            !config.accessKeyId.length ||
            !config.accessKeySecret.length ||
            !config.bucket.length
        ) {

            message.error("请先配置阿里云图床");
            return false;
        }
        return aliOSSUpload(...args);
    }
}
省略了其他类型的图床,以阿里云OSS为例,会先检查一下相关的配置是否存在,存在的话则会调用aliOSSUpload方法:
import OSS from "ali-oss";

export const aliOSSUpload = ({

  file = {
    },
  onSuccess = () => {
    },
  onError = () => {
    },
  images = [],
  content = null, // store content
}) => {

  const config = JSON.parse(window.localStorage.getItem(ALIOSS_IMAGE_HOSTING));
  // 将文件类型转成base64类型
  const base64Reader = new FileReader();
  base64Reader.readAsDataURL(file);
  base64Reader.onload = (e) => {

    const urlData = e.target.result;
    const base64 = urlData.split(",").pop();
    // 获取文件类型
    const fileType = urlData
      .split(";")
      .shift()
      .split(":")
      .pop();

    // base64转blob
    const blob = toBlob(base64, fileType);

    // blob转arrayBuffer
    const bufferReader = new FileReader();
    bufferReader.readAsArrayBuffer(blob);
    bufferReader.onload = (event) => {

      const buffer = new OSS.Buffer(event.target.result);
      aliOSSPutObject({
    config, file, buffer, onSuccess, onError, images, content});
    };
  };
};
这一步主要是将文件类型转换成了arrayBuffer类型,最后会调用aliOSSPutObject进行文件上传操作:
const aliOSSPutObject = ({
     config, file, buffer, onSuccess, onError, images, content}) => {

  let client = new OSS(config);

  // 上传文件名拼接上当前时间
  const OSSName = getOSSName(file.name);

  // 执行上传操作
  client
    .put(OSSName, buffer)
    .then((response) => {

      const names = file.name.split(".");
      names.pop();
      const filename = names.join(".");
      const image = {

        filename, // 名字不变并且去掉后缀
        url: response.url,
      };
      // 插入到文档
      if (content) {

        writeToEditor({
    content, image});
      }
    })
    .catch((error) => {

      console.log(error);
    });
};
上传成功后会把图片插入到文档:
function writeToEditor({
content, image}) {
const isContainImgName = window.localStorage.getItem(IS_CONTAIN_IMG_NAME) === "true";
let text = "";
// 是否带上文件名
if (isContainImgName) {
text = `\n\n`;
} else {
text = `\n\n`;
}
const {
markdownEditor} = content;
// 替换当前选区
const cursor = markdownEditor.getCursor();
markdownEditor.replaceSelection(text, cursor);
content.setContent(markdownEditor.getValue());
}
其他各大平台的具体上传逻辑可以参考源码:imageHosting.js。
格式化Markdown
markdown-nice支持格式化Markdown的功能,也就是美化功能,比如:

美化后:

格式化使用的是prettier:
import prettier from "prettier/standalone";
import prettierMarkdown from "prettier/parser-markdown";

export const formatDoc = (content, store) => {

  content = handlePrettierDoc(content);
  // 给被中文包裹的`$`符号前后添加空格
  content = content.replace(/([\u4e00-\u9fa5])\$/g, "$1 $");
  content = content.replace(/\$([\u4e00-\u9fa5])/g, "$ $1");
  store.setContent(content);
  message.success("格式化文档完成!");
};

// 调用prettier进行格式化
const handlePrettierDoc = (content) => {

  const prettierRes = prettier.format(content, {

    parser: "markdown",
    plugins: [prettierMarkdown],
  });
  return prettierRes;
};
预览
预览也就是将Markdown转换为html进行显示,预览区域只需要提供一个容器元素,比如div,然后将转换后的html内容使用div.innerHTML = html方式追加进去即可。
目前将Markdown转换为html的开源库有很多,比如markdown-it、marked、showdown,markdown-nice使用的是markdown-it。
核心代码:
const parseHtml = markdownParser.render(this.props.content.content);

return (
    <section
        dangerouslySetInnerHTML={
    {

            __html: parseHtml,
        }}
    />
)
markdownParser即markdown-it实例:
import MarkdownIt from "markdown-it";
export const markdownParser = new MarkdownIt({

  html: true,// 允许在源代码中存在HTML标签
  highlight: (str, lang) => {

    // 代码高亮逻辑,后面再看
  },
});
插件
创建完MarkdownIt的实例后,接着注册了很多插件:
markdownParser
  .use(markdownItSpan) // 在标题标签中添加span
  .use(markdownItTableContainer) // 在表格外部添加容器
  .use(markdownItMath) // 数学公式
  .use(markdownItLinkfoot) // 修改脚注
  .use(markdownItTableOfContents, {

    transformLink: () => "",
    includeLevel: [2, 3],
    markerPattern: /^\[toc\]/im,
  }) // TOC仅支持二级和三级标题
  .use(markdownItRuby) // 注音符号
  .use(markdownItImplicitFigures, {
    figcaption: true}) // 图示
  .use(markdownItDeflist) // 定义列表
  .use(markdownItLiReplacer) // li 标签中加入 p 标签
  .use(markdownItImageFlow) // 横屏移动插件
  .use(markdownItMultiquote) // 给多级引用加 class
  .use(markdownItImsize);
插件的功能注释中也体现了。
markdown-it会把输入的Markdown字符串转成一个个token,然后根据token生成html字符串,比如# 街角小林会生成如下的token列表(删减部分字段):
[
  {

    "type": "heading_open",
    "tag": "h1",
    "nesting": 1,
    "level": 0,
    "children": null,
    "content": "",
    "markup": "#",
    "info": "",
    "block": true,
  },
  {

    "type": "inline",
    "tag": "",
    "nesting": 0,
    "level": 1,
    "children": [
      {

        "type": "text",
        "tag": "",
        "nesting": 0,
        "level": 0,
        "children": null,
        "content": "街角小林",
        "markup": "",
        "info": "",
        "block": false,
      }
    ],
    "content": "街角小林",
    "markup": "",
    "info": "",
    "block": true,
  },
  {

    "type": "heading_close",
    "tag": "h1",
    "nesting": -1,
    "level": 0,
    "children": null,
    "content": "",
    "markup": "#",
    "info": "",
    "block": true
  }
]
在markdown-it内部,完成各项工作的是一个个rules,其实就是一个个函数,解析的rules分为三类:core、block、inline。
core包含normalize、block、inline、linkify、replacements、smartquotes这些规则,会对我们传入的markdown字符串按顺序依次执行上述规则,其中就包含着block和inlnie类型的规则的执行过程,block和inline相关规则就是用来生成一个个token的,顾名思义,一个负责生成块级类型的token,比如标题、代码块、表格、项目列表等,一个负责在块级元素生成之后再生成内联类型的token,比如文本、链接、图片等。
block运行时会逐行扫描markdown字符串,对每一行字符串都会依次执行所有块级rule函数,解析生成块级token,内置的block规则有table、code、fence、blockquote、hr、list、heading、paragraph等。
在 block类型的规则处理完之后,可能会生成一种 type 为 inline 的 token,这种 token 属于未完全解析的 token,所以还需要通过inline类型的token再处理一次,也就是对块级token的content字段保存的字符进行解析生成内联token,内置的inline规则有text、link、image等。
这些解析规则都执行完后会输出一个token数组,再通过render相关规则生成html字符串,所以一个markdown-it插件如果想干预生成的token,那就通过更新、扩展、添加不同类型的解析rule,如果想干预根据token生成的html,那就通过更新、扩展、添加渲染rule。
以上只是粗略的介绍,有兴趣深入了解的可以阅读markdown-it源码或下面两个系列的文章:
markdown-it源码分析1-整体流程、markdown-it系列文章
markdown-nice使用的这么多插件,有些是社区的,有些是自己写的,接下来我们看看其中两个比较简单的。
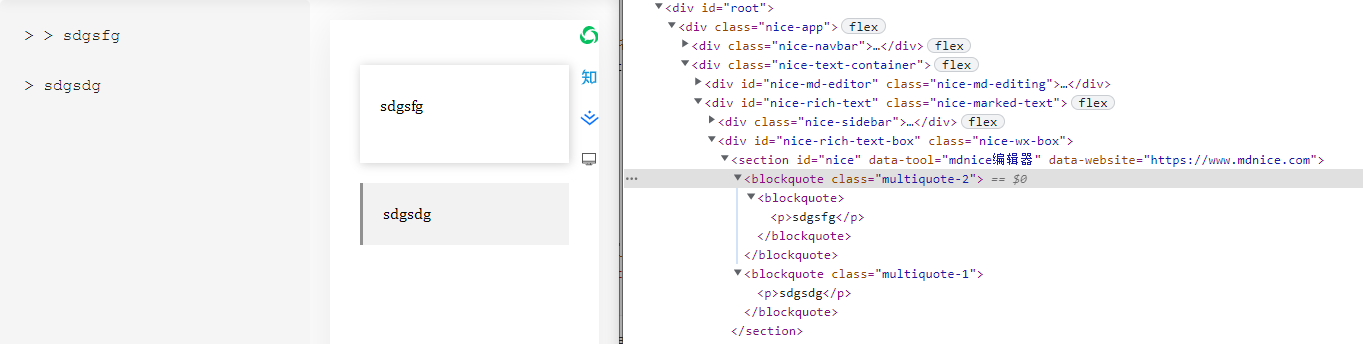
1.markdownItMultiquote
function makeRule() {

  return function addTableContainer(state) {

    let count = 0;
    let outerQuoteToekn;
    for (var i = 0; i < state.tokens.length; i++) {

      // 遍历所有token
      const curToken = state.tokens[i];
      // 遇到blockquote_open类型的token
      if (curToken.type === "blockquote_open") {

        if (count === 0) {

          // 最外层 blockquote 的 token
          outerQuoteToekn = curToken;
        }
        count++;
        continue;
      }
      if (count > 0) {

        // 给最外层的加一个类名
        outerQuoteToekn.attrs = [["class", "multiquote-" + count]];
        count = 0;
      }
    }
  };
}

export default (md) => {

  // 在核心规则下增加一个自定义规则
  md.core.ruler.push("blockquote-class", makeRule(md));
};
这个插件很简单,就是当存在多层嵌套的blockquote时给最外层的blockquote token添加一个类名,效果如下:
2.markdownItLiReplacer
function makeRule(md) {

  return function replaceListItem() {

    // 覆盖了两个渲染规则
    md.renderer.rules.list_item_open = function replaceOpen() {

      return "<li><section>";
    };
    md.renderer.rules.list_item_close = function replaceClose() {

      return "</section></li>";
    };
  };
}

export default (md) => {

  md.core.ruler.push("replace-li", makeRule(md));
};
这个插件就更简单了,覆盖了内置的list_item规则,效果就是在li标签内加了个section标签。
外链转脚注
我们都知道公众号最大的限制就是超链接只允许白名单内的,其他的都会被过滤掉,所以如果不做任何处理,我们的超链接就没了,解决方法一般都是转成脚注,显示在文章末尾,markdown-nice实现这个的逻辑比较复杂,会先更改Markdown内容,将:
[理想青年实验室](http://lxqnsys.com/)
格式化为:
[理想青年实验室](http://lxqnsys.com/ "理想青年实验室")
也就是将标题补上了,然后再通过markdown-it插件处理token,生成脚注:
markdownParser
	.use(markdownItLinkfoot) // 修改脚注
这个插件的实现也比较复杂,有兴趣的可以阅读源码:markdown-it-linkfoot.js。
其实我们可以选择另一种比较简单的思路,我们可以覆盖掉markdown-it内部的链接token渲染规则,同时收集所有的链接数据,最后我们自己来生成html字符串拼接到markdown-it输出的html字符串上。
比如我们创建一个markdownItLinkfoot2插件,注册:
// 用来收集所有的链接
export const linkList = []

markdownParser
	.use(markdownItLinkfoot2, linkList)
把收集链接的数组通过选项传给插件,接下来是插件的代码:
function makeRule(md, linkList) {

  return function() {

    // 每次重新解析前都清空数组和计数器
    linkList.splice(0, linkList.length)
    let index = 0
    let isWeChatLink = false
    // 覆盖a标签的开标签token渲染规则
    md.renderer.rules.link_open = function(tokens, idx) {

      // 获取当前token
      let token = tokens[idx]
      // 获取链接的url
      let href = token.attrs[0] ? token.attrs[0][1] : ''
      // 如果是微信域名则不需要转换
      if (/^https:\/\/mp.weixin.qq.com\//.test(href)) {

        isWeChatLink = true
        return `<a href="${
      href}">`
      }
      // 后面跟着的是链接内的其他token,我们可以遍历查找文本类型的token作为链接标题
      token = tokens[++idx]
      let title = ''
      while(token.type !== 'link_close') {

        if (token.type === 'text') {

          title = token.content
          break
        }
        token = tokens[++idx]
      }
      // 将链接添加到数组里
      linkList.push({

        href,
        title
      })
      // 同时我们把a标签替换成span标签
      return "<span>";
    };
    // 覆盖a标签的闭标签token渲染规则
    md.renderer.rules.link_close = function() {

      if (isWeChatLink) {

        return "</a>"
      }
      // 我们会在链接名称后面加上一个上标,代表它存在脚注,上标就是索引
      index++
      return `<sup>[${
      index}]</sup></span>`;
    };
  };
}

export default (md, linkList) => {

  // 在核心的规则链上添加我们的自定义规则
  md.core.ruler.push("change-link", makeRule(md, linkList));
};
然后我们再自行生成脚注html字符串,并拼接到markdown-it解析后输出的html字符串上 :
let parseHtml = markdownParser.render(this.props.content.content);
if (linkList.length > 0) {
let linkFootStr = '<div>引用链接:</div>'
linkList.forEach((item, index) => {
linkFootStr += `<div>[${
index + 1}] ${
item.title}:${
item.href}</div>`
})
parseHtml += linkFootStr
}
效果如下:
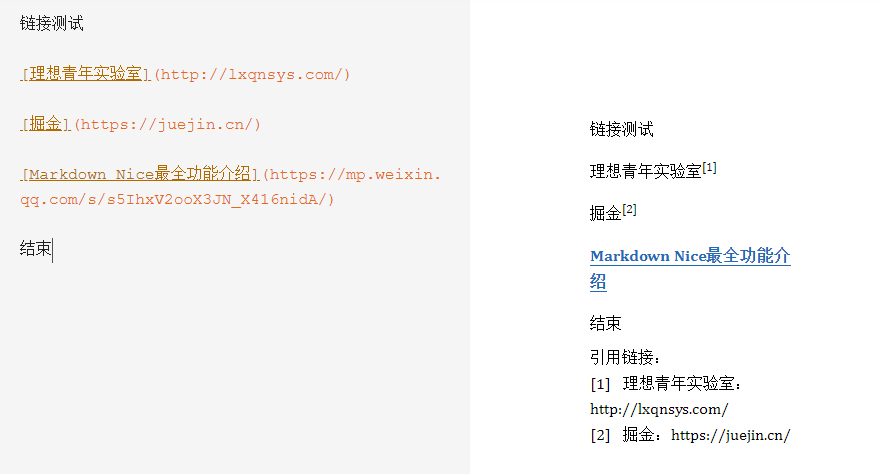
再完善一下样式即可。
同步滚动
编辑区域和预览区域的同步滚动是一个基本功能,首先绑定鼠标移入事件,这样可以判断鼠标是在哪个区域触发的滚动:
// 编辑器
<div id="nice-md-editor" onMouseOver={(e) => this.setCurrentIndex(1, e)}></div>
// 预览区域
<div id="nice-rich-text" onMouseOver={(e) => this.setCurrentIndex(2, e)}></div>

setCurrentIndex(index) {
    this.index = index;
}
然后绑定滚动事件:
// 编辑器
<CodeMirror onScroll={this.handleScroll}></CodeMirror>
// 预览区域容器
<div
    id={BOX_ID}
    onScroll={this.handleScroll}
    ref={(node) => {
		this.previewContainer = node;
	}}
>
    // 预览区域
	<section
        id={LAYOUT_ID}
        dangerouslySetInnerHTML={
   {
        	__html: parseHtml,
    	}}
        ref={(node) => {
            this.previewWrap = node;
        }}
    </section>
</div>
handleScroll = () => {

    if (this.props.navbar.isSyncScroll) {

        const {
    markdownEditor} = this.props.content;
        const cmData = markdownEditor.getScrollInfo();
        // 编辑器的滚动距离
        const editorToTop = cmData.top;
        // 编辑器的可滚动高度
        const editorScrollHeight = cmData.height - cmData.clientHeight;
        // scale = 预览区域的可滚动高度 / 编辑器的可滚动高度
        this.scale = (this.previewWrap.offsetHeight - this.previewContainer.offsetHeight + 55) / editorScrollHeight;
        // scale = 预览区域的滚动距离 / 编辑器的滚动距离 = this.previewContainer.scrollTop / editorToTop
        if (this.index === 1) {

            // 鼠标在编辑器上触发滚动,预览区域跟随滚动
            this.previewContainer.scrollTop = editorToTop * this.scale;
        } else {

            // 鼠标在预览区域触发滚动,编辑器跟随滚动
            this.editorTop = this.previewContainer.scrollTop / this.scale;
            markdownEditor.scrollTo(null, this.editorTop);
        }
    }
};
计算很简单,根据两个区域的可滚动距离之比等于两个区域的滚动距离之比,计算出其中某个区域的滚动距离,但是这种计算实际上不会很准确,尤其是当存在大量图片时:

可以看到上图中编辑器都滚动到了4.2小节,而预览区域4.2小节都还看不见。
要解决这个问题单纯的计算高度就不行了,需要能将两边的元素对应起来,预知详情,可参考笔者的另外一篇文章:如何实现一个能精确同步滚动的Markdown编辑器。
主题
主题本质上就是css样式,markdown转成html后涉及到的标签并不是很多,只要全都罗列出来定制样式即可。
markdown-nice首先创建了四个style标签:

1.basic-theme
基础主题,定义了一套默认的样式,样式内容可以在basic.js文件查看。
2.markdown-theme
用来插入所选择的主题样式,也就是用来覆盖basic-theme的样式,自定义的主题样式也会插入到这个标签:

3.font-theme
用来专门插入字体样式,对应的是这个功能:

// 衬线字体 和 非衬线字体 切换
toggleFont = () => {

    const {
    isSerif} = this.state;
    const serif = `#nice { font-family: Optima-Regular, Optima, PingFangSC-light, PingFangTC-light, 'PingFang SC', Cambria, Cochin, Georgia, Times, 'Times New Roman', serif; }`;
    const sansSerif = `#nice { font-family: Roboto, Oxygen, Ubuntu, Cantarell, PingFangSC-light, PingFangTC-light, 'Open Sans', 'Helvetica Neue', sans-serif; }`;
    const choosen = isSerif ? serif : sansSerif;
    replaceStyle(FONT_THEME_ID, choosen);
    message.success("字体切换成功!");
    this.setState({
    isSerif: !isSerif});
};
4.code-theme
顾名思义,对应的就是用来插入代码块的样式了,markdown-it提供了一个highlight选项来配置代码块高亮,提供一个函数,接收代码字符和语言类型,返回一个html片段,也可以包裹pre标签后返回,这样markdown-it内部就不会再处理。
markdown-nice使用的是highlight.js来实现代码高亮:
export const markdownParser = new MarkdownIt({
html: true,
highlight: (str, lang) => {
if (lang === undefined || lang === "") {
lang = "bash";
}
// 加上custom则表示自定义样式,而非微信专属,避免被remove pre
if (lang && highlightjs.getLanguage(lang)) {
try {
const formatted = highlightjs
.highlight(lang, str, true)
.value.replace(/\n/g, "<br/>") // 换行用br表示
.replace(/\s/g, " ") // 用nbsp替换空格
.replace(/span /g, "span "); // span标签修复
return '<pre class="custom"><code class="hljs">' + formatted + "</code></pre>";
} catch (e) {
console.log(e);
}
}
// escapeHtml方法会转义html种的 &<>" 字符
return '<pre class="custom"><code class="hljs">' + markdownParser.utils.escapeHtml(str) + "</code></pre>";
},
});

highlight.js内置了很多主题:styles,markdown-nice从中挑了6种:

并且还支持mac风格,区别就是mac风格增加了下列样式:

一键复制
markdown-nice有三个一键复制的按钮,分别是公众号、知乎、掘金,掘金现在本身编辑器就是markdown的,所以我们直接忽略。
公众号:
copyWechat = () => {

    const layout = document.getElementById(LAYOUT_ID); // 保护现场
    const html = layout.innerHTML;
    solveWeChatMath();
    this.html = solveHtml();
    copySafari(this.html);
    message.success("已复制,请到微信公众平台粘贴");
    layout.innerHTML = html; // 恢复现场
};
知乎:
copyZhihu = () => {

    const layout = document.getElementById(LAYOUT_ID); // 保护现场
    const html = layout.innerHTML;
    solveZhihuMath();
    this.html = solveHtml();
    copySafari(this.html);
    message.success("已复制,请到知乎粘贴");
    layout.innerHTML = html; // 恢复现场
};
主要的区别其实就是solveWeChatMath和solveZhihuMath方法,这两个方法是用来解决公式的问题。markdown-nice使用MathJax来渲染公式(各位自己看,笔者对MathJax不熟悉,属实看不懂~):
try {

    window.MathJax = {

        tex: {

            inlineMath: [["\$", "\$"]],// 行内公式的开始/结束分隔符
            displayMath: [["\$\$", "\$\$"]],// 块级公式的开始/结束分隔符
            tags: "ams",
        },
        svg: {

            fontCache: "none",// 不缓存svg路径,不进行复用
        },
        options: {

            renderActions: {

                addMenu: [0, "", ""],
                addContainer: [
                    190,
                    (doc) => {

                        for (const math of doc.math) {

                            this.addContainer(math, doc);
                        }
                    },
                    this.addContainer,
                ],
            },
        },
    };
    require("mathjax/es5/tex-svg-full");
} catch (e) {

    console.log(e);
}

addContainer(math, doc) {

    const tag = "span";
    const spanClass = math.display ? "span-block-equation" : "span-inline-equation";
    const cls = math.display ? "block-equation" : "inline-equation";
    math.typesetRoot.className = cls;
    math.typesetRoot.setAttribute(MJX_DATA_FORMULA, math.math);
    math.typesetRoot.setAttribute(MJX_DATA_FORMULA_TYPE, cls);
    math.typesetRoot = doc.adaptor.node(tag, {
    class: spanClass, style: "cursor:pointer"}, [math.typesetRoot]);
}

// 内容更新后调用下列方法重新渲染公式
export const updateMathjax = () => {

  window.MathJax.texReset();
  window.MathJax.typesetClear();
  window.MathJax.typesetPromise();
};
公式转换的html结构如下:

公众号编辑器不支持公式,所以是通过直接插入svg:
export const solveWeChatMath = () => {

  const layout = document.getElementById(LAYOUT_ID);
  // 获取到所有公式标签
  const mjxs = layout.getElementsByTagName("mjx-container");
  for (let i = 0; i < mjxs.length; i++) {

    const mjx = mjxs[i];
    if (!mjx.hasAttribute("jax")) {

      break;
    }
	// 移除mjx-container标签上的一些属性
    mjx.removeAttribute("jax");
    mjx.removeAttribute("display");
    mjx.removeAttribute("tabindex");
    mjx.removeAttribute("ctxtmenu_counter");
    // 第一个节点为svg节点
    const svg = mjx.firstChild;
    // 将svg通过属性设置的宽高改成通过样式进行设置
    const width = svg.getAttribute("width");
    const height = svg.getAttribute("height");
    svg.removeAttribute("width");
    svg.removeAttribute("height");
    svg.style.width = width;
    svg.style.height = height;
  }
};
知乎编辑器支持公式,所以会直接把公式相关的html替换为img标签:
export const solveZhihuMath = () => {

  const layout = document.getElementById(LAYOUT_ID);
  const mjxs = layout.getElementsByTagName("mjx-container");
  while (mjxs.length > 0) {

    const mjx = mjxs[0];
    let data = mjx.getAttribute(MJX_DATA_FORMULA);
    if (!data) {

      continue;
    }

    if (mjx.hasAttribute("display") && data.indexOf("\\tag") === -1) {

      data += "\\\\";
    }
	// 替换整个公式标签
    mjx.outerHTML = '<img class="Formula-image" data-eeimg="true" src="" alt="' + data + '">';
  }
};
处理完公式后接下来会执行solveHtml方法:
import juice from "juice";
export const solveHtml = () => {
const element = document.getElementById(BOX_ID);
let html = element.innerHTML;
// 将公式的容器标签替换成span
html = html.replace(/<mjx-container (class="inline.+?)<\/mjx-container>/g, "<span $1</span>");
// 将空格替换成
html = html.replace(/\s<span class="inline/g, ' <span class="inline');
// 同上
html = html.replace(/svg><\/span>\s/g, "svg></span> ");
// 这个标签上面已经替换过了,这里为什么还要再替换一遍
html = html.replace(/mjx-container/g, "section");
html = html.replace(/class="mjx-solid"/g, 'fill="none" stroke-width="70"');
// 去掉公式的mjx-assistive-mml标签
html = html.replace(/<mjx-assistive-mml.+?<\/mjx-assistive-mml>/g, "");
// 获取四个样式标签内的样式
const basicStyle = document.getElementById(BASIC_THEME_ID).innerText;
const markdownStyle = document.getElementById(MARKDOWN_THEME_ID).innerText;
const codeStyle = document.getElementById(CODE_THEME_ID).innerText;
const fontStyle = document.getElementById(FONT_THEME_ID).innerText;
let res = "";
try {
// 使用juice库将样式内联到html标签上
res = juice.inlineContent(html, basicStyle + markdownStyle + codeStyle + fontStyle, {
inlinePseudoElements: true,// 插入伪元素,做法是转换成span标签
preserveImportant: true,// 保持!import
});
} catch (e) {
message.error("请检查 CSS 文件是否编写正确!");
}
return res;
};
这一步主要是替换掉公式的相关标签,然后获取了四个样式标签内的样式,最关键的一步是最后使用juice将样式内联到了html标签里,所以预览的时候样式是分离的,但是最终我们复制出来的数据是带样式的:


html处理完毕,最后会执行复制到剪贴板的操作copySafari:
export const copySafari = (text) => {

  // 获取 input
  let input = document.getElementById("copy-input");
  if (!input) {

    // input 不能用 CSS 隐藏,必须在页面内存在。
    input = document.createElement("input");
    input.id = "copy-input";
    input.style.position = "absolute";
    input.style.left = "-1000px";
    input.style.zIndex = "-1000";
    document.body.appendChild(input);
  }
  // 让 input 选中一个字符,无所谓那个字符
  input.value = "NOTHING";
  input.setSelectionRange(0, 1);
  input.focus();

  // 复制触发
  document.addEventListener("copy", function copyCall(e) {

    e.preventDefault();
    e.clipboardData.setData("text/html", text);
    e.clipboardData.setData("text/plain", text);
    document.removeEventListener("copy", copyCall);
  });
  document.execCommand("copy");
};
导出为PDF
导出为PDF功能实际上是通过打印功能实现的,也就是调用:
window.print();

可以看到打印的内容只有预览区域,这是怎么实现的呢,很简单,通过媒体查询,在打印模式下隐藏掉不需要打印的其他元素即可:
@media print {

  .nice-md-editing {

    display: none;
  }
  .nice-navbar {

    display: none;
  }
  .nice-sidebar {

    display: none;
  }
  .nice-wx-box {

    overflow: visible;
    box-shadow: none;
    width: 100%;
  }
  .nice-style-editing {

    display: none;
  }
  #nice-rich-text {

    padding: 0 !important;
  }
  .nice-footer-container {

    display: none;
  }
}
效果就是这样的:

总结
本文通过源码的角度简单了解了一下markdown-nice的实现原理,整体逻辑比较简单,有些细节上的实现还是有点麻烦的,比如扩展markdown-it、对数学公式的支持等。扩展markdown-it的场景还是有很多的,比如VuePress大量的功能都是通过写markdown-it插件来实现的,所以有相关的开发需求可以参考一下这些优秀开源项目的实现。
边栏推荐
- PAT 1054 The Dominant Color
- [notes] summarize common horizontal and vertical centering methods
- Among the four common technologies for UAV obstacle avoidance, why does Dajiang prefer binocular vision
- Lambda termination operation find and match nonematch
- Answer private message @ Tiantian Wx //2022-6-12 C language 51 single chip microcomputer led analog traffic light
- Common array methods in JS (map, filter, foreach, reduce)
- R: Airline customer value analysis practice
- Dumi construit un blog documentaire
- 7-289 tag count (300 points)
- 120. 三角形最小路径和-动态规划
猜你喜欢
![[web] cookies and sessions](/img/00/b10a9f4ae918afe5d032a9af20a49c.png)
[web] cookies and sessions

SCM signal generator program

Google Chrome browser reports an error: net:: err_ BLOCKED_ BY_ CLIENT

5G China unicom 直放站 网管协议 实时性要求

dumi 搭建文档型博客
![[MySQL] index and transaction](/img/19/f87fee3749690902c349c42673f148.png)
[MySQL] index and transaction

Advanced Mathematics (Seventh Edition) Tongji University exercises 1-3 personal solutions

Solution to failure to download files by wechat scanning QR code

The could not find com scwang. smart:refresh-layout-kernel:2.0.3. Required by: project: the app cannot load the third-party package
![[note]vs2015 compilation of masm32 using MASM32 Library](/img/f5/b47336af248d1b485208ec3f9ca12b.png)
[note]vs2015 compilation of masm32 using MASM32 Library
随机推荐
The data obtained from mongodb query data command is null
Dagger2学习之Module的应用(二)
120. triangle minimum path sum - Dynamic Planning
Introduction to MCU peripherals: temperature sensor DS18B20
【LeetCode】860. Change with lemonade (2 brushes for wrong questions)
MSG messages in ROS
SCM: introduction to Modbus communication protocol
【ZeloEngine】本地化流程/ImGui中文化
Redis persistence mode AOF and RDB
web自动化测试之webdriver api总结
Lambda termination operation find and match nonematch
[MySQL] index and transaction
Real time requirements for 5g China Unicom repeater network management protocol
Single chip microcomputer: MODBUS multi computer communication program design
Unity Shader 学习 004-Shader 调试 平台差异性 第三方调试工具
5g China Unicom ap:b SMS ASCII transcoding requirements
No more! Another member of the team left..
[kubernetes series] pod chapter actual operation
Advanced Mathematics (Seventh Edition) Tongji University exercises 1-3 personal solutions
Answer private message @ Tiantian Wx //2022-6-12 C language 51 single chip microcomputer led analog traffic light