当前位置:网站首页>3dunity game project practice - first person shooting game
3dunity game project practice - first person shooting game
2022-07-26 10:59:00 【ha_ lee】
One 、 Game planning
1.1 Introduction to the game
In the game scene , There will be several enemy birth points , Generate some enemies regularly , The enemy will take the initiative to find and attack the protagonist . The purpose of the game is to survive , Destroy zombie enemies , Get higher points .
1.2 UI Interface
In the game interface , Including the life value of the protagonist , Quantity of ammunition , Score and aim at the stars .
After the game failed , A restart button appears .
1.3 Lead
The first person perspective cannot see the protagonist himself , On the screen, you can only see the same end M16 firearms , keyboard W、S、A、D Key control the protagonist to move up, down, left and right , Move the mouse to rotate the viewing angle .
1.4 The enemy
The enemy is a zombie like a nurse , It has the function of automatic path finding , Avoid obstacles , And attack the protagonist .
Two 、 Game scenario
- Open the project , Import model 、 Animation 、 Sound effects and other resources .
- Open the scene Scene, In this scenario
LightmapandLight ProbeShow the light and shadow effects of static and dynamic models . - Select the scene model , To add
Mesh ColliderPolygon collision component . In development , Models are often complex , Will prepare two sets of models , A group of high quality is used to display , The other group is for physical collisions .
3、 ... and 、 Lead
The protagonist is invisible , You can only see the guns in the protagonist's hand , Still, create collision bodies for the protagonists , And control its movement .
3.1 Character controller
- Create an empty gamebody ,Tag Set to
player - Add
Character ControllerCharacter controller , So the protagonist won't wear a model when walking - Add
RigidbodyComponents , Cancel gravity simulation , Choose Is Kinermaic So that it is not affected by physical deduction . - establish Player Script
//Player.cs  Complete code
using System.Collections;
using System.Collections.Generic;
using UnityEngine;

public class Player : MonoBehaviour
{


    // Components
    public Transform m_transform;
    CharacterController m_ch;

    // The muzzle of a gun transform
    Transform m_muzzlepoint;
    // When shooting , The collision layer that rays can reach
    public LayerMask m_layer;
    // The particle effect after hitting the target
    public Transform m_fx;
    // Shooting sound
    public AudioSource m_audio;
    public AudioClip m_shootClip; // voice
    // Firing interval
    float m_shootTimer = 0;

    // The camera Transform
    Transform m_camTransform;
    Vector3 m_camRot; // Camera rotation angle
    float m_camHeight = 1.4f; // Camera height

    // Character movement speed
    float m_movSpeed = 3.0f;

    // gravity
    float m_grivity = 2.0f;

    // Health value
    public int m_life = 5;

    // Start is called before the first frame update
    void Start()
    {

        // Get components
        m_transform = this.transform;
        m_ch = this.GetComponent<CharacterController>();
        m_audio = this.GetComponent<AudioSource>();


        // Get the camera
        m_camTransform = Camera.main.transform;

        // Get the muzzle
        m_muzzlepoint = m_camTransform.transform.Find("M16/weapon/muzzlepoint").transform;

        // Set the initial position of the camera
        Vector3 pos = m_transform.position;
        pos.y += m_camHeight;
        m_camTransform.position = pos;

        // Set the initial rotation angle of the camera
        /* * rotation yes Quaternion type , The rotation angle can be changed at any time  * eulerAngles yes Vector3 type , It cannot be changed at any time , Is a fixed value  */
        m_camTransform.rotation = m_transform.rotation;
        m_camRot = m_camTransform.eulerAngles;

        // Lock mouse
        Cursor.lockState = CursorLockMode.Locked;

    }


    // Update is called once per frame
    void Update()
    {

        // If health is 0, Do nothing
        if (m_life <= 0) return;


        // Update the firing interval
        m_shootTimer -= Time.deltaTime;
        // Left mouse button shooting
        if(Input.GetMouseButton(0) && m_shootTimer <= 0)
        {

            m_shootTimer = 0.1f;
            // Shooting sound
            m_audio.PlayOneShot(m_shootClip);
            // Reduce ammo , to update UI
            GameManager.Instance.SetAmmo(1);

            //RaycastHit Used to save ray detection results
            RaycastHit info;

            // from muzzlepoint The location of , Shoot a ray in the positive direction facing the camera
            // Rays can only be associated with m_layer Specified layer collision ,Vector3.forward finger (0,0,1) namely z The unit vector of the direction
            bool hit = Physics.Raycast(m_muzzlepoint.position,
                m_camTransform.TransformDirection(Vector3.forward), out info, 100, m_layer);

            // If you hit Tag by enemy The object
            if (info.transform.tag.CompareTo("enemy") == 0)
            {

                Enemy enemy = info.transform.GetComponent<Enemy>();
                // Enemy reduces life
                enemy.OnDamage(1);
            }
            // Release a particle effect where it hits
            Instantiate(m_fx, info.point, info.transform.rotation);
        }
        Control();

    }


    // Control character movement and perspective change
    void Control()
    {

        float xm = 0, ym = 0, zm = 0;

        // Get the mouse movement distance
        float rh = Input.GetAxis("Mouse X"); // Right is positive
        float rv = Input.GetAxis("Mouse Y"); //  Top is positive


        // Rotate the camera ,z Controlling the inclination , Keep unchanged
        m_camRot.x -= rv;   // Rotating the lens up and down is x control , Up is minus
        m_camRot.y += rh;   // Rotating the lens left and right is y control , Left is minus
        m_camTransform.eulerAngles = m_camRot;

        // Make the main character face the same direction as the camera , That is, only y The axis rotates with the lens , The other two axes do not move
        Vector3 camrot = m_camTransform.eulerAngles;
        camrot.x = 0;
        camrot.z = 0;
        m_transform.eulerAngles = camrot;

        // Gravity movement
        ym -= m_grivity * Time.deltaTime;

        // Up, down, left and right movement
        if (Input.GetKey(KeyCode.W))
        {

            zm += m_movSpeed * Time.deltaTime;
        }
        if (Input.GetKey(KeyCode.S))
        {

            zm -= m_movSpeed * Time.deltaTime;
        }
        if (Input.GetKey(KeyCode.A))
        {

            xm -= m_movSpeed * Time.deltaTime;
        }
        if (Input.GetKey(KeyCode.D))
        {

            xm += m_movSpeed * Time.deltaTime;
        }

        // Move , According to the orientation of the role , Move around relatively
        m_ch.Move(m_transform.TransformDirection(new Vector3(xm, ym, zm)));

        // Make the camera position consistent with the protagonist
        Vector3 pos = m_transform.position;
        pos.y += m_camHeight;
        m_camTransform.position = pos;
    }

    public void OnDamage(int damage)
    {

        m_life -= damage;

        // to update UI
        GameManager.Instance.setLife(m_life);

        // If health is 0, Unlock the mouse
        if(m_life <= 0)
        {

            Cursor.lockState = CursorLockMode.None;
        }
    }
    private void OnDrawGizmos()
    {

        Gizmos.DrawIcon(this.transform.position, "Spawn.tif");
    }
}
3.2 The camera
stay Player.cs Add some code to the script , Make the camera move with the protagonist
Specific implementation part of the code :
void Control()
    {

        float xm = 0, ym = 0, zm = 0;

        // Get the mouse movement distance
        float rh = Input.GetAxis("Mouse X"); // Right is positive
        float rv = Input.GetAxis("Mouse Y"); //  Top is positive


        // Rotate the camera ,z Controlling the inclination , Keep unchanged
        m_camRot.x -= rv;   // Rotating the lens up and down is x control , Up is minus
        m_camRot.y += rh;   // Rotating the lens left and right is y control , Left is minus
        m_camTransform.eulerAngles = m_camRot;

        // Make the main character face the same direction as the camera , That is, only y The axis rotates with the lens , The other two axes do not move
        Vector3 camrot = m_camTransform.eulerAngles;
        camrot.x = 0;
        camrot.z = 0;
        m_transform.eulerAngles = camrot;

        // Gravity movement
        ym -= m_grivity * Time.deltaTime;

        // Up, down, left and right movement
        if (Input.GetKey(KeyCode.W))
        {

            zm += m_movSpeed * Time.deltaTime;
        }
        if (Input.GetKey(KeyCode.S))
        {

            zm -= m_movSpeed * Time.deltaTime;
        }
        if (Input.GetKey(KeyCode.A))
        {

            xm -= m_movSpeed * Time.deltaTime;
        }
        if (Input.GetKey(KeyCode.D))
        {

            xm += m_movSpeed * Time.deltaTime;
        }

        // Move , According to the orientation of the role , Move around relatively
        m_ch.Move(m_transform.TransformDirection(new Vector3(xm, ym, zm)));

        // Make the camera position consistent with the protagonist
        Vector3 pos = m_transform.position;
        pos.y += m_camHeight;
        m_camTransform.position = pos;
    }
3.3 weapons
Bind the weapon to the camera , So that it can move with the protagonist
- The position and rotation angle of the camera are set to 0
- Of the camera
Clipping Plane/NearSet to 0.1, So that it can see objects closer - Put the weapon Prefab Into the scene
- Put the weapon Prefeb Both position and rotation are set to 0, Sub objects placed on the lower layer of the camera , Adjust its position in the screen until you are satisfied .
Four 、 The enemy
4.1 Pathfinding
Unity It provides a very practical way finding function , Its path finding system is divided into two parts , The first part is to set the scene , Make it meet the needs of Routing Algorithm , The other part is to set up Pathfinder .
- stay Inspector The small triangle of the window shows the drop-down menu , determine Navigation Static To be selected .
- choice 【Window】-【AI】-【Navigation】, This window mainly defines the influence of terrain on Wayfinding . After setting the options , choice Bake Calculate the terrain .
- Drag the enemy's object into the scene , choice 【Component】-【Nav Mesh Agent】 Assign the pathfinding component to the enemy .
- Create enemy scripts .
//Enemy.cs
using System.Collections;
using System.Collections.Generic;
using UnityEngine;

public class Enemy : MonoBehaviour
{


    Transform m_transform;
    Player m_player;
    UnityEngine.AI.NavMeshAgent m_agent;  // Pathfinding assembly
    float m_movSpeed = 0.5f; // Enemy movement speed
    float m_rotSpeed = 120;  // Character rotation speed
    float m_timer = 2; // timer
    int m_life = 5; // Health value

    // Point of birth
    protected EnemySpawn m_spawn;

    // initialization
    public void Init(EnemySpawn spawn)
    {

        m_spawn = spawn;
        m_spawn.m_enemyCount++;
    }

    Animator m_ani; // Animation components

    // Start is called before the first frame update
    void Start()
    {

        // Get components
        m_transform = this.transform;
        m_ani = GetComponent<Animator>(); // Get animation components

        // Get the protagonist class instance
        m_player = GameObject.FindGameObjectWithTag("player").GetComponent<Player>();
        // Get pathfinding component
        m_agent = GetComponent<UnityEngine.AI.NavMeshAgent>();
        // Set pathfinding target
        m_agent.SetDestination(m_player.m_transform.position);
    }

    // Update is called once per frame
    void Update()
    {

        //  If the protagonist's life is 0, Do nothing
        if (m_player.m_life <= 0)
            return;

        //  Get the current animation state
        AnimatorStateInfo stateInfo = m_ani.GetCurrentAnimatorStateInfo(0);

        //  If in standby mode
        if (stateInfo.fullPathHash == Animator.StringToHash("Base Layer.idle") && !m_ani.IsInTransition(0))
        {

            m_ani.SetBool("idle", false);

            //  Standby for a certain time
            m_timer -= Time.deltaTime;
            if (m_timer > 0)
                return;

            //  If the distance from the protagonist is less than 1.5 rice , Enter the attack animation state
            if (Vector3.Distance(m_transform.position, m_player.m_transform.position) < 1.5f)
            {

                m_ani.SetBool("attack", true);
            }
            else
            {

                //  Reset timer
                m_timer = 1;

                //  Set the wayfinding target point
                m_agent.SetDestination(m_player.m_transform.position);

                //  Enter the running animation state
                m_ani.SetBool("run", true);
            }
        }

        //  If you are running
        if (stateInfo.fullPathHash == Animator.StringToHash("Base Layer.run") && !m_ani.IsInTransition(0))
        {

            m_ani.SetBool("run", false);


            //  every other 1 Seconds to reposition the protagonist
            m_timer -= Time.deltaTime;
            if (m_timer < 0)
            {

                m_agent.SetDestination(m_player.m_transform.position);

                m_timer = 1;
            }

            //  Chasing the protagonist
            MoveTo();

            //  If the distance from the protagonist is less than 1.5 rice , Attack the protagonist
            if (Vector3.Distance(m_transform.position, m_player.m_transform.position) <= 1.5f)
            {

                // Stop searching
                m_agent.ResetPath();
                m_ani.SetBool("attack", true);
            }
        }

        //  If you are under attack
        if (stateInfo.fullPathHash == Animator.StringToHash("Base Layer.attack") && !m_ani.IsInTransition(0))
        {

            //  Facing the protagonist
            RotateTo();

            m_ani.SetBool("attack", false);

            //  If the attack animation is finished , Re enter standby mode
            if (stateInfo.normalizedTime >= 1.0f)
            {

                m_ani.SetBool("idle", true);

                //  Reset timer
                m_timer = 2;

                // Update the protagonist's life
                m_player.OnDamage(1);

            }
        }

        if (stateInfo.fullPathHash == Animator.StringToHash("Base Layer.death") && !m_ani.IsInTransition(0))
        {

            // When the death animation is played
            if (stateInfo.normalizedTime >= 1.0f)
            {

                OnDeath();
            }
        }
    }

    // Pathfinding movement
    void MoveTo()
    {

        float speed = m_movSpeed * Time.deltaTime;
        //TransformDirection Change the direction from its own coordinates to the world coordinates
        m_agent.Move(m_transform.TransformDirection(new Vector3(0, 0, speed)));
    }

    // Always turn to the leading role
    void RotateTo()
    {

        // Current angle
        Vector3 oldangle = m_transform.eulerAngles;

        // Get an angle towards the protagonist
        m_transform.LookAt(m_player.m_transform);
        float target = m_transform.eulerAngles.y;

        // Turn to the protagonist
        float speed = m_rotSpeed * Time.deltaTime;
        float angle = Mathf.MoveTowardsAngle(oldangle.y, target, speed); // Calculate the rotation angle of the current angle to the target angle
        m_transform.eulerAngles = new Vector3(0, angle, 0);

    }

    public void OnDamage(int damage)
    {

        //  damage
        m_life -= damage;
        if (m_life <= 0)
        {

            m_ani.SetBool("death", true);
        }
    }

    // When destroyed
    public void OnDeath()
    {

        // Update the number of enemies
        m_spawn.m_enemyCount--;
        // Bonus points
        GameManager.Instance.SetScore(100);
        // The destruction
        Destroy(this.gameObject);
    }
}
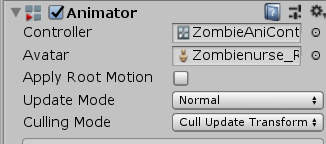
4.2 Animate
Set different animations for different actions of the enemy
Select the enemy in the scene , By default, it has a Animator Components , stay Controller Set one in Animator Controller, deselect Apply Root Motion Options , Force it to be controlled by script .
【window】-【Animation】-【Animator】 open Animator window , Add animation transitions . Click on the status grid , Add animation to it ; Click the arrow to add transition conditions .

Click on 【parameter】, Add parameters for several States .
Be careful : Don't tick the next option
Set animation transition conditions

4.3 Behavior
Modify the enemy's script , Make the enemy's behavior change in different states .
- Add attributes such as animation components
- add to
RotateTofunction , Make the enemy always turn to the angle facing the protagonist
// Always turn to the leading role
    void RotateTo()
    {

        // Current angle
        Vector3 oldangle = m_transform.eulerAngles;

        // Get an angle towards the protagonist
        m_transform.LookAt(m_player.m_transform);
        float target = m_transform.eulerAngles.y;

        // Turn to the protagonist
        float speed = m_rotSpeed * Time.deltaTime;
        float angle = Mathf.MoveTowardsAngle(oldangle.y, target, speed); // Calculate the rotation angle of the current angle to the target angle
        m_transform.eulerAngles = new Vector3(0, angle, 0);

    }
- Add conditions for animation transition
//  Get the current animation state
        AnimatorStateInfo stateInfo = m_ani.GetCurrentAnimatorStateInfo(0);

        //  If in standby mode
        if (stateInfo.fullPathHash == Animator.StringToHash("Base Layer.idle") && !m_ani.IsInTransition(0))
        {

            m_ani.SetBool("idle", false);

            //  Standby for a certain time
            m_timer -= Time.deltaTime;
            if (m_timer > 0)
                return;

            //  If the distance from the protagonist is less than 1.5 rice , Enter the attack animation state
            if (Vector3.Distance(m_transform.position, m_player.m_transform.position) < 1.5f)
            {

                m_ani.SetBool("attack", true);
            }
            else
            {

                //  Reset timer
                m_timer = 1;

                //  Set the wayfinding target point
                m_agent.SetDestination(m_player.m_transform.position);

                //  Enter the running animation state
                m_ani.SetBool("run", true);
            }
        }

        //  If you are running
        if (stateInfo.fullPathHash == Animator.StringToHash("Base Layer.run") && !m_ani.IsInTransition(0))
        {

            m_ani.SetBool("run", false);


            //  every other 1 Seconds to reposition the protagonist
            m_timer -= Time.deltaTime;
            if (m_timer < 0)
            {

                m_agent.SetDestination(m_player.m_transform.position);

                m_timer = 1;
            }

            //  Chasing the protagonist
            MoveTo();

            //  If the distance from the protagonist is less than 1.5 rice , Attack the protagonist
            if (Vector3.Distance(m_transform.position, m_player.m_transform.position) <= 1.5f)
            {

                // Stop searching
                m_agent.ResetPath();
                m_ani.SetBool("attack", true);
            }
        }

        //  If you are under attack
        if (stateInfo.fullPathHash == Animator.StringToHash("Base Layer.attack") && !m_ani.IsInTransition(0))
        {

            //  Facing the protagonist
            RotateTo();

            m_ani.SetBool("attack", false);

            //  If the attack animation is finished , Re enter standby mode
            if (stateInfo.normalizedTime >= 1.0f)
            {

                m_ani.SetBool("idle", true);

                //  Reset timer
                m_timer = 2;

                // Update the protagonist's life
                m_player.OnDamage(1);

            }
        }

        if (stateInfo.fullPathHash == Animator.StringToHash("Base Layer.death") && !m_ani.IsInTransition(0))
        {

            // When the death animation is played
            if (stateInfo.normalizedTime >= 1.0f)
            {

                OnDeath();
            }
        }
5、 ... and 、UI Interface
Use 2D The way of mapping UI effect , Than using OnGUI Save more resources .
- Create a GameManager An empty object , To add 【Component】-【UI】-【Image】 Components , Insert pictures into components , You can also use 【Component】-【UI】-【Text】 Add text components
- adjustment UI Location of pictures and text . Tips : Click the position box , have access to 【shft】+【Alt】 Determine its relative position

- establish GameManager Script file for
//GameManager.cs
using System.Collections;
using System.Collections.Generic;
using UnityEngine;

public class GameManager : MonoBehaviour
{


    public static GameManager Instance = null;

    // Game score
    int m_score = 0;

    // The highest score in the game
    static int m_hiscore = 0;

    // Quantity of ammunition
    int m_ammo = 100;

    // The protagonist of the game
    Player m_player;

    //UI written words
    UnityEngine.UI.Text txt_ammo;
    UnityEngine.UI.Text txt_hiscore;
    UnityEngine.UI.Text txt_life;
    UnityEngine.UI.Text txt_score;

    // Start is called before the first frame update
    void Start()
    {

        Instance = this;

        // Get the protagonist
        m_player = GameObject.FindGameObjectWithTag("player").GetComponent<Player>();

        // Get the set UI written words
        txt_ammo = this.transform.Find("Canvas/txt_ammo").GetComponent<UnityEngine.UI.Text>();
        txt_hiscore = this.transform.Find("Canvas/txt_hiscore").GetComponent<UnityEngine.UI.Text>();
        txt_life = this.transform.Find("Canvas/txt_life").GetComponent<UnityEngine.UI.Text>();
        txt_score = this.transform.Find("Canvas/txt_score").GetComponent<UnityEngine.UI.Text>();
    }

    // Update score
    public void SetScore(int score)
    {

        m_score += score;

        if(m_score > m_hiscore)
        {

            m_hiscore = m_score;
        }

        txt_score.text = "Score " + m_score;
        txt_hiscore.text = "High Score " + m_hiscore;
    }

    // Update ammo
    public void SetAmmo(int ammo)
    {

        m_ammo -= ammo;

        // If the ammunition is negative , Reload
        if(m_ammo <= 0)
        {

            m_ammo = 100 - m_ammo;
        }

        txt_ammo.text = m_ammo.ToString() + "/100";
    }

    // Renew life
    public void setLife(int life)
    {

        txt_life.text = life.ToString();
    }

    private void OnGUI()
    {

        if(m_player.m_life <= 0)
        {

            // Show the end of the game
            GUI.skin.label.alignment = TextAnchor.MiddleCenter;
            GUI.skin.label.fontSize = 40;
            GUI.Label(new Rect(0, 0, Screen.width, Screen.height), "Game Over");

            // Show game restart
            GUI.skin.label.fontSize = 30;
            if (GUI.Button(new Rect(Screen.width * 0.5f - 150, Screen.height * 0.75f, 300, 40), "Try Again"))
            {

                //Application.LoadLevel(Application.loadedLevelName);
                UnityEngine.SceneManagement.SceneManager.LoadScene("Demo");

            }
        }
    }
    // Update is called once per frame
    void Update()
    {


    }
}
6、 ... and 、 Interaction
6.1 The shooting of the protagonist
- open Player.cs, add to
OnDamagefunction , Used to reduce the protagonist's life , And update the UI - The muzzle of the weapon model shoots a ray , Realize the shooting function , Rays can only be associated with m_layer Specified layer collision , See the above for details Player.cs Complete code
- Create two collision layers ,enemy and level, Assign to the enemy and the scene model respectively , Create another enemy Of Tag Assign to the enemy , For scripted m_lay Specify collision layer

- Specify the music source and bullet shooting effects in the script
- Create a AutoDestroy.cs Assign it to the shooting effect , Let it be destroyed in a second
//AutoDestroy.cs
using System.Collections;
using System.Collections.Generic;
using UnityEngine;

public class AutoDestroy : MonoBehaviour
{


    public float m_timer = 1.0f;
    // Start is called before the first frame update
    void Start()
    {


    }

    // Update is called once per frame
    void Update()
    {

        m_timer -= Time.deltaTime;
        if (m_timer <= 0)
            Destroy(this.gameObject);
    }
}
6.2 The attack and death of the enemy
- Choose the enemy , add to Capsule Collider Components , Add rigid body components and set

- stay enemy.cs Add... To the script OnDamage Function update enemy damage , Life is 0 when , Into a state of death , Play the corresponding animation , to update UI fraction , And destroy
7、 ... and 、 birthplace
In order to control the number of enemies , Each birth point needs to know how many enemies it has generated , When the maximum value is reached, stop generating enemies , When the enemy is destroyed, a new enemy is prompted .
- Create script EnemySpawn.cs
using System.Collections;
using System.Collections.Generic;
using UnityEngine;

public class EnemySpawn : MonoBehaviour
{


    public Transform m_enemy; // Put the enemy preset
    public int m_enemyCount = 0; // The number of enemies
    public int m_maxEnemy = 3;// The maximum number of enemies generated
    public float m_timer = 0; // Enemy generation interval
    protected Transform m_transform;
    // Start is called before the first frame update
    void Start()
    {

        m_transform = this.transform;
    }

    // Update is called once per frame
    void Update()
    {

        // If the number of enemies generated reaches the maximum , Stop generating enemies
        if (m_enemyCount >= m_maxEnemy)
            return;

        // Every once in a while , Generate enemies
        m_timer -= Time.deltaTime;
        if(m_timer <= 0)
        {

            m_timer = 5+Random.value * 10.0f;
            Transform obj = (Transform)Instantiate(m_enemy, m_transform.position, Quaternion.identity);
            // Get enemy script
            Enemy enemy = obj.GetComponent<Enemy>();
            enemy.Init(this);
        }
    }

    private void OnDrawGizmos()
    {

        Gizmos.DrawIcon(this.transform.position, "item.png",true);
    }
}
- Create an empty gamebody , Specify the script EnemySpawn.cs, And related to the enemy Prefab
8、 ... and 、 Mini Map
Create a new 【Camera】, Put it directly above the map , Set it up
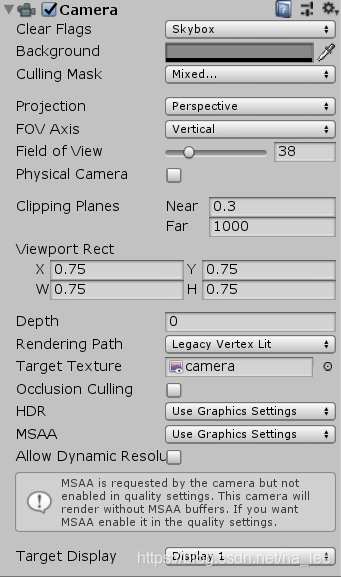
Create sphere objects of different colors in the sub items of the enemy and the protagonist , Name it dummy, As the protagonist and enemy “ succedaneum ”, Pay attention to the 【Sphere Colider】 Get rid of
Create a new Layer, Name it dummy, And set the... Of the sphere object Layer by dummy
Select the main camera , Make it not show dummy layer
Choose a new camera , Make it show only dummy Layers and scenes level layer
Display a small map :
6.1 First create a new 【Render Texture】, Name it camera;
6.2 stay GameManager Add a 【Image】, And use camera For the assignment , Resize ;
6.3 For the new camera 【Target Texture】 assignment
Code and data
边栏推荐
- Visual conversion of nmap vulnerability scanning results
- Bash shell学习笔记(一)
- 0x00007FFD977C04A8 (Qt5Sqld.dll)处(位于 a.exe 中)引发的异常: 0xC0000005: 读取位置 0x0000000000000010 时发生访问冲突
- 27. Remove elements
- Bash shell learning notes (III)
- @The difference and use of jsonformat and @datetimeformat
- 344. Reverse string
- 菜鸟看源码之LinkedBlockingQueue
- Sword finger offer (43): left rotation string
- ISO 639:1988 : Code for the representation of names of languages
猜你喜欢


随机推荐
logging 学习最终版-配置的不同级别日志打印的颜色
Multipartfil to file
242. Effective letter heteronyms
WinPcap packet capturing function pcap_ Loop (), stop the problem
pytest pytest. Ini configuration case grouping case skipping
Sword finger offer (53): a string representing a numeric value
Basic use of logging
Novice source code hashtable
Tutorial of putty
Pytest fixture decorator
菜鸟看源码之ArrayDeque
面试知识点
静态路由和动态路由
Bash shell学习笔记(六)
104.二叉树的最大深度
面试过程中,面试官是如何考察Rust工程师的水平?
Bash shell learning notes (VII)
Bash shell learning notes (4)
Many people don't know whether they are looking for Kanban software or Kanban software
RT thread learning notes (V) -- edit, download and debug programs