当前位置:网站首页>RT-Thread 学习笔记(六)--- 开启基于SPI Flash的elmfat文件系统(上)
RT-Thread 学习笔记(六)--- 开启基于SPI Flash的elmfat文件系统(上)
2022-07-26 10:38:00 【aping_cs_dn】
软件环境:Win7,Keil MDK 4.72a, IAR EWARM 7.2, GCC 4.2,Python 2.7 ,SCons 2.3.2
硬件环境:Armfly STM32F103ZE-EK v3.0开发板
参考文章:RT-Thread编程指南
Github托管的Realtouch分支中examples目录中spi flash的例程
在RT-Thread默认的是SD卡作为文件系统挂载,需要加入相关驱动文件,操作如下:
【1】加入SPI总线驱动
在stm32f107分支的driver目录下有platform.c 平台初始化文件、rt_stm32f10x_spi.c和rt_stm32f10x_spi.h两个spi总线驱动文件,把它们复制到stm32f103ze-ek分支的driver中,并将platform.c重命名成rt_spi_flash_device.c结果如下:

【2】加入SPI Flash设备驱动
在RT-Thread 官方的Git 托管库中有开源项目realtouch-stm32,在driver目录下面有SPI Flash驱动文件spi_flash_w25xx.c和spi_flash_w25xx.h两个文件,把它们复制到stm32f103ze-ek分支的driver中,结果如下:

这样我们就在stm32f103ze-ek分支中加入SPI Flash相关驱动。
【3】将SPI Flash文件加入项目中
打开KeilMDK,在左侧的项目管理树中点开driver分支,然后按下图所示单击右键点击"Add Existing Fils to..."按钮。

定位stm32f103ze-ek/drive目录,将上面刚刚复制的文件选中,如下图:

然后点击"Add"按钮,完成添加,点击“close”按钮关闭对话框。
用同样的办法在rt-thread-1.2.2\components\drivers\spi目录中找到spi_core.c,spi_dev.c两个文件加入到工程的DeviceDrivers组中,结果如下:

【4】打开rtconfig.h配置文件,开启文件DFS系统支持选项,定位到83行附近,修改如下:
/* SECTION: device filesystem */
#define RT_USING_SPI
#define RT_USING_SPI_FLASH
#define RT_USING_DFS
#define RT_USING_DFS_ELMFAT
#define RT_DFS_ELM_WORD_ACCESS
/* Reentrancy (thread safe) of the FatFs module. */
#define RT_DFS_ELM_REENTRANT
/* Number of volumes (logical drives) to be used. */
#define RT_DFS_ELM_DRIVES2
/* #define RT_DFS_ELM_USE_LFN1 */
/* #define RT_DFS_ELM_CODE_PAGE936 */
#define RT_DFS_ELM_MAX_LFN255
/* Maximum sector size to be handled. */
#define RT_DFS_ELM_MAX_SECTOR_SIZE 4096 /*SPI Flash Sector size*/
/* the max number of mounted filesystem */
#define DFS_FILESYSTEMS_MAX2
/* the max number of opened files */
#define DFS_FD_MAX
修改完成后保存。
【5】修改application.c
打开application.c,定位到45行附近,加入如下代码:
extern void rt_spi_flash_device_init(void);
打开application.c,定位到101行附近,加入如下代码:
rt_spi_flash_device_init();
#ifdef RT_USING_FINSH
finsh_set_device(RT_CONSOLE_DEVICE_NAME);
#endif /* RT_USING_FINSH */
/* Filesystem Initialization */
#if defined(RT_USING_DFS) && defined(RT_USING_DFS_ELMFAT)
/* mount SPI flash as root directory */
if (dfs_mount("flash0", "/", "elm", 0, 0) == 0)
{
rt_kprintf("flash0 mount to /.\n");
}
else
rt_kprintf("flash0 mount to / failed.\n");
#endif /* RT_USING_DFS */
... ...
#ifdef RT_USING_RTGUI
{
extern void rt_hw_lcd_init();
extern void rtgui_touch_hw_init(void);
rt_device_t lcd;
/* init lcd */
rt_hw_lcd_init();
#ifdef RTGUI_USING_TOUCHPANEL
/* initilize touch panel */
rtgui_touch_hw_init("spi12");
#endif /* RTGUI_USING_TOUCHPANEL */
/* find lcd device */
lcd = rt_device_find("lcd");
/* set lcd device as rtgui graphic driver */
rtgui_graphic_set_device(lcd);
#ifndef RT_USING_COMPONENTS_INIT
/* init rtgui system server */
rtgui_system_server_init();
#endif /*RT_USING_COMPONENTS_INIT*/
#ifdef RTGUI_USING_CALIBRATION
calibration_set_restore(cali_setup);
calibration_set_after(cali_store);
calibration_init();
#endif /* #ifdef RTGUI_USING_CALIBRATION */
}
#endif /* RT_USING_RTGUI */
#ifdef RT_USING_USB_HOST
/* register stm32 usb host controller driver */
rt_hw_susb_init();
#endif
rt_thread_delay(50);
rt_device_init_all();
}
... ...
修改完成后保存。
【6】打开rt_spi_flash_device.c,看到有关spi底层初始化代码,这时对照开发板原理图,可以看到STM32F103ZE-EK开发板上使用的是SPI Flash芯片型号是SST25VF016B,和CPU连接引脚的原理图如下:

可以看出,原理图上的SPI Flash用到的引脚分别是PA6(MISO),PA7(MOSI),PA5(SCK),其片选信号是PB2引脚,同样还使用SPI1总线的是LCD液晶的触摸屏芯片XTP2046,片选信号是PG11,如下图:

因此我们在修改代码时也需要将其指定为SPI1,在rt_spi_flash_device.c中修改成如下代码:
#ifdef RT_USING_SPI
#include "rt_stm32f10x_spi.h"
#include "spi_flash_w25qxx.h"
#endif /* RT_USING_SPI */
/*
* SPI1_MOSI: PA7
* SPI1_MISO: PA6
* SPI1_SCK : PA5
*
* SPI Flash CE: PB2
* Touch Panel CS: PG11
*/
#ifdef RT_USING_SPI
static void rt_hw_spi_init(void)
{
/* register spi bus */
{
static struct stm32_spi_bus stm32_spi;
GPIO_InitTypeDef GPIO_InitStructure;
/* Enable GPIO clock */
RCC_APB2PeriphClockCmd(RCC_APB2Periph_GPIOA | RCC_APB2Periph_AFIO,ENABLE);
GPIO_InitStructure.GPIO_Pin = GPIO_Pin_5 | GPIO_Pin_6 | GPIO_Pin_7;
GPIO_InitStructure.GPIO_Speed = GPIO_Speed_50MHz;
GPIO_InitStructure.GPIO_Mode = GPIO_Mode_AF_PP;
GPIO_Init(GPIOA, &GPIO_InitStructure);
stm32_spi_register(SPI1, &stm32_spi, "spi1");
}
/* attach spi flash cs */
#ifdef RT_USING_SPI_FLASH
{
static struct rt_spi_device spi_device;
static struct stm32_spi_cs spi_cs;
GPIO_InitTypeDef GPIO_InitStructure;
GPIO_InitStructure.GPIO_Speed = GPIO_Speed_10MHz;
GPIO_InitStructure.GPIO_Mode = GPIO_Mode_Out_PP;
/* spi11: PB2 */
spi_cs.GPIOx = GPIOB;
spi_cs.GPIO_Pin = GPIO_Pin_2;
RCC_APB2PeriphClockCmd(RCC_APB2Periph_GPIOB, ENABLE);
GPIO_InitStructure.GPIO_Pin = spi_cs.GPIO_Pin;
GPIO_SetBits(spi_cs.GPIOx, spi_cs.GPIO_Pin);
GPIO_Init(spi_cs.GPIOx, &GPIO_InitStructure);
rt_spi_bus_attach_device(&spi_device, "spi11", "spi1",(void*)&spi_cs);
}
#endif /* RT_USING_SPI_FLASH */
#ifdef RTGUI_USING_TOUCHPANEL
/* attach touch panel cs */
{
static struct rt_spi_device spi_device;
static struct stm32_spi_cs spi_cs;
GPIO_InitTypeDef GPIO_InitStructure;
GPIO_InitStructure.GPIO_Speed = GPIO_Speed_10MHz;
GPIO_InitStructure.GPIO_Mode = GPIO_Mode_Out_PP;
/* spi21: PG11 */
spi_cs.GPIOx = GPIOG;
spi_cs.GPIO_Pin = GPIO_Pin_11;
RCC_APB2PeriphClockCmd(RCC_APB2Periph_GPIOG, ENABLE);
GPIO_InitStructure.GPIO_Pin = spi_cs.GPIO_Pin;
GPIO_SetBits(spi_cs.GPIOx, spi_cs.GPIO_Pin);
GPIO_Init(spi_cs.GPIOx, &GPIO_InitStructure);
rt_spi_bus_attach_device(&spi_device, "spi12", "spi1", (void*)&spi_cs);
}
#endif /* RTGUI_USING_TOUCHPANEL */
}
#endif /* RT_USING_SPI */
void rt_spi_flash_device_init(void)
{
#if defined(RT_USING_DFS) && defined(RT_USING_DFS_ELMFAT)
w25qxx_init("flash0", "spi11");
#endif /* RT_USING_DFS && RT_USING_DFS_ELMFAT */
}
修改完毕后保存,如果一切顺利,应该编译能够通过,将在下篇文章中研究关于组件初始化问题。
边栏推荐
- 关于硕博士开题报告编写的思考
- SuperMap IClient for Leaflet 加载高斯克吕格投影三度分带CGCS2000大地坐标系WMTS服务
- [leetcode每日一题2021/4/23]368. 最大整除子集
- GIS方法类期刊和论文的综述(Introduction)怎么写?
- 结构体操作报错:Segmentation fault (core dumped)
- 7-25 0-1背包 (50分)
- kali 查看ip地址
- Introduction to data analysis | kaggle Titanic mission (I) - > data loading and preliminary observation
- 分布式锁解决方案之Redis实现
- 剑指Offer(四十九):把字符串转换成整数
猜你喜欢
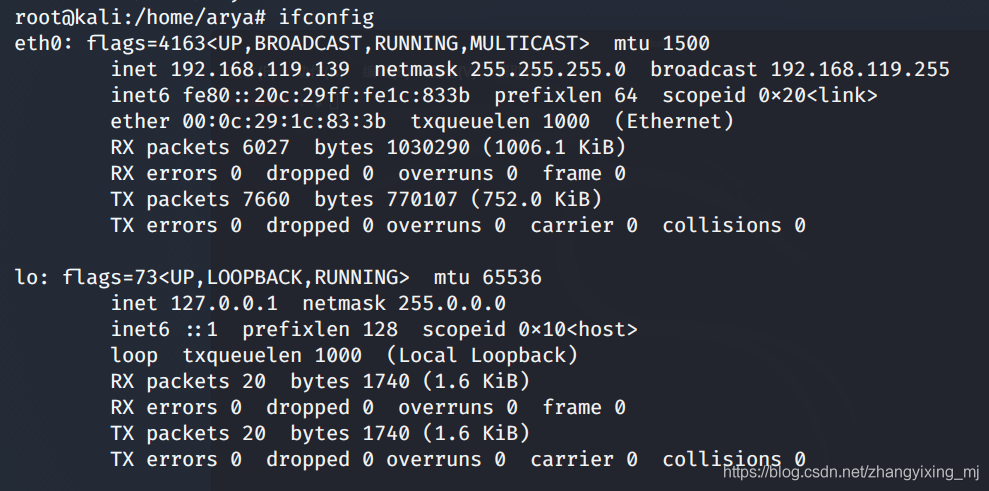
kali 查看ip地址

Centos8 (liunx) deploying WTM (asp.net 5) using PgSQL

Introduction to data analysis | kaggle Titanic mission (I) - > data loading and preliminary observation
The problem of large fluctuation of hx711 data

Write to esp8266 burning brush firmware

Dry goods likeshop takeout order system is open source, 100% open source, no encryption

sigmod 函数与softmax 函数对比

粽子大战 —— 猜猜谁能赢

STM32 阿里云MQTT esp8266 AT命令

【论文下饭】Deep Mining External Imperfect Data for ChestX-ray Disease Screening
随机推荐
oracle 启动不了 tnslistener服务启动不了
【机器学习小记】【风格迁移】deeplearning.ai course4 4th week programming(tensorflow2)
【机器学习小记】【人脸识别】deeplearning.ai course4 4th week programming
Asynctask < T> decoration and await are not used in synchronous methods to obtain asynchronous return values (asynchronous methods are called in synchronous methods)
json_object_put: Assertion `jso->_ref_count > 0‘ failed.Aborted (core dumped)
MySQL速学-2021-09-01
剑指Offer(十):矩形覆盖
centos8(liunx)部署WTM(ASP.NET 5)使用pgsql
干货likeshop外卖点餐系统开源啦100%开源无加密
使用Geoprocessor 工具
[Halcon vision] threshold segmentation
鹏哥C语言第四课(3)
剑指Offer(二十):包含min函数的栈
异常的概念与处理
Navicat15 MySQL (centos7) connected to local virtual machine
Summary of common skills in H5 development of mobile terminal
Redis docker instance and data structure
Navicat15连接本地虚拟机的Mysql(Centos7)
数据分析入门 | kaggle泰坦尼克任务(一)—>数据加载和初步观察
Application of.Net open source framework in industrial production