当前位置:网站首页>Docker installs 3 master and 3 slave redis clusters
Docker installs 3 master and 3 slave redis clusters
2022-07-24 11:02:00 【Scattered_ step】
1. Turn off firewall + start-up docker Background services
systemctl start docker
2. newly build 6 individual docker Containers redis example
docker run -d --name redis-node-1 --net host --privileged=true -v /data/redis/share/redis-node-1:/data redis:6.0.8 --cluster-enabled yes --appendonly yes --port 6381

docker run -d --name redis-node-2 --net host --privileged=true -v /data/redis/share/redis-node-2:/data redis:6.0.8 --cluster-enabled yes --appendonly yes --port 6382

docker run -d --name redis-node-3 --net host --privileged=true -v /data/redis/share/redis-node-3:/data redis:6.0.8 --cluster-enabled yes --appendonly yes --port 6383

docker run -d --name redis-node-4 --net host --privileged=true -v /data/redis/share/redis-node-4:/data redis:6.0.8 --cluster-enabled yes --appendonly yes --port 6384

docker run -d --name redis-node-5 --net host --privileged=true -v /data/redis/share/redis-node-5:/data redis:6.0.8 --cluster-enabled yes --appendonly yes --port 6385

docker run -d --name redis-node-6 --net host --privileged=true -v /data/redis/share/redis-node-6:/data redis:6.0.8 --cluster-enabled yes --appendonly yes --port 6386

The command is explained step by step :
docker run:  Create and run docker Container instance
--name redis-node-6 :  Container name
--net host :  Using the host IP And port , Default
--privileged=true :  Get host root User permissions
-v /data/redis/share/redis-node-6:/data :  The container volume , Host address :docker Internal address
redis:6.0.8 : redis Image and version number
--cluster-enabled yes :  Turn on redis colony
--appendonly yes :  Turn on persistence
--port 6386: redis Port number
Into the container redis-node-1 And for 6 Build cluster relationships on machines :
Into the container :
docker exec -it redis-node-1 /bin/bash
Build a master-slave relationship :
# Be careful , Get into docker After the container, you can execute the command , And pay attention to your truth IP Address
redis-cli --cluster create 192.168.111.147:6381 192.168.111.147:6382 192.168.111.147:6383 192.168.111.147:6384 192.168.111.147:6385 192.168.111.147:6386 --cluster-replicas 1

--cluster-replicas 1  For each master Create a slave node

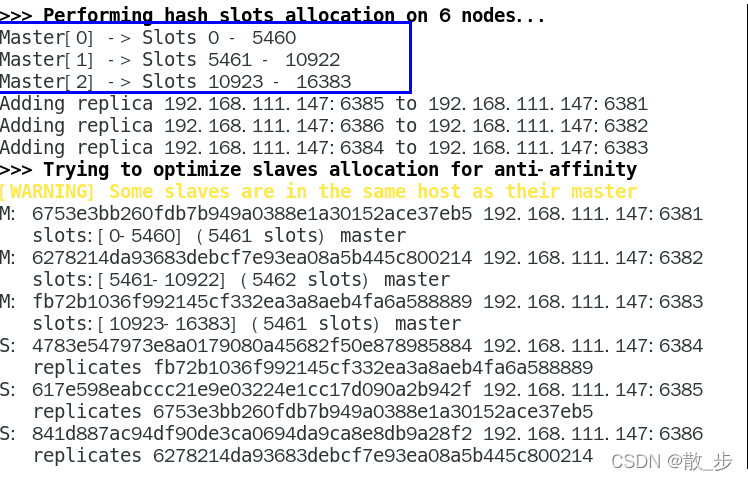

everything OK Words ,3 Lord 3 From here on out
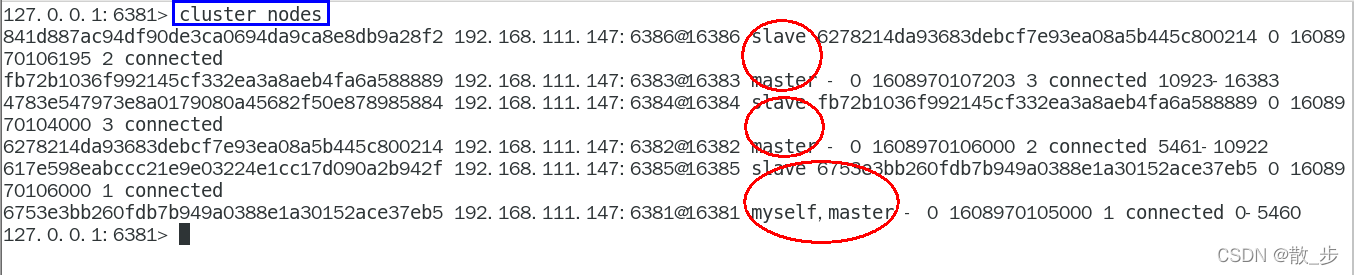
Link to 6381 As an entry point , View the cluster status :
Link to 6381 As an entry point , View node status :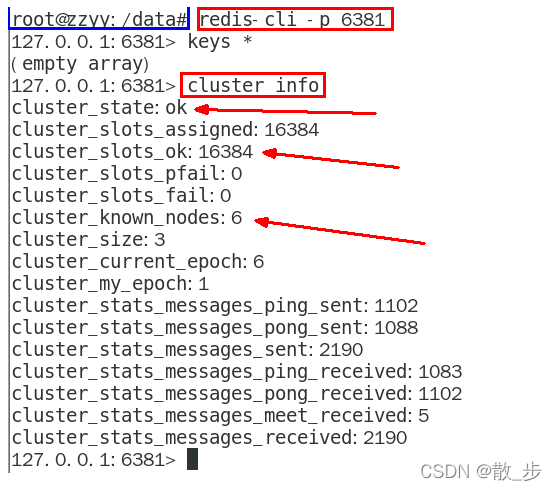
cluster info
cluster nodes
Master slave failover migration case :
Data read / write storage :
1. start-up 6 Cluster composed of machines and through exec Get into
2. Yes 6381 Add two key
3. Prevent route failure and add parameters -c And add two key
4. View cluster information :
redis-cli --cluster check 192.168.111.147:6381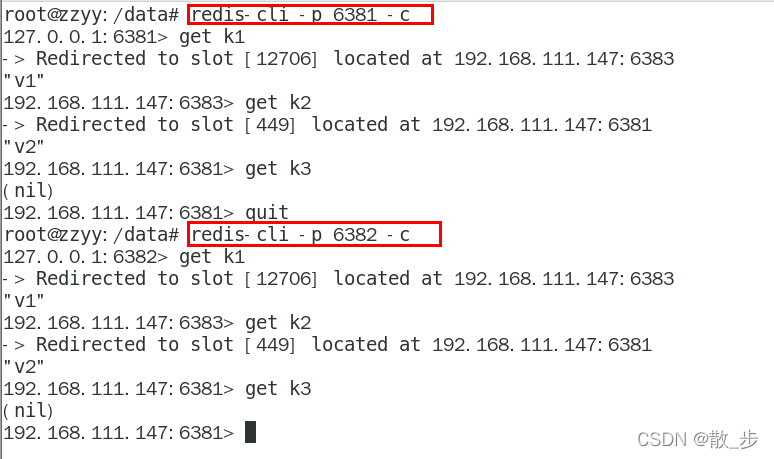

Failover migration :
Lord 6381 And slave switching , Stop the host first 6381
6381 The main engine stopped , The corresponding real slave computer
6381 As 1 The slave assigned by host No. 1 shall be subject to the actual situation , Specifically, the number of machines is the number
View the cluster information again :
6381 It's down. ,6385 The superior has become a new master.
The slave attached under each case shall be subject to the actual situation , Specifically, the number of machines is the number
Restore the previous 3 Lord 3 from :
First start 6381:
docker start redis-node-1

Stop again 6385:
docker stop redis-node-5

To rev. 6385:
docker start redis-node-5

The distribution of master-slave machines shall be subject to the actual situation :
View the cluster status :
redis-cli --cluster check own IP:6381

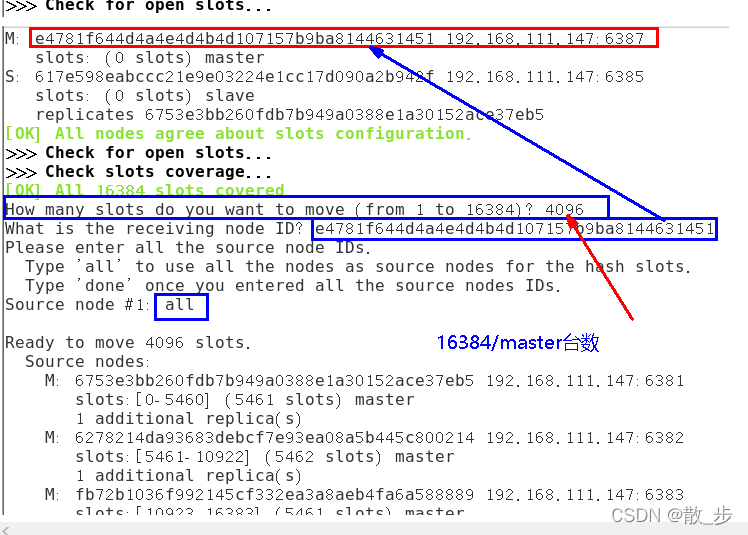
Master slave capacity expansion cases :
newly build 6387、6388 Two nodes + Start after creating a new one + See if 8 node
docker run -d --name redis-node-7 --net host --privileged=true -v /data/redis/share/redis-node-7:/data redis:6.0.8 --cluster-enabled yes --appendonly yes --port 6387
docker run -d --name redis-node-8 --net host --privileged=true -v /data/redis/share/redis-node-8:/data redis:6.0.8 --cluster-enabled yes --appendonly yes --port 6388
docker ps
Get into 6387 Inside the container instance :
docker exec -it redis-node-7 /bin/bash
Will add 6387 node ( Empty slot number ) As master The node joins the original cluster :
 Will add 6387 As master Nodes join the cluster
redis-cli --cluster add-node  Actually IP Address :6387  Actually IP Address :6381
6387  Is going to be master New node
6381  Is the leader in the original cluster node , amount to 6387 Bye-bye 6381 So as to find organizations to join the cluster


Check the cluster condition 1 Time :
redis-cli --cluster check real ip Address :6381


Reassign slot numbers :
 Reassign slot numbers
 command :redis-cli --cluster reshard IP Address : Port number
redis-cli --cluster reshard 192.168.111.147:6381

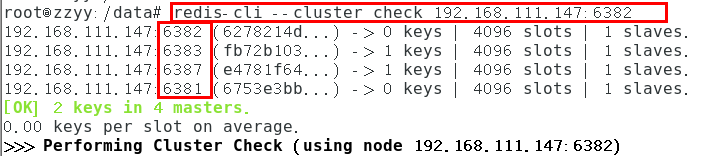
Check the cluster condition 2 Time :
redis-cli --cluster check real ip Address :6381


Slot number assignment description :
Why? 6387 yes 3 A new interval , It used to be continuous ?
Reallocation costs are too high , So before 3 Each family sets aside a part , from 6381/6382/6383 Separate out the three old nodes 1364 A pit for the new node 6387
Master node 6387 Assign slave nodes 6388:
 command :redis-cli --cluster add-node ip: new slave port  ip: new master port  --cluster-slave --cluster-master-id  New host node ID

redis-cli --cluster add-node 192.168.111.147:6388 192.168.111.147:6387 --cluster-slave --cluster-master-id e4781f644d4a4e4d4b4d107157b9ba8144631451------- This is 6387 The number of , According to your actual situation


Check the cluster condition 3 Time :
redis-cli --cluster check 192.168.111.147:6382

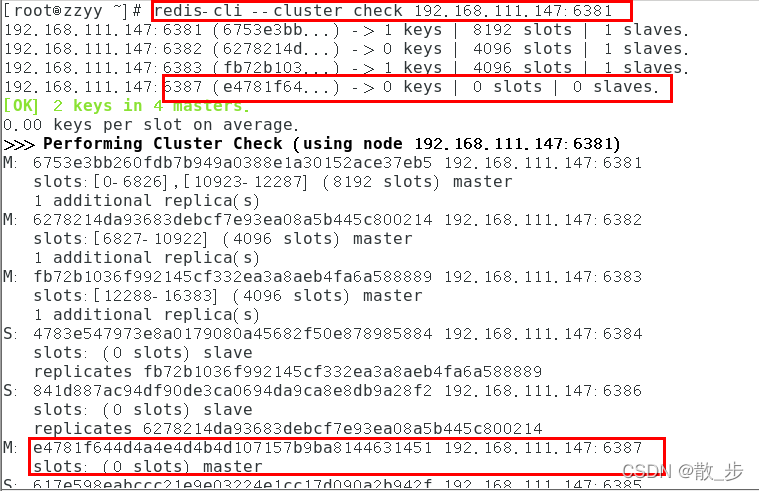
Master-slave volume reduction case :
1. Purpose :6387 and 6388 Offline
2. Check the cluster 1 get 6388 The node of ID
redis-cli --cluster check 192.168.111.147:6382

3. take 6388 Delete
From the cluster 4 No. slave node 6388 Delete
 command :redis-cli --cluster del-node ip: Slave port   Slave 6388 node ID

redis-cli --cluster del-node 192.168.111.147:6388 5d149074b7e57b802287d1797a874ed7a1a284a8

redis-cli --cluster check 192.168.111.147:6382

4. take 6387 Empty the slot number , Redistribution , In this example, all the slot numbers cleared are given to 6381
redis-cli --cluster reshard 192.168.111.147:6381


5. Check the cluster for the second time
redis-cli --cluster check 192.168.111.147:6381

4096 All slots are pointed to 6381, It became 8192 Slots , It's equivalent to giving everything to 6381 了 , Otherwise, enter 3 Time , One pot
6. take 6387 Delete
 command :redis-cli --cluster del-node ip: port  6387 node ID

redis-cli --cluster del-node 192.168.111.147:6387 e4781f644d4a4e4d4b4d107157b9ba8144631451

7. Check the cluster for the third time
redis-cli --cluster check 192.168.111.147:6381

边栏推荐
- Summary of const type data
- js树形结构,根据里层id找出它所属的每层父级集合
- JS tree structure, find out the parent set of each layer it belongs to according to the ID of the inner layer
- [dish of learning notes, dog learning C] minesweeping game
- [dish of learning notes dog learning C] initial level of structure
- Cookie sessionstorage localstorage differences
- BBR 与 queuing
- [FPGA]: IP core -- xadc
- Hongmeng's first note
- 零基础学习CANoe Panel(6)—— 开关/显示控件(Switch/Indicator)
猜你喜欢

Four components and working principle of frequency converter

QT application prevents multiple opening, that is, single instance operation

5个最佳WordPress广告插件

N-tree, page_ Size, database strict mode modification, and the difference between delete and drop in the database
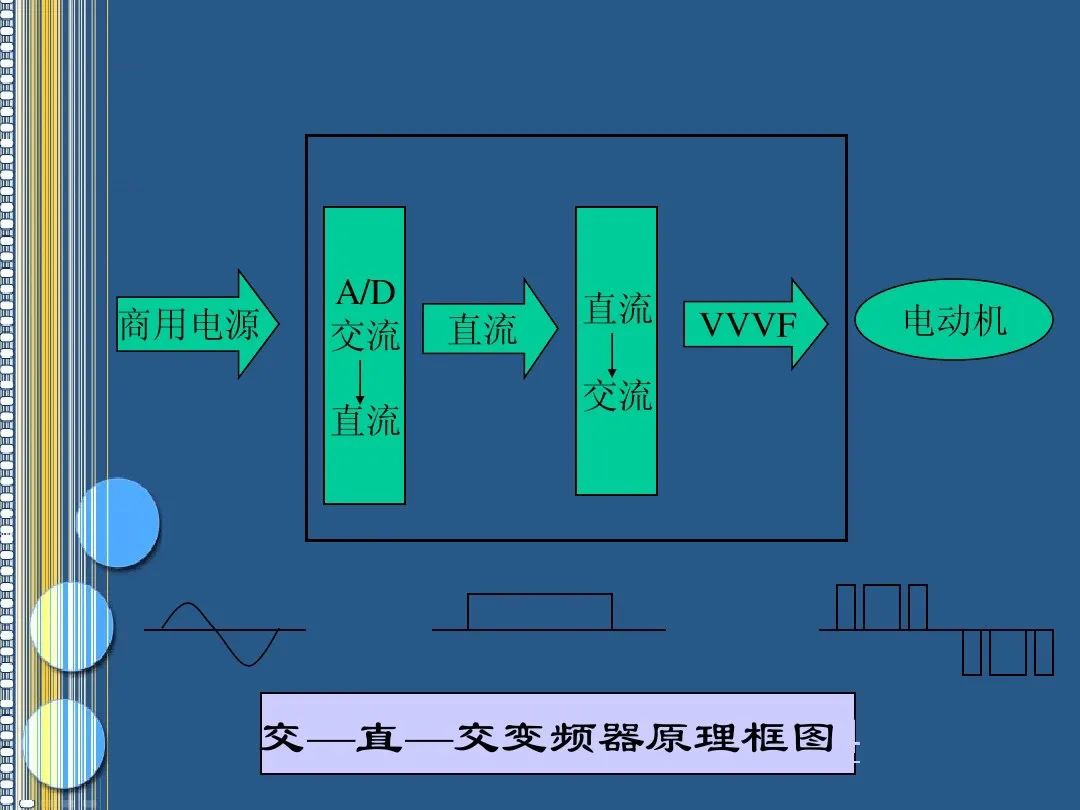
变频器的工作原理和功能应用

View the source code of idea Download
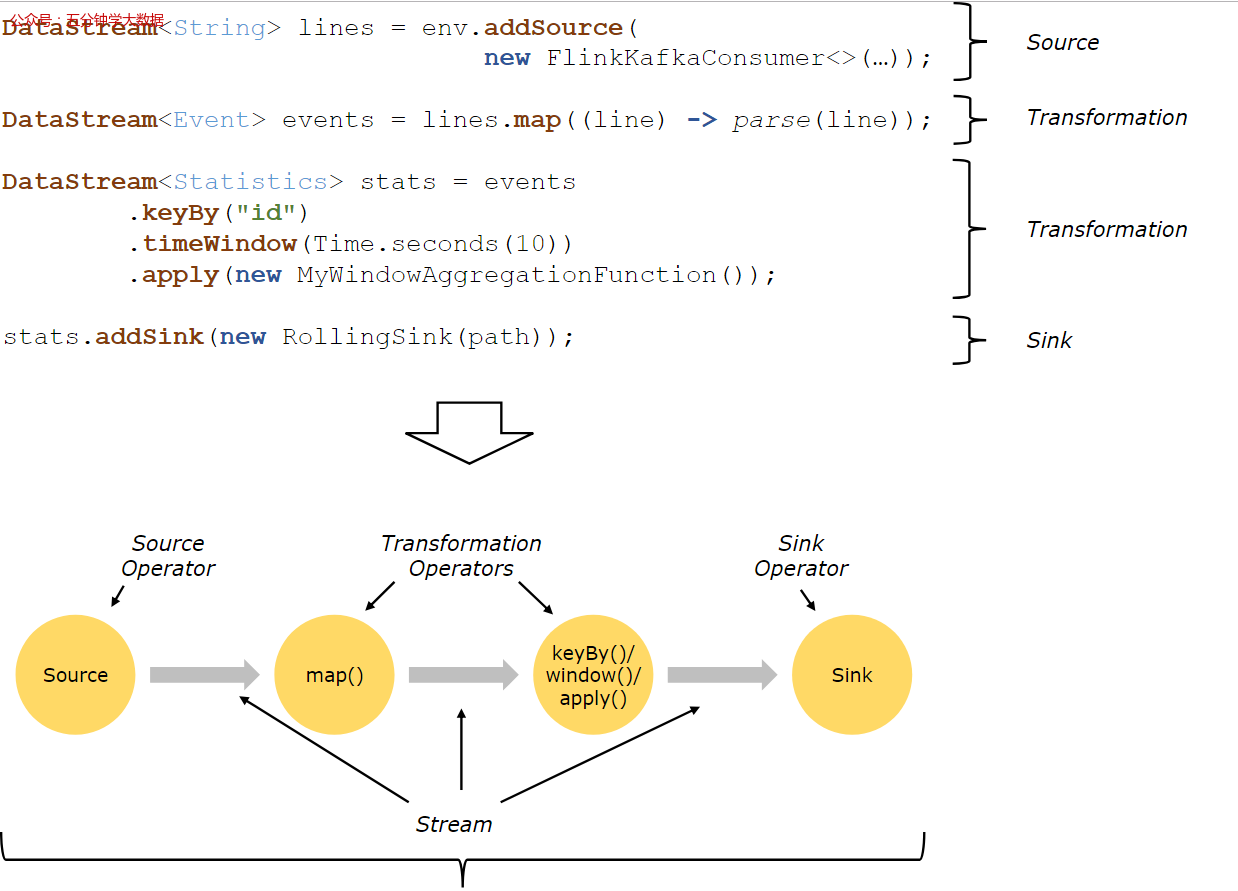
Detailed explanation of Flink operation architecture
Flink 运行架构详解

零基础学习CANoe Panel(7)—— 开关/显示控件(Input/Output Box )
![[attack and defense world web] difficulty five-star 15 point advanced question: ics-07](/img/97/555a76be9e96629fd7379ce8612a3b.png)
[attack and defense world web] difficulty five-star 15 point advanced question: ics-07
随机推荐
浅析拉格朗日乘数法及其对偶问题
[attack and defense world web] difficulty five-star 15 point advanced question: ics-07
LoRa无线技术与LoRaWAN网关模块的区别
[AHK] AutoHotKey tutorial ①
Zero basic learning canoe panel (4) -- button
自动推理的逻辑06--谓词演算
【类、抽象与继承】
Summary of const type data
RS485 communication OSI model network layer
Download path of twincat3 versions
read_ CSV error: 'GBK' codec can't decode byte 0xb4 in position 274: illegal multibyte sequence
小熊派学习——内核开发
The difference between Lora wireless technology and lorawan gateway module
[FPGA]: frequency measurement
[FPGA]: IP core - multiplier
零基础学习CANoe Panel(7)—— 文件选择(PathDiaglog)
[dish of learning notes dog learning C] detailed operator
Signal processing: < three > DFT and FFT
UVM - two way communication
二叉树基础知识概览