当前位置:网站首页>3D vision - 2 Introduction to pose estimation - openpose includes installation, compilation and use (single frame, real-time video)
3D vision - 2 Introduction to pose estimation - openpose includes installation, compilation and use (single frame, real-time video)
2022-07-03 13:52:00 【Tourists 26024】
Last words
This chapter blog is right OpenPose Toolkit for development ; I work hard ( Smile to cry ), Experience many difficulties , Want to give up many times ( because openpose The compilation of is really too troublesome ) But then it succeeded , Please give me a compliment ! This is really troublesome .

Write in the order of single frame image and real-time video , One frame is used Pytorch Programming just calls OpenPose Model of ; Used in real-time video Python call OpenPose My bag , So you have to install OpenPose, And compile it , Final use .
First of all, from the github On , download CMU Provide the source code down :
Project structure
OpenPose-Demo-Pytorch-master
|
|----images----|----pose.jpg
|----bin( After the compilation , Copied from the source code , Don't look at this in a single frame )
|----x64( After the compilation , Copied from the source code , Don't look at this in a single frame )
|----Release( After the compilation , Copied from the source code , Don't look at this in a single frame )
|----models----|----pose----|----body_25----|----pose_deploy.prototxt
|                           |               |----pose_iter_584000.caffemodel
|                           |----coco----|----pose_deploy_linevec.prototxt
|                           |            |----pose_iter_440000.caffemodel
|----video----|----1.mp4
|----config.py
|----predict.py( A single frame )
|----Demo.py( real-time video )
Detailed explanation of key points
Key points 25(model\pose\body_25\pose_iter_584000.caffemodel or pose_deploy.prototxt) Here's the picture 1. Shown , Key points 18(model\pose\coco\pose_iter_440000.caffemodel or pose_deploy_linevec.prototxt) Here's the picture 2. Shown .
Download model , Can be found in CMU Of github Upload and download , It provides , No more .
step :
git clone https://github.com/CMU-Perceptual-Computing-Lab/openpose.git
or
downloads .zip
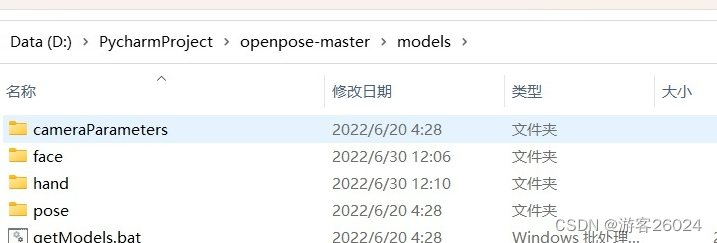
cd openpose-master/models
bash getModels.sh (Linux)
double-click getModels.bat (Windows)
download pose_iter_584000.caffemodel
pose_iter_440000.caffemodel
...( Just these two , Put it in our project models\pose\ Next )
chart 1.
{0, “Nose”},
{1, “Neck”},
{2, “RShoulder”},
{3, “RElbow”},
{4, “RWrist”},
{5, “LShoulder”},
{6, “LElbow”},
{7, “LWrist”},
{8, “MidHip”},
{9, “RHip”},
{10, “RKnee”},
{11, “RAnkle”},
{12, “LHip”},
{13, “LKnee”},
{14, “LAnkle”},
{15, “REye”},
{16, “LEye”},
{17, “REar”},
{18, “LEar”},
{19, “LBigToe”},
{20, “LSmallToe”},
{21, “LHeel”},
{22, “RBigToe”},
{23, “RSmallToe”},
{24, “RHeel”}
chart 2.
{"Nose": 0,
"Neck": 1,
"RShoulder": 2,
"RElbow": 3,
"LShoulder": 5,
"LElbow": 6,
"LWrist": 7,
"RHip": 8,
"RKnee": 9,
"RAnkle": 10,
"LHip": 11,
"LKnee": 12,
"LAnkle": 13,
"REye": 14,
"LEye": 15,
"REar": 16,
"LEar": 17,
"Background": 18}
1. Single frame code
For a single frame, download the previous source code , And copy the model weight ( Into the source models Double click inside getModels.bat Download these weights ) To our own project , Will be models in .prototxt And .caffemodel Torture away ; Then we reason about the model , The main steps are :
- First , Read the image needed by the model and reasoning , Reasoning to get results
- secondly , Key point detection , recycling PAFs, Find some key points
- Last , Combine the point pairs to form the correct human skeleton map
The configuration file
config.py
prototxt_25 = "models/pose/body_25/pose_deploy.prototxt"
caffemodel_25 = "models/pose/body_25/pose_iter_584000.caffemodel"

point_name_25 = ['None', 'Neck', 'RShoulder',
                 'RElbow', 'RWrist', 'LShoulder',
                 'LElbow', 'LWrist', 'MidHip',
                 'RHip', 'RKnee', 'RAnkle',
                 'LHip', 'LKnee', 'LAnkle',
                 'REye', 'LEye', 'REar',
                 'LEar', 'LBigToe', 'LSmallToe',
                 'LHeel', 'RBigToe', 'RSmallToe',
                 'RHeel']
point_pairs_25 = [[1, 8], [1, 2], [1, 5], [2, 3], [3, 4], [5, 6],
                  [6, 7], [8, 9], [9, 10], [10, 11], [8, 12], [12, 13],
                  [13, 14], [1, 0], [0, 15], [15, 17], [0, 16], [16, 18],
                  [2, 17], [5, 18], [14, 19], [19, 20], [14, 21], [11, 22],
                  [22, 23], [11, 24]]

map_idx_25 = [[26, 27], [40, 41], [48, 49], [42, 43], [44, 45], [50, 51],
              [52, 53], [32, 33], [28, 29], [30, 31], [34, 35], [36, 37],
              [38, 39], [56, 57], [58, 59], [62, 63], [60, 61], [64, 65],
              [46, 47], [54, 55], [66, 67], [68, 69], [70, 71], [72, 73],
              [74, 75], [76, 77]]

colors_25 = [[255, 0, 0], [255, 85, 0], [255, 170, 0],
             [255, 255, 0], [170, 255, 0], [85, 255, 0],
             [0, 255, 0], [0, 255, 85], [0, 255, 170],
             [0, 255, 255], [0, 170, 255], [0, 85, 255],
             [0, 0, 255], [85, 0, 255], [170, 0, 255],
             [255, 0, 255], [255, 0, 170], [255, 0, 85],
             [255, 170, 85], [255, 170, 170], [255, 170, 255],
             [255, 85, 85], [255, 85, 170], [255, 85, 255],
             [170, 170, 170]]

prototxt_18 = "./models/coco/pose_deploy_linevec.prototxt"
caffemodel_18 = "./models/coco/pose_iter_440000.caffemodel"

point_names_18 = ['Nose', 'Neck',
                  'R-Sho', 'R-Elb', 'R-Wr',
                  'L-Sho', 'L-Elb', 'L-Wr',
                  'R-Hip', 'R-Knee', 'R-Ank',
                  'L-Hip', 'L-Knee', 'L-Ank',
                  'R-Eye', 'L-Eye', 'R-Ear', 'L-Ear']

point_pairs_18 = [[1, 2], [1, 5], [2, 3], [3, 4], [5, 6], [6, 7],
                  [1, 8], [8, 9], [9, 10], [1, 11], [11, 12], [12, 13],
                  [1, 0], [0, 14], [14, 16], [0, 15], [15, 17],
                  [2, 17], [5, 16]]

map_idx_18 = [[31, 32], [39, 40], [33, 34], [35, 36], [41, 42], [43, 44],
              [19, 20], [21, 22], [23, 24], [25, 26], [27, 28], [29, 30],
              [47, 48], [49, 50], [53, 54], [51, 52], [55, 56],
              [37, 38], [45, 46]]

colors_18 = [[0, 100, 255], [0, 100, 255], [0, 255, 255],
             [0, 100, 255], [0, 255, 255], [0, 100, 255],
             [0, 255, 0], [255, 200, 100], [255, 0, 255],
             [0, 255, 0], [255, 200, 100], [255, 0, 255],
             [0, 0, 255], [255, 0, 0], [200, 200, 0],
             [255, 0, 0], [200, 200, 0], [0, 0, 0]]
OpenPose
predict.py( The core )
import cv2
import time
import numpy as np
import matplotlib.pyplot as plt
from config import *

class general_mulitpose_model(object):

    #  initialization  Pose keypoint_num: 25 or 18
    def __init__(self, keypoint_num):

    #  load openpose Model
    def get_model(self):

    #  Get keys
    def getKeypoints(self, probMap, threshold=0.1):

    #  Get valid point pairs
    def getValidPairs(self, output, detected_keypoints, width, height):

    #  Connect valid point pairs , Get a complete picture of human bones
    def getPersonwiseKeypoints(self, valid_pairs, invalid_pairs, keypoints_list):

    #  Visualization after key points are connected
    def vis_pose(self, img_file, personwiseKeypoints, keypoints_list):

    #  forecast ( Reasoning ) Key points
    def predict(self, imgfile):
initialization
 def __init__(self, keypoint_num):
        self.point_names = point_name_25 if keypoint_num == 25 else point_names_18
        self.point_pairs = point_pairs_25 if keypoint_num == 25 else point_pairs_18
        self.map_idx = map_idx_25 if keypoint_num == 25 else map_idx_18
        self.colors = colors_25 if keypoint_num == 25 else colors_18
        self.num_points = 25 if keypoint_num == 25 else 18

        self.prototxt = prototxt_25 if keypoint_num == 25 else prototxt_18
        self.caffemodel = caffemodel_25 if keypoint_num == 25 else caffemodel_18
        self.pose_net = self.get_model()
Get keys
    def getKeypoints(self, probMap, threshold=0.1):
        mapSmooth = cv2.GaussianBlur(probMap, (3, 3), 0, 0)
        mapMask = np.uint8(mapSmooth > threshold)
        keypoints = []

        # find the blobs
        contours, hierarchy = cv2.findContours(mapMask, cv2.RETR_TREE, cv2.CHAIN_APPROX_SIMPLE)
        for cnt in contours:
            blobMask = np.zeros(mapMask.shape)
            blobMask = cv2.fillConvexPoly(blobMask, cnt, 1)
            maskedProbMap = mapSmooth * blobMask
            _, maxVal, _, maxLoc = cv2.minMaxLoc(maskedProbMap)
            keypoints.append(maxLoc + (probMap[maxLoc[1], maxLoc[0]],))
        return keypoints
Get valid point pairs
    def getValidPairs(self, output, detected_keypoints, width, height):
        valid_pairs = []
        invalid_pairs = []
        n_interp_samples = 15
        paf_score_th = 0.1
        conf_th = 0.7

        for k in range(len(self.map_idx)):
            # A -> B constitute a limb
            pafA = output[0, self.map_idx[k][0], :, :]
            pafB = output[0, self.map_idx[k][1], :, :]
            pafA = cv2.resize(pafA, (width, height))
            pafB = cv2.resize(pafB, (width, height))

            candA = detected_keypoints[self.point_pairs[k][0]]
            candB = detected_keypoints[self.point_pairs[k][1]]
            nA = len(candA)
            nB = len(candB)
            if (nA != 0 and nB != 0):
                valid_pair = np.zeros((0, 3))
                for i in range(nA):
                    max_j = -1
                    maxScore = -1
                    found = 0
                    for j in range(nB):
                        # Find d_ij
                        d_ij = np.subtract(candB[j][:2], candA[i][:2])
                        norm = np.linalg.norm(d_ij)
                        if norm:
                            d_ij = d_ij / norm
                        else:
                            continue
                        # Find p(u)
                        interp_coord = list(
                            zip(np.linspace(candA[i][0], candB[j][0], num=n_interp_samples),
                                np.linspace(candA[i][1], candB[j][1], num=n_interp_samples)))
                        # Find L(p(u))
                        paf_interp = []
                        for k in range(len(interp_coord)):
                            paf_interp.append([pafA[int(round(interp_coord[k][1])), int(round(interp_coord[k][0]))],
                                               pafB[int(round(interp_coord[k][1])), int(round(interp_coord[k][0]))]])
                        # Find E
                        paf_scores = np.dot(paf_interp, d_ij)
                        avg_paf_score = sum(paf_scores) / len(paf_scores)
                        # check if the connection is valid
                        # If the fraction of interpolated vectors aligned with PAF is higher then threshold -> Valid Pair
                        if (len(np.where(paf_scores > paf_score_th)[0]) / n_interp_samples) > conf_th:
                            if avg_paf_score > maxScore:
                                max_j = j
                                maxScore = avg_paf_score
                                found = 1
                    # Append the connection to the list
                    if found:
                        valid_pair = np.append(valid_pair, [[candA[i][3], candB[max_j][3], maxScore]], axis=0)

                # Append the detected connections to the global list
                valid_pairs.append(valid_pair)

            else:  # If no keypoints are detected
                print("No Connection : k = {}".format(k))
                invalid_pairs.append(k)
                valid_pairs.append([])

        return valid_pairs, invalid_pairs
Connect valid point pairs , Get a complete picture of human bones
    def getPersonwiseKeypoints(self, valid_pairs, invalid_pairs, keypoints_list):
        personwiseKeypoints = -1 * np.ones((0, self.num_points + 1))
        for k in range(len(self.map_idx)):
            if k not in invalid_pairs:
                partAs = valid_pairs[k][:, 0]
                partBs = valid_pairs[k][:, 1]
                indexA, indexB = np.array(self.point_pairs[k])
                for i in range(len(valid_pairs[k])):
                    found = 0
                    person_idx = -1
                    for j in range(len(personwiseKeypoints)):
                        if personwiseKeypoints[j][indexA] == partAs[i]:
                            person_idx = j
                            found = 1
                            break
                    if found:
                        personwiseKeypoints[person_idx][indexB] = partBs[i]
                        personwiseKeypoints[person_idx][-1] += keypoints_list[partBs[i].astype(int), 2] + \
                                                               valid_pairs[k][i][2]
                    elif not found and k < self.num_points - 1:
                        row = -1 * np.ones(self.num_points + 1)
                        row[indexA] = partAs[i]
                        row[indexB] = partBs[i]
                        row[-1] = sum(keypoints_list[valid_pairs[k][i, :2].astype(int), 2]) + \
                                  valid_pairs[k][i][2]
                        personwiseKeypoints = np.vstack([personwiseKeypoints, row])
        return personwiseKeypoints
Visualization after key points are connected
    def vis_pose(self, img_file, personwiseKeypoints, keypoints_list):
        img = cv2.imread(img_file)
        for i in range(self.num_points - 1):
            for n in range(len(personwiseKeypoints)):
                index = personwiseKeypoints[n][np.array(self.point_pairs[i])]
                if -1 in index:
                    continue
                B = np.int32(keypoints_list[index.astype(int), 0])
                A = np.int32(keypoints_list[index.astype(int), 1])
                cv2.line(img, (B[0], A[0]), (B[1], A[1]), self.colors[i], 3, cv2.LINE_AA)
        plt.figure()
        plt.imshow(img[:, :, ::-1])
        plt.title('Results')
        plt.axis("off")
        plt.show()
forecast ( Reasoning ) Key points
import cv2 Show
Because the original image size is too large , So I resize For a moment .
    def vis_pose(self, img_file, personwiseKeypoints, keypoints_list):
        img = cv2.imread(img_file)
        for i in range(self.num_points - 1):
            for n in range(len(personwiseKeypoints)):
                index = personwiseKeypoints[n][np.array(self.point_pairs[i])]
                if -1 in index:
                    continue
                B = np.int32(keypoints_list[index.astype(int), 0])
                A = np.int32(keypoints_list[index.astype(int), 1])
                cv2.line(img, (B[0], A[0]), (B[1], A[1]), self.colors[i], 3, cv2.LINE_AA)
        img = cv2.resize(img, (480, 640))
        cv2.imshow("Results", img)
        cv2.waitKey(0)
        cv2.destroyAllWindows()
import matplotlib.pyplot as plt Show
    def predict(self, imgfile):
        img = cv2.imread(imgfile)
        height, width, _ = img.shape
        net_height = 368
        net_width = int((net_height / height) * width)
        start = time.time()

        in_blob = cv2.dnn.blobFromImage(
            img, 1.0 / 255, (net_width, net_height), (0, 0, 0), swapRB=False, crop=False)
        self.pose_net.setInput(in_blob)
        output = self.pose_net.forward()
        print("[INFO]Time Taken in Forward pass: {} ".format(time.time() - start))
        detected_keypoints = []
        keypoints_list = np.zeros((0, 3))
        keypoint_id = 0
        threshold = 0.1
        for part in range(self.num_points):
            probMap = output[0, part, :, :]
            probMap = cv2.resize(probMap, (width, height))

            keypoints = self.getKeypoints(probMap, threshold)
            print("Keypoints - {} : {}".format(self.point_names[part], keypoints))
            keypoint_with_id = []
            for i in range(len(keypoints)):
                keypoint_with_id.append(keypoints[i] + (keypoint_id,))
                keypoints_list = np.vstack([keypoints_list, keypoints[i]])
                keypoint_id += 1
            detected_keypoints.append(keypoint_with_id)
        valid_paris, invalid_pairs = self.getValidPairs(output, detected_keypoints, width, height)
        personwiseKeypoints = self.getPersonwiseKeypoints(valid_paris, invalid_pairs, keypoints_list)
        self.vis_pose(imgfile, personwiseKeypoints, keypoints_list)
main.py
if __name__ == '__main__':
    gmm = general_mulitpose_model(25)
    personwiseKeypoints, keypoints_list = gmm.predict("images/pose.jpg")
Complete code
import cv2
import time
import math
import numpy as np
from config import *


class general_mulitpose_model(object):
    def __init__(self, keypoint_num):
        self.point_names = point_name_25 if keypoint_num == 25 else point_names_18
        self.point_pairs = point_pairs_25 if keypoint_num == 25 else point_pairs_18
        self.map_idx = map_idx_25 if keypoint_num == 25 else map_idx_18
        self.colors = colors_25 if keypoint_num == 25 else colors_18
        self.num_points = 25 if keypoint_num == 25 else 18

        self.prototxt = prototxt_25 if keypoint_num == 25 else prototxt_18
        self.caffemodel = caffemodel_25 if keypoint_num == 25 else caffemodel_18
        self.pose_net = self.get_model()

    def get_model(self):
        coco_net = cv2.dnn.readNetFromCaffe(self.prototxt, self.caffemodel)
        return coco_net

    def predict(self, imgfile):
        start = time.time()
        img = cv2.imread(imgfile)
        height, width, _ = img.shape
        net_height = 368
        net_width = int((net_height / height) * width)
        start = time.time()

        in_blob = cv2.dnn.blobFromImage(
            img, 1.0 / 255, (net_width, net_height), (0, 0, 0), swapRB=False, crop=False)
        self.pose_net.setInput(in_blob)
        output = self.pose_net.forward()
        print("[INFO]Time Taken in Forward pass: {} ".format(time.time() - start))
        detected_keypoints = []
        keypoints_list = np.zeros((0, 3))
        keypoint_id = 0
        threshold = 0.1
        for part in range(self.num_points):
            probMap = output[0, part, :, :]
            probMap = cv2.resize(probMap, (width, height))

            keypoints = self.getKeypoints(probMap, threshold)
            print("Keypoints - {} : {}".format(self.point_names[part], keypoints))
            keypoint_with_id = []
            for i in range(len(keypoints)):
                keypoint_with_id.append(keypoints[i] + (keypoint_id,))
                keypoints_list = np.vstack([keypoints_list, keypoints[i]])
                keypoint_id += 1
            detected_keypoints.append(keypoint_with_id)
        valid_paris, invalid_pairs = self.getValidPairs(output, detected_keypoints, width, height)
        personwiseKeypoints = self.getPersonwiseKeypoints(valid_paris, invalid_pairs, keypoints_list)
        img = self.vis_pose(imgfile, personwiseKeypoints, keypoints_list)
        FPS = math.ceil(1 / (time.time() - start))
        img = cv2.putText(img, "FPS" + str(int(FPS)), (25, 50), cv2.FONT_HERSHEY_SIMPLEX, 1, (0, 255, 0), 3)
        return img

    def getKeypoints(self, probMap, threshold=0.1):
        mapSmooth = cv2.GaussianBlur(probMap, (3, 3), 0, 0)
        mapMask = np.uint8(mapSmooth > threshold)
        keypoints = []

        # find the blobs
        _, contours, hierarchy = cv2.findContours(mapMask, cv2.RETR_TREE, cv2.CHAIN_APPROX_SIMPLE)
        for cnt in contours:
            blobMask = np.zeros(mapMask.shape)
            blobMask = cv2.fillConvexPoly(blobMask, cnt, 1)
            maskedProbMap = mapSmooth * blobMask
            _, maxVal, _, maxLoc = cv2.minMaxLoc(maskedProbMap)
            keypoints.append(maxLoc + (probMap[maxLoc[1], maxLoc[0]],))
        return keypoints

    def getValidPairs(self, output, detected_keypoints, width, height):
        valid_pairs = []
        invalid_pairs = []
        n_interp_samples = 15
        paf_score_th = 0.1
        conf_th = 0.7

        for k in range(len(self.map_idx)):
            # A -> B constitute a limb
            pafA = output[0, self.map_idx[k][0], :, :]
            pafB = output[0, self.map_idx[k][1], :, :]
            pafA = cv2.resize(pafA, (width, height))
            pafB = cv2.resize(pafB, (width, height))

            candA = detected_keypoints[self.point_pairs[k][0]]
            candB = detected_keypoints[self.point_pairs[k][1]]
            nA = len(candA)
            nB = len(candB)
            if (nA != 0 and nB != 0):
                valid_pair = np.zeros((0, 3))
                for i in range(nA):
                    max_j = -1
                    maxScore = -1
                    found = 0
                    for j in range(nB):
                        # Find d_ij
                        d_ij = np.subtract(candB[j][:2], candA[i][:2])
                        norm = np.linalg.norm(d_ij)
                        if norm:
                            d_ij = d_ij / norm
                        else:
                            continue
                        # Find p(u)
                        interp_coord = list(
                            zip(np.linspace(candA[i][0], candB[j][0], num=n_interp_samples),
                                np.linspace(candA[i][1], candB[j][1], num=n_interp_samples)))
                        # Find L(p(u))
                        paf_interp = []
                        for k in range(len(interp_coord)):
                            paf_interp.append([pafA[int(round(interp_coord[k][1])), int(round(interp_coord[k][0]))],
                                               pafB[int(round(interp_coord[k][1])), int(round(interp_coord[k][0]))]])
                        # Find E
                        paf_scores = np.dot(paf_interp, d_ij)
                        avg_paf_score = sum(paf_scores) / len(paf_scores)
                        # check if the connection is valid
                        # If the fraction of interpolated vectors aligned with PAF is higher then threshold -> Valid Pair
                        if (len(np.where(paf_scores > paf_score_th)[0]) / n_interp_samples) > conf_th:
                            if avg_paf_score > maxScore:
                                max_j = j
                                maxScore = avg_paf_score
                                found = 1
                    # Append the connection to the list
                    if found:
                        valid_pair = np.append(valid_pair, [[candA[i][3], candB[max_j][3], maxScore]], axis=0)

                # Append the detected connections to the global list
                valid_pairs.append(valid_pair)

            else:  # If no keypoints are detected
                print("No Connection : k = {}".format(k))
                invalid_pairs.append(k)
                valid_pairs.append([])

        return valid_pairs, invalid_pairs

    def getPersonwiseKeypoints(self, valid_pairs, invalid_pairs, keypoints_list):
        personwiseKeypoints = -1 * np.ones((0, self.num_points + 1))
        for k in range(len(self.map_idx)):
            if k not in invalid_pairs:
                partAs = valid_pairs[k][:, 0]
                partBs = valid_pairs[k][:, 1]
                indexA, indexB = np.array(self.point_pairs[k])
                for i in range(len(valid_pairs[k])):
                    found = 0
                    person_idx = -1
                    for j in range(len(personwiseKeypoints)):
                        if personwiseKeypoints[j][indexA] == partAs[i]:
                            person_idx = j
                            found = 1
                            break
                    if found:
                        personwiseKeypoints[person_idx][indexB] = partBs[i]
                        personwiseKeypoints[person_idx][-1] += keypoints_list[partBs[i].astype(int), 2] + \
                                                               valid_pairs[k][i][2]
                    elif not found and k < self.num_points - 1:
                        row = -1 * np.ones(self.num_points + 1)
                        row[indexA] = partAs[i]
                        row[indexB] = partBs[i]
                        row[-1] = sum(keypoints_list[valid_pairs[k][i, :2].astype(int), 2]) + \
                                  valid_pairs[k][i][2]
                        personwiseKeypoints = np.vstack([personwiseKeypoints, row])
        return personwiseKeypoints

    def vis_pose(self, img_file, personwiseKeypoints, keypoints_list):
        img = cv2.imread(img_file)
        for i in range(self.num_points - 1):
            for n in range(len(personwiseKeypoints)):
                index = personwiseKeypoints[n][np.array(self.point_pairs[i])]
                if -1 in index:
                    continue
                B = np.int32(keypoints_list[index.astype(int), 0])
                A = np.int32(keypoints_list[index.astype(int), 1])
                cv2.line(img, (B[0], A[0]), (B[1], A[1]), self.colors[i], 3, cv2.LINE_AA)
        img = cv2.resize(img, (480, 640))
        return img


if __name__ == '__main__':
    gmm = general_mulitpose_model(25)
    img = gmm.predict("images/pose.jpg")
    cv2.imshow("frame", img)
    cv2.waitKey(0)
    cv2.destroyAllWindows()
Running results
cv2 Show

plt Show

2. real-time video
Because I just called openpose Our model doesn't really use the source code , So now we really use , And compile , The steps are :
1) The configuration file 3rdparty\windows
Before github Download a good project , Find the location to open , Such as my position :
D:\PycharmProject\openpose-master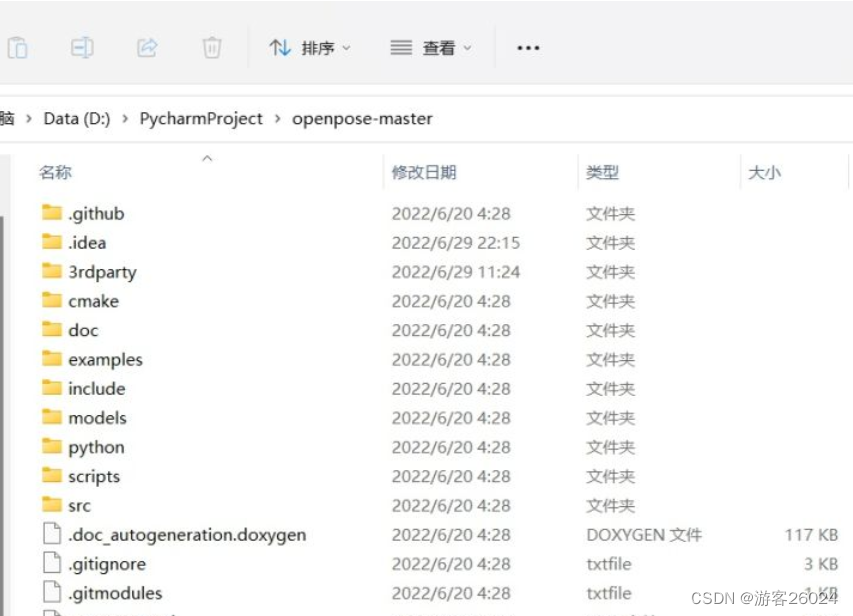
Get into "3rdparty", find windows, Double click four .bat file
D:\PycharmProject\openpose-master\3rdparty\windows
getCaffe.bat
getCaffe3rdparty.bat
getFreeglut.bat
getOpenCV.bat 
2) The configuration file 3rdparty\caffe or pybind11
Enter the official website "3rdparty", find caffe or pybind11
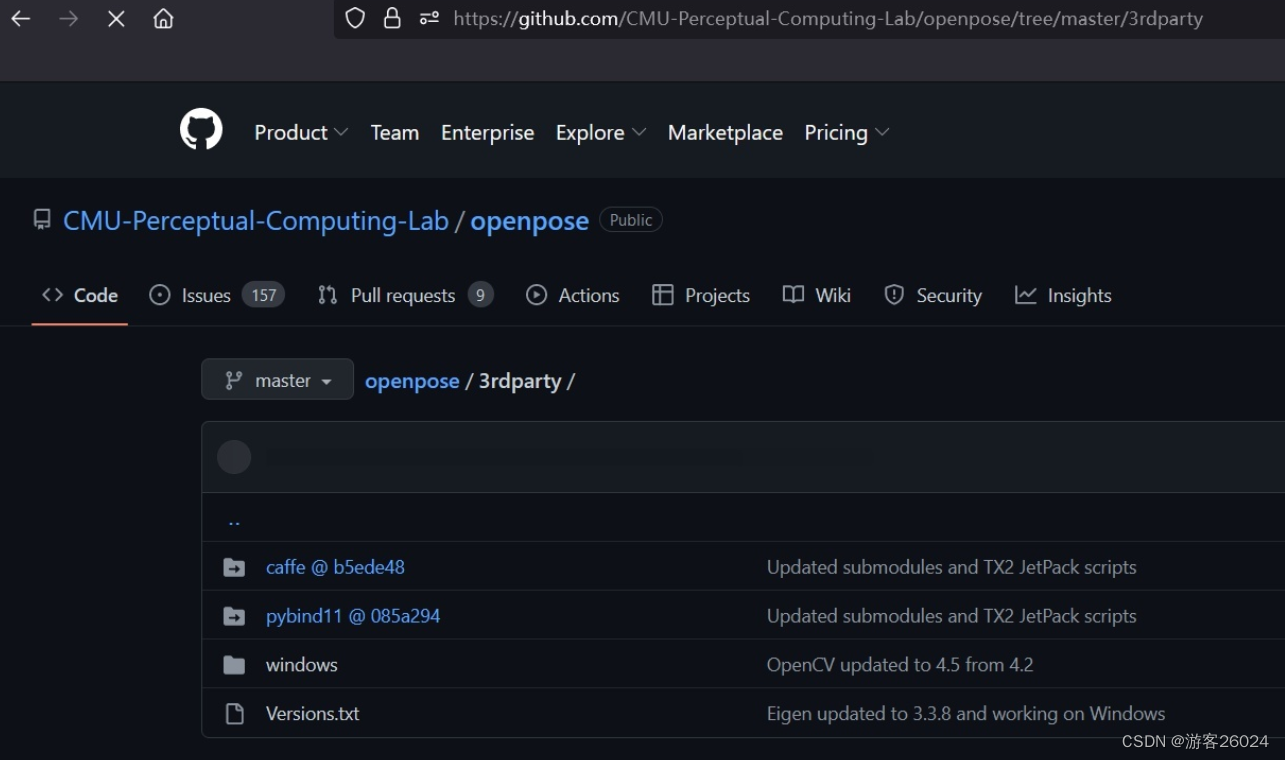
Put it git clone https://github.com/CMU-Perceptual-Computing-Lab/caffe.git perhaps download .zip file , Put it in the location of your file, such as :
'D:\PycharmProject\openpose-master\3rdparty\caffe'
Put it git clone https://github.com/pybind/pybind11.git perhaps download .zip file , Put it in the location of your file, such as :'D:\PycharmProject\openpose-master\3rdparty\pybind11'
Pictured

3) Model download ( We've talked about that before )
cd openpose-master/models
bash getModels.sh (Linux)
 double-click  getModels.bat (Windows)
 download  pose_iter_584000.caffemodel
     pose_iter_440000.caffemodel
...( also hand,face Model of )

4)Cmake compile
First download cmake-gui:
https://cmake.org/download/ https://cmake.org/download/windows Just download .msi Version of

And then there will be openpose-master compile
In the third line build It's my own name , Can directly build Or other build_CPU

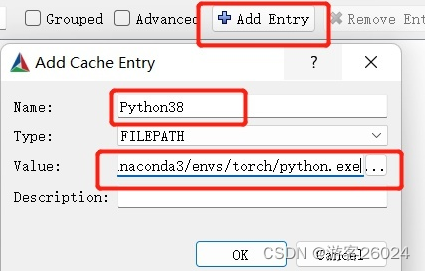
Click on Add Entry, Enter your own Python route , Click again OK!
after , Click on “Configure“

To configure vs, Yours vs Be the same as your computer version , Can be found in Control panel -> Program View in


When it's done , Point again BUILD_PYTHON,DOWNLOAD_BODY_25_MODEL,DOWNLOAD_BODY_COCO_MODEL,DOWNLOAD_BODY_MPI_MODEL(hand,face Also choose if it's useful !).
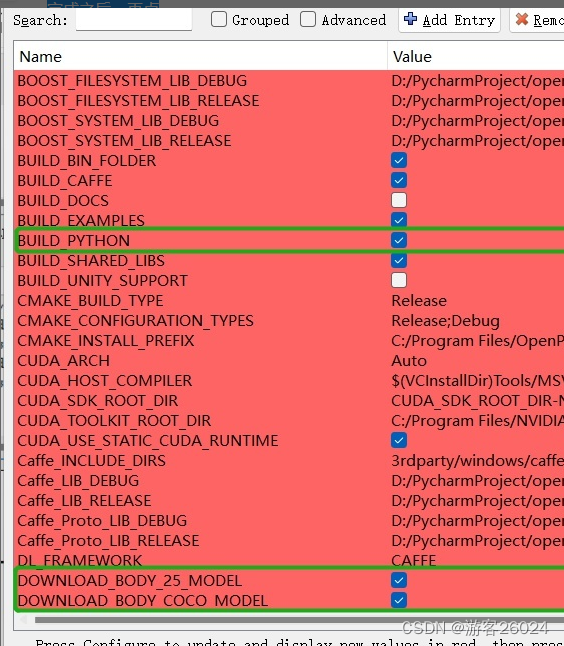

“GPU_MODE” Choose “CPU_ONLY”, No election "USE_CUDNN"; You can also choose "CUDA", After that, you must choose “USE_CUDNN”

Click on “Configure”, When it's all done , Click on “Generate”


5) Compiler Engineering
find openpose-master/build/OpenPose.sln Use vs 2017 open , Input (release x64 edition ) Click the green inverted triangle symbol , Wait for the result

If successful, this is the following state , And the video camera is turned on ,openpose Begin to recognize human posture and people !

Then right click pyopenpose, Set as startup project


Then combine , The code given by the official website , Modelled on the "openpose-master\build\examples\tutorial_api_python\01_body_from_image.py" Import pyopenpose
Give it to the official website openpose-master\build\bin And openpose-master\x64 Copy it into your own project

hold openpose-master\build\python\openpose\Release Import your own project

And then openpose-master\models Medium hand and face also pose Import your own project
Code
Try importing openpose, Check for success
import os
import sys
from sys import platform

BASE_DIR = os.path.dirname(os.path.realpath(__file__))
if platform == 'win32':
    lib_dir = 'Release'
    bin_dir = 'bin'
    x64_dir = 'x64'
    lib_path = os.path.join(BASE_DIR, lib_dir)
    bin_path = os.path.join(BASE_DIR, bin_dir)
    x64_path = os.path.join(BASE_DIR, x64_dir)
    sys.path.append(lib_path)
    os.environ['PATH'] += ';' + bin_path + ';' + x64_path + '\Release;'
    try:
        import pyopenpose as op
        print("successful, import pyopenpose!")
    except ImportError as e:
        print("fail to import pyopenpose!")
        raise e
else:
    print(f" Current computer environment :\n{platform}\n")
    sys.exit(-1)
View results

Real time video core code
    #  Processing data
    datum = op.Datum()

    #  Start openpose
    opWrapper = op.WrapperPython()

    #  Configuration parameters
    params = dict()
    params["model_folder"] = BASE_DIR + "\models"
    params["model_pose"] = "BODY_25"
    params["number_people_max"] = 3
    params["disable_blending"] = False

    #  Import parameters
    opWrapper.configure(params)
    opWrapper.start()
...
...
# Process images
# The input image frame Into the datum.cvInputData
datum.cvInputData = frame
# Process the input image
opWrapper.emplaceAndPop(op.VectorDatum([datum]))
# The output image is opframe
opframe = datum.cvOutputData
....Complete code
import os
import time

import cv2
import sys
from tqdm import tqdm
from sys import platform

BASE_DIR = os.path.dirname(os.path.realpath(__file__))
if platform == 'win32':
    lib_dir = 'Release'
    bin_dir = 'bin'
    x64_dir = 'x64'
    lib_path = os.path.join(BASE_DIR, lib_dir)
    bin_path = os.path.join(BASE_DIR, bin_dir)
    x64_path = os.path.join(BASE_DIR, x64_dir)
    sys.path.append(lib_path)
    os.environ['PATH'] += ';' + bin_path + ';' + x64_path + '\Release;'
    try:
        import pyopenpose as op

        print("successful, import pyopenpose!")
    except ImportError as e:
        print("fail to import pyopenpose!")
        raise e
else:
    print(f" Current computer environment :\n{platform}\n")
    sys.exit(-1)


def out_video(input):
    datum = op.Datum()
    opWrapper = op.WrapperPython()
    params = dict()
    params["model_folder"] = BASE_DIR + "\models"
    params["model_pose"] = "BODY_25"
    params["number_people_max"] = 3
    params["disable_blending"] = False
    opWrapper.configure(params)
    opWrapper.start()
    file = input.split("/")[-1]
    output = "video/out-optim-" + file
    print("It will start processing video: {}".format(input))
    cap = cv2.VideoCapture(input)
    frame_count = int(cap.get(cv2.CAP_PROP_FRAME_COUNT))
    frame_size = (int(cap.get(cv2.CAP_PROP_FRAME_WIDTH)), int(cap.get(cv2.CAP_PROP_FRAME_HEIGHT)))
    # create VideoWriter,VideoWriter_fourcc is video decode
    fourcc = cv2.VideoWriter_fourcc('D', 'I', 'V', 'X')
    fps = cap.get(cv2.CAP_PROP_FPS)
    out = cv2.VideoWriter(output, fourcc, fps, frame_size)
    # the progress bar
    with tqdm(range(frame_count)) as pbar:

        while cap.isOpened():
            start = time.time()
            success, frame = cap.read()
            if success:
                datum.cvInputData = frame
                opWrapper.emplaceAndPop(op.VectorDatum([datum]))
                opframe = datum.cvOutputData
                FPS = 1 / (time.time() - start)
                opframe = cv2.putText(opframe, "FPS" + str(int(FPS)), (25, 50), cv2.FONT_HERSHEY_SIMPLEX, 1,
                                      (0, 255, 0), 3)
                out.write(opframe)
                pbar.update(1)
            else:
                break

    pbar.close()
    cv2.destroyAllWindows()
    out.release()
    cap.release()
    print("{} finished!".format(output))


if __name__ == "__main__":
    video_dir = "video/2.avi"
    out_video(video_dir)
Running results
OpenPose Running results
The effect is better than before MediaPipe Much better
Reference resources :
Project realization || be based on opencv Use openpose Complete human posture estimation https://blog.csdn.net/magic_ll/article/details/108451560?spm=1001.2014.3001.5506openpose From installation to actual combat !(win10)https://zhuanlan.zhihu.com/p/500651669
Next words
边栏推荐
- untiy世界边缘的物体阴影闪动,靠近远点的物体阴影正常
- Qt学习24 布局管理器(三)
- The solution of Chinese font garbled code in keil5
- The latest BSC can pay dividends. Any B usdt Shib eth dividend destruction marketing can
- Can newly graduated European college students get an offer from a major Internet company in the United States?
- Qt学习22 布局管理器(一)
- Logback log sorting
- 常见的几种最优化方法Matlab原理和深度分析
- SQL Injection (GET/Search)
- 3D视觉——2.人体姿态估计(Pose Estimation)入门——OpenPose含安装、编译、使用(单帧、实时视频)
猜你喜欢

Setting up remote links to MySQL on Linux
SQL Injection (GET/Search)

Can newly graduated European college students get an offer from a major Internet company in the United States?

从零开始的基于百度大脑EasyData的多人协同数据标注
JVM系列——概述,程序计数器day1-1
Flutter dynamic | fair 2.5.0 new version features
Another industry has been broken by Chinese chips. No wonder the leading analog chip companies in the United States have cut prices and sold off

Brief analysis of tensorboard visual processing cases

SQL Injection (POST/Search)

NFT新的契机,多媒体NFT聚合平台OKALEIDO即将上线
随机推荐
Several common optimization methods matlab principle and depth analysis
php 迷宫游戏
Go language web development series 29: Gin framework uses gin contrib / sessions library to manage sessions (based on cookies)
Red hat satellite 6: better management of servers and clouds
[understanding by chance-37]: the structure of human sensory system determines that human beings are self-centered
太阳底下无新事,元宇宙能否更上层楼?
Static linked list (subscript of array instead of pointer)
MySQL 数据处理值增删改
挡不住了,国产芯片再度突进,部分环节已进到4nm
Leetcode-1175.Prime Arrangements
ThreadPoolExecutor realizes multi-threaded concurrency and obtains the return value (elegant and concise way)
Which securities company has the lowest Commission for opening an account online? I want to open an account. Is it safe for the online account manager to open an account
Golang - command line tool Cobra
windos 创建cordova 提示 因为在此系统上禁止运行脚本
Shell timing script, starting from 0, CSV format data is regularly imported into PostgreSQL database shell script example
Mycms we media mall v3.4.1 release, user manual update
SwiftUI 开发经验之作为一名程序员需要掌握的五个最有力的原则
JS convert pseudo array to array
mysql中的字段问题
Go 1.16.4: purpose of go mod tidy