当前位置:网站首页>Initial deployment of Servlet
Initial deployment of Servlet
2022-06-11 10:03:00 【Fly upward】
Catalog
3.1 install Smart Tomcat plug-in unit
3.2 To configure Smart Tomcat plug-in unit
4.5 appear " Can't access this website "
1. servlet Main work
servlet Is a technology to realize dynamic pages , It's a group. Tomcat For programmers API, Help group programmers develop a simple and efficient web app. Without concern Socket,HTTP Form of agreement , Multithreading concurrency and other technical details , To reduce the web app The development threshold of , Improved development efficiency rate .
2. first Servlet Program
2.1 Create project

2) Select the directory where the project will be stored

3) Project creation completed

2.2 Introduce dependencies

<dependencies>
<!-- https://mvnrepository.com/artifact/javax.servlet/javax.servlet-api -->
<dependency>
<groupId>javax.servlet</groupId>
<artifactId>javax.servlet-api</artifactId>
<version>3.1.0</version>
<scope>provided</scope>
</dependency>
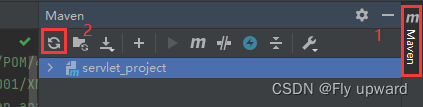
</dependencies>When it was first copied , It is marked in red , That's because of our IDEA Not downloaded yet .jar package . This requires us to manually click IDEA On the top right of Maven Refresh icon for , Just wait for the download .
2.3 Create directory

however , These directories are not enough , We need to manually add some necessary directories .
1)webapp


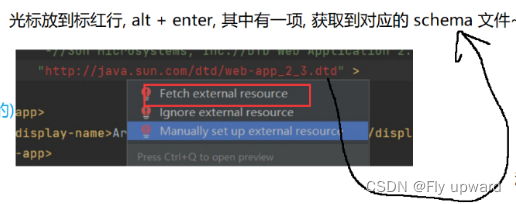
<!DOCTYPE web-app PUBLIC
        "-//Sun Microsystems, Inc.//DTD Web Application 2.3//EN"
        "http://java.sun.com/dtd/web-app_2_3.dtd" >
<web-app>
    <display-name>Archetype Created Web Application</display-name>
</web-app>
, If in IDEA in , The following code appears in red , Do the following .
2.4 Write code
stay java Create a class in the directory HelloServlet, The code is as follows
import javax.servlet.annotation.WebServlet;
import javax.servlet.ServletException;
import javax.servlet.http.HttpServlet;
import javax.servlet.http.HttpServletRequest;
import javax.servlet.http.HttpServletResponse;
import java.io.IOException;

@WebServlet("/hello")
public class HelloServlet extends HttpServlet {
    @Override
    protected void doGet(HttpServletRequest req, HttpServletResponse resp) throws ServletException, IOException {
        // This line of code needs to be commented out , Cannot reference a parent class's  doGet
        //super.doGet(req, resp);

        // This is to let the server print in its own console
        System.out.println("hello world");
        // You can also print on the page  hello world  character string , Put it in  http  Responsive  body  in .  The browser will put  body  The content of
        // Show on page
        // If nothing is set in the response object ,  This is the time when   Blank page
        resp.getWriter().write("hello world" + System.currentTimeMillis());
    }
}
In the above code :
a) The created class needs to inherit from HttpServletb) This class needs to use @WebServlet The annotation is associated with the previous HTTP The path ofc) This class needs to implement doXXX Method
2.5 packaged applications
Current code , It can't run alone ( No, main Method ) Current code , It can't run alone ( No, Main Method )
Need to put the current code , pack , And then deploy to Tomcat. On , from Tomcat To make the call , Need to put the current code , pack , And then deploy to Tomcat. On , from Tomcat To make the call .
Before packing , First in pom.xml Add a <packaging>war</packaging> , Because we packed war package , If not , Will default to jar package .
jar and war All are java The compressed package format used by the publisher .war It's for Tomcat Specialized in . There will not only be some .class, You can also include configuration files , And the second 3 Tripartite jar , also html, Css, js....
Add location as follows


When the console appears BUILD SUCCESS, And the directory list appears servlet_hello.war It indicates that the packaging is successful

2.6 The deployment process

After the open hold war Package copy to Tomcat Of webapps Under the table of contents . Then start Tomcat , Tomcat Will automatically put war Packet decompression .

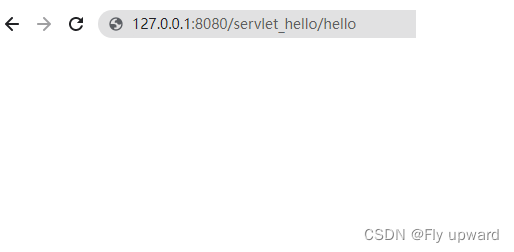
2.7 Verification procedure
Enter the URL of the direct deployment through the browser , You can get a response http://127.0.0.1:8080/servlet_hello/hello, as follows

Be careful : URL Medium PATH Divided into two parts , among servlet_hello by Context Path, hello by Servlet Path

2.8 summary
These seven steps , This is for a new project , After the project is created , Subsequent modification code , The first three steps need not be repeated . Directly from 4—7 Just operate .
3. Easier deployment
3.1 install Smart Tomcat plug-in unit

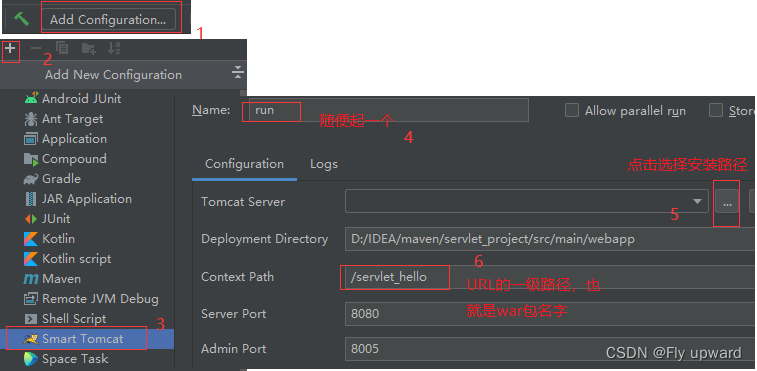
3.2 To configure Smart Tomcat plug-in unit
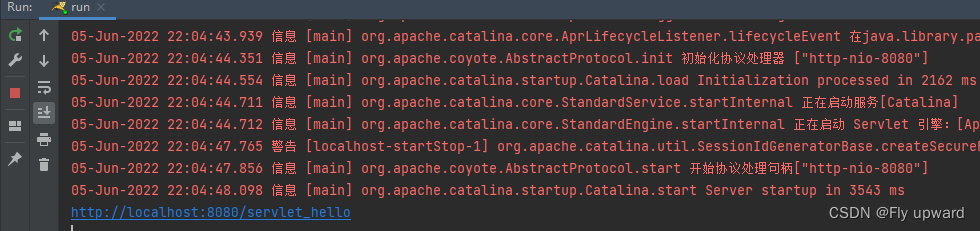
Click the green triangle , IDEA Will automatically compile , Deploy

start-up Tomcat The process of , The font is red , It is not an error that makes it red .
4. Common error problems
4.1 appear 404

2) Write less. Servlet Path namely hello

3)Servlet Path It's written and URL No match

Error is as follows

4)web.xml Write the wrong
4.2 appear 405
@WebServlet("/hello")
public class HelloServlet extends HttpServlet {
// Be annotated out , So it didn't come true doGet  Method
  //@Override
    //protected void doGet(HttpServletRequest req, HttpServletResponse resp) throws ServletException, IOException { }
}
4.3 appear 500
@WebServlet("/hello")
public class HelloServlet extends HttpServlet {
    @Override
    protected void doGet(HttpServlet Requestreq, HttpServlet Responseresp) throws Servlet Exception, IOException {
        String s = null;
        resp.getWriter().write(s.length());
    }
}
4.4 appear " Blank page "
@WebServlet("/hello")
public class HelloServlet extends HttpServlet {
    @Override
    protected void doGet(HttpServletRequest req, HttpServletResponse resp) throws ServletException, IOException {
        // This line of code needs to be commented out , Cannot reference a parent class's  doGet
        //super.doGet(req, resp);

        // This is to let the server print in its own console
        System.out.println("hello world");
        // You can also print on the page  hello world  character string , Put it in  http  Responsive  body  in .  The browser will put  body  The content of
        // Show on page
        // If nothing is set in the response object ,  This is the time when   Blank page
        //resp.getWriter().write("hello world" + System.currentTimeMillis());
    }
}
4.5 appear " Can't access this website "
// hold
@WebServlet("/hello")
// It has been written. , Just missing one  /
@WebServlet("hello")
5. summary
边栏推荐
- 宝塔面板备份与恢复数据
- 深夜小酌,50道经典SQL题,真香~
- How much do you know about software compatibility testing? How to select a software compatibility testing organization?
- go连接数据库报错 wsarecv: An existing connection was forcibly closed by the remote host.
- Understanding of the keyword this in JS
- 赛灵思引脚约束文件 .xdc
- ORACLE RAC中连接ScanIP报错ORA-12545的问题解决
- 帝国CMS仿《手艺活》DIY手工制作网源码/92kaifa仿手艺活自适应手机版模板
- 2022 must have Chrome extension - browser plug-in to double your Internet efficiency
- An error can't locate env pm in @INC
猜你喜欢

B站到底能不能赚到钱?

The ins-30131 installer failed to verify the required initial settings
What are the application fields of MAG gear pump? To sum up

BeanFactoryPostProcessor 与BeanPostProcessor的区别

Standard dual airbags, Changan Lumin listed, starting at 48900 yuan

ORACLE DG物理备库使用别名数据文件改变路径到OMF路径

Dynamically render data and carousels
Oracle XDB組件的重建

Empire CMS imitation "game bird" template source code /92kaifa version large mobile game portal template

DENISON液压泵用什么液压油?有哪些要求
随机推荐
Tenthousand words thoroughly learn heap and binary tree
What are the functions and applications of Mogg test controller
What are the functions and functions of the EMG actuator
图片规则翻页
The ins-30131 installer failed to verify the required initial settings
ZigBee模块无线传输星形拓扑组网结构简介
等待事件 enq: KO - fast object checkpoint可行的一些处理方法
New feature of ES6 - arrow function
DOtween使用方法
基于SSM+Vue+OSS的“依伴汉服”商城设计与开发(含源码+论文+ppt+数据库)
不卷了!入职字节跳动一周就果断跑了。
什么是数字孪生?一个实时而虚拟的表现形式
Q355HR钢板化学成分
puppeteer入门之 Browser 类
2022 must have Chrome extension - browser plug-in to double your Internet efficiency
Servlet 的初次部署
Chemical composition of q355hr steel plate
【Objective-C】结构体和类的区别
Interface, abstract class and relationship between classes
What are the differences between Parker pilot solenoid valve and direct acting solenoid valve?