当前位置:网站首页>LVS+NAT 负载均衡群集,NAT模式部署
LVS+NAT 负载均衡群集,NAT模式部署
2022-08-04 18:08:00 【世上无难事754】
文章目录
一,案例部署环境,所需机器配置信息
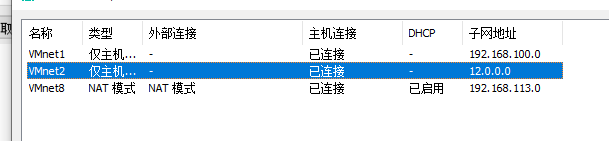
- LVS调度器作为Web服务器池的网关,LVS两块网卡,分别连接内外网,使用轮询调度算法 (图片只是例子根据自己ip地址配置)
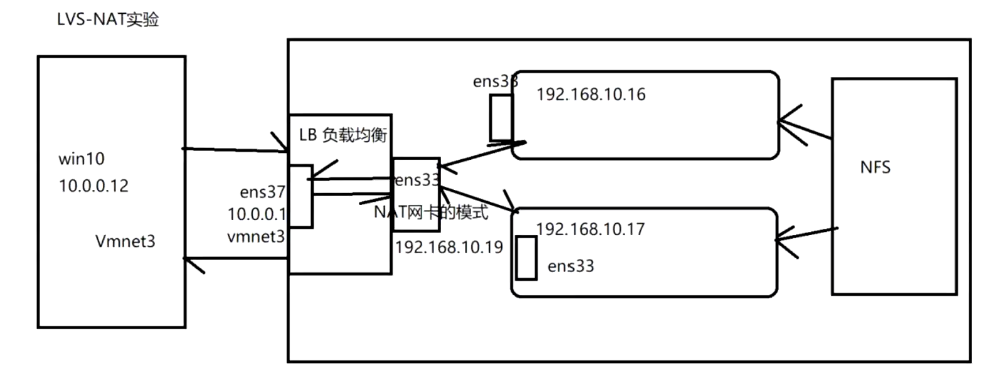
LVS负载均衡调节器: ens33:192.168.35.10 (Vmnet 8 NAT模式)
ens36:12.0.0.1(Vmnet 2 仅主机模式)
Web1 节点服务器:192.168.35.8 网关:192.168.35.10
Web2 节点服务器:192.168.35.7 网关:192.168.35.10
NFS服务器:192.168.113.113.126
客户端 win10:12.0.0.12 网关:12.0.0.1 (Vmnet 2 仅主机模式)
注:干净环境下配置
一.部署LVS负载均衡调节器(192.168.35.10)
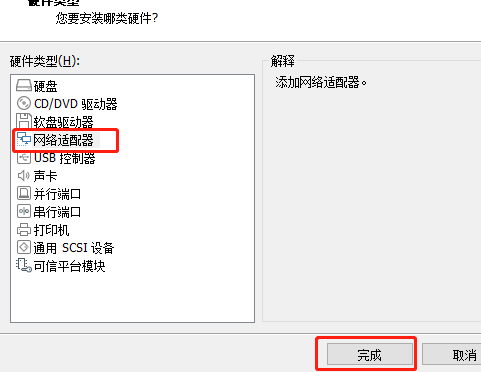
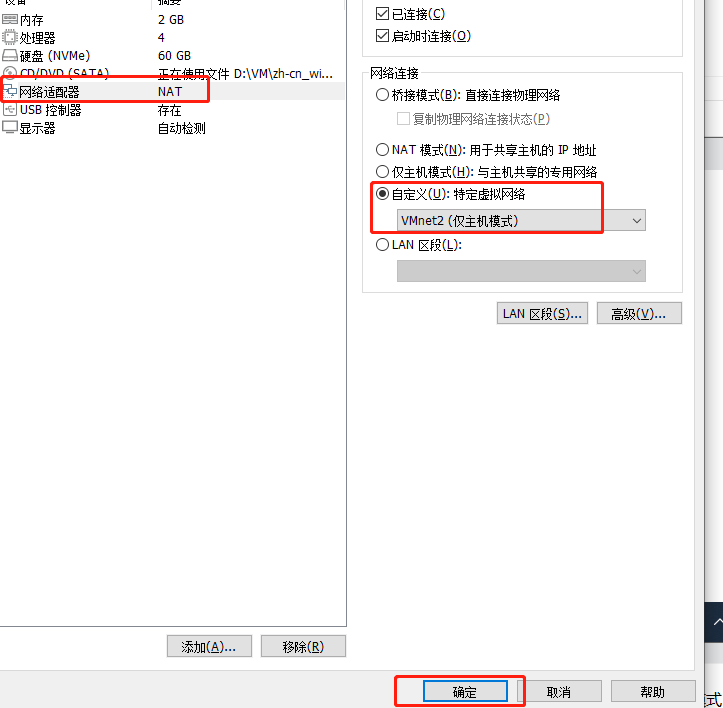
1.添加双网卡
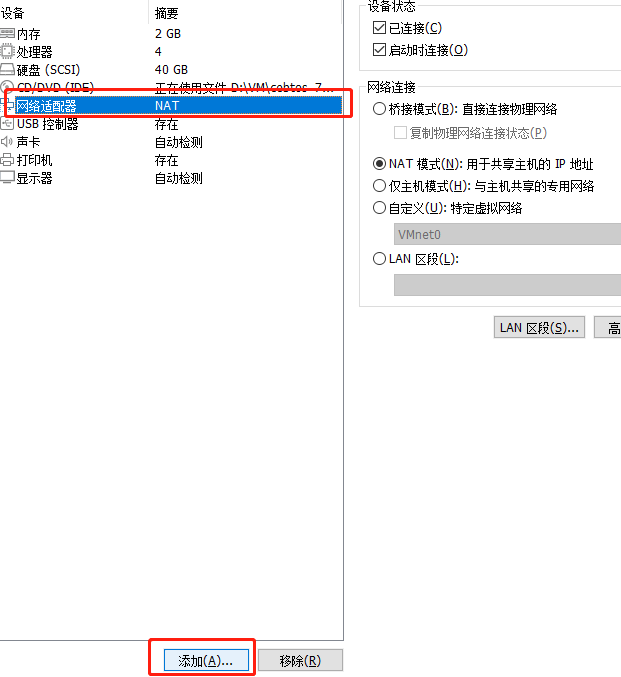
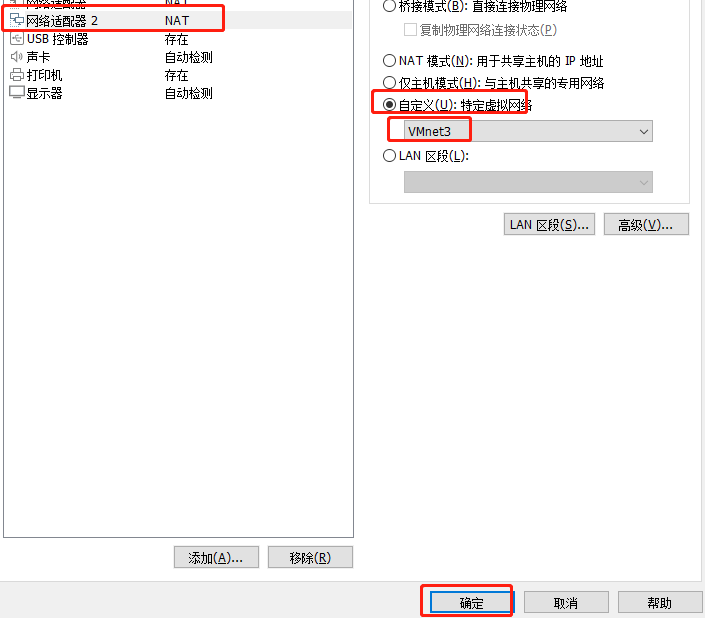
- 确认自己的VM2的IP地址
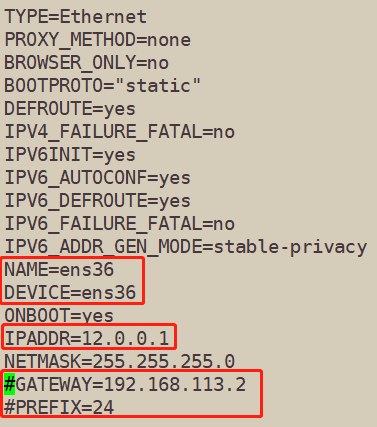
2.编辑ens36内容
[[email protected] ~]# cd /etc/sysconfig/network-scripts/
[[email protected] network-scripts]# cp ifcfg-ens33 ifcfg-ens36
[[email protected] network-scripts]# vim ifcfg-ens36
- 去掉UUID,更改网卡名字,配置网关跟VM2一致,不需要的可以注释或删除,更改后图如下
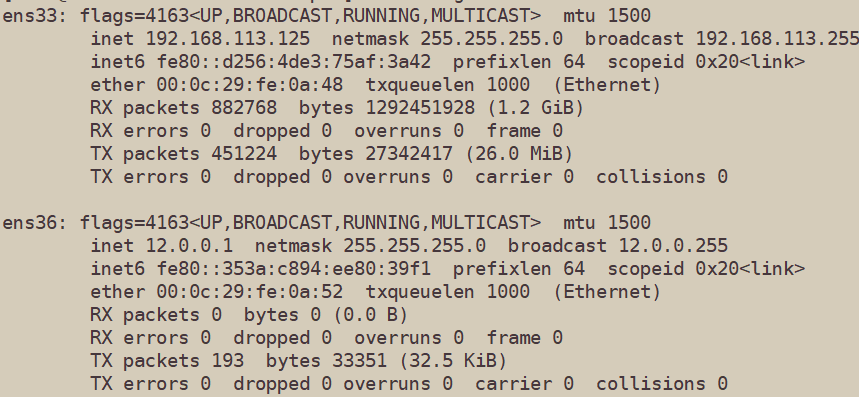
3.重启网卡,查看是否更改
[[email protected] network-scripts]# systemctl restart network
[[email protected] network-scripts]# ifconfig
二,部署共享存储(NFS 服务器 192.168.35.9)
1.关闭防火墙和开机自启,关闭核心防护
[[email protected] ~]# systemctl stop firewalld
[[email protected] ~]# systemctl disable firewalld
[[email protected] ~]# setenforce 0
2.安装共享环境,另外俩也要安装,为了共享(切记关闭防火墙,核心防护)
##192.168.35.9安装
[[email protected] ~]# yum install -y nfs-utils rpcbind

##Web1 节点服务器:192.168.35.8
[[email protected] ~]# systemctl stop firewalld
[[email protected] ~]# systemctl disable firewalld
[[email protected] ~]# setenforce 0
[[email protected] ~]# yum install -y nfs-utils rpcbind


##Web2 节点服务器:192.168.35.7
[[email protected] ~]# systemctl stop firewalld
[[email protected] ~]# systemctl disable firewalld
[[email protected] ~]# setenforce 0
[[email protected] ~]# yum install -y nfs-utils rpcbind
3.开启并开机自启动共享服务
##192.168.113.113.126
[[email protected] ~]# systemctl start nfs
[[email protected] ~]# systemctl enable nfs
[[email protected] ~]# systemctl start rpcbind
[[email protected] ~]# systemctl enable rpcbind

##Web1 节点服务器:192.168.35.8
[[email protected] ~]# systemctl start nfs
[[email protected] ~]# systemctl enable nfs
[[email protected] ~]# systemctl start rpcbind
[[email protected] ~]# systemctl enable rpcbind

##Web2 节点服务器:192.168.35.7
[[email protected] ~]# systemctl start nfs
[[email protected] ~]# systemctl enable nfs
[[email protected] ~]# systemctl start rpcbind
[[email protected] ~]# systemctl enable rpcbind
4.创建共享目录,并赋权
##NFS 服务器 192.168.35.9
[[email protected] ~]# mkdir /opt/dxj /opt/xtj
[[email protected] ~]# chmod 777 /opt/dxj /opt/xtj
[[email protected] ~]# ll /opt
总用量 0
drwxrwxrwx. 2 root root 6 7月  31 18:35 dxj
drwxr-xr-x. 2 root root 6 9月   7 2017 rh
drwxrwxrwx. 2 root root 6 7月  31 18:35 xtj

##添加给予共享的目录和网段地址,和权限
[[email protected] ~]# vim /etc/exports
/opt/dxj 192.168.35.0/24(rw,sync)
/opt/xtj 192.168.35.0/24(rw,sync)

##发布共享
[[email protected] ~]# exportfs -rv
exporting 192.168.35.0/24:/opt/xtj
exporting 192.168.35.0/24:/opt/dxj
##查看共享列表是否发布
[[email protected] ~]# showmount -e
Export list for localhost.localdomain:
/opt/xtj 192.168.35.0/24
/opt/dxj 192.168.35.0/24
5.挂载共享目录
##测试是否能共享
##Web1 节点服务器:192.168.35.8
[[email protected] ~]# showmount -e 192.168.35.9
Export list for 192.168.35.9:
/opt/xtj 192.168.35.0/24
/opt/dxj 192.168.35.0/24

##Web2 节点服务器:192.168.35.7
[[email protected] ~]# showmount -e 192.168.35.9
Export list for 192.168.35.9:
/opt/xtj 192.168.35.0/24
/opt/dxj 192.168.35.0/24

##Web1 节点服务器:192.168.35.8
##安装httpd
[[email protected] ~]# yum install -y httpd

##Web2 节点服务器:192.168.35.7
##安装httpd
[[email protected] ~]# yum install -y httpd

##挂载共享目录
##Web1 节点服务器:192.168.35.8
[[email protected] ~]# mount.nfs 192.168.35.9:/opt/xtj /var/www/html
##查看挂载
[[email protected] ~]# df -h
192.168.35.9:/opt/xtj   47G  4.1G   43G    9% /var/www/html
##设置个页面在共享目录下,测试是否共享
[[email protected] ~]# echo 'this is xtj' > /var/www/html/index.html
[[email protected] ~]# ls /var/www/html/
index.html

##挂载共享目录
##Web2 节点服务器:192.168.35.7
[[email protected] ~]# mount.nfs 192.168.35.9:/opt/dxj /var/www/html
##查看挂载
[[email protected] ~]# df -h
192.168.35.9:/opt/dxj   47G  4.1G   43G    9% /var/www/html
##设置个页面在共享目录下
[[email protected] ~]# echo 'this is dxj' > /var/www/html/index.html
[[email protected] ~]# ls /var/www/html/
index.html

##NFS 服务器 192.168.35.9查看
[[email protected] ~]# ls /opt/xtj
index.html
[[email protected] ~]# ls /opt/dxj
index.html
6.重启服务流量器访问测试
##Web1 节点服务器:192.168.35.8
[[email protected] ~]# systemctl start httpd

##Web2 节点服务器:192.168.35.7
[[email protected] ~]# systemctl start httpd
7.配置更改web1 web2 的网关
##Web1 节点服务器:192.168.35.8
[[email protected] ~]# vim /etc/sysconfig/network-scripts/ifcfg-ens33
[[email protected] ~]# systemctl restart network

##Web2 节点服务器:192.168.35.7
[[email protected] ~]# vim /etc/sysconfig/network-scripts/ifcfg-ens33
[[email protected] ~]# systemctl restart network
- Web1 节点服务器:192.168.35.8配置图片如下

- Web2 节点服务器:192.168.35.7配置图片如下

三,配置SNAT转发规则
1.进入配置文件添加规则
- 192.168.35.10 机器配置
##行尾添加
[[email protected] network-scripts]# vim /etc/sysctl.conf
net.ipv4.ip_forward=1
##查看
[[email protected] network-scripts]# sysctl -p
net.ipv4.ip_forward = 1

2.安装iptables,并添加规则
[[email protected] network-scripts]# yum install -y iptables*
[[email protected] network-scripts]# systemctl start iptables.service

[[email protected] network-scripts]# iptables -F ##清空所有规则
[[email protected] network-scripts]# iptables -t nat -vnl ##查看

##添加规则
[[email protected] network-scripts]# iptables -t nat -A POSTROUTING -s 192.168.35.0/24 -o ens36 -j SNAT --to-source 12.0.0.1
[[email protected] network-scripts]# iptables -t nat -vnL
Chain POSTROUTING (policy ACCEPT 0 packets, 0 bytes)
 pkts bytes target     prot opt in     out     source               destination
    0     0 SNAT       all  --  *      ens36   192.168.35.0/24     0.0.0.0/0            to:12.0.0.1
- 添加内容解析
nat表:修改数据包中的源、日标IP地址或湍口
POSTROUTING:在进行路由判断之"后"所要进行的规则(SNAT/MASQUERADE)
PREROUTING:在进行路由判断之"前"所要进行的规则(DNAT/REDIRECT)
-A: 在规则链的末尾加入新规则
-s: 匹配来源地址IP/MASK.
-o:K网卡名称匹配从这块网卡流出的数据
-i:网卡名称匹配从这块网卡流入的数据
-j:控制类型
3.加载LVS内核模块
##手动加载ip_vs模块
[[email protected] network-scripts]# modprobe ip_vs

##查看ip_vs版本信息
[[email protected] network-scripts]# cat /proc/net/ip_vs
IP Virtual Server version 1.2.1 (size=4096)
Prot LocalAddress:Port Scheduler Flags
  -> RemoteAddress:Port Forward Weight ActiveConn InActConn

4.安装ipvsadm管理工具
[[email protected] network-scripts]# yum install -y ipvsadm

##注:启动服务前必须保存负载分配策略,否则将会保存
ipvsadm-save > /etc/sysconfig/ipvsadm
或者
ipvsadm --save > /etc/sysconfig/ipvsadm
或者
touch /etc/sysconfig/ipvsadm
[[email protected] network-scripts]# ipvsadm-save > /etc/sysconfig/ipvsadm

##启动服务
[[email protected] network-scripts]# systemctl start ipvsadm.service
5.配置负载分配策略
- NAT模式只要在服务器上配置,节点服务器不需要特殊配置
##清空原有策略
[[email protected] network-scripts]# ipvsadm -C

##添加新策略
[[email protected] network-scripts]# ipvsadm -A -t 12.0.0.1:80 -s rr
[[email protected] network-scripts]# ipvsadm -a -t 12.0.0.1:80 -r 192.168.35.8:80 -m -w 1
[[email protected] network-scripts]# ipvsadm -a -t 12.0.0.1:80 -r 192.168.35.7:80 -m -w 1

##启动服务
[[email protected] network-scripts]# ipvsadm
IP Virtual Server version 1.2.1 (size=4096)
Prot LocalAddress:Port Scheduler Flags
  -> RemoteAddress:Port           Forward Weight ActiveConn InActConn
TCP  localhost.localdomain:http rr
  -> 192.168.35.8:http         Masq    1      0          0
  -> 192.168.35.7:http         Masq    1      0          0

##保存负载分配策略,防止重启机器策略丢失
[[email protected] network-scripts]# ipvsadm-save > /etc/sysconfig/ipvsadm
- 添加选项说明
-A 添加虚拟服务器
-S 指定负载调度算法(轮询:rr、加权轮询:wrr、最少连接:1c、加权最少连接:w1c)
-a 表示添加真实服务器(后端节点服务器)
-t 指定VIP地址及TCP端口
-m 表示使用NAT群集模式
-W 设置权重(权重为0时表示暂停节点)
四,浏览器范围测试
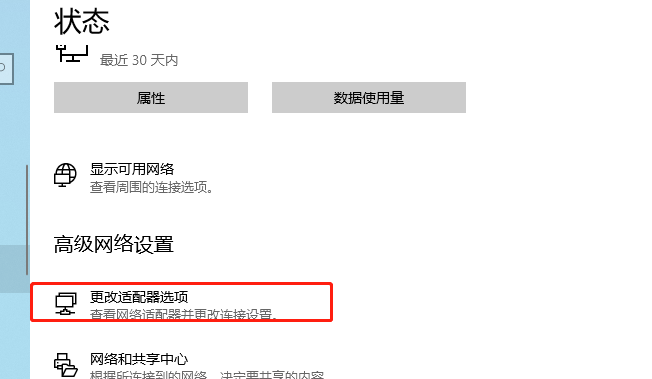
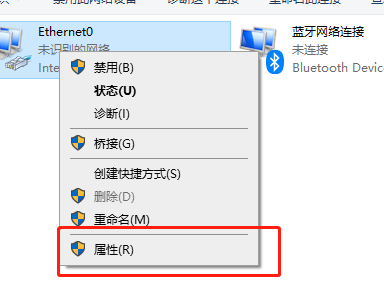
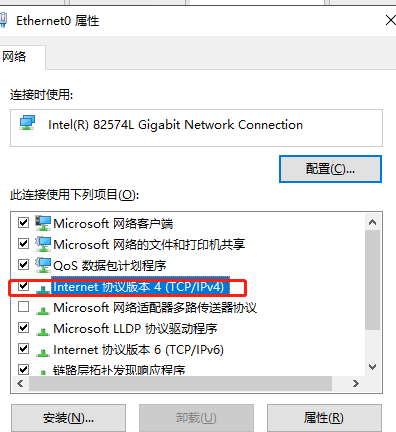
1.更改win10网卡

-a 表示添加真实服务器(后端节点服务器)
-t 指定VIP地址及TCP端口
-m 表示使用NAT群集模式
-W 设置权重(权重为0时表示暂停节点)
四,浏览器范围测试
1.更改win10网卡
[外链图片转存中…(img-PEMDZ4S3-1659442274964)]
[外链图片转存中…(img-pfKW8thB-1659442274965)]
[外链图片转存中…(img-GLOM02YZ-1659442274967)]
[外链图片转存中…(img-tn5isb53-1659442274968)]
[外链图片转存中…(img-6mPatPzi-1659442274969)]
在windows机器测试192.168.127.1
边栏推荐
猜你喜欢

开发那些事儿:如何通过EasyCVR平台获取监控现场的人流量统计数据?

基于 eBPF 的 Kubernetes 可观测实践

链表的经典入门LeetCode题目
图解LeetCode——899. 有序队列(难度:困难)

Cholesterol-PEG-DBCO,CLS-PEG-DBCO,胆固醇-聚乙二醇-二苯基环辛炔科研试剂
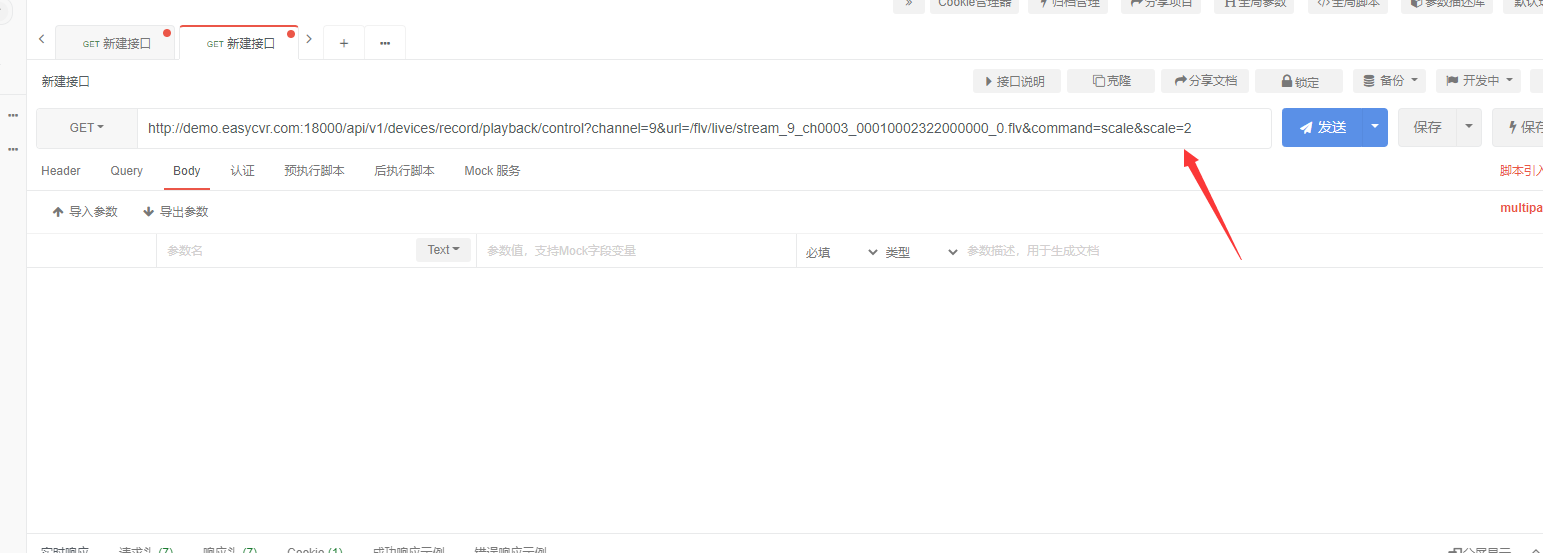
How does EasyCVR call the double-speed playback of device recording through the interface?

网页端IM即时通讯开发:短轮询、长轮询、SSE、WebSocket
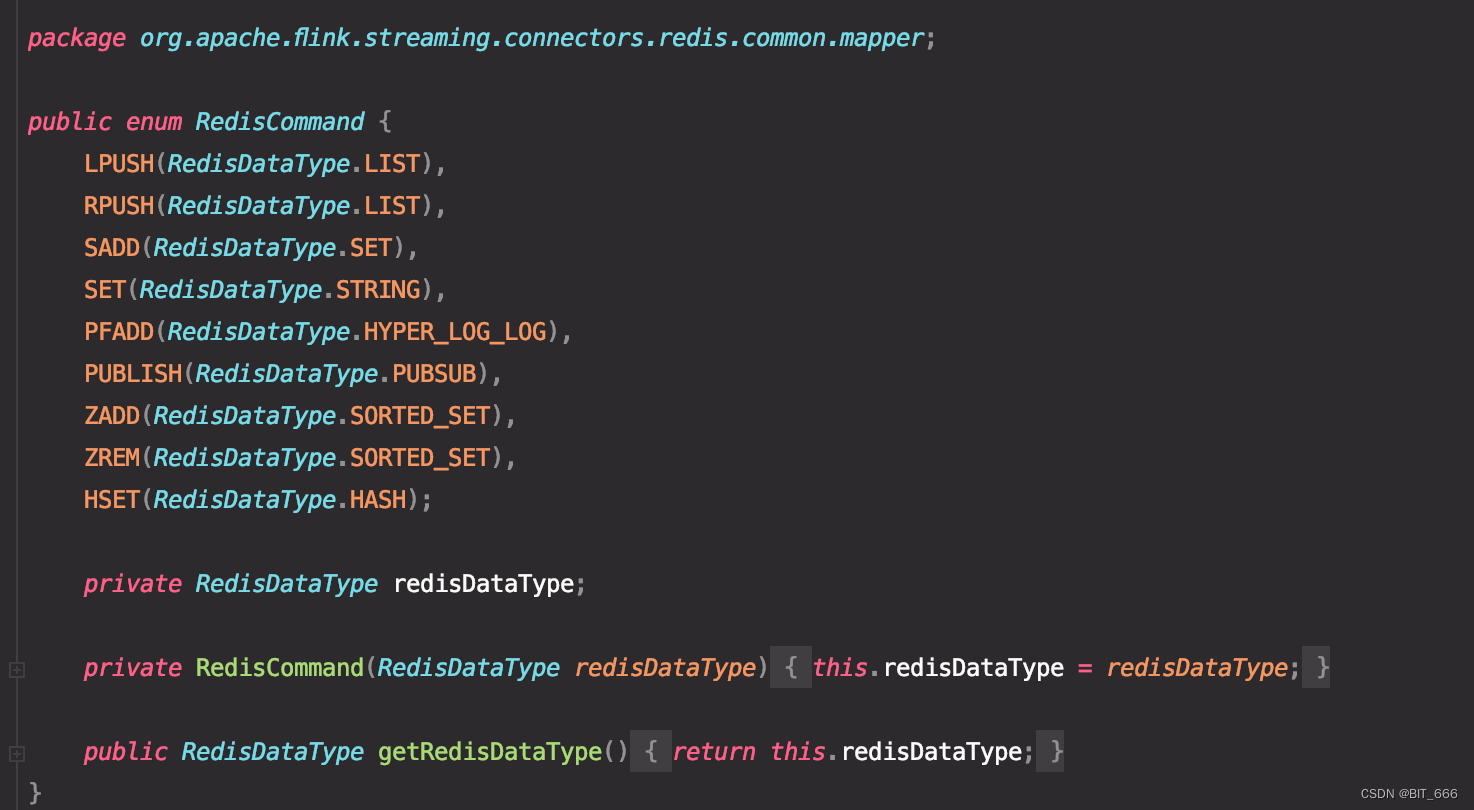
Flink / Scala - 使用 RedisSink 存储数据

2022 May 1 Mathematical Modeling Question C Explanation

Introduction of three temperature measurement methods for PT100 platinum thermal resistance
随机推荐
2019年海淀区青少年程序设计挑战活动小学组复赛试题详细答案
darknet source code reading notes-02-list.h and lish.c
margin 塌陷和重合的理解
mysql cdc 为什么需要RELOAD 这个权限?这个权限在采集数据的过程中的作用是什么?有哪
OpenInfra Days China 2022|SelectDB与你共享 Apache Doris 在互联网广告业务中的实践
【web自动化测试】Playwright快速入门,5分钟上手
leetcode/含有所有字符的最短字符串
链表的经典入门LeetCode题目
clickhouse 上下线表
使用scikit-learn计算文本TF-IDF值
静态iP与权限更改[通俗易懂]
语音识别学习资源
DHCP&OSPF combined experimental demonstration (Huawei routing and switching equipment configuration)
Go 言 Go 语,一文看懂 Go 语言文件操作
火灾报警联网FC18中CAN光端机常见问题解答和使用指导
mood swings
How to make JS code unbreakable
JS兼容问题总结
不论你是大众,科班和非科班,我这边整理很久,总结出的学习路线,还不快卷起来
【web自动化测试】Playwright快速入门,5分钟上手