当前位置:网站首页>Pytoch learning notes (I) installation and use of common functions
Pytoch learning notes (I) installation and use of common functions
2022-07-26 13:39:00 【Did Xiao Hu get stronger today】
List of articles
install Pytorch
stay Anaconda Create... In the environment pytorch Environmental Science
conda create -n pytorch python=3.6
Activate the environment
conda activate pytorch
View the package list
pip list
pytorch Official website :
https://pytorch.org/
![[ Failed to transfer the external chain picture , The origin station may have anti-theft chain mechanism , It is suggested to save the pictures and upload them directly (img-wMEEx9Ga-1658802973736)(C:\Users\Husheng\Desktop\ Learning notes \image-20220721105827500.png)]](/img/ef/c15f4af71b02b2c566e404cf82fad5.png)
Installation command :
conda install pytorch torchvision torchaudio cudatoolkit=11.3 -c pytorch
appear True explain pytorch have access to GPU.
![[ Failed to transfer the external chain picture , The origin station may have anti-theft chain mechanism , It is suggested to save the pictures and upload them directly (img-guSm5J4A-1658802973737)(C:\Users\Husheng\Desktop\ Learning notes \image-20220712220003299.png)]](/img/0c/57e8f43dcac3bf681b7f4935f3faed.png)
stay pytorch Install in jupyter
conda install nb_conda
start-up jupyter
jupyter notebook
shift + enter , Jump to another code block , And run the last code block .
Two common functions
(1)dir() There is something in the toolbox and the partition of the toolbox ;
(2)help() How each tool is used , How to use the tool .
Differences between the three coding methods
![[ Failed to transfer the external chain picture , The origin station may have anti-theft chain mechanism , It is suggested to save the pictures and upload them directly (img-6HjdTzgI-1658802973737)(C:\Users\Husheng\Desktop\ Learning notes \image-20220721131337757.png)]](/img/40/b9087f6de8df6b3111626c4d09384f.png)
Dataset actual combat
from torch.utils.data import Dataset
from PIL import Image
import os

class MyData(Dataset):
    def __init__(self, root_dir, label_dir):
        self.root_dir = root_dir
        self.label_dir = label_dir
        self.path = os.path.join(self.root_dir, self.label_dir)
        self.img_path = os.listdir(self.path)


    def __getitem__(self, idx):
        img_name = self.img_path[idx]
        img_item_path = os.path.join(self.root_dir, self.label_dir, img_name)
        img = Image.open(img_item_path)
        label = self.label_dir
        return img, label

    def __len__(self):
        return len(self.img_path)

root_dir = "dataset/train"
ants_label_dir = "ants"
bees_label_dir = "bees"
ants_dataset = MyData(root_dir, ants_label_dir)
bees_dataset = MyData(root_dir, bees_label_dir)

train_dataset = ants_dataset + bees_dataset
![[ Failed to transfer the external chain picture , The origin station may have anti-theft chain mechanism , It is suggested to save the pictures and upload them directly (img-MiOH3EHJ-1658802973738)(C:\Users\Husheng\Desktop\ Learning notes \image-20220721170630153.png)]](/img/3a/3dcd63471b3fcbbf73e5b9b8622a66.png)
TensorBoard Use
install tensorboard
pip install tensorboard
Report errors :
![[ Failed to transfer the external chain picture , The origin station may have anti-theft chain mechanism , It is suggested to save the pictures and upload them directly (img-TVY5sptY-1658802973738)(C:\Users\Husheng\Desktop\ Learning notes \image-20220721172628638.png)]](/img/3f/aaad2046a1936e4b69314f2fe2dd14.png)
solve : Run as Administrator Anaconda Prompt, reinstall .
Installation and operation error :![[ Failed to transfer the external chain picture , The origin station may have anti-theft chain mechanism , It is suggested to save the pictures and upload them directly (img-maB8KXuL-1658802973738)(C:\Users\Husheng\Desktop\ Learning notes \image-20220721173651485.png)]](/img/5d/0d11edeb5933b710730703ac287d6d.png)
solve :setuptools There is a problem with the version , Unload and reload .
pip uninstall setuptools
pip install setuptools==59.5.0
![[ Failed to transfer the external chain picture , The origin station may have anti-theft chain mechanism , It is suggested to save the pictures and upload them directly (img-uGXu9wRs-1658802973738)(C:\Users\Husheng\Desktop\ Learning notes \image-20220721174213013.png)]](/img/0a/7bc6decb7f61844e85f293d3e47c8d.png)
–logdir=logs No space in the middle
Designated port :
tensorboard --logdir=logs --port=6007
If you draw y = 2x, Draw again 3x, Will automatically fit the image , The solution is to delete logs All files under , Rerun code , Rerun tensorboard --logdir=logs --port=6007
display picture :
from torch.utils.tensorboard import SummaryWriter
import numpy as np
from PIL import Image

writer = SummaryWriter("logs")
img_path = "data/train/ants_image/0013035.jpg"
img_PIL = Image.open(img_path)
img_array = np.array(img_PIL)
print(type(img_array))
print(img_array.shape)

writer.add_image("train", img_array, 1, dataformats='HWC')
# y = x
for i in range(100):
    writer.add_scalar("y = 2x", 3*i, i)

writer.close()
![[ Failed to transfer the external chain picture , The origin station may have anti-theft chain mechanism , It is suggested to save the pictures and upload them directly (img-cFyyh1MN-1658802973739)(C:\Users\Husheng\Desktop\ Learning notes \image-20220721225136606.png)]](/img/f3/b97661812068a688549a8f1d288910.png)
Transforms

install opencv Failure :![[ Failed to transfer the external chain picture , The origin station may have anti-theft chain mechanism , It is suggested to save the pictures and upload them directly (img-I5LKEQJT-1658802973743)(C:\Users\Husheng\Desktop\ Learning notes \image-20220721232654305.png)]](/img/2b/2257ea19f20b10a825cecda170aa90.png)
This error has also been solved for a long time , Several methods have been tried ( The last blog specifically solved this problem :https://blog.csdn.net/hshudoudou/article/details/125930549?spm=1001.2014.3001.5502), The final solution is to specify the version installation :
Code :
from PIL import Image
from torch.utils.tensorboard import SummaryWriter
from torchvision import transforms


img_path = "dataset/train/ants/0013035.jpg"
img = Image.open(img_path)
# print(img)

writer = SummaryWriter("logs")

# 1. transforms How to use
tensor_trans = transforms.ToTensor()
tensor_img = tensor_trans(img)

writer.add_image("Tensor_img", tensor_img)

writer.close()
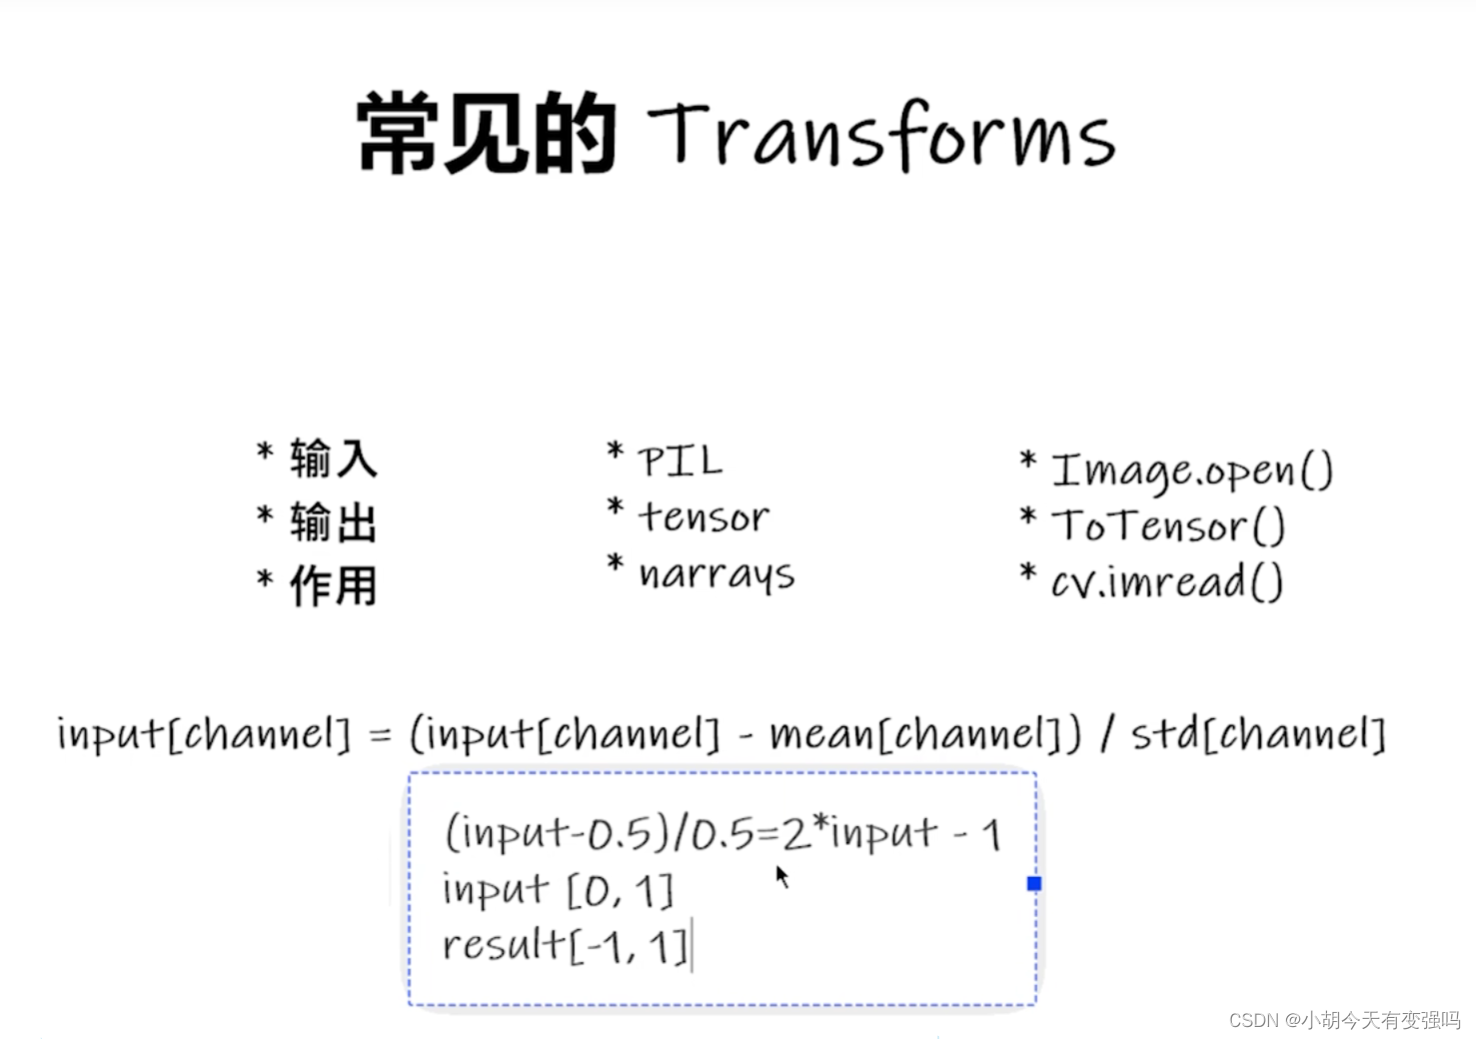
common Transforms
from PIL import Image
from torch.utils.tensorboard import SummaryWriter
from torchvision import transforms

writer = SummaryWriter("logs")
img = Image.open("imgages/blue.jpg")
print(img)

#ToTensor Use
trans_totensor = transforms.ToTensor()
img_tensor = trans_totensor(img)
writer.add_image("ToTensor", img_tensor)


#Normalize normalization
print(img_tensor[0][0][0])
trans_norm = transforms.Normalize([6, 3, 2], [9, 3, 5])
img_norm = trans_norm(img_tensor)
print(img_norm[0][0][0])
writer.add_image("Normalize", img_norm, 2)

#Resize
print(img.size)
trans_resize = transforms.Resize((512, 512))
# img PIL -> resize -> img_size PIL
img_resize = trans_resize(img)
# img_resize PIL -> totensor -> img_resize tensor
img_resize = trans_totensor(img_resize)
writer.add_image("Resize", img_resize, 0)
print(img_resize)

# Compose - resize - 2
trans_resize_2 = transforms.Resize(512)
# PIL -> PIL -> tensor
trans_compose = transforms.Compose([trans_resize_2, trans_totensor])
img_resize_2 = trans_compose(img)
writer.add_image("Resize", img_resize_2, 2)

# RandomCrop
trans_random = transforms.RandomCrop((500, 1000))
trans_compose_2 = transforms.Compose([trans_random, trans_totensor])
for i in range(10):
    img_crop = trans_compose_2(img)
    writer.add_image("RandomCropHW", img_crop, i)

writer.close()

Use transforms Points for attention :
Focus on input and output , Read more official documents , Pay attention to the parameters required by the method .
torchvision Use of data sets in

import torchvision
from torch.utils.tensorboard import SummaryWriter

dataset_transform = torchvision.transforms.Compose([
    torchvision.transforms.ToTensor()
])
train_set = torchvision.datasets.CIFAR10(root="./dataset", train=True, transform=dataset_transform, download=True)
test_set = torchvision.datasets.CIFAR10(root="./dataset", train=False, transform=dataset_transform, download=True)

# print(test_set[0])
# print(test_set.classes)

# img, target = test_set[0]
# print(img)
# print(target)
# print(test_set.classes[target])
# img.show()
#
# print(test_set[0])

writer = SummaryWriter("p10")
for i in range(10):
    img, target = test_set[i]
    writer.add_image("test_set", img, i)
writer.close()
DataLoader Use
import torchvision
from torch.utils.data import DataLoader

#  Prepared test data set
from torch.utils.tensorboard import SummaryWriter

test_data = torchvision.datasets.CIFAR10("./dataset", train=False, transform=torchvision.transforms.ToTensor())

test_loader = DataLoader(dataset=test_data, batch_size=64, shuffle=True, num_workers=0, drop_last=True)

#  The first picture in the test data set and target
img, target = test_data[0]
print(img.shape)
print(target)

writer = SummaryWriter("dataloader")
# step = 0

# for data in test_loader:
# imgs, targets = data
# # print(imgs.shape)
# # print(targets)
# writer.add_images("test_data", imgs, step)
# step += 1

for epoch in range(2):
    step = 0
    for data in test_loader:
        imgs, targets = data
        # print(imgs.shape)
        # print(targets)
        writer.add_images("Epoch:{}".format(epoch), imgs, step)
        step += 1

writer.close()
dataloader Equivalent to how to start from dataset Retrieve data from ,dataset: Data sets ,batch_size: The maximum number of each group ,shuffle: Whether to disturb ,num_workers: Number of threads ,drop_last: Whether to discard the last picture that is not divisible .
Reference material
边栏推荐
- 2022年,我们只用一个月就“送走”了这么多互联网产品
- Parent class reference to child class (parent class reference points to child class object)
- Click El dropdown item/@click.native
- The shell script in Jenkins fails to execute but does not exit by itself
- With 8 years of product experience, I have summarized these practical experience of continuous and efficient research and development
- TDSQL-C Serverless:助力初创企业实现降本增效
- LCL三相pwm整流器(逆变器)
- LeetCode 217. 存在重复元素
- AI theory knowledge map 1 Foundation
- MySQL data directory (1) -- database structure (24)
猜你喜欢

Oom caused by improper use of multithreading

Win11+vs2019 configuration yolox

银行业客户体验管理现状与优化策略分析

Basic sentence structure of English ----- origin

云智技术论坛工业专场 明天见!

TDSQL-C Serverless:助力初创企业实现降本增效

The last time I heard about eBay, or the last time

Detailed explanation of factory mode

3D modeling and rendering based on B é zier curve

周伟:寻找非共识性投资机会,陪伴延迟满足的创始团队
随机推荐
Precautions for triggering pytest.main() from other files
Seven steps to copywriting script ---- document team collaborative management
Using the geoprocessor tool
TDSQL-C Serverless:助力初创企业实现降本增效
冒泡排序的时间复杂度分析
B+ tree (5) introduction to MyISAM -- MySQL from getting started to mastering (17)
The last time I heard about eBay, or the last time
421. 数组中两个数的最大异或值
I. creation and constraint of MySQL table
Brief introduction of reflection mechanism
LCL三相pwm整流器(逆变器)
421. Maximum XOR value of two numbers in the array
Some practical operations of vector
Golang port scanning design
See you tomorrow at the industrial session of cloud intelligence technology forum!
Leetcode 217. there are duplicate elements
时间复杂度和空间复杂度
【Oauth2】五、OAuth2LoginAuthenticationFilter
How to write the introduction of GIS method journals and papers?
Hcip day 12 notes sorting (BGP Federation, routing rules)