当前位置:网站首页>考虑关系的图卷积神经网络R-GCN的一些理解以及DGL官方代码的一些讲解
考虑关系的图卷积神经网络R-GCN的一些理解以及DGL官方代码的一些讲解
2022-07-01 19:13:00 【Icy Hunter】
前言
昨天写的GCN的一篇文章入榜了,可喜可贺。但是感觉距离我的目标还是有点远,因为最后要用R-GAT,我感觉可能得再懂一点R-GCN和GAT才可能比较好的理解R-GAT,今天就尝试一下把R-GCN搞搞清楚吧(至少得读懂DGL官方给的代码吧)
R-GCN
R-GCN和GCN的区别就在于这个R。R-GCN考虑了关系对消息传播的影响。
带你快速理解R-GCN(relational-GCN)
看看b站这个视频就应该能够比较形象的知道R-GCN是有什么创新点了,讲的还是非常不错的。
R-GCN解决了什么问题,可以这么形象的理解: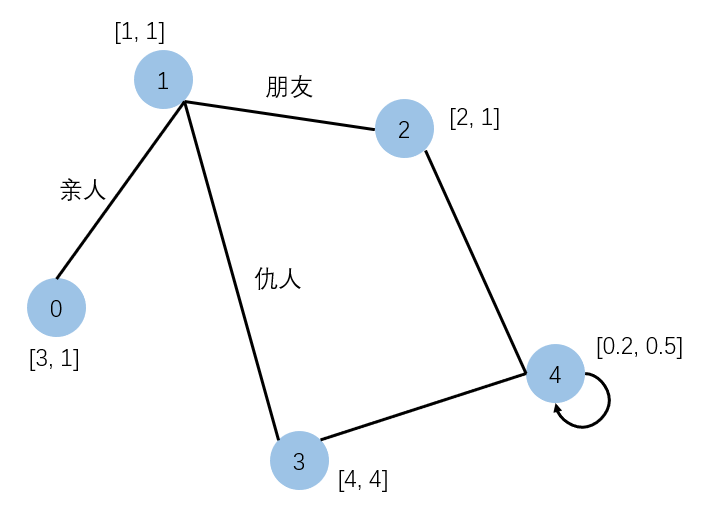
例如假设节点之间有那么些关系,如果不考虑边,仅仅GCN的话,那么1节点更新参数时,2节点和3节点传来的特征比例应该是一样的,那么就不太合理了,因为你的仇人和你的朋友怎么能够一概而论呢?
R-GCN就是考虑到了这一点,因此将关系加入考虑特征更新的操作。
传播公式

其中
σ()是激活函数
hj(l)是值输入的邻居节点的特征
hi(l) 是指输入的自己节点的特征
hi(l+1) 是指更新后的自己节点的特征
Wrl是对应关系特征的权重矩阵,因为考虑不同的关系,那么有多少种关系就有多少个Wr
W0就是自己的特征权重矩阵
ci,r是正则化常量
虽然这个公式看起来复杂,但是其实就是考虑了各种不同关系的GCN,GCN的是通过权重*特征来计算节点特征,权重就是通过度来计算出来;而R-GCN则是通过关系矩阵(Wrl) * hjl对应的特征矩阵来计算出对应节点的特征,Wr的个数就是图中所有节点之间的关系数+1(自连也算一种关系,需要一个即W0)。
正则化

正则化的意义就是在实验中发现,当图变大一点的时候,其关系的数量会迅速增长,从而导致模型训练困难,不仅如此,可能某些边的训练数据会不那么多,就会很容易导致过拟合的产生,基于此,论文中提到了一种正则化的技巧。
其核心思想就是对于每个关系r,共享参数Vb,训练的只是arb,这样共享参数的方式就减少了训练参数的数量,也缓解了过拟合。
对应到代码里,应该就是相当于将关系矩阵降维成一个小的关系矩阵之后,再进行特征的计算。
例如原来的关系矩阵可能是1000 * 1000,特征值维度为300 ,那么接个线性层 1000 * 10就将1000种关系转换成了10维来表示,然后再接一个10 * 300的线性层得出对应特征的权重,再得出特征向量的值即可完成考虑关系得出对应节点特征值的操作,然后汇聚即可。
如果这样的话,训练的参数应该是 1000 * 10 + 10 * 300
如果不这样,直接计算,那么训练的参数应该 1000 * 300
这个就是他正则化的好处了吧,应该是这样吧,我从代码里感觉出是这样的。
DGL中的R-GCN实体分类的实例

模型流程图就是这么简单
谁能想到,那代码拷下了居然有小bug,可能版本问题吧,但是稍微改改就可以跑了。
环境配置:
dgl0.6.1
torch1.9.1
理解代码前还是需要学习一下某些相关的操作的。
nn.Parameter
import torch.nn as nn
a = nn.Parameter(torch.Tensor(3, 2, 2))
print(a)
b = a[torch.tensor([1, 1, 2, 2])]
print(b)
print(b.shape)
输出:
Parameter containing:
tensor([[[1.0194e-38, 9.6429e-39],
         [9.2755e-39, 9.1837e-39]],

        [[9.3674e-39, 1.0745e-38],
         [1.0653e-38, 9.5510e-39]],

        [[1.0561e-38, 1.0194e-38],
         [1.1112e-38, 1.0561e-38]]], requires_grad=True)
tensor([[[9.3674e-39, 1.0745e-38],
         [1.0653e-38, 9.5510e-39]],

        [[9.3674e-39, 1.0745e-38],
         [1.0653e-38, 9.5510e-39]],

        [[1.0561e-38, 1.0194e-38],
         [1.1112e-38, 1.0561e-38]],

        [[1.0561e-38, 1.0194e-38],
         [1.1112e-38, 1.0561e-38]]], grad_fn=<IndexBackward>)
torch.Size([4, 2, 2])
这个操作就是对能够更新的参数矩阵a中,索引出a里面的各个元素。
(看一眼就懂了,以前没这么用过,看到这代码开始的时候看不太懂)
torch.matmul
这个就是矩阵乘法,举两个例子就大概知道它有啥特别的了:
import torch
a = torch.tensor([[1, 2],
                   [2, 2]])

b = torch.tensor([[[1, 4],
                   [2, 4]],
                   [[1, 5],
                   [2, 4]],
                   [[1, 5],
                   [2, 4]]])
c = torch.matmul(a, b)
print(a.shape)
print(b.shape)
print(c)
输出结果:
torch.Size([2, 2])
torch.Size([3, 2, 2])
tensor([[[ 5, 12],
         [ 6, 16]],

        [[ 5, 13],
         [ 6, 18]],

        [[ 5, 13],
         [ 6, 18]]])
import torch
a = torch.tensor([[[1, 2],
                   [2, 2]],])

b = torch.tensor([[[1, 4],
                   [2, 4]],
                   [[1, 5],
                   [2, 4]],
                   [[1, 5],
                   [2, 4]]])
c = torch.matmul(a, b)
print(a.shape)
print(b.shape)
print(c)
输出结果
torch.Size([1, 2, 2])
torch.Size([3, 2, 2])
tensor([[[ 5, 12],
         [ 6, 16]],

        [[ 5, 13],
         [ 6, 18]],

        [[ 5, 13],
         [ 6, 18]]])
import torch
a = torch.tensor([[[1, 2],
                   [2, 2]],
                   [[1, 5],
                   [2, 4]]])

b = torch.tensor([[[1, 4],
                   [2, 4]],
                   [[1, 5],
                   [2, 4]],
])
c = torch.matmul(a, b)
print(a.shape)
print(b.shape)
print(c)
输出结果:
torch.Size([2, 2, 2])
torch.Size([2, 2, 2])
tensor([[[ 5, 12],
         [ 6, 16]],

        [[11, 25],
         [10, 26]]])
就是当两个三维矩阵第一维维度相同,那么就能对应元素进行矩阵乘法,如果第一维维度为1或者缺少一维,那么就是直接进行矩阵乘法,如果第一维维度不同且都不为1,那么就会报错。
看了一下午的R-GCN的代码,我感觉应该差不多可以理解代码的思路了,千言万语都在注释里了,并且可直接运行(如果版本和我匹配的话)
import torch
import torch.nn as nn
import torch.nn.functional as F
from dgl import DGLGraph
import dgl.function as fn
from functools import partial

class RGCNLayer(nn.Module):
    def __init__(self, in_feat, out_feat, num_rels, num_bases=-1, bias=None,
                 activation=None, is_input_layer=False):
        super(RGCNLayer, self).__init__()
        # 输入的特征维度
        self.in_feat = in_feat
        # 输出的特征维度
        self.out_feat = out_feat
        # 关系的数量
        self.num_rels = num_rels
        # 基分解中W_r分解的数量,即B的大小
        self.num_bases = num_bases
        # 是否带偏置b
        self.bias = bias
        # 激活函数
        self.activation = activation
        # 是否是输入层
        self.is_input_layer = is_input_layer

        # 如果说没设定W_r的个数(B)或者W_r的个数比关系数大,那么就直接取关系数
        # 因为这个正则化就是为了解决关系数过多而导致训练参数过多及过拟合的问题的
        # 如果没有正则化优化正常来说有几个关系就对应几个W_r
        # 因为因此肯定是B <= num_rels的
        if self.num_bases <= 0 or self.num_bases > self.num_rels:
            self.num_bases = self.num_rels

        # 创建基分解矩阵num_bases * in_feat * out_feat, 对应公式3
        self.weight = nn.Parameter(torch.Tensor(self.num_bases, self.in_feat,
                                                self.out_feat))
        if self.num_bases < self.num_rels:
            # 如果B小于关系数,那么就需要进行一个维度变换,
            # 关系数变成成B的数量才可以进行后续计算
            # 对应公式3
            self.w_comp = nn.Parameter(torch.Tensor(self.num_rels, self.num_bases))

        # 如果需要偏置则添加偏置b
        if self.bias:
            self.bias = nn.Parameter(torch.Tensor(out_feat))

        # 初始化参数
        nn.init.xavier_uniform_(self.weight,
                                gain=nn.init.calculate_gain('relu'))
        # 初始化参数,如果B<num_rels说明self.w_comp需要使用,
        # 因此需要初始化,否则如果b = num_rels则不必使用这个来转化
        # 那也就用不到这个矩阵了
        if self.num_bases < self.num_rels:
            nn.init.xavier_uniform_(self.w_comp,
                                    gain=nn.init.calculate_gain('relu'))
        # 使用偏置的话也初始化
        if self.bias:
            nn.init.xavier_uniform_(self.bias,
                                    gain=nn.init.calculate_gain('relu'))

    def forward(self, g):
        # 如果B < 关系数
        # 那么参数矩阵就需要转换一下
        if self.num_bases < self.num_rels:
            # 根据公式3转换权重
            # weight的维度 = num_bases * in_feat * out_feat --> in_feat * num_bases * out_feat
            weight = self.weight.view(self.in_feat, self.num_bases, self.out_feat)
            # w_comp的维度 => num_rels * num_bases
            # torch.matmul(self.w_comp, weight)
            # w_comp(num_rels * num_bases) weight(in_feat * num_bases * out_feat)
            # ||
            # V
            # in_feat * num_rels * out_feat
            # 再经过view操作
            # weight --> num_rels * in_feat * out_feat
            weight = torch.matmul(self.w_comp, weight).view(self.num_rels,
                                                        self.in_feat, self.out_feat)
        else:
        # 如果没有正则化,即直接取所有关系,原本初始化就是这个形状
        # weight = num_rels * in_feat * out_feat
            weight = self.weight

        if self.is_input_layer:
            # 如果是输入层,需要获得节点的embedding表达
            def message_func(edges):
                # for input layer, matrix multiply can be converted to be
                # an embedding lookup using source node id
                # 就这个例子来说,weight: num_rels * in_feat * out_feat = 91 * 8285 * 16
                embed = weight.view(-1, self.out_feat) # embed = 753935 * 16
                # 这句话真的看了半天才懂一点点
                # edges.data['rel_type']存的是所有的关系 共65439个关系
                # self.in_feat是输入的embedding,因为这里直接one-hot表示,因此大小为8285
                # edges.src['id']是每个关系的源节点id, 这个参数看了好久也不知道是怎么来的,我感觉可能是节点有了“id”,然后传进来便就会有这个参数了吧
                # 这个index还是很奇妙的
                # 因为一共91种关系,8285个节点,那么最开始输入需要赋值节点自身的特征
                # 那么每个节点对应的91种关系都有不同的表达
                # edges.data['rel_type'] * self.in_feat + edges.src['id']就是取自身节点对应的关系的那种表达
                # 从而获得节点的embedding表达
                index = edges.data['rel_type'] * self.in_feat + edges.src['id']
                return {
    'msg': embed[index] * edges.data['norm']}
        else:
            # 如果不是输入层那么用计算出 邻居特征*关系 的特征值
            def message_func(edges):
                # 取出对应关系的权重矩阵
                w = weight[edges.data['rel_type'].long()]
                # 矩阵乘法获取每条边需要传递的特征msg:(65439 * 4)
                msg = torch.bmm(edges.src['h'].unsqueeze(1), w).squeeze()
                msg = msg * edges.data['norm']
                return {
    'msg': msg}
        # msg求和作为节点特征
        # 有偏置加偏置。
        # 有激活加激活,主要是用于输出层设置的
        def apply_func(nodes):
            h = nodes.data['h']
            if self.bias:
                h = h + self.bias
            if self.activation:
                h = self.activation(h)
            return {
    'h': h}

        g.update_all(message_func, fn.sum(msg='msg', out='h'), apply_func)


class Model(nn.Module):
    def __init__(self, num_nodes, h_dim, out_dim, num_rels,
                 num_bases=-1, num_hidden_layers=1):
        super(Model, self).__init__()
        self.num_nodes = num_nodes
        self.h_dim = h_dim
        self.out_dim = out_dim
        self.num_rels = num_rels
        self.num_bases = num_bases
        self.num_hidden_layers = num_hidden_layers

        # 创建R-GCN层
        self.build_model()

        # 获取特征
        self.features = self.create_features()

    def build_model(self):
        self.layers = nn.ModuleList()
        # 输入层
        i2h = self.build_input_layer()
        self.layers.append(i2h)
        # 隐藏层
        for _ in range(self.num_hidden_layers):
            h2h = self.build_hidden_layer()
            self.layers.append(h2h)
        # 输出层
        h2o = self.build_output_layer()
        self.layers.append(h2o)

    # 初始胡化每个节点的特征
    def create_features(self):
        features = torch.arange(self.num_nodes)
        return features

    # 构建输入层
    def build_input_layer(self):
        return RGCNLayer(self.num_nodes, self.h_dim, self.num_rels, self.num_bases,
                         activation=F.relu, is_input_layer=True)

    # 构建隐藏层
    def build_hidden_layer(self):
        return RGCNLayer(self.h_dim, self.h_dim, self.num_rels, self.num_bases,
                         activation=F.relu)
    # 构建输出层
    def build_output_layer(self):
        return RGCNLayer(self.h_dim, self.out_dim, self.num_rels, self.num_bases,
                         activation=partial(F.softmax, dim=1))
    # 前向传播
    def forward(self, g):
        if self.features is not None:
            g.ndata['id'] = self.features
        for layer in self.layers:
            layer(g)
        # 取出每个节点的隐藏层并且删除"h"特征,方便下一次进行训练
        return g.ndata.pop('h')


from dgl.contrib.data import load_data
data = load_data(dataset='aifb')
num_nodes = data.num_nodes  # 节点数量
num_rels = data.num_rels # 关系数量
num_classes = data.num_classes # 分类的类别数
labels = data.labels # 标签
train_idx = data.train_idx  # 训练集节点的index
# split training and validation set
val_idx = train_idx[:len(train_idx) // 5] # 划分验证集
train_idx = train_idx[len(train_idx) // 5:] # 划分训练集
edge_type = torch.from_numpy(data.edge_type) # 获取边的类型
edge_norm = torch.from_numpy(data.edge_norm).unsqueeze(1) # 获取边的标准化因子

labels = torch.from_numpy(labels).view(-1)


# configurations
n_hidden = 16 # 每层的神经元个数
n_bases = -1 # 直接用所有的关系,不正则化
n_hidden_layers = 0 # 使用一层输入一层输出,不用隐藏层
n_epochs = 25 # 训练次数
lr = 0.01 # 学习率
# 创建图
g = DGLGraph((data.edge_src, data.edge_dst))
g.edata.update({
    'rel_type': edge_type, 'norm': edge_norm})

# 创建模型
model = Model(len(g),
              n_hidden,
              num_classes,
              num_rels,
              num_bases=n_bases,
              num_hidden_layers=n_hidden_layers)


optimizer = torch.optim.Adam(model.parameters(), lr=lr, weight_decay=l2norm)

print("start training...")
model.train()
for epoch in range(n_epochs):
    optimizer.zero_grad()
    logits = model.forward(g)
    loss = F.cross_entropy(logits[train_idx], labels[train_idx].long())
    loss.backward()

    optimizer.step()

    train_acc = torch.sum(logits[train_idx].argmax(dim=1) == labels[train_idx])
    train_acc = train_acc.item() / len(train_idx)
    val_loss = F.cross_entropy(logits[val_idx], labels[val_idx].long())
    val_acc = torch.sum(logits[val_idx].argmax(dim=1) == labels[val_idx])
    val_acc = val_acc.item() / len(val_idx)
    print("Epoch {:05d} | ".format(epoch) +
          "Train Accuracy: {:.4f} | Train Loss: {:.4f} | ".format(
              train_acc, loss.item()) +
          "Validation Accuracy: {:.4f} | Validation loss: {:.4f}".format(
              val_acc, val_loss.item()))
其实代码并没有完完全全读懂,还是有一些地方有疑惑的,有不对的地方,希望大家能够批评指正!
参考
https://docs.dgl.ai/en/0.6.x/tutorials/models/1_gnn/4_rgcn.html
Modeling Relational Data with Graph Convolutional Networks
边栏推荐
- Test of NSI script
- How to turn off the boot auto start software in win11
- Big factories are wolves, small factories are dogs?
- STC 32-bit 8051 single chip microcomputer development example tutorial II i/o working mode and its configuration
- 升级版手机检测微信工具小程序源码-支持多种流量主模式
- Use of common built-in classes of JS
- 如果浏览器被意外关闭,react怎么缓存用户填写的表单?
- Problems encountered in installing MySQL in docker Ubuntu container
- 2022年低压电工考试试题及答案
- 强大、好用、适合程序员/软件开发者的专业编辑器/笔记软件综合评测和全面推荐
猜你喜欢

渗透工具-TrustedSec 公司的渗透测试框架 (PTF)
Détection des cibles - série Yolo

Past and present life of product modular design

Entering Ruxin Town, digital intelligence transformation connects "future community"
math_ Use differentiation to calculate approximate value

随机头像大全,多分类带历史记录微信小程序源码_支持流量主
RichView 文档中的 ITEM

Comprehensive evaluation and detailed inventory of high-quality note taking software (I) note, obsedian, remnote, flowus
目標檢測——Yolo系列
Getting started with fastdfs
随机推荐
如果浏览器被意外关闭,react怎么缓存用户填写的表单?
RichView TRVDocParameters 页面参数设置
Swiftui 4 new features complete toggle and mixed toggle multiple binding components
RichView RichEdit SRichViewEdit PageSize 页面设置与同步
Review notes of Zhang Haifan in introduction to software engineering (Sixth Edition)
基于图的 Affinity Propagation 聚类计算公式详解和代码示例
Use of common built-in classes of JS
How to prevent repeated submission of new orders
8K HDR!|为 Chromium 实现 HEVC 硬解 - 原理/实测指南
Is it safe to open an account online? Can a novice open a stock trading account.
300题线性代数 第四讲 线性方程组
ORA-01950
独家消息:阿里云悄然推出RPA云电脑,已与多家RPA厂商开放合作
math_ Use differentiation to calculate approximate value
Develop those things: easycvr cluster device management page function display optimization
利用QEventLoop实现同步等待槽函数返回
大厂做狼,小厂做狗?
Penetration tools - trustedsec's penetration testing framework (PTF)
Items in richview documents
Oracle 死锁测试