当前位置:网站首页>PyQt5快速开发与实战 4.3 QLabel and 4.4 文本框类控件
PyQt5快速开发与实战 4.3 QLabel and 4.4 文本框类控件
2022-07-27 17:47:00 【Ding Jiaxiong】
PyQt5快速开发与实战
文章目录
4. 第4章 PyQt5 基本窗口控件
4.3 QLabel
4.3.1 QLabel介绍
QLabel对象作为一个占位符可以显示不可编辑的文本或图片,也可以放置一GIF 动画,还可以被用作提示标记为其他控件。纯文本、链接或富文本可以显示标签上。
QLabel是界面中的标签类,它继承自QFrame类。QLabel类的继承结构:
QObject → QPaintDevice → Qwidget → QFrame → QLabel
4.3.2 Qlabel类中的常用方法:
| 方法 | 描述 |
|---|---|
| setAlignment() | 按固定值方式对齐文本 - Qt.AlignLeft,水平方向靠左对齐 - Qt.AlignRight,水平方向靠右对齐 - Qt.AlignCenter,水平方向居中对齐 - Qt.AlignJustify,水平方向调整间距两端对齐 - Qt.AlignTop,垂直方向靠上对齐 - Qt.AlignBottom,垂直方向靠下对齐 - Qt.AlignVCenter,垂直方向居中对齐 |
| setIndent() | 设置文本缩进值 |
| setPixmap() | 设置QLabel为一个Pixmap图片 |
| text() | 获得QLabel的文本内容 |
| setText() | 设置QLabel的文本内容 |
| selectedText() | 返回所选择的字符 |
| setBuddy() | 设置QLabel的助记符及buddy(伙伴),即使用QLabel设置快捷键,会在快捷键后将焦点设置到其buddy 上,这里用到了QLabel的交互控件功能。此外,buddy可以是任何–个 Widget 控件。使用setBuddy(QWidget *)设置,其QLabel必须是文本内容,并且使用“&”符号设置了助记符 |
| setWordWrap() | 设置是否允许换行 |
4.3.3 QLabel类的常用信号
| 信号 | 描述 |
|---|---|
| linkActivated | 当单击标签中嵌入的超链接,希望在新窗口中打开这个超连接时,setOpenExternalLinks特性必须设置为true |
| linkHovered | 当鼠标指针滑过标签中嵌入的超链接时,需要用槽函数与这个信号进行绑定 |
4.3.4 显示QLabel标签案例
from PyQt5.QtWidgets import QApplication,QLabel,QWidget,QVBoxLayout
from PyQt5.QtCore import Qt
from PyQt5.QtGui import QPixmap ,QPalette
import sys

class WindowDemo(QWidget):
    def __init__(self):
        super().__init__()

        label1 = QLabel(self)
        label2 = QLabel(self)
        label3 = QLabel(self)
        label4 = QLabel(self)

        # 初始化标签控件
        label1.setText("这是一个文本标签。")
        label1.setAutoFillBackground(True)
        palette = QPalette()
        palette.setColor(QPalette.Window , Qt.blue)
        label1.setPalette(palette)
        label1.setAlignment(Qt.AlignCenter) ## 设置文本标签居中显示

        label2.setText("<a href=#>欢迎使用Python GUI应用</a>")

        label3.setAlignment(Qt.AlignCenter)
        label3.setToolTip("这是一个图片标签")
        label3.setPixmap(QPixmap("../打包资源文件/pic/python.jpg"))

        label4.setText("<A href='https://blog.csdn.net/weixin_44226181?type=blog'>欢迎访问丁家雄的博客主页</a>")

        label4.setAlignment(Qt.AlignRight)
        label4.setToolTip("这是一个超链接标签")

        # 在窗口布局中添加控件
        vbox = QVBoxLayout()
        vbox.addWidget(label1)
        vbox.addStretch()
        vbox.addWidget(label2)
        vbox.addStretch()
        vbox.addWidget(label3)
        vbox.addStretch()
        vbox.addWidget(label4)

        ## 允许label1 控件访问超链接
        label1.setOpenExternalLinks(True)
        # 允许label4 控件访问超链接
        label4.setOpenExternalLinks(True)

        # 点击 文本框 绑定槽事件
        label4.linkActivated.connect(link_clicked)

        ##滑过文本框 绑定 槽事件

        label2.linkHovered.connect(link_hovered)
        label1.setTextInteractionFlags(Qt.TextSelectableByMouse)

        self.setLayout(vbox)
        self.setWindowTitle("QLabel案例")

def link_hovered():
    print("当用鼠标滑过 label 1-2 标签时,触发事件。")

def link_clicked():
    print("当用鼠标滑过 label -4 标签时,触发事件。")


if __name__ == '__main__':
    from pyqt5_plugins.examples.exampleqmlitem import QtCore
    QtCore.QCoreApplication.setAttribute(QtCore.Qt.AA_EnableHighDpiScaling)
    app = QApplication(sys.argv)
    win = WindowDemo()
    win.show()
    sys.exit(app.exec_())

4.3.5 QLabel标签快捷键的使用案例
from PyQt5.QtWidgets import *
import sys

class QlableDemo(QDialog):
    def __init__(self):
        super().__init__()

        self.setWindowTitle("QLabel例子")
        nameLb1 = QLabel('&Name',self)
        nameEd1 = QLineEdit(self)
        nameLb1.setBuddy(nameEd1) # 设置伙伴

        nameLb2 = QLabel('&Password',self)
        nameEd2 = QLineEdit(self)
        nameLb2.setBuddy(nameEd2)

        btnOK = QPushButton('&Ok')
        btnCancel = QPushButton('&Cancel')
        mainLayout = QGridLayout(self)
        mainLayout.addWidget(nameLb1,0,0)
        mainLayout.addWidget(nameEd1,0,1,1,2)

        mainLayout.addWidget(nameLb2,1,0)
        mainLayout.addWidget(nameEd2,1,1,1,2)

        mainLayout.addWidget(btnOK,2,1)
        mainLayout.addWidget(btnCancel,2,2)

if __name__ == '__main__':
    from pyqt5_plugins.examples.exampleqmlitem import QtCore
    QtCore.QCoreApplication.setAttribute(QtCore.Qt.AA_EnableHighDpiScaling)
    app = QApplication(sys.argv)
    win = QlableDemo()
    win.show()
    sys.exit(app.exec_())

4.4 文本框类控件
4.4.1 QLineEdit
QLineEdit类是一个单行文本框控件,可以输入单行字符串。如果需要输入多行字符串,则使用QTextEdit 类。
QLineEdit类中的常用方法:
| 方法 | 描述 |
|---|---|
| setAlignment() | 按固定值方式对齐文本: Qt.AlignLeft,水平方向靠左对齐. Qt.AlignRight,水平方向靠右对齐 Qt.AlignCenter,水平方向居中对齐 Qt.AlignJustify,水平方向调整间距两端对齐· Qt.AlignTop,垂直方向靠上对齐 |
| QL.AlignBottom,垂直方向靠下对齐 Qt.Align VCenter,垂直方向居中对齐 | |
| clear() | 清除文本框内容 |
| setEchoMode() | 设置文本框显示格式。允许输入的文本显示格式的值可以是: QLineEdit.Normal,正常显示所输入的字符,此为默认选项 QLineEdit.NoEcho,不显示任何输入的字符,常用于密码类型的输入,且其密码长度需要保密时 |
| QLineEdit.Password,显示与平台相关的密码掩码字符,而不是实际输入的字符 | |
| QLineEdit.PasswordEchoOnEdit,在编辑时显示字符,负责显示密码类型的输入 | |
| setPlaceholderText() | 设置文本框浮显文字 |
| setMaxLength() | 设置文本框所允许输入的最大字符数 |
| setReadOnly() | 设置文本框为只读 |
| setText() | 设置文本框内容 |
| Text() | 返回文本框内容 |
| setDragEnabled() | 设置文本框是否接受拖动 |
| setMaxLength() | 设置允许输入字符的最大长度 |
| selectAll() | 全选 |
| setFocus() | 获得焦点 |
| setInputMask() | 设置掩码 |
| setValidator() | 设置文本框的验证器(验证规则),将限制任意可能输入的文本。 可用的校验器为: QIntValidator。限制输入整数 |
| QDoubleValidator,限制输入浮点数 | |
| QRegexpValidator,检查输入是否符合正则表达式 |
输入掩码的占位符和字面字符
| 字符 | 含义 |
|---|---|
| A | ASCHI字母字符是必须输入的(A-Z、a~z) |
| a | ASCII字母字符是允许输入的,但不是必需的 |
| N | ASCHI字母字符是必须输入的(A-Z、az、09) |
| n | ASCII字母字符是允许输入的,但不是必需的 |
| X | 任何字符都是必须输入的 |
| x | 任何字符都是允许输入的,但不是必需的 |
| 9 | ASCII数字字符是必须输入的(0-9) |
| 0 | ASCII 数字字符是允许输入的,但不是必需的 |
| D | ASCII 数字字符是必须输入的(1-9) |
| d | ASCII 数字字符是允许输入的,但不是必需的(1~9) |
| # | ASCII数字字符或加/减符号是允许输入的,但不是必需的 |
| H | 十六进制格式字符是必须输入的(A-F、af、09) |
| h | 十六进制格式字符是允许输入的,但不是必需的 |
| B | 二进制格式字符是必须输入的(0,1) |
| b | 二进制格式字符是允许输入的,但不是必需的 |
| > | 所有的字母字符都大写 |
| < | 所有的字母字符都小写 |
| ! | 关闭大小写转换 |
| \ | 使用"\"转义上面列出的字符 |
掩码由掩码字符和分隔符字符串组成,后面可以跟一个分号和空白字符,空白字符在编辑后会从文本中删除的。
掩码示例:
| 掩码 | 注意事项 |
|---|---|
| 000.000.000.000;_ | IP地址,空白字符是"_" |
| HH:HH:HH:HH:HH:HH; | MAC地址 |
| 0000-00-00 | 日期,空白字符是空格 |
| >AAAAA-AAAAA-AAAAA-AAAAA-AAAAA;# | 许可证号,空白字符是"-",所有字母字符转换为大写 |
QLineEdit类中的常用信号:
| 信号 | 描述 |
|---|---|
| selectionChanged | 只要选择改变了,这个信号就会被发射 |
| textChanged | 当修改文本内容时,这个信号就会被发射 |
| editingFinished | 当编辑文本结束时,这个信号会被发射 |
4.4.2 案例——EchoMode的显示效果
from PyQt5.QtWidgets import QApplication,QLineEdit,QWidget,QFormLayout

import sys

class lineEditDemo(QWidget):
    def __init__(self,parent = None):
        super(lineEditDemo , self).__init__(parent)
        self.setWindowTitle("QLineEdit案例")

        flo = QFormLayout()
        pNormalLineEdit = QLineEdit()
        pNoEchoLineEdit = QLineEdit()

        pPasswordLineEdit = QLineEdit()
        pPasswordEchoOnEditLineEdit = QLineEdit()

        flo.addRow("Normal",pNormalLineEdit)
        flo.addRow("NoEcho",pNoEchoLineEdit)
        flo.addRow("Password",pPasswordLineEdit)
        flo.addRow("PasswordEchoOnEdit",pPasswordEchoOnEditLineEdit)

        pNormalLineEdit.setPlaceholderText("Normal")
        pNoEchoLineEdit.setPlaceholderText("NoEcho")

        pPasswordLineEdit.setPlaceholderText("Password")
        pPasswordEchoOnEditLineEdit.setPlaceholderText("PasswordEchoOnEdit")

        # 设置显示效果
        pNormalLineEdit.setEchoMode(QLineEdit.Normal)
        pNoEchoLineEdit.setEchoMode(QLineEdit.NoEcho)
        pPasswordLineEdit.setEchoMode(QLineEdit.Password)
        pPasswordEchoOnEditLineEdit.setEchoMode(QLineEdit.PasswordEchoOnEdit)

        self.setLayout(flo)

if __name__ == '__main__':
    from pyqt5_plugins.examples.exampleqmlitem import QtCore
    QtCore.QCoreApplication.setAttribute(QtCore.Qt.AA_EnableHighDpiScaling)
    app = QApplication(sys.argv)
    win = lineEditDemo()
    win.show()
    sys.exit(app.exec_())

4.4.3 案例——验证器
from PyQt5.QtWidgets import QApplication,QLineEdit,QWidget,QFormLayout
from PyQt5.QtGui import QIntValidator,QDoubleValidator,QRegExpValidator
from PyQt5.QtCore import QRegExp
import sys

class lineEditDemo(QWidget):
    def __init__(self,parent = None):
        super(lineEditDemo,self).__init__(parent)
        self.setWindowTitle("QLineEdit验证器案例")

        flo = QFormLayout()
        pIntLineEdit = QLineEdit()
        pDoubleLineEdit = QLineEdit()
        pValidatorLineEdit = QLineEdit()

        flo.addRow("整型",pIntLineEdit)
        flo.addRow("浮点型",pDoubleLineEdit)
        flo.addRow("字母和数字",pValidatorLineEdit)

        pIntLineEdit.setPlaceholderText("整型")
        pDoubleLineEdit.setPlaceholderText("浮点型")
        pValidatorLineEdit.setPlaceholderText("字母和数字")

        # 整型,范围:[1,99]
        pIntValidator = QIntValidator(self)
        pIntValidator.setRange(1,99)

        # 浮点型 ,范围:[-360,360],精度:小数点后两位
        pDoubleValidator = QDoubleValidator(self)
        pDoubleValidator.setRange(-360,360)
        pDoubleValidator.setNotation(QDoubleValidator.StandardNotation)
        pDoubleValidator.setDecimals(2)

        # 字母和数字
        reg = QRegExp("[a-zA-Z0-9]+$")
        pValidator = QRegExpValidator(self)
        pValidator.setRegExp(reg)

        # 设置验证器
        pIntLineEdit.setValidator(pIntValidator)
        pDoubleLineEdit.setValidator(pDoubleValidator)
        pValidatorLineEdit.setValidator(pValidator)

        self.setLayout(flo)


if __name__ == '__main__':
    from pyqt5_plugins.examples.exampleqmlitem import QtCore
    QtCore.QCoreApplication.setAttribute(QtCore.Qt.AA_EnableHighDpiScaling)
    app = QApplication(sys.argv)
    win = lineEditDemo()
    win.show()
    sys.exit(app.exec_())

4.4.4 案例——输入掩码
from PyQt5.QtWidgets import QApplication , QLineEdit , QWidget ,QFormLayout
import sys

class lineEditDemo(QWidget):
    def __init__(self,parent = None):
        super(lineEditDemo , self).__init__(parent)
        self.setWindowTitle("QLineEdit输入掩码案例")

        flo = QFormLayout()
        pIPLineEdit = QLineEdit()
        pMACLineEdit = QLineEdit()
        pDateLineEdit = QLineEdit()
        pLicenseLineEdit = QLineEdit()

        pIPLineEdit.setInputMask("000.000.000.000;_")
        pMACLineEdit.setInputMask("HH:HH:HH:HH:HH:HH;_")

        pDateLineEdit.setInputMask("0000-00-00")
        pLicenseLineEdit.setInputMask(">AAAAA-AAAAA-AAAAA-AAAAA-AAAAA;#")

        flo.addRow("数字掩码",pIPLineEdit)
        flo.addRow("MAC掩码",pMACLineEdit)
        flo.addRow("日期掩码",pDateLineEdit)
        flo.addRow("许可证掩码",pLicenseLineEdit)

        self.setLayout(flo)

if __name__ == '__main__':
    from pyqt5_plugins.examples.exampleqmlitem import QtCore
    QtCore.QCoreApplication.setAttribute(QtCore.Qt.AA_EnableHighDpiScaling)
    app = QApplication(sys.argv)
    win = lineEditDemo()
    win.show()
    sys.exit(app.exec_())

4.4.5 综合示例
from PyQt5.QtWidgets import QApplication , QLineEdit , QWidget , QFormLayout
from PyQt5.QtGui import QIntValidator , QDoubleValidator , QFont
from PyQt5.QtCore import Qt
import sys

class lineEditDemo(QWidget):
    def __init__(self,parent = None):
        super(lineEditDemo, self).__init__(parent)
        e1 = QLineEdit()
        e1.setValidator(QIntValidator())
        e1.setMaxLength(4)
        e1.setAlignment(Qt.AlignRight)
        e1.setFont(QFont("Arial",20))

        e2 = QLineEdit()
        e2.setValidator(QDoubleValidator(0.99,99.99,2))

        flo = QFormLayout()
        flo.addRow("integer validator",e1)
        flo.addRow("Double validator" , e2)

        e3 = QLineEdit()
        e3.setInputMask('+99_9999_999999')
        flo.addRow("Input Mask",e3)

        e4 = QLineEdit()
        e4.textChanged.connect(self.textchanged)
        flo.addRow("Text changed",e4)

        e5 = QLineEdit()
        e5.setEchoMode(QLineEdit.Password)
        flo.addRow("Password",e5)

        e6 = QLineEdit("Hello DingJiaxiong")
        e6.setReadOnly(True)
        flo.addRow("Read Only",e6)

        e5.editingFinished.connect(self.enterPress)
        self.setLayout(flo)
        self.setWindowTitle("QLineEdit综合示例")

    def textchanged(self,text):
        print("输入的内容为:" + text)

    def enterPress(self):
        print("已输入值")

if __name__ == '__main__':
    from pyqt5_plugins.examples.exampleqmlitem import QtCore
    QtCore.QCoreApplication.setAttribute(QtCore.Qt.AA_EnableHighDpiScaling)
    app = QApplication(sys.argv)
    win = lineEditDemo()
    win.show()
    sys.exit(app.exec_())

4.4.5 【QTextEdit】
QTextEdit类是一个多行文本框控件,可以显示多行文本内容,当文本内容超出控件显示范围时,可以显示水平个垂直滚动条。QTextEdit 不仅可以显示文本还可以显示HTML文档。
QTextEdit类中常用方法
| 方法 | 描述 |
|---|---|
| setPlainText() | 设置多行文本框的文本内容 |
| toPlainText() | 返回多行文本框的文本内容 |
| setHtml() | 设置多行文本框的内容为HTML文档 |
| toHTML() | 返回多行文本框的HTML文档内容 |
| clear() | 清除内容 |
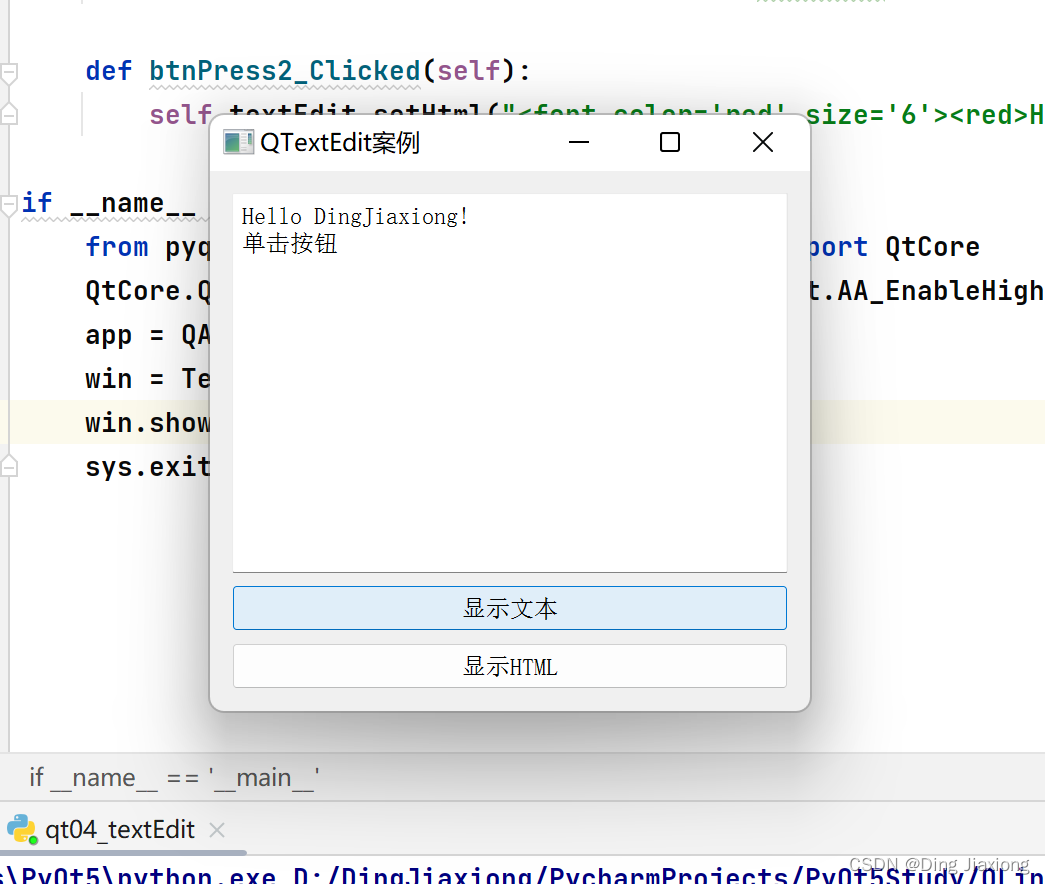
4.4.6 案例——多行文本框QTextEdit的使用
from PyQt5.QtWidgets import QApplication , QWidget,QTextEdit ,QVBoxLayout,QPushButton
import sys

class TextEditDemo(QWidget):
    def __init__(self,parent = None):
        super(TextEditDemo, self).__init__(parent)
        self.setWindowTitle("QTextEdit案例")

        self.resize(300 , 270)
        self.textEdit = QTextEdit()
        self.btnPress1 = QPushButton("显示文本")
        self.btnPress2 = QPushButton("显示HTML")

        layout = QVBoxLayout()
        layout.addWidget(self.textEdit)
        layout.addWidget(self.btnPress1)
        layout.addWidget(self.btnPress2)

        self.setLayout(layout)
        self.btnPress1.clicked.connect(self.btnPress1_Clicked)
        self.btnPress2.clicked.connect(self.btnPress2_Clicked)

    def btnPress1_Clicked(self):
        self.textEdit.setPlainText("Hello DingJiaxiong!\n单击按钮")

    def btnPress2_Clicked(self):
        self.textEdit.setHtml("<font color='red' size='6'><red>Hello DingJiaxiong!\n单击按钮。</font>")

if __name__ == '__main__':
    from pyqt5_plugins.examples.exampleqmlitem import QtCore
    QtCore.QCoreApplication.setAttribute(QtCore.Qt.AA_EnableHighDpiScaling)
    app = QApplication(sys.argv)
    win = TextEditDemo()
    win.show()
    sys.exit(app.exec_())

边栏推荐
- Detailed introduction to common coordinate system of cesium
- Sword finger offer 25. merge two sorted linked lists
- How to encrypt the data in MySQL database? Mysql8.0 comes with new features
- 什么是多层感知机(什么是多层感知机)
- C243: examination ranking
- 获得微店商品详情 API
- [paper reading] rich feature hierarchies for accurate object detection and semantic segmentation
- codeforces每日5题(均1500)-第二十四天
- Introduction to basic cesium controls
- 1.2、基于增量式生成遮挡与对抗抑制的行人再识别(代码理解与实验进度+报告)
猜你喜欢

Sword finger offer 25. merge two sorted linked lists
2022年,软件测试还能学吗?别学了,软件测试岗位饱和了...

第3章 基本操作

如何运行 kevinchappell / formBuilder

TS2532: Object is possibly ‘undefined‘
![[openbmc series] 4. Start the process and use qume to simulate ast2600 EVB](/img/ab/026111b25836758ec7ffec8d60f49d.png)
[openbmc series] 4. Start the process and use qume to simulate ast2600 EVB

电容串联与并联以及电容串联与平衡电阻

邬贺铨:因地制宜 数字化技术赋能“双碳”实践

ViewUI 中 DatePicker 日期选择器在 IE11 浏览器中兼容解决方案

Use cpolar to build a business website (5)
随机推荐
[C # network application programming] Experiment 3: process management exercise
速卖通:按关键字搜索商品 API
Introduction to reinforcement learning
LeetCode练习2——两数之和
kubectl 获取pod日志 —— 筑梦之路
mysql数据库中的数据如何加密呢?mysql8.0自带新特性
Wu Hequan: digital technology empowering "double carbon" practice according to local conditions
ViewUI 中 DatePicker 日期选择器在 IE11 浏览器中兼容解决方案
Dcm11- write the function and configuration of the data service ($2e) according to the identifier [based on DaVinci configurator classic]
Assignment 1 - Hello World ! - Simple thread Creation
Product Manager: check where there is an error prompt of "system exception" on the offline
Huawei's mobile phone shipments exceed Apple's, ranking second in the world, but it faces a large amount of inventory that needs to be cleaned up
京东:获得商品详情原数据 API
mysql函数汇总之系统信息函数
联发科发布中端游戏手机芯片Helio G80
China business CDP white paper | love Analysis Report
华为全联接大会2022开启曼谷之旅;Facebook推视频收入分成功能,创作者可获20%分成…
Introduction to basic cesium controls
New library online | cnopendata detailed address data of all patents in China
Qt的QTextToSpeech类实现语音播报功能