当前位置:网站首页>1、 Kubernetes basic concept + environment installation (build cross server public network environment)
1、 Kubernetes basic concept + environment installation (build cross server public network environment)
2022-07-27 00:09:00 【kk_ lina】
One 、 What is it?

docker Human deployment containers waste time ! Waste energy ! Need an arrangement system to solve –k8s!
1、 characteristic
Service discovery and load balancing
For example, deploying on one machine can only resist 100 Concurrent requests , At this time to run 3 Taiwan machine , In this way, you can resist 300 Concurrent , Deploy the service to three servers , This increases the number of concurrent services . Suppose another service manages the services on the three servers , When asked to come , First request this server , The server can distribute the traffic to different servers for processing according to the server configuration , Increase concurrency and reduce server pressure , This is load balancing .
Service discovery is the first step to load balancing , When the service of a machine suddenly hangs up , When asked to come in ,k8s You need to know the status of all services , Remove the suspended services in time , No request processing .Storage choreography
Applications in each service need to open up hard disk space , If the application hangs or is not used , You need to release all the space associated with this application .Automatic deployment and rollback
The service hangs up or the upgrade fails ,k8s You can rollback versions and deploy services automatically .Automatically complete the packing calculation
k8s Put all containers into a sandbox to run , The memory and memory of the container cpu Can pass k8s Set up and monitor .Self repair
k8s Can restart automatically 、 Replace the hanging container . Once a machine hangs up , It can put the containers in this machine on other machines to run , Ensure that the machine is always running .Key and configuration management
Be similar to springcloud Control center in
summary :Kubernetes Provide you with a framework that can flexibly run distributed systems .k8s Will meet your expansion requirements , Fail over , Deployment mode, etc . for example ,Kubernetes It's easy to manage the system Canary Deploy .
2、 framework
- Operation mode
A master-slave mode , Master node (master) Manage work nodes (worker), General tasks are carried out by work nodes , When there are more primary nodes, a highly available cluster will be formed , If a master node hangs up, it will reselect the master node to manage the work node .
Kubernetes Cluster = N Master Node + N Worker Node :N>=1 - Component architecture


Node: Every working node , Similar to every factory ;
kubelet: Decide whether the application in each work node is running , It can detect whether the application is running normally at any time , If there is a problem with the application , Then the message is fed back to the master node , If you set this node as the primary node , It will start all the components required by the master node , Similar factory director ;
api-serve: Receive messages from work nodes , Usually we are with K8s The interaction of is also handled by it ;
controller-maneger: receive api Messages sent to be processed , And determine whether the application needs to be distributed , And store the decision information in the key value database , And notify api;
ETCD: Key value database , Store data information ;
scheduler: from api Receiving information , Dynamically calculate which work node can handle the application ;
kube-proxy: Know the working node address of all applications ;
give an example :
If the application fails ,Kubernetes Processing flow :
Communication processing flow between different applications :
Two 、 Cluster environment
1、 Cluster installation logic
Basic environment construction

Processing flow when setting the master node

correct :kubeadm Download all components ,kubelet All components required to start up !!!
2、 Public network environment configuration
Because of the limited funds , Set only one master and one slave server , But you can also follow this step to add a work node .
- server information
| Cloud products | Public network ip Address | Intranet ip |
|---|---|---|
| Tencent cloud (master) | 49.232.181.123 | |
| Alibaba cloud (node) | 182.92.128.93 |
- Open ports :
 Turn on  6443 TCP port : to  kube-apiserver  Use
 Turn on  8472 UPD port : to  flannel  Network plug-in communication use
- System network environment configuration
# Public network   To configure hosts, establish ip Mapping with domain name , It can ensure that even if the code migrates to other environments, there is no need to change the Intranet in the code ip Address , We can still access it according to the domain name ip  Those who have not applied for their own domain name can be omitted
echo "IP  Customize hostname" >> /etc/hosts
echo "" >> /etc/hosts

#  take  SELinux  Set to  permissive  Pattern ( It's equivalent to disabling ) Turn off firewall , close setenforce
#SELinux: Security enhancing components , Love is wrong and difficult to locate ! The main reason is , After shutdown, allow the container to access the file system of the host
# Turn off firewall :nftables Back end compatibility issues , Generate duplicate firewall rules
sudo setenforce 0
# see setenforce state  disabled
setenforce -v

# If appear SELinux is disabled It indicates that it has been permanently closed ,0 It's temporary closure , Both cases are ok
sudo sed -i 's/^SELINUX=enforcing$/SELINUX=permissive/' /etc/selinux/config
# Check the status SELINUX disabled
getenforce

# close swap  It can lead to docker Abnormal operation , Turn it off and it will be normal . reason :swap When the memory is insufficient , Store some memory data to disk , Will affect performance .
swapoff -a  # Temporarily Closed   Current session only
sed -ri 's/.*swap.*/#&/' /etc/fstab # Permanent ban
# see swap Close successfully  swap Everything is 0 The successful
free -m

# establish  /etc/sysctl.d/k8s.conf  file
cat > k8s.conf <<EOF # Turn on bridge mode  net.bridge.bridge-nf-call-ip6tables = 1 net.bridge.bridge-nf-call-iptables = 1 # Open the forward  net.ipv4.ip_forward = 1 ## close ipv6 net.ipv6.conf.all.disable_ipv6=1 EOF
cp k8s.conf /etc/sysctl.d/k8s.conf
sysctl -p /etc/sysctl.d/k8s.conf
- Set host name , Can't repeat !!
hostnamectl set-hostname k8s-master - Set the nic : Virtual machines are bound to the intranet ip, Because my servers are Alibaba cloud and Tencent cloud ,VPC no , Intranet access cannot be linked , need Use the virtual network card to bind the public network ip, Through the public network ip To register the cluster .
#  All hosts should create virtual network cards , And bind the corresponding public network  ip
#  Provisional entry into force , Restart will fail
ifconfig eth0:1 < Your public network IP>
ifconfig eth0:1 49.232.181.123
#  permanent
cat > /etc/sysconfig/network-scripts/ifcfg-eth0:1 <<EOF BOOTPROTO=static DEVICE=eth0:1 IPADDR=182.92.128.93 PREFIX=32 TYPE=Ethernet USERCTL=no ONBOOT=yes EOF
# Restart the network
systemctl restart network
# View results
ip addr
ifconfig

3、 Based on the environment
- yum Installation and configuration :
# 1、 Download the required installation package
yum install -y yum-utils

# 2、 Set up the warehouse for the image
yum-config-manager \
 --add-repo \
 https://download.docker.com/linux/centos/docker-ce.repo #  foreign !!!
 #  Use domestic Alibaba cloud to install , Installation is very fast
yum-config-manager \
  --add-repo \
http://mirrors.aliyun.com/docker-ce/linux/centos/docker-ce.repo

# 3、 to update yum Package index
yum makecache fast

# 4、k8s Version number needs to be specified ! install docker Related engines  docker-ce  Community Edition  ee Enterprise Edition
yum install -y docker-ce-20.10.7 docker-ce-cli-20.10.7 containerd.io-1.4.6
Reference resources :docker Details of the article
- start-up docker Boot from boot
systemctl enable docker --now - Configuration acceleration : establish daemon.json file , The parameters in this file will be executed at startup , By default, if there is no such file, you need to create it yourself . If there is a detailed explanation of the parameters currently needed ( Only the currently used , There are also many parameters that you can check the official documents by yourself ):
registry-mirrors: Set up image acceleration
exec-opts: Run time execution options
log-driver: Default driver for container logs ( The default is “ json-file”)
log-opts: Storage driver options
storage-driver: Storage drivers for managing images and containers ,
sudo mkdir -p /etc/docker
sudo tee /etc/docker/daemon.json <<-'EOF' { "registry-mirrors": ["https://******* .mirror.aliyuncs.com"], "exec-opts": ["native.cgroupdriver=systemd"], "log-driver": "json-file", "log-opts": { "max-size": "100m" }, "storage-driver":"overlay2" } EOF
sudo systemctl daemon-reload
sudo systemctl restart docker
If there is an error report here , Check whether the writing in the document conforms to the specification , such as - It has been written. ., The comma falls and waits , If not, take another look /lib/systemd/system/docker.service Is there any repetition in the content that leads to conflict .
#  Set the system time zone to   China / Shanghai
timedatectl set-timezone Asia/Shanghai
#  Change the current UTC Time written to hardware clock
timedatectl set-local-rtc 0
#  Restart services that depend on system time
systemctl restart rsyslog
systemctl restart crond
# Shut down services not needed by the system
systemctl stop postfix && systemctl disable postfix

# Log operations :
mkdir /var/log/journal #  Persist the log directory
mkdir /etc/systemd/journald.conf.d
cat > /etc/systemd/journald.conf.d/99-prophet.conf <<EOF [Journal] #  Persist to disk  Storage=persistent #  Compress history log  Conpress=yes SyncIntervalSec=5m RateLimitInterval=30s RateLimitBurst=1000 #  Maximum space  10G SystemMaxUse=10G #  Single log file is the largest  200M SystemMaxFileSize=200M #  Log save time 2 Zhou  MaxRetentionSec=2week #  Do not forward logs to syslog ForwardToSyslog=no EOF

# Restart and take effect
systemctl restart systemd-journald
#CentOS 7.x System native 3.10x There are some in the kernel Bugs, Cause to run Docker、Kubernetes unstable .
rpm -Uvh http://mirror.ventraip.net.au/elrepo/elrepo/el7/x86_64/RPMS/elrepo-release-7.0-4.el7.elrepo.noarch.rpm

#  Check after installation  /boot/grub2/grub.cfg  The corresponding kernel in  menuentry  Include in  initrd16  To configure , without , Install it again
yum --enablerepo=elrepo-kernel install -y kernel-lt
#  Set boot from new kernel
grub2-set-default "CentOS Linux (4.4.182-1.el7.elrepo.x86_64) 7 (Core)"


 testing :
[[email protected] ~]# uname -r
4.4.237-1.el7.elrepo.x86_64
4、 About iptables and ipvs
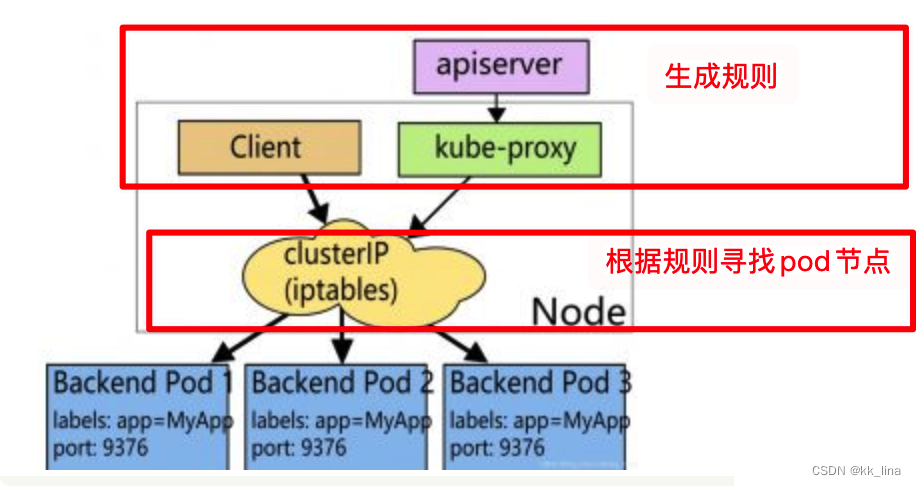
- iptables Processing flow :kube-proxy monitor apiserver Inside service and endpoint( Stored in etcd in , One for recording service All corresponding pod Access address of ) Generate an ordered iptables The rules , Each rule corresponds to one pod, Then randomly redirect to a pod On , If the first one pod Hang up , Will retry another . such iptables Record pod And the corresponding ip The method of has great disadvantages , When in cluster mode , If we had 2000 There are services and each service has 10 individual pod, This will produce at least 20000 individual iptable Record .
- ipvs Handling rules :kube-proxy monitor API Server in service and endpoint The change of , call netlink Interface to create the corresponding ipvs The rules , And regularly will ipvs Rules and Services and Endpoints Sync . Guarantee IPVS state .IPVS The proxy mode is based on netfilter hook function , This function is similar to iptables Pattern , But use hash Table as the underlying data structure , Working in kernel space . It means IPVS Mode of kube-proxy Use lower redirection traffic . The efficiency of synchronization rules and network throughput are also higher .
- ipvs Provides better scalability and performance for large clusters
- ipvs Support than iptables More complex load balancing algorithms ( The minimum load 、 The minimum connection 、 A weighted, etc. )
- ipvs Support for server health checks and connection retries
- iptables Create rules based on the kernel rule list ,ipvs be based on netlink Interface
- If not loaded and enabled ipvs modular , Or no configuration ipvs Related configuration , Will be downgraded to iptables Pattern .
- kube-proxy Turn on ipvs Preconditions for
# install ipvs
yum -y install ipvsadm

# Make the configuration file work
modprobe br_netfilter
# To configure ipvs file
cat > /etc/sysconfig/modules/ipvs.modules <<EOF #!/bin/bash modprobe -- ip_vs modprobe -- ip_vs_rr modprobe -- ip_vs_wrr modprobe -- ip_vs_sh modprobe -- nf_conntrack_ipv4 EOF

chmod 755 /etc/sysconfig/modules/ipvs.modules && bash /etc/sysconfig/modules/ipvs.modules && lsmod | grep -e ip_vs -e nf_conntrack_ipv4
5、 install kubelet、kubeadm、kubectl
- Download resources
cat <<EOF | sudo tee /etc/yum.repos.d/kubernetes.repo [kubernetes] name=Kubernetes baseurl=http://mirrors.aliyun.com/kubernetes/yum/repos/kubernetes-el7-x86_64 enabled=1 gpgcheck=0 repo_gpgcheck=0 gpgkey=http://mirrors.aliyun.com/kubernetes/yum/doc/yum-key.gpg http://mirrors.aliyun.com/kubernetes/yum/doc/rpm-package-key.gpg exclude=kubelet kubeadm kubectl EOF


sudo yum install -y kubelet-1.20.9 kubeadm-1.20.9 kubectl-1.20.9 --disableexcludes=kubernetes

sudo systemctl enable --now kubelet
- modify kublete Launch parameters
#  This file installs kubeadm Then it exists
vim /usr/lib/systemd/system/kubelet.service.d/10-kubeadm.conf

#  Be careful , This step is very important , If you don't do , Nodes will still use the intranet IP Register into the cluster , There will be two in the document ExecStart, Never change !! Just add a space at the end of the last  --node-ip=< Public network IP>
#  Add parameters at the end  --node-ip= Public network IP
ExecStart=/usr/bin/kubelet $KUBELET_KUBECONFIG_ARGS $KUBELET_CONFIG_ARGS $KUBELET_KUBEADM_ARGS $KUBELET_EXTRA_ARGS --node-ip=< Public network IP>

#ExecStart=/usr/bin/kubelet $KUBELET_KUBECONFIG_ARGS $KUBELET_CONFIG_ARGS $KUBELET_KUBEADM_ARGS $KUBELET_EXTRA_ARGS --node-ip=182.92.128.93
6、 Use kubeadm Leading the cluster
- Download the images required by each machine
Node except kubelet Other components are downloaded as containers , So you need to download the image first .
sudo tee ./images.sh <<-'EOF' #!/bin/bash images=( kube-apiserver:v1.20.9 kube-proxy:v1.20.9 kube-controller-manager:v1.20.9 kube-scheduler:v1.20.9 coredns:1.7.0 etcd:3.4.13-0 pause:3.2 ) for imageName in ${images[@]} ; do docker pull registry.cn-hangzhou.aliyuncs.com/lfy_k8s_images/$imageName done EOF

chmod +x ./images.sh && ./images.sh
- Modify the master node ( Only in master Execution on node !!!)
find master Medium ip fictitious ip Addressip a
The configuration file :
#  Add configuration file , Note to replace the following IP
cat > kubeadm-config.yaml <<EOF apiVersion: kubeadm.k8s.io/v1beta2 kind: ClusterConfiguration kubernetesVersion: v1.20.9 apiServer: certSANs: - master # Please replace with hostname - xx.xx.xx.xx # Please replace with public network IP - xx.xx.xx.xx # Please replace with private network IP - 10.96.0.1 controlPlaneEndpoint: xx.xx.xx.xx:6443 # Replace with public network IP imageRepository: registry.cn-hangzhou.aliyuncs.com/lfy_k8s_images networking: podSubnet: 10.244.0.0/16 serviceSubnet: 10.96.0.0/12 --- apiVersion: kubeproxy-config.k8s.io/v1alpha1 kind: KubeProxyConfiguration featureGates: SupportIPVSProxyMode: true mode: ipvs EOF

cat > kubeadm-config.yaml <<EOF apiVersion: kubeadm.k8s.io/v1beta2 kind: ClusterConfiguration kubernetesVersion: v1.20.9 apiServer: certSANs: - k8s-master - 49.232.181.123 - 10.0.8.7 - 10.96.0.1 controlPlaneEndpoint: 49.232.181.123:6443 imageRepository: registry.cn-hangzhou.aliyuncs.com/lfy_k8s_images networking: podSubnet: 10.244.0.0/16 serviceSubnet: 10.96.0.0/12 --- apiVersion: kubeproxy-config.k8s.io/v1alpha1 kind: KubeProxyConfiguration featureGates: SupportIPVSProxyMode: true mode: ipvs EOF
#1. Initialize the master node
sysctl -w net.ipv4.ip_forward=1
kubeadm init --config=kubeadm-config.yaml
Problems during installation :
[init] Using Kubernetes version: v1.20.9
[preflight] Running pre-flight checks
        [WARNING SystemVerification]: this Docker version is not on the list of validated versions: 20.10.7. Latest validated version: 19.03
        [WARNING Hostname]: hostname "k8s-master" could not be reached
        [WARNING Hostname]: hostname "k8s-master": lookup k8s-master on 183.60.83.19:53: no such host
error execution phase preflight: [preflight] Some fatal errors occurred:
        [ERROR FileContent--proc-sys-net-ipv4-ip_forward]: /proc/sys/net/ipv4/ip_forward contents are not set to 1
[preflight] If you know what you are doing, you can make a check non-fatal with `--ignore-preflight-errors=...`
To see the stack trace of this error execute with --v=5 or higher
solve :sysctl -w net.ipv4.ip_forward=1
Record the file
Your Kubernetes control-plane has initialized successfully!

To start using your cluster, you need to run the following as a regular user:

  mkdir -p $HOME/.kube
  sudo cp -i /etc/kubernetes/admin.conf $HOME/.kube/config
  sudo chown $(id -u):$(id -g) $HOME/.kube/config

Alternatively, if you are the root user, you can run:

  export KUBECONFIG=/etc/kubernetes/admin.conf

You should now deploy a pod network to the cluster.
Run "kubectl apply -f [podnetwork].yaml" with one of the options listed at:
  https://kubernetes.io/docs/concepts/cluster-administration/addons/

You can now join any number of control-plane nodes by copying certificate authorities
and service account keys on each node and then running the following as root:

  kubeadm join 49.232.181.123:6443 --token f8v1ln.8ybsrc1uockwknns \
    --discovery-token-ca-cert-hash sha256:cc9547cb6f6756377af6b6be6cbde82d95c98b99b1065f58365866abf2c467b7 \
    --control-plane

Then you can join any number of worker nodes by running the following on each as root:

kubeadm join 49.232.181.123:6443 --token f8v1ln.8ybsrc1uockwknns \
    --discovery-token-ca-cert-hash sha256:cc9547cb6f6756377af6b6be6cbde82d95c98b99b1065f58365866abf2c467b7

mkdir -p $HOME/.kube
sudo cp -i /etc/kubernetes/admin.conf $HOME/.kube/config
sudo chown $(id -u):$(id -g) $HOME/.kube/config
modify kube-apiserver Parameters :
#  Modify two messages , add to --bind-address And modify --advertise-address
vim /etc/kubernetes/manifests/kube-apiserver.yaml

apiVersion: v1
kind: Pod
metadata:
  annotations:
    kubeadm.kubernetes.io/kube-apiserver.advertise-address.endpoint: 10.0.20.8:6443
  creationTimestamp: null
  labels:
    component: kube-apiserver
    tier: control-plane
  name: kube-apiserver
  namespace: kube-system
spec:
  containers:
  - command:
    - kube-apiserver
    - --advertise-address=xx.xx.xx.xx #  Change to public network IP
    - --bind-address=0.0.0.0  #  The new parameters
    - --allow-privileged=true
    - --authorization-mode=Node,RBAC
    - --client-ca-file=/etc/kubernetes/pki/ca.crt
    - --enable-admission-plugins=NodeRestriction
    - --enable-bootstrap-token-auth=true
    - --etcd-cafile=/etc/kubernetes/pki/etcd/ca.crt
    - --etcd-certfile=/etc/kubernetes/pki/apiserver-etcd-client.crt
    - --etcd-keyfile=/etc/kubernetes/pki/apiserver-etcd-client.key
    - --etcd-servers=https://127.0.0.1:2379
    - --insecure-port=0
    - --kubelet-client-certificate=/etc/kubernetes/pki/apiserver-kubelet-client.crt
    - --kubelet-client-key=/etc/kubernetes/pki/apiserver-kubelet-client.key
    - --kubelet-preferred-address-types=InternalIP,ExternalIP,Hostname
    - --proxy-client-cert-file=/etc/kubernetes/pki/front-proxy-client.crt
    - --proxy-client-key-file=/etc/kubernetes/pki/front-proxy-client.key
    - --requestheader-allowed-names=front-proxy-client
    - --requestheader-client-ca-file=/etc/kubernetes/pki/front-proxy-ca.crt
    - --requestheader-extra-headers-prefix=X-Remote-Extra-
    - --requestheader-group-headers=X-Remote-Group
    - --requestheader-username-headers=X-Remote-User
    - --secure-port=6443
    - --service-account-issuer=https://kubernetes.default.svc.cluster.local
    - --service-account-key-file=/etc/kubernetes/pki/sa.pub
    - --service-account-signing-key-file=/etc/kubernetes/pki/sa.key
    - --service-cluster-ip-range=10.96.0.0/12
    - --tls-cert-file=/etc/kubernetes/pki/apiserver.crt
    - --tls-private-key-file=/etc/kubernetes/pki/apiserver.key
    image: registry.cn-hangzhou.aliyuncs.com/lfy_k8s_images/kube-apiserver:v1.20.9
    imagePullPolicy: IfNotPresent
    livenessProbe:
      failureThreshold: 8
      httpGet:
        host: 10.0.20.8
        path: /livez
        port: 6443
        scheme: HTTPS
      initialDelaySeconds: 10
      periodSeconds: 10
      timeoutSeconds: 15
    name: kube-apiserver
    readinessProbe:
      failureThreshold: 3
      httpGet:
        host: 10.0.20.8
        path: /readyz
        port: 6443
        scheme: HTTPS
      periodSeconds: 1
      timeoutSeconds: 15
    resources:
      requests:
        cpu: 250m
    startupProbe:
      failureThreshold: 24
      httpGet:
        host: 10.0.20.8
        path: /livez
        port: 6443
        scheme: HTTPS
      initialDelaySeconds: 10
      periodSeconds: 10
      timeoutSeconds: 15
    volumeMounts:
    - mountPath: /etc/ssl/certs
      name: ca-certs
      readOnly: true
    - mountPath: /etc/pki
      name: etc-pki
      readOnly: true
    - mountPath: /etc/kubernetes/pki
      name: k8s-certs
      readOnly: true
  hostNetwork: true
  priorityClassName: system-node-critical
  volumes:
  - hostPath:
      path: /etc/ssl/certs
      type: DirectoryOrCreate
    name: ca-certs
  - hostPath:
      path: /etc/pki
      type: DirectoryOrCreate
    name: etc-pki
  - hostPath:
      path: /etc/kubernetes/pki
      type: DirectoryOrCreate
    name: k8s-certs
status: {
    }
- Check whether the master node is successfully configured
[[email protected] sysctl.d]# kubectl get nodes
NAME         STATUS     ROLES                  AGE     VERSION
k8s-master   NotReady   control-plane,master   7m34s   v1.20.9
Master node configuration succeeded !!
- Install network components -flannel
# 1、 download flannel The configuration file
wget https://raw.githubusercontent.com/coreos/flannel/master/Documentation/kube-flannel.yml
Modify the configuration
---
apiVersion: policy/v1beta1
kind: PodSecurityPolicy
metadata:
  name: psp.flannel.unprivileged
  annotations:
    seccomp.security.alpha.kubernetes.io/allowedProfileNames: docker/default
    seccomp.security.alpha.kubernetes.io/defaultProfileName: docker/default
    apparmor.security.beta.kubernetes.io/allowedProfileNames: runtime/default
    apparmor.security.beta.kubernetes.io/defaultProfileName: runtime/default
spec:
  privileged: false
  volumes:
  - configMap
  - secret
  - emptyDir
  - hostPath
  allowedHostPaths:
  - pathPrefix: "/etc/cni/net.d"
  - pathPrefix: "/etc/kube-flannel"
  - pathPrefix: "/run/flannel"
  readOnlyRootFilesystem: false
  runAsUser:
    rule: RunAsAny
  supplementalGroups:
    rule: RunAsAny
  fsGroup:
    rule: RunAsAny
  allowPrivilegeEscalation: false
  defaultAllowPrivilegeEscalation: false
  allowedCapabilities: ['NET_ADMIN', 'NET_RAW']
  defaultAddCapabilities: []
  requiredDropCapabilities: []
  hostPID: false
  hostIPC: false
  hostNetwork: true
  hostPorts:
  - min: 0
    max: 65535
  seLinux:
    rule: 'RunAsAny'
---
kind: ClusterRole
apiVersion: rbac.authorization.k8s.io/v1
metadata:
  name: flannel
rules:
- apiGroups: ['extensions']
  resources: ['podsecuritypolicies']
  verbs: ['use']
  resourceNames: ['psp.flannel.unprivileged']
- apiGroups:
  - ""
  resources:
  - pods
  verbs:
  - get
- apiGroups:
  - ""
  resources:
  - nodes
  verbs:
  - list
  - watch
- apiGroups:
  - ""
  resources:
  - nodes/status
  verbs:
  - patch
---
kind: ClusterRoleBinding
apiVersion: rbac.authorization.k8s.io/v1
metadata:
  name: flannel
roleRef:
  apiGroup: rbac.authorization.k8s.io
  kind: ClusterRole
  name: flannel
subjects:
- kind: ServiceAccount
  name: flannel
  namespace: kube-system
---
apiVersion: v1
kind: ServiceAccount
metadata:
  name: flannel
  namespace: kube-system
---
kind: ConfigMap
apiVersion: v1
metadata:
  name: kube-flannel-cfg
  namespace: kube-system
  labels:
    tier: node
    app: flannel
data:
  cni-conf.json: |
    {

      "name": "cbr0",
      "cniVersion": "0.3.1",
      "plugins": [
        {

          "type": "flannel",
          "delegate": {

            "hairpinMode": true,
            "isDefaultGateway": true
          }
        },
        {

          "type": "portmap",
          "capabilities": {

            "portMappings": true
          }
        }
      ]
    }
  net-conf.json: |
    {

      "Network": "10.244.0.0/16",
      "Backend": {

        "Type": "vxlan"
      }
    }
---
apiVersion: apps/v1
kind: DaemonSet
metadata:
  name: kube-flannel-ds
  namespace: kube-system
  labels:
    tier: node
    app: flannel
spec:
  selector:
    matchLabels:
      app: flannel
  template:
    metadata:
      labels:
        tier: node
        app: flannel
    spec:
      affinity:
        nodeAffinity:
          requiredDuringSchedulingIgnoredDuringExecution:
            nodeSelectorTerms:
            - matchExpressions:
              - key: kubernetes.io/os
                operator: In
                values:
                - linux
      hostNetwork: true
      priorityClassName: system-node-critical
      tolerations:
      - operator: Exists
        effect: NoSchedule
      serviceAccountName: flannel
      initContainers:
      - name: install-cni-plugin
        image: rancher/mirrored-flannelcni-flannel-cni-plugin:v1.1.0
        command:
        - cp
        args:
        - -f
        - /flannel
        - /opt/cni/bin/flannel
        volumeMounts:
        - name: cni-plugin
          mountPath: /opt/cni/bin
      - name: install-cni
        image: rancher/mirrored-flannelcni-flannel:v0.18.1
        command:
        - cp
        args:
        - -f
        - /etc/kube-flannel/cni-conf.json
        - /etc/cni/net.d/10-flannel.conflist
        volumeMounts:
        - name: cni
          mountPath: /etc/cni/net.d
        - name: flannel-cfg
          mountPath: /etc/kube-flannel/
      containers:
      - name: kube-flannel
        image: rancher/mirrored-flannelcni-flannel:v0.18.1
        command:
        - /opt/bin/flanneld
        args:
        - --ip-masq
        - --kube-subnet-mgr
        resources:
          requests:
            cpu: "100m"
            memory: "50Mi"
          limits:
            cpu: "100m"
            memory: "50Mi"
        securityContext:
          privileged: false
          capabilities:
            add: ["NET_ADMIN", "NET_RAW"]
        env:
        - name: POD_NAME
          valueFrom:
            fieldRef:
              fieldPath: metadata.name
        - name: POD_NAMESPACE
          valueFrom:
            fieldRef:
              fieldPath: metadata.namespace
        - name: EVENT_QUEUE_DEPTH
          value: "5000"
        volumeMounts:
        - name: run
          mountPath: /run/flannel
        - name: flannel-cfg
          mountPath: /etc/kube-flannel/
        - name: xtables-lock
          mountPath: /run/xtables.lock
      volumes:
      - name: run
        hostPath:
          path: /run/flannel
      - name: cni-plugin
        hostPath:
          path: /opt/cni/bin
      - name: cni
        hostPath:
          path: /etc/cni/net.d
      - name: flannel-cfg
        configMap:
          name: kube-flannel-cfg
      - name: xtables-lock
        hostPath:
          path: /run/xtables.lock
          type: FileOrCreate
docker The running application is called container ,k8s Call in pod
# see pod state
kubectl get pod -A
# see nodes state
kubectl get nodes
kube-system   kube-flannel-ds-265kg                1/1     Running   0          113s
- Work nodes join master node ,tocken Regenerate after expiration :
#master perform :
kubeadm token create --print-join-command
# My result :kubeadm join 49.232.181.123:6443 --token 3685xd.kxfcfxv94fgdom59 --discovery-token-ca-cert-hash sha256:cc9547cb6f6756377af6b6be6cbde82d95c98b99b1065f58365866abf2c467b7
# Perform the above steps to print out the contents
kubeadm join 49.232.181.123:6443 --token 3685xd.kxfcfxv94fgdom59     --discovery-token-ca-cert-hash sha256:cc9547cb6f6756377af6b6be6cbde82d95c98b99b1065f58365866abf2c467b7
边栏推荐
- Design of vision protector based on 51 single chip microcomputer
- NFT display guide: how to display your NFT collection
- 告别宽表,用 DQL 成就新一代 BI
- [netding Cup 2018] Fakebook records
- np. transpose & np.expand_ dims
- 09_ Keyboard events
- Re understand the life world and ourselves
- Can the stock account opening commission be adjusted? Is it safe to open an account on your mobile phone
- Complete backpack and 01 Backpack
- Last week's hot review (7.11-7.17)
猜你喜欢


随机推荐
力扣155题,最小栈
Practice of data storage scheme in distributed system
Part II - C language improvement_ 9. Linked list
Pytorch learning record (II): tensor
Design of intelligent humidification controller based on 51 single chip microcomputer
Hcip day 2_ HCIA review comprehensive experiment
Dynamic SQL
04-传统的Synchronized锁
【C语言】数组
Anaconda => PyCharm => CUDA => cudnn => PyTorch 环境配置
动态sql
Chapter 2 develop user traffic interceptors
Transformers is a graph neural network
2022.7.26-----leetcode.1206
【面试:并发篇26:多线程:两阶段终止模式】volatile版本
MVC three-tier architecture
Force deduction 155 questions, minimum stack
Arthas quick start
大疆智图、CC生产了多份数据,如何合并为一份在图新地球进行加载
Last week's hot review (7.11-7.17)