当前位置:网站首页>###数据库的高可用配置(mysql)
###数据库的高可用配置(mysql)
2022-06-21 12:50:00 【51CTO】
一、环境配置:
1、操作系统版本:CentOS7
2、MySQL版本:5.7.28
3、VIP(虚IP):10.0.0.140
4、机器列表及功能:
IP | hostname | server_id | 角色及功能 |
10.0.0.158 | s142 | 142 | Monitor Host(监控复制组)/ Master(响应写请求) |
10.0.0.159 | s143 | 143 | Candidate Master(响应读请求) |
10.0.0.160 | s144 | 144 | Slave(响应读请求) |
二、搭建
1、在s142、s143、s144机器上安装mysql5.7
①下载mysql-5.7.28,URL: https://downloads.mysql.com/archives/community/ 我这里下载的是64位版本
②下载后文件为:mysql-5.7.28-linux-glibc2.12-x86_64.tar.gz
2. 卸载自带的mariadb和mysql
①检查是否安装了mariadb和mysql,有时候默认安装了
②如果没有,就可以安装mysql,如果有,需要先卸载(remove后为上面命令查询到的内容,全文件名,我这里没有,没法展示)
②如果没有,就可以安装mysql,如果有,需要先卸载(remove后为上面命令查询到的内容,全文件名,我这里没有,没法展示)
3.解压文件,修改目录名方便配置
       [[email protected] ~]#tar -zxvf mysql-5.7.28-linux-glibc2.12-x86_64.tar.gz -C /opt/soft/


[[email protected] ~]#mkdir -p /opt/soft


[[email protected] ~]#cd /opt/soft


[[email protected] ~]#mv mysql-5.7.28-linux-glibc2.12-x86_64 mysql-5.7.28
- 1.
- 2.
- 3.
- 4.
4.在/usr/local/目录下创建到/opt/soft/mysql-5.7.28的软链接

5.添加mysql用户,修改mysql目录权限,并用此用户执行应用
       [[email protected] ~]#useradd -s /bin/false -M mysql


[[email protected] ~]#cd /opt/soft


[[email protected] ~]#chown -R mysql:mysql mysql-5.7.28
- 1.
- 2.
- 3.
6.拷贝配置文件,将mysql的配置文件拷贝为/etc/目录下的my.cnf,并修改配置文件
       [[email protected] ~]#vim /etc/my.cnf[mysqld]


# binlog 配置


log-bin=/usr/local/mysql/logs/mysql-bin.log


expire-logs-days=14


max-binlog-size=500M


server-id=1


# GENERAL


basedir=/usr/local/mysql


datadir=/usr/local/mysql/data


socket=/usr/local/mysql/mysql.sock


user=mysql


default-storage-engine=InnoDB


character-set-server=utf8lower_case_table_names = 1explicit_defaults_for_timestamp=true


[mysqld_safe]


log-error=/usr/local/mysql/mysql-error.log


pid-file=/usr/local/mysql/mysqld.pid


[client]


socket=/usr/local/mysql/mysql.sock


[mysql]


default-character-set=utf8


socket=/usr/local/mysql/mysql.sock
- 1.
- 2.
- 3.
- 4.
- 5.
- 6.
- 7.
- 8.
- 9.
- 10.
- 11.
- 12.
- 13.
- 14.
- 15.
- 16.
- 17.
- 18.
- 19.
- 20.
- 21.
7.安装mysql,进入mysql目录执行以下命令
注:如果出现如下错误,说明需要安装依赖包:

① 安装autoconf依赖包:
②再次执行
出现以下信息,代表成功,要保存一下密码,

8.拷贝启动程序,将mysql的启动程序拷贝到/etc/init.d/目录下

9.安装完,启动mysql服务
注:如果出现如下错误:
       [[email protected] support-files]# service mysqld start


Starting MySQL.2020-01-31T23:14:27.412533Z mysqld_safe error: log-error set to '/usr/local/mysql/mysql-error.log', however file don't exists. Create writable for user 'mysql'.


ERROR! The server quit without updating PID file (/usr/local/mysql/data/s144.pid).
- 1.
- 2.
- 3.
说明mysql-error.log不存在,手动去创建,并修改权限
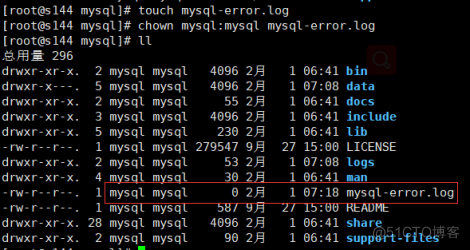
出现SUCCESS,说明启动成功

10.配置环境变量,编辑/etc/profile,方便在任何地方用mysql命令
注:别忘记重新编译 /etc/profile
11.登录mysql,修改密码
①首次登录没有密码,提示输入密码时,输入第7步安装时生成的密码:p5j2jfX7am.h

②这里要先使用alter user重置密码,不然会报错,我这里 修改mysql root用户密码 为 111111 :

③ 至此本机登录密码修改完成,若是想让其他机器访问,需要配置远程访问:
12.创建复制用户及复制配置
①在主节点(master)上配置复制用户:
②在从节点(slave)上执行主从复制命令:
注:
#master_log_file='master-bin.000001',#5.6后不需要指定
#master_log_pos=189;
③启动主从复制
④查看主从复制信息
⑤说明主从复制成功,可以在主库中创建一个库,看看从库是否同步

13.在每台机器上安装yum源头及MHA依赖的perl包
如图安装成功:


1 4.配置ssh免密登录
①分别在s142/s143/s144机器上生成ssh秘钥:
②将各自公钥id_rsa.pub发送到另外两台机器,并追加到 ~/.ssh/authorized_keys中:
s142:
s143:
s144:
s142:
s143:
s144:
15.安装MHA
①分别在s142、s143、s144上下载node安装包并安装:

②在s142上安装manager

16.配置MHA Manager
①配置全局配置文件
新建 /etc/masterha_default.cnf (一定要是这个路径,不然后期masterha_check_ssh会提示未找到全局文件)
       vim /etc/masterha_default.cnf


[server default]


user=root


password=111111


ssh_user=root


repl_user=canal_repl_user


repl_password=111111


ping_interval=1


#master_binlog_dir=/usr/local/mysql/logs


secondary_check_script=masterha_secondary_check -s s142 -s s143 -s s144


master_ip_failover_script="/opt/soft/mha/scripts/master_ip_failover"


master_ip_online_change_script="/opt/soft/mha/scripts/master_ip_online_change"


report_script="/opt/soft/mha/scripts/send_report"
- 1.
- 2.
- 3.
- 4.
- 5.
- 6.
- 7.
- 8.
- 9.
- 10.
- 11.
- 12.
- 13.
- 14.
②配置主配置文件
新建/opt/soft/mha/app1/app1.cnf文件,并配置如下信息:
       [server default]


manager_workdir=/opt/soft/mha


manager_log=/opt/soft/mha/manager.log


password=111111


user=root


ping_interval=1


repl_password=111111


repl_user=canal_repl_user


#master_binlog_dir=/usr/local/mysql/logs


#secondary_check_script=masterha_secondary_check -s s142 -s s143 -s s144


#master_ip_failover_script="/opt/soft/mha/scripts/master_ip_failover"


#master_ip_online_change_script="/opt/soft/mha/scripts/master_ip_online_change"


#report_script="/opt/soft/mha/scripts/send_report"


#ssh用户


ssh_user=root


[server1]


hostname=s142


port=3306


master_binlog_dir=/usr/local/mysql/logs


candidate_master=1


check_repl_delay=0


[server2]


hostname=s143


port=3306


master_binlog_dir=/usr/local/mysql/logs


candidate_master=1


check_repl_delay=0


[server3]


hostname=s144


port=3306


master_binlog_dir=/usr/local/mysql/logs


ignore_fail=1


no_master=1
- 1.
- 2.
- 3.
- 4.
- 5.
- 6.
- 7.
- 8.
- 9.
- 10.
- 11.
- 12.
- 13.
- 14.
- 15.
- 16.
- 17.
- 18.
- 19.
- 20.
- 21.
- 22.
- 23.
- 24.
- 25.
- 26.
- 27.
- 28.
- 29.
- 30.
- 31.
- 32.
- 33.
- 34.
- 35.
- 36.
- 37.
- 38.
- 39.
- 40.
- 41.
③配置VIP切换
为了防止脑裂发生,推荐生产环境采用脚本的方式来管理虚拟 ip,而不是使用 keepalived来完成。
       vim /opt/soft/mha/scripts/master_ip_failover


  #!/usr/bin/env perl


    use strict;


    use warnings FATAL => 'all';


    use Getopt::Long;


    my (


        $command,   $ssh_user,  $orig_master_host,


        $orig_master_ip,$orig_master_port, $new_master_host, $new_master_ip,$new_master_port


    );


    #定义VIP变量


    my $vip = '192.168.30.140/24';


    my $key = '1';


    my $ssh_start_vip = "/sbin/ifconfig ens33:$key $vip";


    my $ssh_stop_vip = "/sbin/ifconfig ens33:$key down";


    GetOptions(


        'command=s'     => \$command,


        'ssh_user=s'        => \$ssh_user,


        'orig_master_host=s'    => \$orig_master_host,


        'orig_master_ip=s'  => \$orig_master_ip,


        'orig_master_port=i'    => \$orig_master_port,


        'new_master_host=s' => \$new_master_host,


        'new_master_ip=s'   => \$new_master_ip,


        'new_master_port=i' => \$new_master_port,


    );


    exit &main();


    sub main {


        print "\n\nIN SCRIPT TEST====$ssh_stop_vip==$ssh_start_vip===\n\n";


        if ( $command eq "stop" || $command eq "stopssh" ) {


            my $exit_code = 1;


            eval {


                print "Disabling the VIP on old master: $orig_master_host \n";


                &stop_vip();


                $exit_code = 0;


            };


            if ([email protected]) {


                warn "Got Error: [email protected]\n";


                exit $exit_code;


            }


            exit $exit_code;


        }


        elsif ( $command eq "start" ) {


        my $exit_code = 10;


        eval {


            print "Enabling the VIP - $vip on the new master - $new_master_host \n";


            &start_vip();


            $exit_code = 0;


        };


        if ([email protected]) {


            warn [email protected];


            exit $exit_code;


            }


        exit $exit_code;


        }


        elsif ( $command eq "status" ) {


            print "Checking the Status of the script.. OK \n";


            exit 0;


        }


        else {


            &usage();


            exit 1;


        }


    }


    sub start_vip() {


        `ssh $ssh_user\@$new_master_host \" $ssh_start_vip \"`;    }


    sub stop_vip() {


        return 0 unless ($ssh_user);


        `ssh $ssh_user\@$orig_master_host \" $ssh_stop_vip \"`;    }


    sub usage {


        print


        "Usage: master_ip_failover --command=start|stop|stopssh|status --orig_master_host=host --orig_master_ip=ip --orig_master_port=port --new_master_host=host --new_master_ip=ip --new_master_port=port\n";


}
- 1.
- 2.
- 3.
- 4.
- 5.
- 6.
- 7.
- 8.
- 9.
- 10.
- 11.
- 12.
- 13.
- 14.
- 15.
- 16.
- 17.
- 18.
- 19.
- 20.
- 21.
- 22.
- 23.
- 24.
- 25.
- 26.
- 27.
- 28.
- 29.
- 30.
- 31.
- 32.
- 33.
- 34.
- 35.
- 36.
- 37.
- 38.
- 39.
- 40.
- 41.
- 42.
- 43.
- 44.
- 45.
- 46.
- 47.
- 48.
- 49.
- 50.
- 51.
- 52.
- 53.
- 54.
- 55.
- 56.
- 57.
- 58.
- 59.
- 60.
- 61.
- 62.
- 63.
- 64.
- 65.
- 66.
- 67.
- 68.
- 69.
- 70.
- 71.
- 72.
- 73.
- 74.
- 75.
- 76.
- 77.
- 78.
- 79.
- 80.
- 81.
④配置VIP脚本
       vim /opt/soft/mha/scripts/master_ip_online_change


#!/bin/bash


source /root/.bash_profile


vip=`echo '192.168.30.140/24'`  #设置VIP


key=`echo '1'`


command=`echo "$1" | awk -F = '{print $2}'`


orig_master_host=`echo "$2" | awk -F = '{print $2}'`


new_master_host=`echo "$7" | awk -F = '{print $2}'`


orig_master_ssh_user=`echo "${12}" | awk -F = '{print $2}'`


new_master_ssh_user=`echo "${13}" | awk -F = '{print $2}'`


#要求服务的网卡识别名一样,都为ens33(这里是)


stop_vip=`echo "ssh [email protected]$orig_master_host /usr/sbin/ifconfig ens33:$key down"`


start_vip=`echo "ssh [email protected]$new_master_host /usr/sbin/ifconfig ens33:$key $vip"`


if [ $command = 'stop' ]


  then


    echo -e "\n\n\n****************************\n"


    echo -e "Disabled thi VIP - $vip on old master: $orig_master_host \n"


    $stop_vip


    if [ $? -eq 0 ]


      then


    echo "Disabled the VIP successfully"


      else


    echo "Disabled the VIP failed"


    fi


    echo -e "***************************\n\n\n"


  fi


if [ $command = 'start' -o $command = 'status' ]


  then


    echo -e "\n\n\n*************************\n"


    echo -e "Enabling the VIP - $vip on new master: $new_master_host \n"


    $start_vip


    if [ $? -eq 0 ]


      then


    echo "Enabled the VIP successfully"


      else


    echo "Enabled the VIP failed"


    fi


    echo -e "***************************\n\n\n"


fi
- 1.
- 2.
- 3.
- 4.
- 5.
- 6.
- 7.
- 8.
- 9.
- 10.
- 11.
- 12.
- 13.
- 14.
- 15.
- 16.
- 17.
- 18.
- 19.
- 20.
- 21.
- 22.
- 23.
- 24.
- 25.
- 26.
- 27.
- 28.
- 29.
- 30.
- 31.
- 32.
- 33.
- 34.
- 35.
- 36.
- 37.
- 38.
- 39.
- 40.
- 41.
- 42.
- 43.
- 44.
- 45.
⑤.配置报警邮件脚本
首先配置邮件发送设置信息
#mail邮件发送程序,需要先配置好发送这信息
       vim /etc/mail.rc


set [email protected]


set smtp=smtp.163.com


set smtp-auth-user=qixing


#拿163邮箱来说这个不是密码,而是授权码


set smtp-auth-password=qixing


set smtp-auth=login
- 1.
- 2.
- 3.
- 4.
- 5.
- 6.
- 7.
- 8.
编写邮件发送脚本:
       vim /opt/soft/mha/script/send_report


#!/bin/bash


source /root/.bash_profile


# 解析变量


orig_master_host=`echo "$1" | awk -F = '{print $2}'`


new_master_host=`echo "$2" | awk -F = '{print $2}'`


new_slave_hosts=`echo "$3" | awk -F = '{print $2}'`


subject=`echo "$4" | awk -F = '{print $2}'`


body=`echo "$5" | awk -F = '{print $2}'`


#定义收件人地址


email="[email protected]"


tac /var/log/mha/app1/manager.log | sed -n 2p | grep 'successfully' > /dev/null


if [ $? -eq 0 ]


    then


    messages=`echo -e "MHA $subject 主从切换成功\n master:$orig_master_host --> $new_master_host \n $body \n 当前从库:$new_slave_hosts"`


    echo "$messages" | mail -s "Mysql 实例宕掉,MHA $subject 切换成功" $email >>/tmp/mailx.log 2>&1


    else


    messages=`echo -e "MHA $subject 主从切换失败\n master:$orig_master_host --> $new_master_host \n $body" `


    echo "$messages" | mail -s ""Mysql 实例宕掉,MHA $subject 切换失败"" $email >>/tmp/mailx.log 2>&1


fi
- 1.
- 2.
- 3.
- 4.
- 5.
- 6.
- 7.
- 8.
- 9.
- 10.
- 11.
- 12.
- 13.
- 14.
- 15.
- 16.
- 17.
- 18.
- 19.
- 20.
- 21.
- 22.
- 23.
⑥将脚本赋予可执行权限
17.验证MHA配置信息是否正常
① 检查ssh配置:

成功!!!
②(在所有机器执行)
③检查主从复制情况:

健康!!!
18.在master节点上绑定VIP,只需绑定一次,后续会随主备切换而自动切换
①如过遇到问题,需手动删除,可执行如下命令:
②可以查看绑定VIP是否成功:
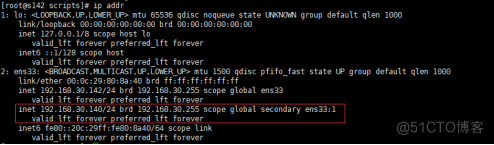
说明绑定成功!
19.在MHA的manager节点上启动MHA管理进程
&命令参数:
--remove_dead_master_conf 该参数代表当发生主从切换后,老的主库的ip将会从配置文件中移除。
--manger_log 日志存放位置
观察manager.log日志,查看是否有成功,一般最后打印如下日志,说明成功:

20.查看MHA状态

说明MHA正在运行中,主节点是s142
21.停止MHA管理进程
manager.log日志会打印终止日志:

22.手动进行主备切换(在进行手动切换前要先停值manager进程)
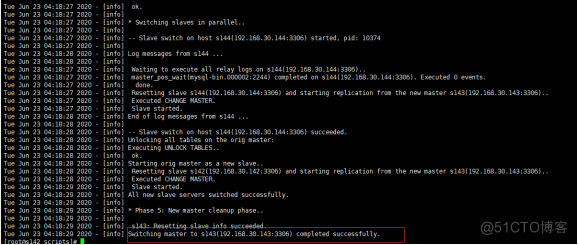
说明切换成功!
边栏推荐
- Reading notes on how to connect the Internet ADSL
- Educoder Web练习题---页面结点元素
- [appium stepping pit] close the inspector and open the WebEditor, uiautomator2 exceptions. NullPointerExceptionError: -32001 Jsonrpc er
- 安科瑞BM100系列信号隔离器的实际应用
- Educoder Web练习题---表单的结构
- Consultation: what kind of securities company is micro securities? Is it safe to open an account?
- 【Appium踩坑】关闭inspector后打开weditor,uiautomator2.exceptions.NullPointerExceptionError: -32001 Jsonrpc er
- cartographer_ceres_scan_matcher_2d
- Memcached(高性能内存对象缓存)
- Summary of several ways to calculate distance
猜你喜欢
![[appium stepping pit] close the inspector and open the WebEditor, uiautomator2 exceptions. NullPointerExceptionError: -32001 Jsonrpc er](/img/72/b5bf1be466518525b68e84b2e64b71.jpg)
[appium stepping pit] close the inspector and open the WebEditor, uiautomator2 exceptions. NullPointerExceptionError: -32001 Jsonrpc er

Add a description to the form component

CVPR2022 | 上科大x小红书首次提出动作序列验证任务,可应用于体育赛事打分等多场景

cartographer_ ceres_ scan_ matcher_ 2d

爱可可AI前沿推介(6.21)

TOOD: Task-aligned One-stage Object Detection

Apache ShardingSphere 5.1.2 发布|全新驱动 API + 云原生部署,打造高性能数据网关

Sharing new experiences in home office | community essay solicitation

Deep understanding of convolution in convolution neural network

Distributed transaction processing scheme big PK
随机推荐
这不会又是一个Go的BUG吧?
matplotlib 画图 Tips
南京大学 静态软件分析(static program analyzes)-- introduction 学习笔记
漫谈公网网络延迟
Educoder Web练习题---文本层次语义元素
Application configuration management, basic principle analysis
Apache shardingsphere 5.1.2 release | new driving API + cloud native deployment to create a high-performance data gateway
uva11729
【深入理解TcaplusDB技术】TcaplusDB构造数据
Educator web exercise - grouping form elements
Memcached (high performance memory object cache)
vmware12虚拟机打开报错“\\.\Global\vmx86”: 系统找不到指定的文件。
uva11995
还在用generator生成xxx管理系统的CRUD代码?来看看我是怎么写的
Kubernetes' fast practice and core principle analysis
塔米狗分享:产权交易的方式及其产权交易市场数据化意义
Display all indexes of a table in Oracle
Educoder Web练习题---交互元素
centos7 部署mysql 环境
Libcef common concepts framework features